Introduction
Welcome to the world of iPhone 3D scanning! With advancements in technology, it is now possible to transform your iPhone into a portable 3D scanner. Whether you are a hobbyist, a designer, or an architect, the ability to capture 3D models directly from your iPhone opens up a whole new realm of possibilities.
An iPhone 3D scanner is a powerful tool that allows you to capture the intricacies and details of objects in three dimensions. It uses the advanced camera and sensor capabilities of your iPhone to capture thousands of points on an object’s surface, creating a highly accurate digital representation of the physical object.
Using an iPhone as a 3D scanner has many advantages. It is portable, convenient, and readily available, making it easy to capture objects on-the-go. Additionally, the intuitive user interface and the vast selection of 3D scanning apps make the process accessible to both beginners and experienced users.
Whether you want to scan small objects for 3D printing, create virtual models for architectural visualization, or simply explore the world of 3D scanning, an iPhone 3D scanner is a versatile and affordable solution.
In this article, we will guide you through the process of using an iPhone 3D scanner. We’ll explore how it works, the different scanning apps available, how to calibrate your iPhone for accurate scans, and tips and tricks to get the best results. So, grab your iPhone and let’s dive into the exciting world of 3D scanning!
What is an iPhone 3D Scanner?
An iPhone 3D scanner is a cutting-edge technology that utilizes the built-in camera and sensors of your iPhone to create digital 3D models of real-life objects. It allows you to capture the shape, texture, and dimensions of objects with remarkable precision.
Unlike traditional scanning methods that require expensive, specialized equipment, an iPhone 3D scanner offers an accessible and affordable solution. With the rapid advancements in smartphone technology, iPhones now have the computational power and high-quality cameras necessary for accurate 3D scanning.
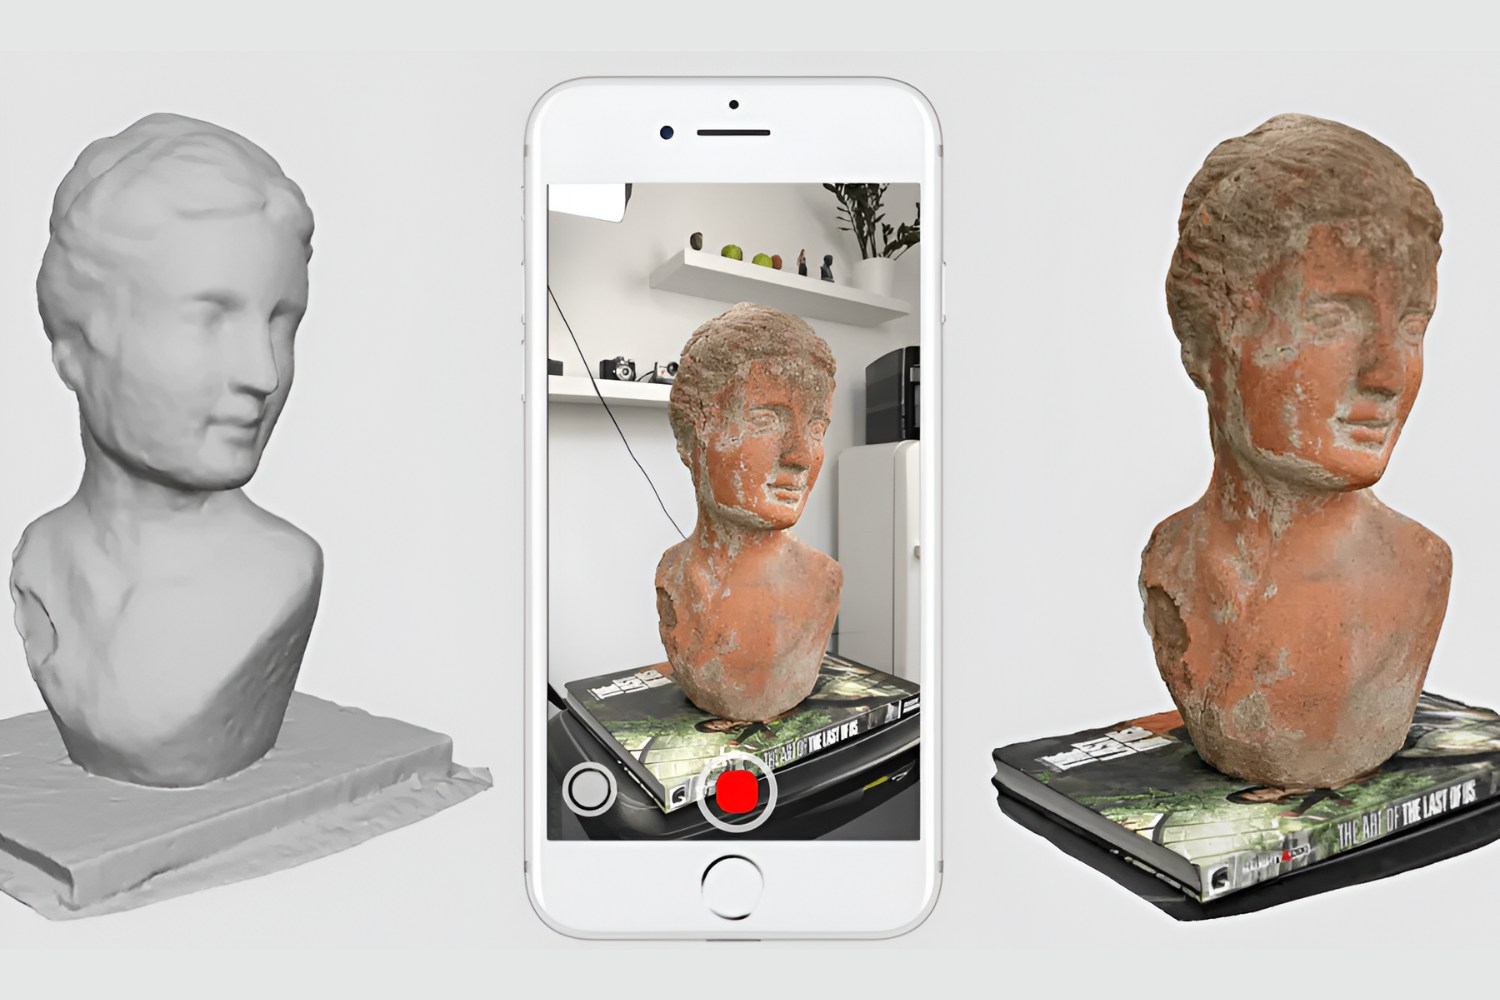
The process of 3D scanning involves capturing a series of images or scans from multiple angles and combining them into a cohesive 3D model. The iPhone’s camera captures the object’s surface by measuring the distance and position of thousands of points on the object. This data is then processed and transformed into a digital model that can be viewed, edited, and shared.
One of the key advantages of using an iPhone 3D scanner is its portability. You can easily carry your iPhone with you wherever you go, allowing you to capture 3D scans on the fly. This makes it ideal for capturing small objects, scanning architectural elements, or even documenting archaeological artifacts.
Furthermore, the user-friendly interface of iPhone 3D scanning apps makes the process accessible to users of all skill levels. These apps provide step-by-step instructions, automatic alignment, and real-time feedback, ensuring that you can achieve accurate and high-quality 3D scans effortlessly.
Whether you are a designer, engineer, artist, or simply someone with a curiosity for innovative technology, an iPhone 3D scanner opens up a world of possibilities. From creating 3D models for visual effects in movies to prototyping products for manufacturing, the applications of an iPhone 3D scanner are vast and exciting.
In the next sections, we will explore how an iPhone 3D scanner works, the process of scanning objects, editing and enhancing scanned models, and tips and tricks to maximize your 3D scanning experience. So, let’s dive in and unlock the endless potential of 3D scanning with your iPhone!
How Does an iPhone 3D Scanner Work?
Understanding how an iPhone 3D scanner works can help you make the most of this powerful tool. The process involves utilizing the camera and sensors on your iPhone to capture detailed information about the object you want to scan.
When you initiate a 3D scan using a compatible scanning app, the app will guide you through the scanning process. Typically, you will need to move your iPhone around the object, capturing images or scans from different angles. The app uses advanced algorithms to analyze the captured data and create a 3D representation of the object.
The iPhone’s camera plays a crucial role in the scanning process. It captures images or scans of the object from multiple viewpoints. The higher the resolution and quality of your iPhone’s camera, the more details will be captured during the scanning process.
In addition to the camera, the sensors on your iPhone enable precise measurement and mapping of the object’s surface. These sensors, such as accelerometers and gyroscopes, help determine the position and orientation of the iPhone during scanning. This information is critical for accurately aligning the captured scans and creating a cohesive 3D model.
Once the app has captured images or scans from different angles, it utilizes advanced algorithms to process the data and create a 3D model. These algorithms analyze the captured information, calculate the depth and position of points on the object’s surface, and reconstruct the object in three dimensions.
After the initial scan is complete, the app may provide options to refine, edit, and enhance the scanned model. You can typically adjust settings such as resolution, smoothness, and alignment to achieve the desired level of detail and accuracy.
It’s important to note that the accuracy and quality of the scanned models can vary depending on several factors, including the lighting conditions during the scan, the stability of the iPhone during scanning, and the complexity of the object being scanned. Experimenting with different settings, angles, and lighting conditions can help improve the quality of your scans.
Now that you have a basic understanding of how an iPhone 3D scanner works, we will delve deeper into the process of getting started with an iPhone 3D scanner in the next section. From choosing the right scanning app to calibrating your iPhone, we will cover all the essential steps to ensure successful 3D scanning with your iPhone.
Getting Started with an iPhone 3D Scanner
Now that you’re ready to embark on your 3D scanning journey with your iPhone, let’s explore the essential steps to get started.
1. Choose a compatible scanning app: There are several scanning apps available for iPhone that offer different features and capabilities. Research and choose an app that suits your needs, taking into consideration factors such as ease of use, accuracy, export options, and compatibility with your iPhone model.
2. Install the scanning app: Once you have selected a scanning app, download and install it on your iPhone from the App Store. Follow the app’s instructions to complete the installation process.
3. Familiarize yourself with the app’s interface: Launch the scanning app and spend some time exploring its interface. Get acquainted with the various features, settings, and options available. This will help you navigate the app smoothly and make the most of its functionality.
4. Calibrate your iPhone: Calibrating your iPhone is an important step to ensure accurate and precise 3D scans. Most scanning apps provide a calibration process that involves capturing reference images or scanning patterns. Follow the app’s instructions carefully to complete the calibration process.
5. Set up the scan environment: Create an environment that is well-lit and free from any obstacles or distractions. Adequate lighting is crucial for capturing clear and detailed scans. Avoid places with strong shadows or uneven lighting, as they can affect the quality of your scans.
6. Position the object: Place the object you want to scan on a stable surface. Ensure that the object is well-aligned and positioned within the camera’s view. For larger objects, you may need to move around the object to capture scans from different angles.
7. Start the scanning process: Follow the instructions provided by the scanning app to start the scanning process. Move your iPhone around the object, capturing scans from various angles. The app may provide guidance on the number of scans to capture and the optimal positioning.
8. Review and refine the scans: Once you have captured the desired number of scans, review them within the app to ensure that all necessary details have been captured. Some apps may offer options to align and refine the scans for better accuracy. Make any necessary adjustments or refinements using the app’s editing tools.
9. Save and export: Once you are satisfied with the scans and any adjustments you have made, save the 3D model within the app. Most scanning apps allow you to export the 3D model in various formats, such as OBJ or STL, which can then be used in other software or 3D printing applications.
By following these steps, you can get started with your iPhone 3D scanner and begin capturing exciting 3D scans of objects around you. In the next sections, we will explore the process of choosing the right scanning app, calibrating your iPhone, scanning objects, editing and enhancing scanned models, and tips and tricks to maximize your scanning experience.
Choosing the Right iPhone 3D Scanner App
When it comes to choosing the right iPhone 3D scanner app, there are several factors to consider. Each app offers unique features and capabilities that can enhance your 3D scanning experience. Let’s explore some key considerations to help you make an informed decision.
1. Compatibility: Ensure that the scanning app you choose is compatible with your iPhone model. Some apps may have specific requirements in terms of hardware capabilities, such as camera quality or sensor support. Check the app’s requirements and ensure that your iPhone meets them.
2. Ease of Use: Look for an app that has an intuitive and user-friendly interface. The scanning process should be easy to understand and navigate, even for beginners. Consider apps that provide clear instructions, interactive guides, and real-time feedback to help you capture accurate scans.
3. Features and Functionality: Assess the features and functionality offered by the app. Some apps provide automatic alignment, editing tools, texture mapping, color capture, or the ability to export to various file formats. Determine which features are important to you and choose an app that meets your requirements.
4. Accuracy and Quality: The quality of the scans produced by the app is crucial. Look for apps that offer high accuracy and produce detailed and precise 3D models. User reviews and ratings can give you a good indication of the app’s performance in terms of scan quality.
5. Export Options: Consider the exporting capabilities of the app. Ensure that it supports the file formats you require for your intended workflow. Some apps may offer direct integration with 3D printing services or other design software, making it easier to transfer your scans for further processing or printing.
6. Cost: Evaluate the cost of the app, as some scanning apps may require a one-time purchase or have subscription plans. Take into account the value offered by the app in terms of features, support, and regular updates. Keep in mind that while some apps may be free, they may have limited functionality or place watermarks on your scans.
7. User Reviews and Ratings: Read user reviews and check the ratings of the app in the App Store. This can provide valuable insights into the experiences of other users and help you gauge the overall satisfaction with the app.
It’s also worth exploring any additional resources or support provided by the app developers. Some apps may have tutorials, forums, or communities where you can seek assistance or share your experiences with fellow users.
By considering these factors and doing some research, you can choose the right iPhone 3D scanner app that aligns with your needs and preferences. In the next sections, we will cover the process of calibrating your iPhone, scanning objects, editing and enhancing scanned models, and provide tips and tricks to help you make the most of your iPhone 3D scanning experience.
Calibrating Your iPhone 3D Scanner
Calibrating your iPhone is a crucial step to ensure accurate and precise 3D scans. By calibrating your device, you enable the scanning app to accurately measure distances and positions, resulting in higher-quality scans. Here’s a step-by-step guide on how to calibrate your iPhone for optimal 3D scanning:
1. Find a well-lit environment: Choose a location with ample lighting, preferably natural light or evenly distributed artificial light. Avoid areas with strong shadows and extreme variations in lighting.
2. Launch the scanning app: Open the 3D scanning app on your iPhone. Navigate to the calibration or settings section of the app.
3. Follow the on-screen instructions: Most scanning apps will provide step-by-step instructions for calibration. These instructions may include capturing reference images or scanning a calibration pattern.
4. Capture reference images: Some apps may require you to capture reference images to help establish the size and scale for accurate measurements. Follow the app’s instructions and capture the reference images from various angles.
5. Scan the calibration pattern: If the app utilizes a calibration pattern, position it within the camera’s view and scan it from different angles. Ensure that the pattern is aligned and fully visible within the frame.
6. Complete the calibration process: Once you have captured the necessary reference images or scanned the calibration pattern, follow the app’s instructions to complete the calibration process. This may involve analyzing the captured data and establishing the calibration parameters.
7. Test your calibration: After the calibration process is complete, it’s a good idea to perform a test scan to ensure that your iPhone is accurately measuring distances and positions. Scan a small object with known dimensions and compare the measurements obtained from the scan to the actual measurements of the object. This will help verify the calibration accuracy.
8. Adjust if necessary: If you find that your scans are consistently inaccurate or measurements are off, you may need to recalibrate your iPhone. Repeat the calibration process, paying close attention to the instructions and ensuring that you capture the reference images or scan the calibration pattern accurately.
It’s important to note that different scanning apps may have variations in the calibration process. Some apps may handle calibration automatically, while others may require manual calibration. Always refer to the specific instructions provided by the app you are using.
By calibrating your iPhone 3D scanner, you can ensure that your scans are accurate, precise, and maintain correct proportions. This calibration process sets a baseline for accurate measurements and enhances the overall quality of your 3D scans.
Now that your iPhone is calibrated and ready, let’s move on to the exciting part – scanning objects and creating amazing 3D models!
Scanning Objects with Your iPhone
With your iPhone 3D scanner app and a calibrated device, you are now ready to start scanning objects and creating stunning 3D models. Follow these steps to capture accurate scans:
1. Prepare the object: Choose the object you want to scan and ensure it is clean and free from any dirt, dust, or debris. Smaller objects can be placed on a stable surface, while larger objects may require you to move around them to capture scans from different angles.
2. Positioning: Place your iPhone at a comfortable distance from the object, ensuring that it has a clear view of the entire object. Try to keep the phone steady throughout the scanning process to avoid blurry scans.
3. Capture scans from different angles: Start by capturing scans from multiple angles around the object. Move slowly, making sure to cover as much surface area as possible. It’s important to get a good amount of overlap between scans to ensure accurate alignment.
4. Follow instructions: Most scanning apps provide real-time feedback and guidance during the scanning process. Pay attention to any prompts or instructions provided by the app to optimize your scans. Some apps may have features like automatic alignment or masking tools to help you get precise results.
5. Focus on details: For objects with intricate details, consider capturing additional scans or focusing on specific areas to ensure that all the fine details are captured accurately. Zoom in on specific sections or use manual controls to adjust the focus as needed.
6. Check for completeness: Once you have captured scans from all angles, review them within the app. Ensure that you have captured all the necessary details and that there are no missing sections or areas. If needed, go back and rescan any missed areas to ensure completeness.
7. Optimize scanning environment: Experiment with different lighting conditions to find the optimal setup for your scans. Adjust the angle and intensity of the light source to minimize shadows and maximize the visibility of surface details.
8. Refine if necessary: Some scanning apps offer post-processing options to refine and enhance your scanned models. This may include features like smoothing, hole filling, or texture mapping. Explore these tools to improve the overall quality and appearance of your scans.
Remember, practice makes perfect when it comes to 3D scanning. It may take a few tries to get comfortable with the scanning process and achieve the desired results. Don’t be afraid to experiment and learn from each scan to improve your skills.
By following these steps and taking the time to properly scan your objects, you’ll be able to create impressive 3D models on your iPhone. In the next section, we will explore how to edit and enhance your scanned models to bring them to life.
Editing and Enhancing Scanned Models
Once you have completed the scanning process and have a collection of 3D models, it’s time to refine and enhance them to achieve the desired result. With the help of your iPhone 3D scanner app or additional editing software, you can make adjustments to your scanned models to improve their appearance and functionality. Here are some essential steps to edit and enhance your scanned models:
1. Import the model: Depending on the scanning app you are using, you may have the option to import your scanned models directly into the app’s editing interface. Alternatively, you can transfer the model files to your computer and use specialized 3D modeling software for editing purposes.
2. Check for imperfections: Carefully examine your scanned model for any imperfections, such as holes, gaps, or artifacts. These can occur during the scanning process or may be inherent in the object itself. Use the software’s editing tools to fill holes, smooth surfaces, or remove unwanted elements that may affect the quality of the model.
3. Adjust the mesh: The mesh of your scanned model may require some adjustments to achieve the desired level of detail. You can manipulate the mesh by adding or reducing vertices, adjusting the smoothness or sharpness of edges, and refining the overall shape and structure of the model.
4. Enhance texture and colors: If your scanning app captured texture or color information, you have the option to enhance these attributes to make your model more visually appealing. Adjust the brightness, contrast, and saturation levels to bring out the details and optimize the appearance of your model’s textures and colors.
5. Merge or separate elements: If your scanned model consists of multiple objects or parts, you can use editing tools to merge them into a single cohesive model or separate them into individual components, depending on your requirements. This allows for easier manipulation and customization of the model.
6. Resize and scale: Use the scaling tools to adjust the size of your model to meet specific requirements or fit within a particular context. Ensure that the proportions and dimensions are accurately reflected to maintain the realism and accuracy of the model.
7. Add additional details: If desired, you can enhance your model by adding additional details or features. This can involve sculpting or carving details directly onto the model or incorporating separate 3D elements into the design. Consider your creative vision and experiment with different possibilities.
8. Optimize for file size and compatibility: Depending on your intended use for the 3D model, you may need to optimize it for file size and compatibility. Reduce the polygon count or simplify the geometry to create a lighter model that is easier to handle and share while preserving essential details.
By following these steps and utilizing the editing tools and features provided by the scanning app or 3D modeling software, you can tailor your scanned models to meet your specific needs and achieve the desired visual and functional outcomes. Take the time to experiment and explore the various editing options available to unlock the full potential of your scanned models.
In the next section, we will explore how to export and share your 3D scans, allowing you to showcase your creations and collaborate with others.
Exporting and Sharing 3D Scans
Once you have edited and enhanced your 3D scans to your satisfaction, it’s time to export and share them with others. Exporting your scans allows you to use them in various applications, such as 3D printing, virtual reality, animation, or simply sharing them with others who may appreciate your work. Here’s how to export and share your 3D scans:
1. Choose the appropriate file format: Determine the file format that best suits your intended use. Common file formats for 3D scans include OBJ, STL, and PLY. Check if your scanning app or 3D modeling software supports the desired file format.
2. Export from the scanning app: If your scanning app has built-in export functionality, follow the app’s instructions to save your scans in the desired format. Some apps may offer options to adjust settings like resolution, file size, or level of detail during the export process.
3. Transfer to a computer: If you prefer to do further editing or processing on a computer, transfer the exported scan files from your iPhone to your computer using methods like AirDrop, email, or cloud storage services.
4. Use 3D modeling software: If necessary, open the exported 3D scan files in 3D modeling software for further editing, refinement, or integration with other projects. This step allows you to fine-tune the scans or combine them with other models or environments.
5. Sharing platforms and communities: Consider sharing your 3D scans on dedicated platforms or communities for 3D artists and enthusiasts. Websites like Sketchfab, Thingiverse, or Cults let you upload and showcase your 3D models, allowing others to view, download, and provide feedback on your work.
6. Social media and portfolio websites: Share your 3D scans on social media platforms or personal portfolio websites to reach a wider audience. You can use platforms like Instagram, Twitter, or Facebook to showcase your scans and engage with other creatives in the community.
7. Collaborate with others: If you’re interested in collaborating with others, consider sharing your scans with fellow artists, designers, or researchers. Collaborative platforms and forums enable you to connect with like-minded individuals and explore new possibilities for your scans.
8. 3D printing: One of the most exciting aspects of 3D scanning is the ability to bring your digital creations into the physical world through 3D printing. Export your scans in a file format compatible with your 3D printer and convert them into tangible objects that you can hold and display.
Remember to respect copyrights and intellectual property rights when sharing your 3D scans. If you scanned an object that belongs to someone else, ensure that you have the proper authorization to share or use the scan.
By exporting and sharing your 3D scans, you can inspire others, showcase your creativity, and collaborate within the vibrant 3D community. It’s an opportunity to connect with like-minded individuals, receive valuable feedback, and push the boundaries of what’s possible with your scanned models.
Finally, in the last section of this article, we will provide some valuable tips and tricks to help you maximize your iPhone 3D scanning experience.
Tips and Tricks for Using an iPhone 3D Scanner
Mastering the art of using an iPhone 3D scanner takes time and practice. To help you optimize your scanning experience and achieve the best results, here are some valuable tips and tricks:
1. Lighting is key: Ensure that you have sufficient lighting to capture clear and detailed scans. Natural light or evenly distributed artificial light works best. Experiment with different lighting angles to minimize shadows and maximize visibility of surface details.
2. Keep your iPhone steady: Stability is essential for capturing sharp and accurate scans. Use a tripod or rest your iPhone on a stable surface to minimize camera shake. You can also consider using a remote shutter release or the self-timer function to further reduce any movement during the scan.
3. Move around the object: Capture scans from multiple angles to ensure full coverage and accurate representation of the object. Take your time to carefully rotate around the object, maintaining a consistent distance and angle to achieve consistent results.
4. Experiment with different apps: Try out different scanning apps to find the one that best suits your needs. Each app may have different features, settings, and capabilities, so explore various options and choose the one that provides the best results for your specific requirements.
5. Take test scans: Before scanning a critical or intricate object, practice on simple objects to become familiar with the app’s interface and scanning process. This allows you to refine your technique and understand how variations in lighting, distance, and angles can affect the quality of your scans.
6. Use manual controls: Some scanning apps offer manual controls for parameters such as exposure, focus, or scene settings. Experiment with these controls to get optimal results in challenging lighting conditions or for fine-tuning specific aspects of your scans.
7. Calibrate regularly: Regularly calibrate your iPhone to ensure accurate measurements and alignment. Lighting conditions, temperature, and external factors can affect the calibration, so perform the calibration process periodically or whenever you notice a decline in scan quality.
8. Clean your lens: Keep your iPhone’s camera lens free from dirt, fingerprints, or smudges. Use a microfiber cloth or lens cleaning solution to gently clean the lens before each scan. A clean lens ensures sharp and clear scans.
9. Consider using an external light source: For challenging lighting conditions or objects with intricate details, you can use external lighting sources such as LED panels or ring lights to enhance the capture of surface textures and details.
10. Collaborate and learn from the community: Engage with other 3D scanning enthusiasts, join forums, and participate in online communities. Sharing your experiences, seeking advice, and learning from others will help you improve your skills and stay updated on the latest techniques and developments in the field.
Remember, practice and experimentation are key to mastering the art of 3D scanning with your iPhone. Each scanning session is an opportunity to learn, adapt, and refine your technique. With time, you will develop your own style and discover unique ways to capture stunning 3D models.
Now armed with these tips and tricks, go out there and unleash your creativity with your iPhone 3D scanner!
Conclusion
Congratulations! You have now gained a solid understanding of using an iPhone as a 3D scanner. With its portability and powerful capabilities, your iPhone has transformed into a tool that can capture the intricate details of real-life objects and bring them into the digital realm.
We started by exploring the concept of an iPhone 3D scanner and how it utilizes the camera and sensors to create accurate 3D models. We then delved into the process of getting started with an iPhone 3D scanner, including choosing the right scanning app and calibrating your device for optimal results.
We discussed the techniques and considerations for scanning objects with your iPhone, taking into account lighting, stability, and capturing scans from multiple angles. We also dived into the editing and enhancing of scanned models, refining mesh details, adjusting textures, and optimizing the models for various purposes.
Exporting and sharing your 3D scans allows you to showcase your creations, collaborate with others, and explore the possibilities of 3D printing or other applications. We explored different platforms and communities where you can share your scans and connect with fellow 3D enthusiasts.
Lastly, we provided valuable tips and tricks to help you maximize your iPhone 3D scanning experience. From lighting considerations to stability, calibration to collaboration, these tips will assist you in capturing impressive 3D scans and improving your skills as a 3D scanner.
As technology continues to advance, the possibilities with iPhone 3D scanning will only expand. This technology opens up new avenues for designers, artists, engineers, and hobbyists to create, prototype, and explore the world of 3D scanning and printing.
Now armed with the knowledge and guidance from this article, it’s time to unleash your creativity and take your iPhone 3D scanning skills to the next level. Embrace the ever-evolving field of 3D scanning and let your imagination soar as you capture and share captivating 3D models with the world.
Get out there, start scanning, and make your mark in the exciting realm of iPhone 3D scanning!