Overview
Upgrading the RAM (Random Access Memory) on your Acer Nitro 5 laptop is an effective way to boost its performance and improve multitasking capabilities. RAM plays a crucial role in the speed and efficiency of your computer, allowing it to handle more data and run multiple applications simultaneously.
In this guide, we will walk you through the step-by-step process of upgrading the RAM on your Acer Nitro 5. Whether you’re an avid gamer needing a performance boost or a professional requiring faster processing speeds for demanding tasks, increasing your laptop’s RAM can make a noticeable difference.
Before diving into the upgrade process, it’s important to familiarize yourself with the necessary tools and materials and take proper safety precautions. This includes ensuring compatibility with your laptop, having the right tools at hand, and following safe practices to avoid any damage during the upgrade.
Once you have gathered the required tools and taken appropriate precautions, you’ll be ready to start upgrading your Acer Nitro 5’s RAM. We’ll guide you through each step, from powering off your laptop and locating the RAM slot to removing the old RAM and installing the new one securely. After completing the upgrade, we’ll explain how to check if the RAM upgrade is detected by your system.
With the upgraded RAM, you’ll experience smoother multitasking, faster application loading times, and improved overall performance on your Acer Nitro 5 laptop. Whether you’re a student, professional, or casual user, increasing your RAM capacity can enhance your computing experience and allow you to run resource-intensive applications more efficiently.
So, let’s get started and learn how to upgrade the RAM on your Acer Nitro 5 laptop to unleash its full potential!
Tools and Materials Needed
Before you begin the RAM upgrade process on your Acer Nitro 5 laptop, make sure you have the following tools and materials ready:
- Screwdrivers: Depending on your laptop model, you may need a Phillips or Torx screwdriver to open the back panel and access the RAM slot.
- New RAM module: Choose a RAM module that is compatible with your Acer Nitro 5 laptop. Check the manufacturer’s specifications or consult your laptop’s user manual to determine the compatible RAM type, speed, and capacity.
- Anti-static wrist strap: This strap helps prevent static electricity discharge, which can potentially damage sensitive components of your laptop. It is essential to wear an anti-static wrist strap throughout the upgrade process.
- Clean cloth or compressed air: You might need a clean cloth or compressed air to remove any dust or debris accumulated in your laptop’s internal components.
It’s essential to ensure that you have the correct tools and materials handy before you start the upgrade process. This will help you work efficiently and minimize the risk of damaging any components during the RAM installation.
Remember to choose a reputable and reliable source for purchasing your new RAM module. With the proper tools and the right RAM module in hand, you’re ready to move on to the next steps of the upgrade process.
Now that we have gathered the necessary tools and materials, let’s move on to the next section, where we’ll discuss the steps to safely upgrade your Acer Nitro 5 laptop’s RAM.
Step 1: Determine the Compatible RAM
Before proceeding with the RAM upgrade on your Acer Nitro 5 laptop, it’s crucial to determine the compatible RAM module for your specific model. Choosing the right RAM will ensure compatibility and optimal performance after the upgrade.
There are a few key factors to consider when selecting the compatible RAM:
- Type of RAM: Different laptops support different types of RAM, such as DDR3, DDR4, or DDR5. Check your laptop’s specifications or user manual to identify the type of RAM supported.
- Capacity: Determine the maximum RAM capacity supported by your laptop. It’s advisable to check the manufacturer’s website or consult the user manual for this information.
- Speed: RAM modules come in various speeds, measured in megahertz (MHz). It’s essential to choose a module that matches or exceeds the speed of your existing RAM for optimal performance.
- Form Factor: Laptop RAM modules typically come in the form of SODIMM (Small Outline Dual In-Line Memory Module). Ensure that the module you choose is the correct form factor for your Acer Nitro 5.
Once you have determined the compatible RAM specifications for your laptop, you can proceed with purchasing the new RAM module from a reputable seller or manufacturer. Make sure to double-check the compatibility before making a purchase.
Remember, upgrading your laptop’s RAM can greatly enhance its performance and multitasking capabilities. By selecting the appropriate RAM module, you’ll ensure compatibility and a smooth RAM upgrade process for your Acer Nitro 5 laptop.
Now that we’ve covered the first step of determining the compatible RAM, let’s move on to the next section, where we’ll discuss the tools and materials needed for the RAM upgrade process.
Step 2: Gather the Necessary Tools
Before you start the RAM upgrade process on your Acer Nitro 5 laptop, it’s important to gather all the necessary tools. Having the right tools on hand will ensure a smooth and efficient upgrade process.
Here are the tools you’ll need:
- Screwdrivers: Depending on your laptop model, you may need a Phillips or Torx screwdriver to remove the screws that secure the back panel of your laptop. Check your laptop’s user manual or inspect the screws to determine the correct screwdriver type.
- Anti-static wrist strap: This is a crucial tool to prevent any static electricity build-up while working on your laptop’s sensitive components. It helps protect your laptop from potential damage due to electrostatic discharge.
- Clean cloth or compressed air: It’s always a good idea to have a clean cloth or compressed air on hand to remove any dust or debris from your laptop’s internal components before and after the RAM upgrade process.
Make sure to have these tools readily available before you start the upgrade process. This will save you time and prevent any delays or interruptions during the installation.
Additionally, it’s a good practice to have a clean and clutter-free workspace. This will ensure that you have enough room to comfortably work on your laptop and keep track of small components.
Now that you have gathered all the necessary tools, you’re ready to move on to the next step, which involves taking safety precautions before opening your laptop. We’ll discuss these precautions in detail in the next section.
Step 3: Safety Precautions
Before you begin the RAM upgrade process on your Acer Nitro 5 laptop, it’s essential to take proper safety precautions. These precautions will help protect both you and your laptop from any potential damage.
Here are some safety measures to keep in mind:
- Power off and unplug your laptop: Make sure to shut down your laptop completely and unplug it from the power source before starting the upgrade process. This will minimize the risk of electrical shock and ensure your safety.
- Wear an anti-static wrist strap: Static electricity can damage sensitive electronic components. Wearing an anti-static wrist strap will help discharge any static build-up on your body, preventing potential damage to your laptop’s internal parts.
- Work on a stable surface: Find a flat and stable surface to work on, such as a desk or table. This will prevent accidental drops or jolts that could cause damage to your laptop.
- Avoid wearing jewelry or static-inducing clothing: Remove any jewelry, such as rings or bracelets, and avoid wearing clothing made of materials that generate static electricity, like wool or synthetic fibers.
- Handle components with care: RAM modules and other internal components are delicate. Handle them with caution, holding them by the edges and avoiding excessive force or bending.
By taking these safety precautions, you minimize the risk of accidents or damage during the RAM upgrade process. Keeping yourself and your laptop safe is crucial for a successful and stress-free upgrade.
Now that you’re aware of the safety precautions, it’s time to move on to the next step: powering off and unplugging your laptop. We’ll discuss this step in detail in the following section.
Step 4: Power off and Unplug Your Laptop
Before you begin the RAM upgrade process on your Acer Nitro 5 laptop, it’s important to power off the laptop and unplug it from the power source. This step ensures your safety and prevents any potential damage to your laptop’s internal components.
Here’s how to power off and unplug your laptop:
- Save your work and close all applications: Make sure to save any unsaved work and close all applications before shutting down your laptop. This will prevent data loss or file corruption.
- Shut down your laptop: Click on the “Start” menu in Windows or the Apple logo in macOS and select “Shut Down” or “Power Off”. Wait for your laptop to fully shut down before proceeding to the next step.
- Unplug the power adapter: Disconnect the power adapter from your laptop and remove it from the power outlet. This ensures that your laptop is not connected to any power source during the upgrade process.
It’s crucial to power off and unplug your laptop to avoid any electrical shocks or accidental power-on while working on the internal components. This step ensures your safety and the integrity of the upgrade process.
Once you have powered off and unplugged your laptop, you’re ready to move on to the next step: locating the RAM slot. We’ll discuss this step in detail in the following section.
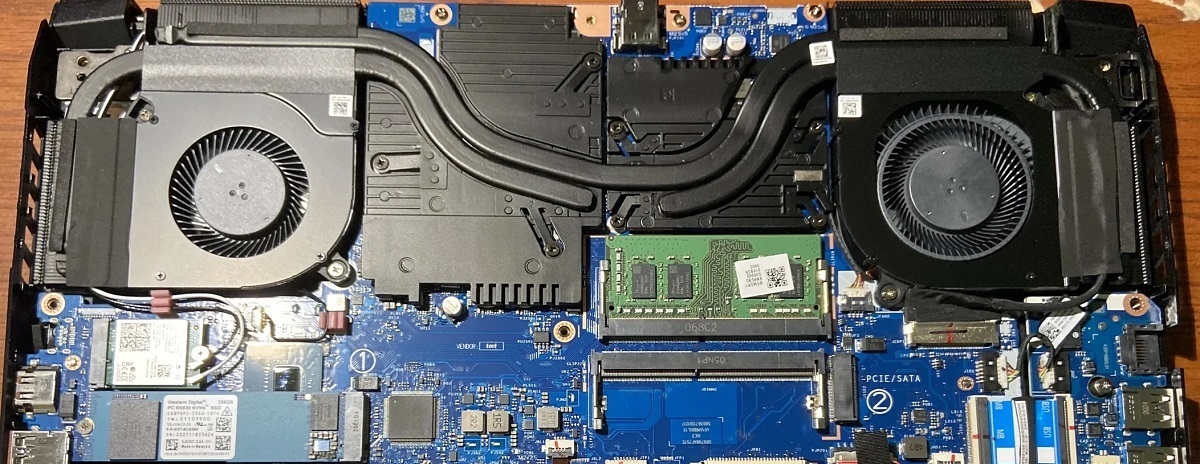
Step 5: Locate the RAM Slot
Before you can begin the RAM upgrade process on your Acer Nitro 5 laptop, you need to locate the RAM slot. The RAM slot is where you will be inserting the new RAM module.
Here’s how to locate the RAM slot on your Acer Nitro 5:
- Find the access panel: Flip your laptop over and locate the access panel on the bottom. This panel usually has a few screws holding it in place.
- Remove the screws: Using the appropriate screwdriver, carefully unscrew the screws on the access panel. Keep the screws in a safe place, as you will need them later to secure the panel back in place.
- Open the access panel: Gently lift the access panel to expose the internal components of your laptop. Set the panel aside in a secure location.
- Locate the RAM slot: Look for the existing RAM module(s) inside your laptop. The RAM slot should be nearby, usually positioned next to or near the CPU.
It’s important to handle the access panel and the internal components with care to avoid any damage. Be gentle when removing the screws and opening the panel to ensure a smooth and successful upgrade process.
Once you have located the RAM slot, you’re ready to move on to the next step: removing the old RAM module. We’ll guide you through this process in detail in the following section.
Step 6: Remove the Old RAM
Now that you have located the RAM slot on your Acer Nitro 5 laptop, it’s time to remove the old RAM module. Removing the old RAM module is necessary before you can install the new one.
Follow these steps to remove the old RAM module:
- Release the retaining clips: Look for the retaining clips on the sides of the RAM module. Gently pull these clips away from the module to release it.
- Slide the module out: Once the retaining clips are released, the RAM module will pop up at a slight angle. Carefully slide it out of the RAM slot, making sure to hold it by the edges and avoid touching the gold contacts.
- Set aside the old RAM module: Place the old RAM module in a safe and static-free location. You may keep it as a spare or consider donating it if it is still in good working condition.
Remember to handle the old RAM module with care, as it contains delicate electronic components. Avoid applying excessive force or bending the module during removal.
Once you have successfully removed the old RAM module, you’re now ready to proceed to the next step: installing the new RAM module. We’ll provide detailed instructions on how to install the new RAM module in the following section.
Step 7: Install the New RAM
With the old RAM module removed, it’s time to install the new RAM module in your Acer Nitro 5 laptop. Properly installing the new RAM module is crucial for optimal performance and compatibility.
Follow these steps to install the new RAM module:
- Align the new RAM module: Take the new RAM module and align it with the slot, ensuring that the notch on the module matches the slot in the socket. Make sure the gold contacts on the module are facing downward.
- Insert the new RAM module: Once aligned, gently insert the RAM module into the slot at an angle. Press down firmly but carefully until the module is fully seated in the slot. You should feel a slight click when it is properly inserted.
- Apply even pressure to secure the module: Once the module is fully inserted, apply even pressure to the top of the module, ensuring it is seated evenly in the slot. This will help secure it in place.
It’s important to handle the new RAM module carefully, holding it by the edges and avoiding touching the gold contacts. Take your time during installation to ensure proper alignment and a secure fit.
With the new RAM module successfully installed, you’re one step closer to improving your laptop’s performance. In the next step, we’ll cover how to secure the RAM in place to avoid any movement or disconnection during usage.
Step 8: Secure the RAM in Place
After installing the new RAM module in your Acer Nitro 5 laptop, it’s important to secure it in place to ensure a stable connection and prevent any movement or disconnection during usage.
Follow these steps to secure the RAM module:
- Push down on the module: Apply gentle pressure on the top of the RAM module, pushing it down towards the slot. Ensure that the module is seated firmly and evenly in the slot.
- Listen for a click: As you push down on the module, listen for a click or a snapping sound. This indicates that the retaining clips on the sides of the RAM slot have engaged and secured the module in place.
- Check for even alignment: Verify that the RAM module is aligned evenly with the edges of the slot. It should appear flush and symmetrical, without any visible gaps or misalignment.
Securing the RAM module is crucial because it ensures a reliable connection and prevents any accidental dislodging of the module during regular usage or transportation.
Once you have confirmed that the RAM module is securely in place, you can proceed to the next step: closing the laptop and powering it on. We’ll discuss these steps in detail in the following section.
Step 9: Close the Laptop and Power It On
With the new RAM module securely installed in your Acer Nitro 5 laptop, it’s time to close the laptop and power it on to complete the upgrade process.
Follow these steps to close the laptop and power it on:
- Replace the access panel: Take the access panel that you removed earlier and align it with the screw holes on the bottom of your laptop. Carefully slide it into place and make sure it sits flush with the rest of the laptop’s body.
- Tighten the screws: Using the screwdriver, tighten the screws on the access panel. Make sure not to overtighten them, as this can damage the screws or the laptop’s casing.
- Power on your laptop: Plug in the power adapter and press the power button to turn on your Acer Nitro 5 laptop. Wait for your laptop to boot up and reach the operating system.
After powering on your laptop, the system should automatically detect the new RAM module. You can confirm this by checking the system information or using diagnostic software to verify the increased RAM capacity.
By closing the laptop and powering it on, you have completed the RAM upgrade process for your Acer Nitro 5. Congratulations! Your laptop’s performance and multitasking capabilities should be noticeably improved.
In the next step, we’ll discuss how to check if the RAM upgrade is detected by your system. This will help ensure that the new RAM module is functioning properly and contributing to your laptop’s performance.
Step 10: Check if the RAM Upgrade is Detected
After completing the RAM upgrade on your Acer Nitro 5 laptop, it’s important to check if the system has detected the new RAM module. Verifying that the RAM upgrade is detected ensures that your laptop is utilizing the increased RAM capacity.
You can follow these steps to check if the RAM upgrade is detected:
- Open the system information: On Windows, you can press the Windows key + R, type “msinfo32” in the Run dialog box, and hit Enter. On macOS, click on the Apple menu, select “About This Mac,” and then click on “System Report.”
- Check the installed RAM: In the system information window, look for the “Installed Physical Memory” or “Memory” section. This will display the total RAM capacity detected by your laptop.
- Verify the capacity: Compare the displayed total RAM capacity to the capacity of the new RAM module you installed. If the displayed capacity matches or exceeds the new RAM module’s capacity, it means your laptop has detected the RAM upgrade successfully.
If the system information confirms the increased RAM capacity, congratulations! Your Acer Nitro 5 laptop is now utilizing the upgraded RAM, which will contribute to improved performance, smoother multitasking, and faster application loading times.
In the rare event that the system does not detect the RAM upgrade, double-check the installation to ensure the module is properly seated in the slot. If the issue persists, you may need to consult the laptop’s user manual or reach out to the manufacturer’s support for further assistance.
With the RAM upgrade successfully detected by the system, you can enjoy the enhanced performance and capabilities of your Acer Nitro 5 laptop. Take advantage of the increased RAM capacity to run memory-intensive applications, play demanding games, and tackle resource-heavy tasks with ease.
Conclusion
Upgrading the RAM on your Acer Nitro 5 laptop is a worthwhile investment that can significantly improve its performance and multitasking capabilities. By following the step-by-step guide outlined in this article, you can successfully upgrade the RAM and reap the benefits of increased memory capacity.
We started by understanding the importance of determining the compatible RAM for your laptop model. This involved considering factors such as RAM type, capacity, speed, and form factor to ensure a compatible and optimal upgrade. Gathering the necessary tools, including screwdrivers, an anti-static wrist strap, and a clean cloth, helped prepare you for a smooth upgrade process.
Throughout the upgrade process, safety precautions were emphasized to protect you and your laptop from any potential harm. Powering off the laptop, wearing an anti-static wrist strap, and working on a stable surface ensured a secure and safe environment for the upgrade.
The step-by-step process covered locating the RAM slot, removing the old RAM module, and installing the new RAM module with precision and care. Securing the new RAM module in place was an important step to ensure a stable and reliable connection. Finally, closing the laptop, powering it on, and checking if the RAM upgrade was detected completed the process.
Now, armed with the upgraded RAM, your Acer Nitro 5 laptop is ready to deliver enhanced performance. Increased RAM capacity enables smoother multitasking, faster loading times, and improved overall responsiveness. Whether you’re a gamer, professional, or casual user, the RAM upgrade will provide a noticeable boost in system performance.
Remember to consult your laptop’s user manual or seek professional assistance if you encounter any difficulties during the upgrade process. Following the precautions and guidelines outlined in this article will help ensure a successful RAM upgrade.
So, go ahead and enjoy the improved performance and enhanced capabilities of your Acer Nitro 5 laptop with the upgraded RAM. Embrace the increased speed, efficiency, and productivity this upgrade brings to your computing experience!