Introduction
Welcome to this guide on how to wipe a Windows 10 computer. Whether you’re looking to sell your old machine, hand it down to a family member, or simply want to start fresh, wiping your computer is an essential step to protect your privacy and ensure a clean slate. In this article, we will walk you through the step-by-step process of wiping a Windows 10 computer, allowing you to remove all personal data and reinstall the operating system.
Before diving into the process, it’s important to note that wiping your computer means that all files, applications, and settings will be permanently deleted. Therefore, it is crucial to back up any important files or documents that you wish to keep before proceeding. Additionally, make sure to sign out of all online accounts and services to prevent any unauthorized access to your personal information.
The process of wiping a Windows 10 computer involves resetting the PC using the built-in tool, choosing the appropriate reset option, reinstalling Windows 10, and setting up your computer again. We will guide you through each step, providing clear instructions to ensure a smooth and successful process. So, let’s get started and learn how to wipe a Windows 10 computer!
Step 1: Back up your important files
Before you proceed with wiping your Windows 10 computer, it is crucial to back up all your important files and documents. This step is essential to ensure that you don’t lose any valuable data during the process.
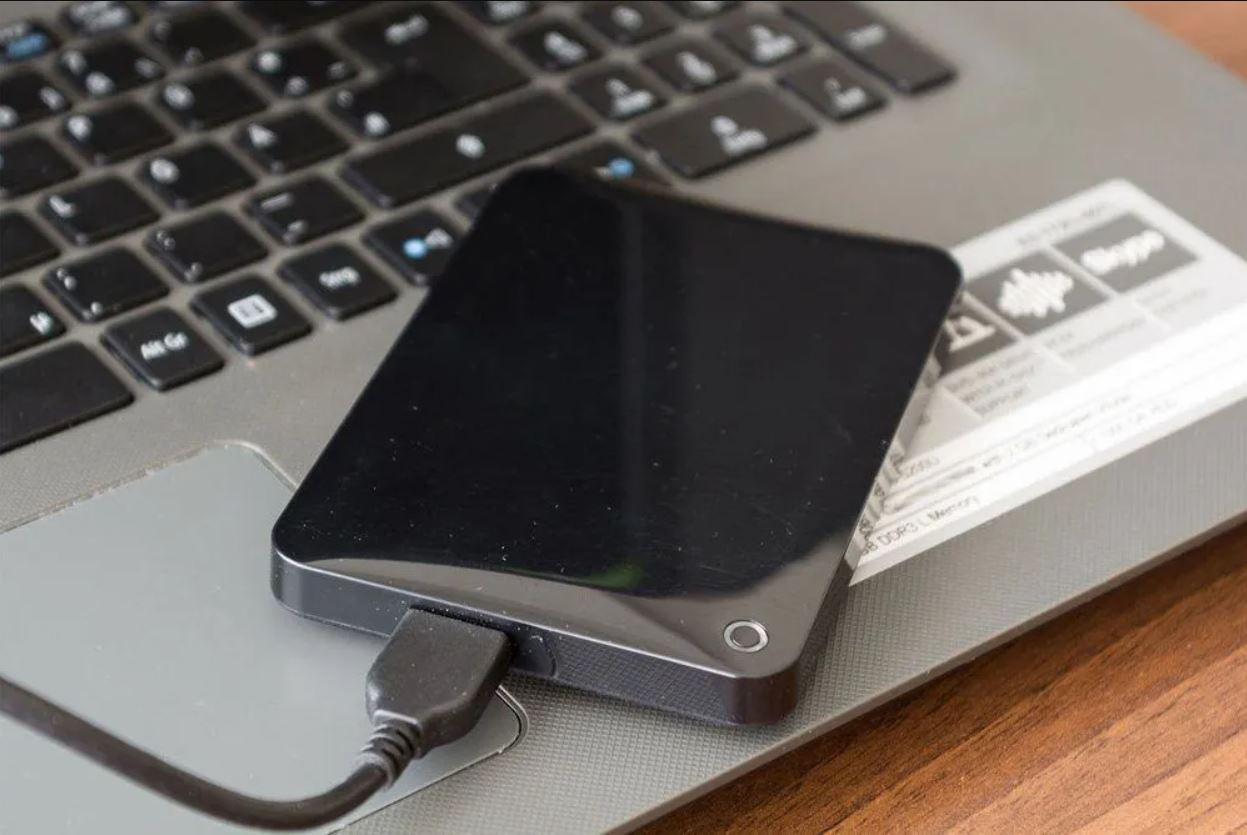
There are several ways you can back up your files. One option is to use an external hard drive or USB flash drive to manually copy and transfer your files. Simply connect the external storage device to your computer, navigate to the files you want to back up, and copy them to the device.
Another convenient option is to utilize cloud storage services like Google Drive, Dropbox, or Microsoft OneDrive. These services allow you to upload your files to the cloud, ensuring that they are securely stored and accessible from any device with an internet connection.
If you have a large amount of data to back up, you may consider using backup software that automates the process and allows you to schedule regular backups. This can save you time and ensure that your files are always protected.
Remember to include all important documents, photos, videos, music, and any other files that you want to keep. Take your time to ensure that you have successfully backed up everything you need before proceeding to the next steps.
By backing up your important files, you can have peace of mind knowing that even if something goes wrong during the wiping process, you will still have a copy of your files to fall back on. It is always better to be safe than sorry when it comes to preserving your valuable data.
Step 2: Sign out of all online accounts and services
Prior to wiping your Windows 10 computer, it is essential to sign out of all online accounts and services. This step ensures that your personal information and data are not accessible to anyone else during the wiping process.
Start by signing out of any email accounts you have linked to your computer. Open your email client, such as Microsoft Outlook or Gmail, and navigate to the settings or account options. Look for the option to sign out or log out of your account. Make sure you sign out of all accounts associated with the email client.
Additionally, sign out of any social media accounts you have accessed on your computer. Open the respective social media applications or websites and locate the account settings. Look for the option to sign out or log out of your account. Repeat this process for all social media accounts you use.
Don’t forget to sign out of any cloud storage services you have connected to your computer, such as Google Drive or Dropbox. Access the settings or account options of each service and follow the steps to sign out or log out.
If you use any productivity tools or online office suites, such as Microsoft Office or Google Docs, ensure that you sign out of those accounts as well. This will prevent any unauthorized access to your documents and files.
Lastly, sign out of any other online accounts or services that you frequently use on your computer. This can include online banking accounts, shopping accounts, streaming services, and any other platforms that require you to log in.
By signing out of all online accounts and services, you take an important precautionary step in protecting your personal information and privacy. It ensures that no one can access your accounts or view your sensitive data while your computer is being wiped and reset.
Step 3: Reset your PC using the built-in tool
Once you have backed up your important files and signed out of all online accounts, it’s time to reset your Windows 10 computer using the built-in tool. This tool allows you to erase all personal data, applications, and settings, bringing your computer back to its original factory state.
To access the reset tool, go to the Start menu and click on the “Settings” icon, which looks like a gear. In the Settings menu, scroll down and click on the “Update & Security” option.
In the Update & Security menu, you will find the “Recovery” tab on the left-hand side. Click on it to open the recovery options.
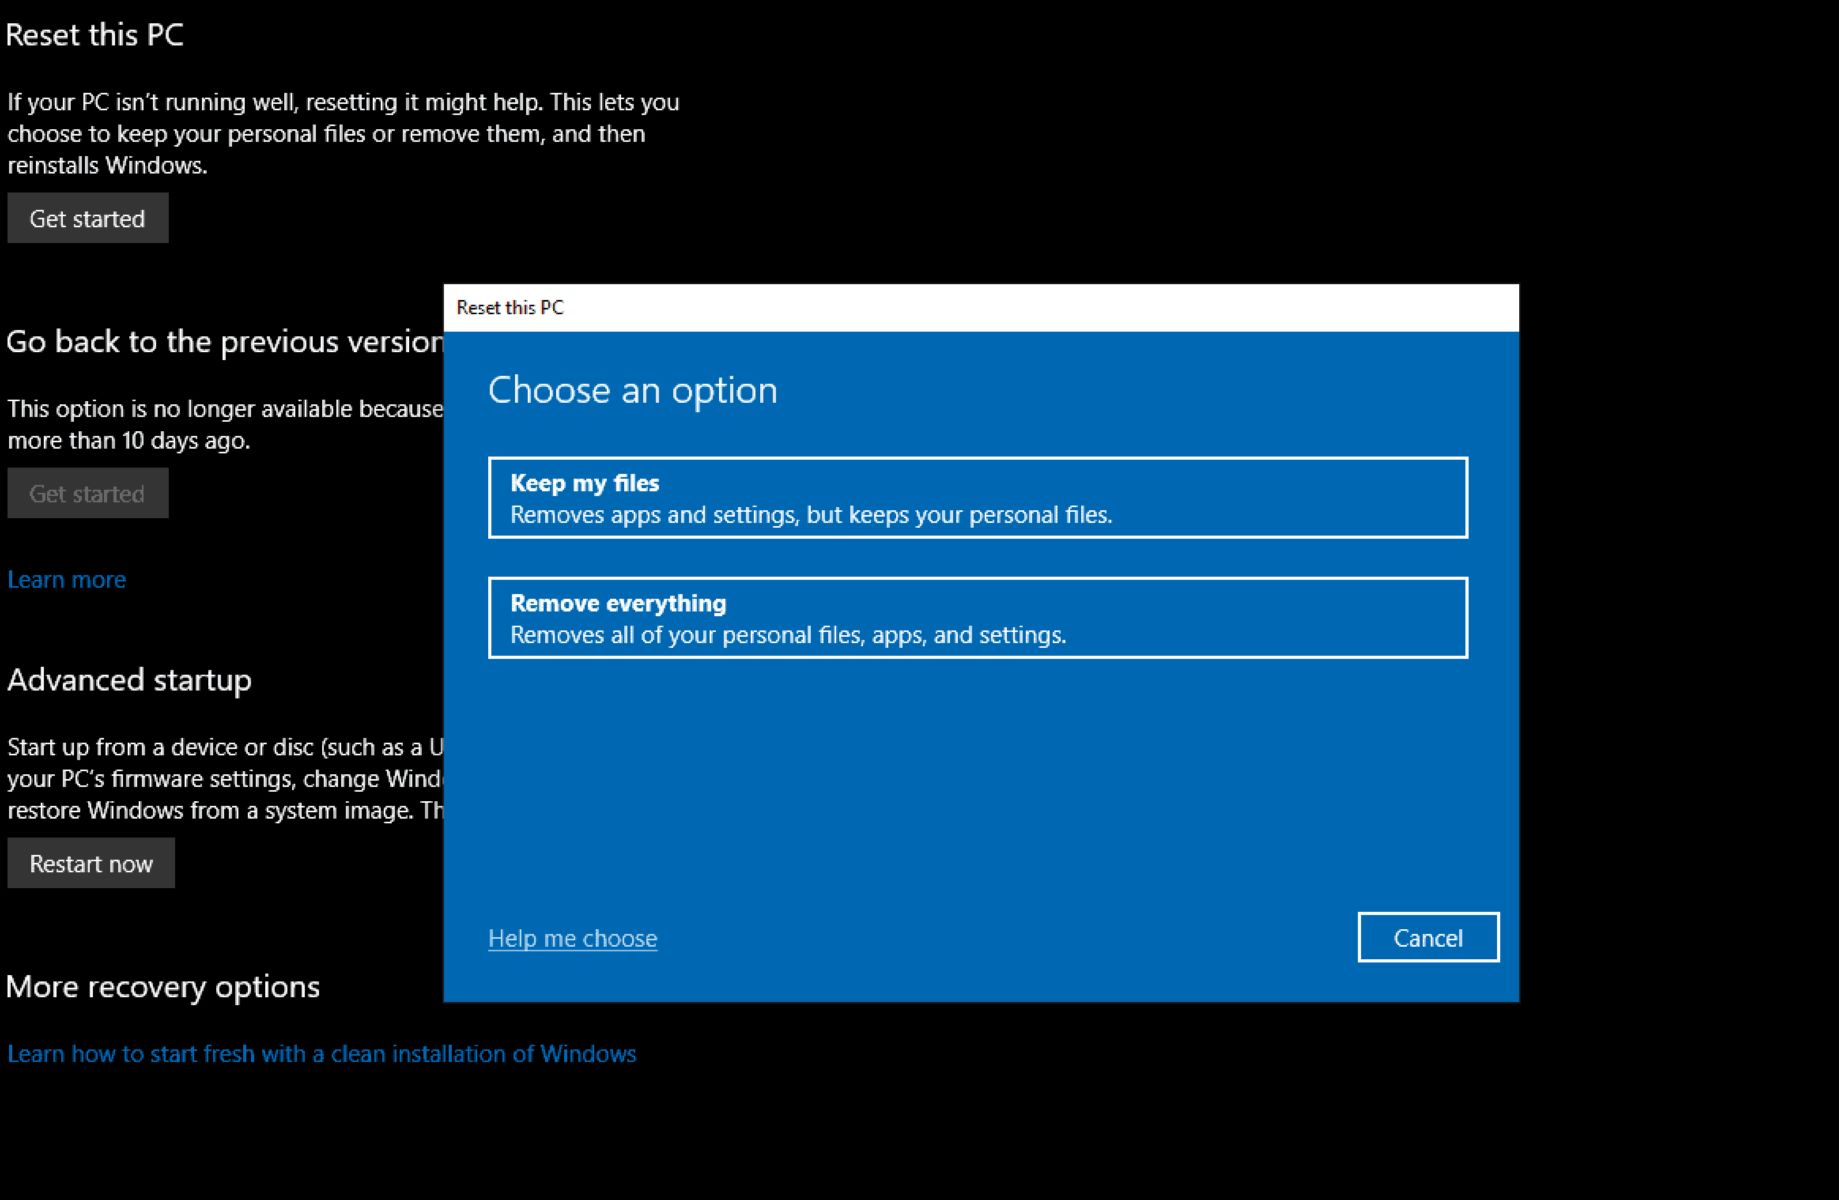
Under the “Reset this PC” section, click on the “Get started” button. You will be presented with two options:
- Keep my files: This option will remove apps and settings but keep your personal files intact. It is suitable if you want to start fresh but still retain important documents, photos, and other files.
- Remove everything: This option will remove all apps, settings, and personal files from your computer. It is the recommended choice if you are selling or giving away your computer and want to ensure that no personal data is left behind.
Select the option that aligns with your needs and preferences. Keep in mind that choosing the “Remove everything” option will delete all your files permanently, so make sure you have backed up everything you want to keep.
After selecting the desired reset option, you may be asked to confirm your choice and enter your Windows 10 password. Follow the on-screen instructions to proceed with the reset process.
This process may take some time, depending on the speed of your computer and the amount of data being erased. Once the reset is complete, your computer will restart, and you will be directed to the initial setup screen, as if you were setting up a new computer from scratch.
By utilizing the built-in reset tool, you can quickly and efficiently wipe your Windows 10 computer, removing all personal data and reverting it back to its original state. This ensures a clean slate and a fresh start for your computer.
Step 4: Choose the appropriate reset option
After initiating the reset process for your Windows 10 computer, you will be presented with two options: “Keep my files” and “Remove everything.” It is important to choose the appropriate option that aligns with your specific needs and goals.
Option 1: Keep my files:
If you select the “Keep my files” option, it means that your personal files will be preserved while removing apps and settings. This option is best suited if you want to start fresh with your computer but still want to retain important documents, photos, videos, and other files.
During the reset process, Windows will uninstall all apps and programs and revert the settings to their defaults. However, your personal files will remain untouched. It is important to note that some pre-installed apps that came with your computer may still be present after the reset.
This option is ideal if you want to quickly refresh your computer’s performance and remove unnecessary applications, while still retaining your important files. It allows for a clean and organized system without the need to back up and restore all your personal data.
Option 2: Remove everything:
If you choose the “Remove everything” option, it means that all personal files, apps, and settings will be permanently deleted from your computer. This option is recommended if you are selling or giving away your computer, or if you want to ensure that no personal data is left behind.
When selecting this option, Windows will erase all your files, including documents, photos, videos, music, and any other personal data. It will also uninstall all applications and restore the settings to their default state.
Ensure that you have backed up all your important files before choosing this option, as the data cannot be recovered once the reset process is complete. It is a thorough and comprehensive reset that provides maximum privacy and security by erasing all traces of your personal information.
Consider your specific needs and circumstances when choosing between these two options. Whether you want to retain your personal files or completely wipe everything, selecting the appropriate reset option is crucial to achieving your desired outcome.
Step 5: Confirm the reset process
After selecting the appropriate reset option for your Windows 10 computer, it is important to confirm the reset process before proceeding further. This step ensures that you understand the implications of the reset and are ready to proceed with the next stages.
Once you have chosen either the “Keep my files” or “Remove everything” option, Windows will display a confirmation screen outlining what will happen during the reset process. Take a moment to review the information provided and ensure that you have backed up any important files.
If you have chosen the “Keep my files” option, the confirmation screen will inform you that your personal files will be preserved, but apps and settings will be removed. It may also mention that some pre-installed apps will remain on your computer after the reset. Make sure you are aware of these details and are prepared to proceed.
On the other hand, if you have selected the “Remove everything” option, the confirmation screen will inform you that all personal files, apps, and settings will be permanently deleted. It is crucial to double-check that you have backed up all necessary files and are fully prepared for the complete removal of your data.
Take the time to read through the confirmation screen carefully, ensuring that you understand the consequences of the reset process. If you are satisfied with your selection and have backed up all important data, proceed to confirm and initiate the reset.
Keep in mind that once the reset process is confirmed, there is no turning back. All personal data, apps, and settings will be irreversibly erased. Therefore, it is vital to exercise caution and make sure you are ready to proceed before confirming the reset.
By confirming the reset process after understanding the implications, you will be one step closer to wiping your Windows 10 computer and starting fresh. It is a critical checkpoint to ensure that you are fully prepared for the next stages of the reset process.
Step 6: Reinstall Windows 10
After confirming the reset process, the next step is to reinstall Windows 10 on your computer. This is necessary to bring back the operating system and set up a fresh installation.
Once the reset process is initiated, your computer will automatically restart. During the restart, you will see the Windows logo and the message “Resetting this PC” or something similar. The system will enter a process called “Getting things ready” or “Preparing Windows,” which may take some time.
After this initial preparation, you will be presented with the Windows setup screen. Follow the on-screen prompts and provide the required information to reinstall Windows 10. These prompts may include selecting your language preferences, time zone, keyboard layout, and signing in with a Microsoft account or creating a local account.
If prompted to enter your Windows 10 product key, you may find it on the packaging of your computer or in your purchase confirmation email. However, if your computer came pre-installed with Windows 10 or you previously activated it, you can select the “I don’t have a product key” option to continue the installation.
Throughout the setup process, make sure to choose the appropriate settings that align with your preferences. These settings may include privacy options, Windows updates, and customizations such as choosing a computer name.
As the Windows 10 installation progresses, your computer will go through multiple restarts. This is normal and part of the installation process, so be patient and let the system complete the necessary steps to reinstall Windows 10 properly.
Once the installation is complete, you will be welcomed by the Windows 10 desktop and a fresh set-up. At this point, Windows 10 is successfully reinstalled on your computer, and you are ready to proceed to the next step of setting up your computer again.
Reinstalling Windows 10 not only ensures a clean, stable operating system but also provides the opportunity to start fresh with a clean slate. It allows you to have a system that is free from clutter and potential issues, providing a smooth, optimized experience.
Step 7: Set up your computer again
Now that you have successfully reinstalled Windows 10, the next step is to set up your computer again. This involves customizing your settings, installing necessary applications, and configuring your preferences to personalize your computing experience.
Upon reaching the Windows 10 desktop after the reinstallation, you will be guided through a series of initial setup screens. These screens will prompt you to choose your region and language preferences, review the privacy settings, and sign in with your Microsoft account or create a new local account.
If you choose to sign in with your Microsoft account, it will allow you to sync your settings, files, and preferences across multiple devices. This can be useful if you have other Windows 10 devices and want a seamless experience across them.
Once you’ve completed the initial setup, you can start personalizing your computer. Begin by customizing your desktop background, screen resolution, and other appearance settings to make your computer feel familiar and visually pleasing.
Next, install any essential applications that you regularly use. This may include productivity software, web browsers, media players, and antivirus software. Visit the official websites or app stores to download and install these applications, ensuring they are from trusted sources.
As you set up your computer again, you may also consider organizing your files and creating a folder structure that suits your needs. This can make it easier to locate and manage your documents, photos, videos, and other files.
Take the time to configure any additional settings, such as notification preferences, power management options, and automatic updates. Customize these settings to align with your preferences and optimize your computer’s performance.
Lastly, make sure to reconfigure any peripheral devices that you use with your computer, such as printers, scanners, and external hard drives. Connect these devices and follow the manufacturer’s instructions to install any necessary drivers or software.
Setting up your computer again allows you to recreate a tailored experience that suits your needs and preferences. By taking the time to personalize your settings and install the required applications, you can ensure that your Windows 10 computer is optimized for your specific usage.
Step 8: Restore your backed up files
Now that you have set up your computer again, it’s time to restore your backed up files and bring back your important data. By following this step, you can regain access to your documents, photos, videos, and other files that were previously backed up.
Start by connecting the external hard drive or USB flash drive that contains your backed up files. If you used cloud storage services, ensure that you are connected to the internet and have logged into the respective accounts.
If you backed up your files to an external storage device, navigate to the device using File Explorer or Finder, depending on your operating system. Locate the folders or files you want to restore and copy them to the appropriate locations on your computer.
If you utilized cloud storage services, access the respective platforms by opening your web browser and logging into the accounts. Locate your backed up files and download them to your computer, ensuring they are saved in the appropriate folders or directories.
Take the time to organize your restored files, creating folders and subfolders as needed to maintain a structured file system. This can make it easier for you to find and access your files in the future.
If you had any specific settings or customizations for certain applications, such as email clients or productivity software, take the necessary steps to restore those settings as well. This may involve importing email accounts, restoring preferences, or reconfiguring options to match your previous setup.
As you restore your backed up files, it’s important to verify that everything has been successfully transferred and is accessible. Open some of your restored documents, photos, and other files to ensure they open correctly and are intact.
By restoring your backed up files, you can reclaim your important data and continue where you left off before the computer reset. It allows you to seamlessly transition back into your workflow and regain access to your personal files and documents.
Conclusion
Congratulations! You have successfully learned how to wipe a Windows 10 computer and start fresh with a clean slate. By following the step-by-step process outlined in this guide, you were able to back up your important files, sign out of online accounts, reset your PC, reinstall Windows 10, set up your computer again, and restore your backed up files.
Wiping your computer is an essential step to protect your privacy, ensure the removal of personal data, and create a fresh environment for optimal performance. It allows you to start anew, whether you’re selling your computer, passing it on to someone else, or simply wanting a clean start.
Throughout the process, it is crucial to back up your important files to prevent any potential data loss. Signing out of online accounts and services adds an extra layer of security and ensures that your personal information remains protected.
Resetting your PC using the built-in tool and choosing the appropriate reset option helps you remove all personal data, applications, and settings. Reinstalling Windows 10 brings back the operating system, while setting up your computer again allows you to customize the settings and install necessary applications.
Finally, restoring your backed up files ensures that you regain access to your important data and files, completing the process of wiping and starting fresh.
Remember, the instructions provided in this guide are meant to serve as a general outline. It’s always a good practice to refer to official documentation or seek further assistance if you encounter any issues during the process.
Wiping your Windows 10 computer can be a transformative process, offering you a blank canvas to create a customized and efficient computing experience. Enjoy your freshly wiped computer and make the most of the clean start it provides!


![[Full Guide] How to Bypass Google Account Verification After Reset](https://robots.net/wp-content/uploads/2023/11/How-to-Bypass-Google-Account-Verification-After-Reset-300x180.png)