Introduction
Windows 10 is a popular operating system widely used by millions of users around the world. It offers a plethora of features and a user-friendly interface. However, like any software, Windows 10 can encounter issues and errors that may disrupt your workflow and cause frustration.
When faced with a problem on your Windows 10 computer, it’s important to know how to troubleshoot and repair it effectively. In this guide, we will discuss various methods to repair Windows 10 and get your system back up and running smoothly.
In this article, we will cover:
- Backing up your files
- Basic troubleshooting steps
- Using System Restore
- Repairing corrupted system files
- Using the Windows 10 Repair Tool
- Resetting Windows 10
- Performing a clean install of Windows 10
Whether you’re dealing with a slow-performing computer, frequent crashes, or startup problems, this guide will provide you with step-by-step instructions to resolve these issues. It’s important to note that before attempting any repairs, it’s always recommended to back up your important files to prevent data loss.
Now let’s dive into the various methods you can use to repair Windows 10 and restore your computer’s performance and stability.
Part 1: Backing Up Your Files
Before you proceed with any repairs or troubleshooting steps, it’s crucial to back up your important files. This ensures that in the event of data loss or system failure, you can still retrieve your valuable data.
There are several methods you can use to back up your files in Windows 10:
- External Storage Device: Connect an external hard drive or USB flash drive to your computer and manually copy the files you want to back up. This method is simple and allows you to have direct control over what files are saved.
- Cloud Storage Services: Utilize popular cloud storage services such as Google Drive, OneDrive, or Dropbox to store your files securely in the cloud. These services offer a certain amount of free storage and allow you to access your files from any device with an internet connection.
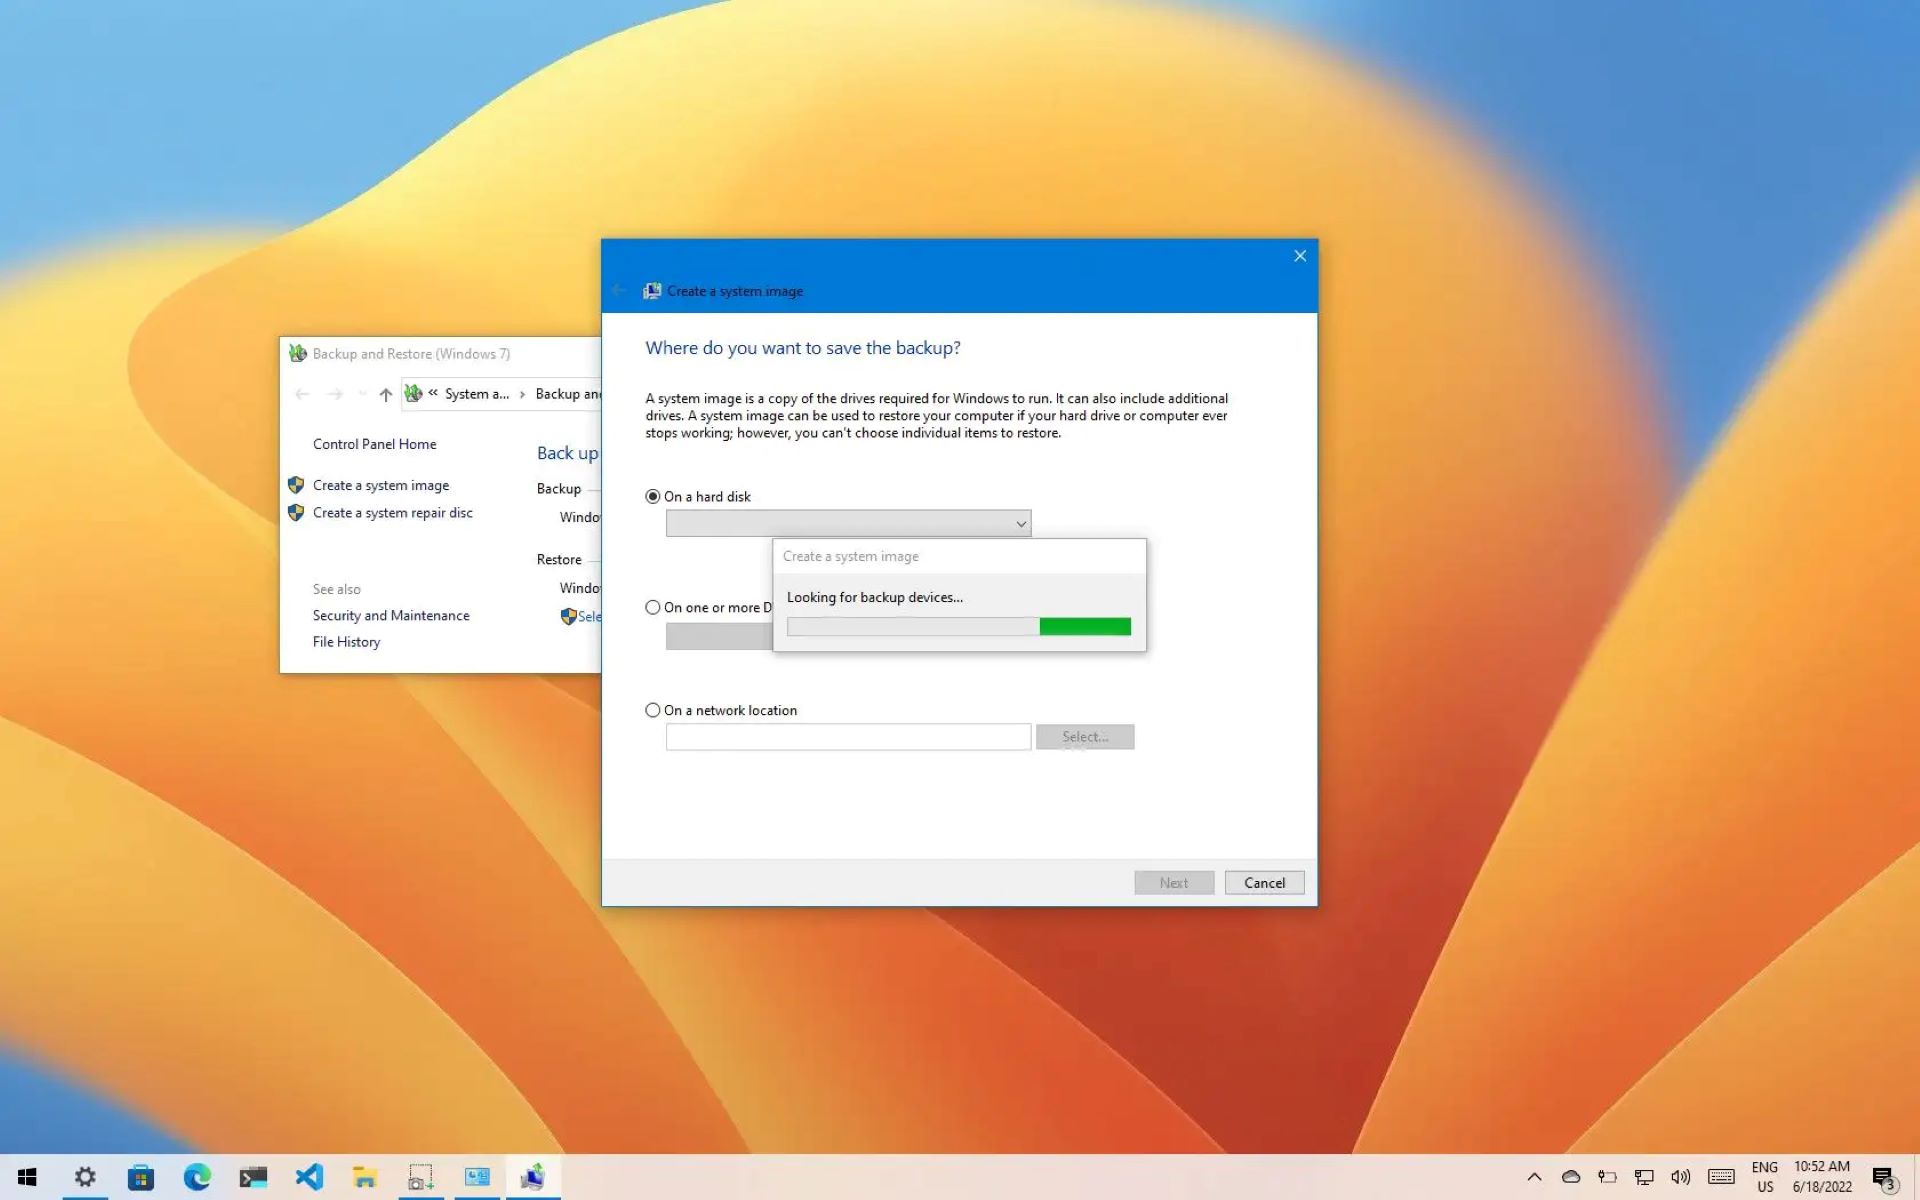
- Windows Backup and Restore: Windows 10 has a built-in backup feature called Backup and Restore. You can access this by going to the Control Panel, selecting “Backup and Restore (Windows 7)”, and following the prompts to create a backup of your files.
When choosing a method to back up your files, consider factors such as storage capacity, ease of access, and the importance of the files. It’s recommended to have multiple backup methods in place to ensure redundancy and protect your data from any unforeseen circumstances.
Remember, backing up your files regularly is a best practice that everyone should follow, regardless of the current state of your computer. It provides peace of mind and reduces the risk of losing important documents, photos, videos, and other files.
Now that you have safeguarded your important files, you can proceed with confidence to the next steps of troubleshooting and repairing your Windows 10 system.
Part 2: Basic Troubleshooting Steps
When you encounter issues with your Windows 10 computer, it’s a good idea to start with basic troubleshooting steps to identify and resolve the problem. These steps can help in resolving common software-related issues without the need for more advanced repairs.
Here are some basic troubleshooting steps you can follow:
- Restart Your Computer: This simple step can sometimes fix minor issues by clearing temporary files and resetting system processes.
- Check for Windows Updates: Ensure that your system is up to date by checking for and installing any available Windows updates. Updates often include bug fixes and security patches that can resolve issues.
- Scan for Malware: Run a full scan using a reputable antivirus or anti-malware program to check for any malicious software that may be causing problems.
- Disconnect External Devices: Disconnect any unnecessary external devices like printers, cameras, or USB drives and check if the issue persists. Faulty or incompatible devices can sometimes cause conflicts.
- Check Device Drivers: Ensure that all your device drivers are up to date. You can use the Device Manager in Windows to check for driver updates or download them from the manufacturer’s website.
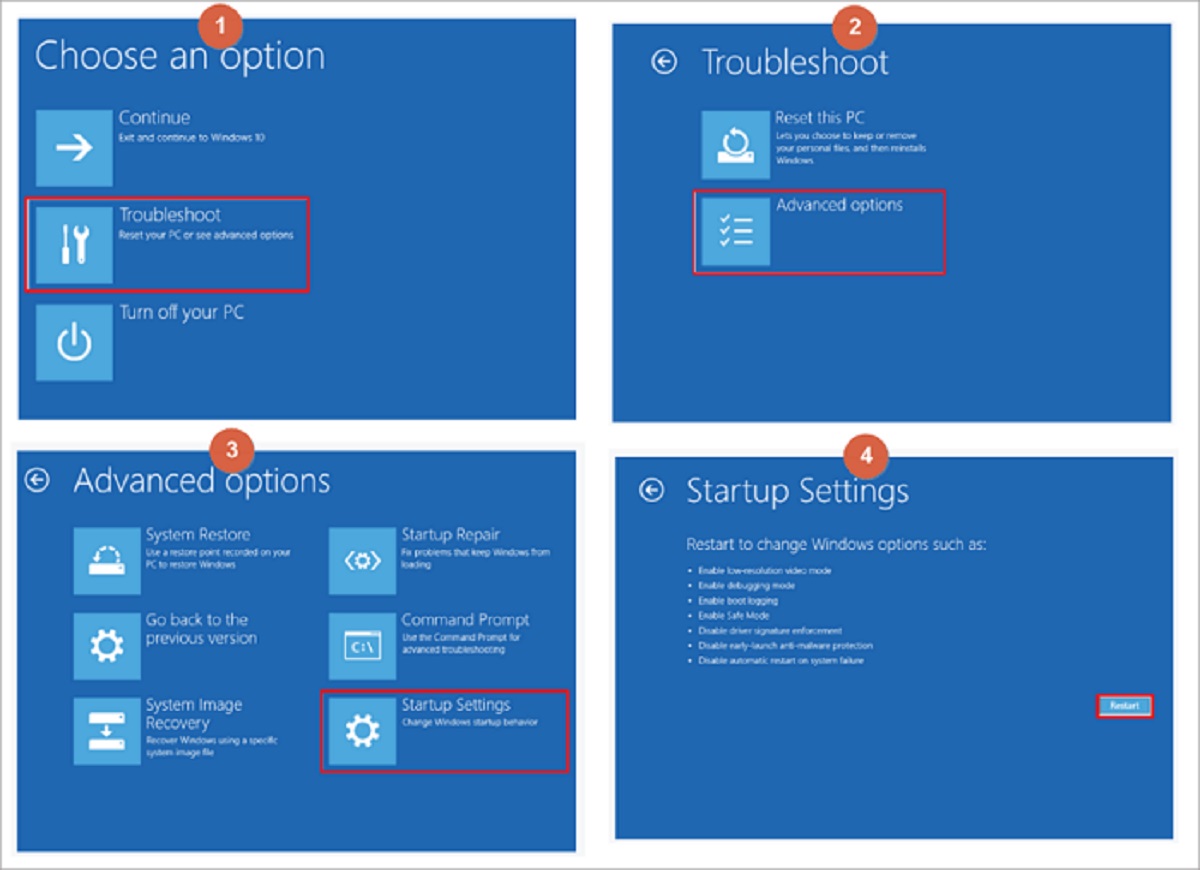
- Use Safe Mode: Boot your computer into Safe Mode to diagnose and troubleshoot issues. Safe Mode loads only the essential drivers and services, helping you identify if a third-party application is causing the problem.
- Perform a System File Check: Use the built-in System File Checker tool (SFC) to scan for and repair any corrupted or missing system files. Open Command Prompt as an administrator and type “sfc /scannow” to start the scanning process.
These basic troubleshooting steps can often resolve common issues faced by Windows 10 users. If your problem persists after trying these steps, you may need to explore more advanced repair methods.
Remember to document any changes or steps you take during the troubleshooting process. This information can be helpful if you need to seek further assistance or revert any modifications made.
Now that we’ve covered the basic troubleshooting steps, let’s move on to more advanced methods of repairing Windows 10.
Part 3: Using System Restore
System Restore is a built-in feature in Windows 10 that allows you to revert your computer’s state to a previous point in time. It can be a useful tool for fixing system issues caused by recent changes, such as software installations or updates.
Here’s how you can use System Restore to repair your Windows 10 system:
- Access System Restore: Open the Start menu and search for “System Restore.” Click on “Create a restore point” from the search results to open the System Properties window.
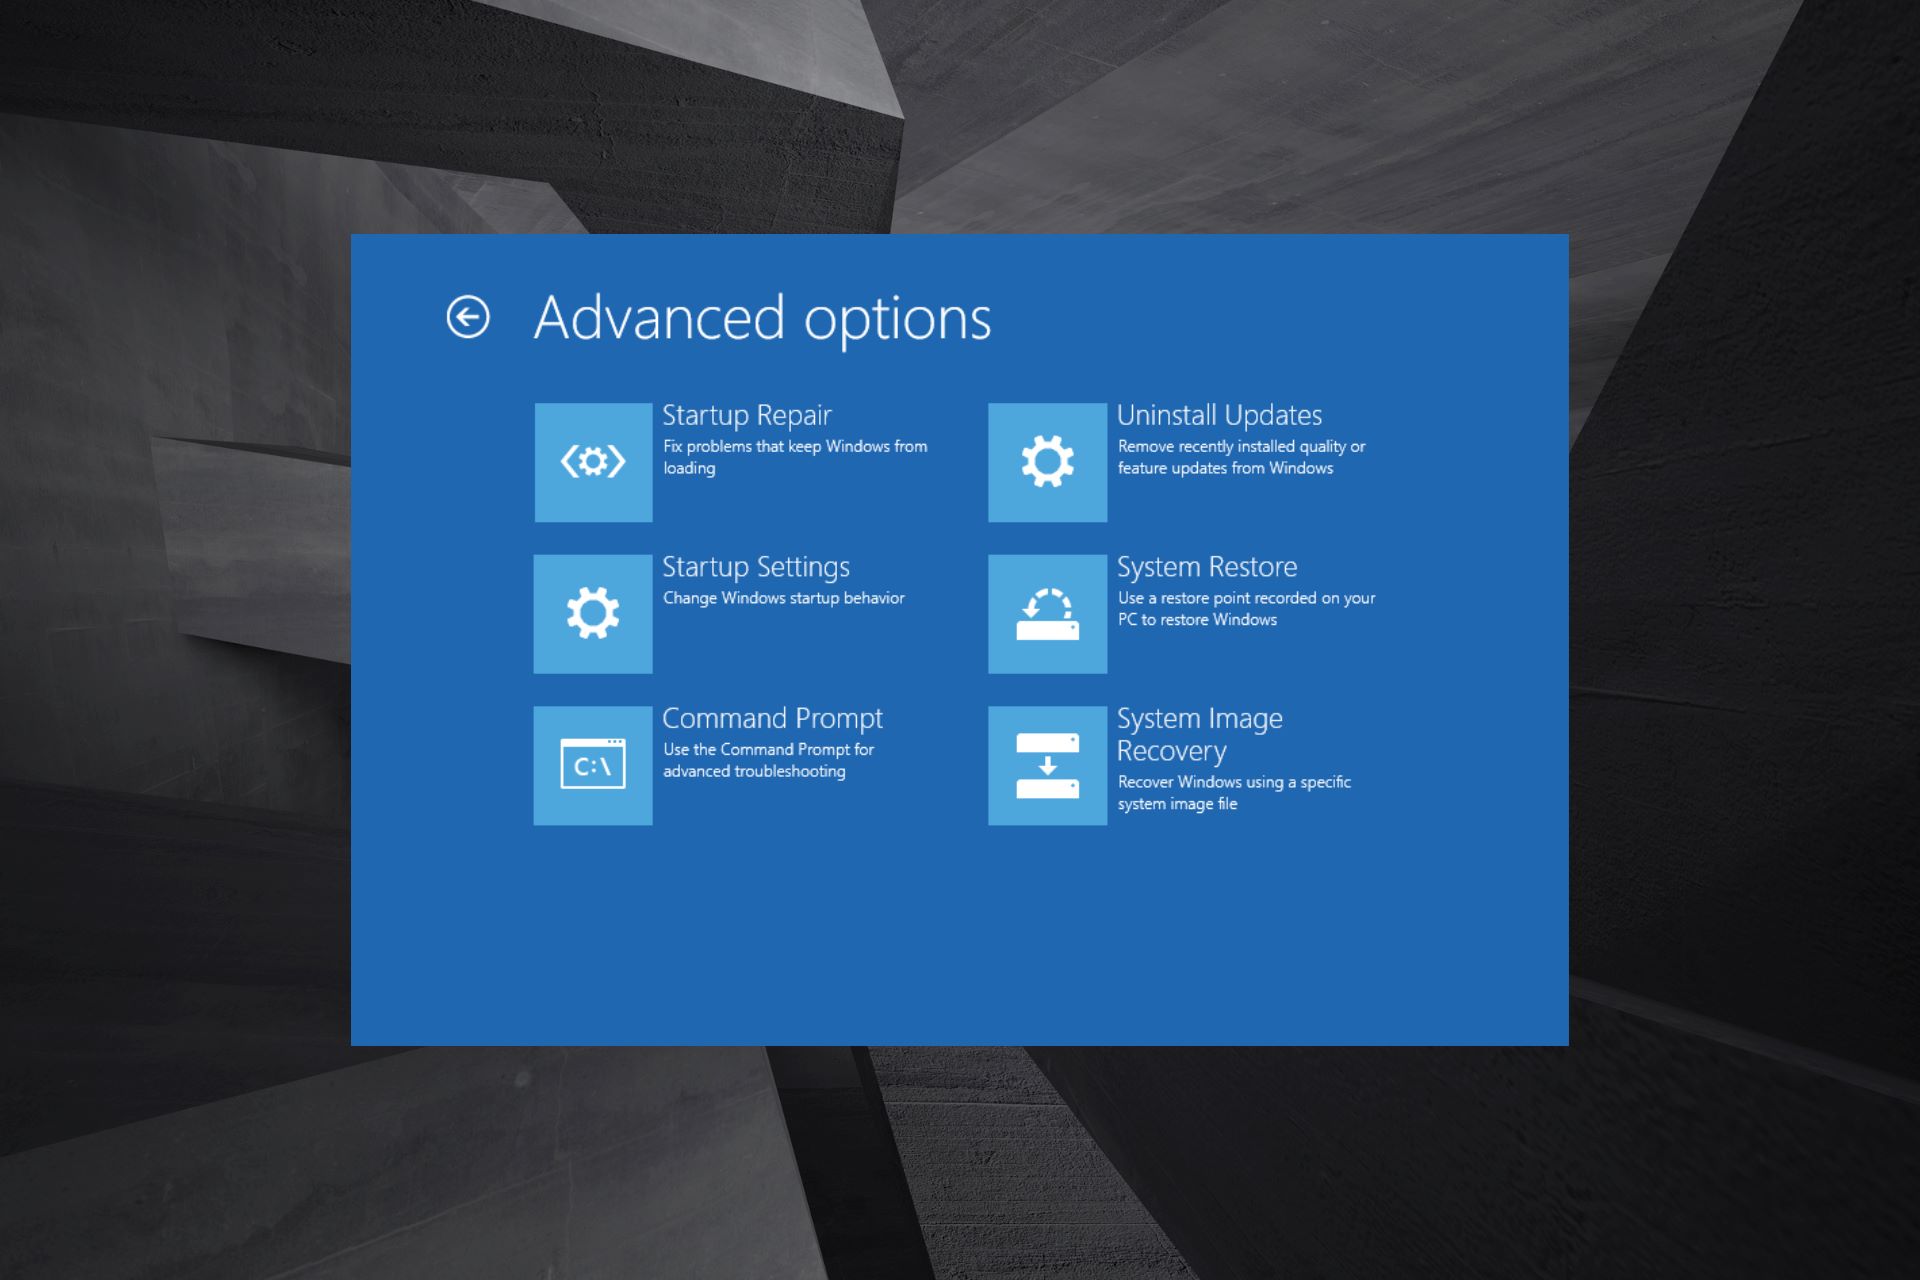
- Choose a Restore Point: In the System Properties window, click on the “System Restore” button. This will launch the System Restore wizard.
- Select a Restore Point: In the System Restore wizard, you’ll see a list of available restore points. Choose a restore point that predates the onset of the problem you’re experiencing.
- Start the Restoration Process: Click “Next” and then “Finish” to start the restoration process. Your computer will restart, and the rollback to the selected restore point will begin.
- Wait for the Process to Complete: The restoration process may take a while to complete. It’s important not to interrupt the process or turn off your computer during this time.
- Review the Results: Once the restoration process is complete, your computer will restart. You’ll see a message indicating whether the system restore was successful or not.
It’s important to note that System Restore will not affect your personal files, but it may remove recently installed software or updates. Therefore, it’s advisable to reinstall any software or updates that were removed after the system restore.
If System Restore does not resolve the issue, you can undo the restoration and try a different restore point or explore other repair methods.
System Restore can be a valuable tool in repairing Windows 10 system issues. However, it relies on the presence of previously created restore points, so it’s recommended to regularly create restore points or enable automatic restore point creation for enhanced system protection.
Now that you understand how to use System Restore, let’s explore other techniques for repairing Windows 10 in the upcoming sections.
Part 4: Repairing Corrupted System Files
Corrupted system files can cause various issues on your Windows 10 computer, including crashes, performance problems, and error messages. In this section, we will discuss how to repair these files using built-in Windows tools.
Here are two methods you can use to repair corrupted system files:
- Using the System File Checker (SFC) Tool:
The System File Checker (SFC) tool is a command-line utility that scans for and repairs corrupted system files in Windows.
- Open the Command Prompt as an administrator by right-clicking on the Start menu and selecting “Command Prompt (Admin)”.
- Type the following command and press Enter:
sfc /scannow - Wait for the scan to complete. The tool will automatically repair any corrupted files it finds.
- Once the scan is finished, restart your computer and check if the issue has been resolved.
- Using the Deployment Image Servicing and Management (DISM) tool:
The DISM tool is another command-line utility that can repair corrupted system files in Windows 10.
- Open the Command Prompt as an administrator.
- Type the following command and press Enter:
dism /online /cleanup-image /restorehealth - Wait for the scan to complete. The tool will download and replace any corrupted files from Windows Update.
- Once the scan is finished, restart your computer and check if the issue has been resolved.
Both the SFC and DISM tools can take some time to complete, and it’s important not to interrupt the process while it’s running.
Repairing corrupted system files can help resolve many issues on your Windows 10 computer. However, in some cases, the damage to the system files may be severe, requiring more advanced repair methods such as reinstalling Windows.
Now that you know how to repair corrupted system files, we’ll move on to exploring another method for repairing Windows 10 in the upcoming section.
Part 5: Using the Windows 10 Repair Tool
Windows 10 provides a built-in repair tool known as the Windows 10 Repair Tool, which can help diagnose and fix common issues with the operating system. This tool is designed to automatically identify and resolve problems that may be affecting your computer’s performance and stability.
Here’s how you can use the Windows 10 Repair Tool:
- Open the Settings app: Click on the Start menu, then the gear icon to open the Settings app.
- Select the “Update & Security” option: In the Settings app, click on “Update & Security” to access the Windows Update settings.
- Navigate to the “Troubleshoot” section: In the left sidebar, click on “Troubleshoot” to access the troubleshooting menu.
- Select the appropriate troubleshooter: Browse through the available troubleshooters or use the search bar to find a specific one related to the issue you’re experiencing. For example, if you’re facing network connectivity problems, select the “Network Adapter” troubleshooter.
- Follow the on-screen instructions: Once you’ve selected a troubleshooter, click on it and follow the prompts to diagnose and repair the problem.
- Restart your computer: After the repair has been completed, restart your computer to apply the changes.
The Windows 10 Repair Tool covers a wide range of issues, including network problems, audio and video playback issues, printer connectivity problems, and more. It’s a convenient and user-friendly tool that can help resolve common problems without the need for manual troubleshooting.
If the Windows 10 Repair Tool doesn’t fix the issue, you may need to explore more advanced repair methods or seek assistance from Microsoft support or other technical resources.
Now that you know how to use the Windows 10 Repair Tool, we’ll move on to discussing another method for repairing Windows 10 in the upcoming section.
Part 6: Resetting Windows 10
If you’re experiencing persistent issues with your Windows 10 computer that cannot be resolved through other methods, resetting Windows 10 can be a viable solution. Resetting your system reinstalls Windows but keeps your personal files and some settings intact.
Here’s how you can reset Windows 10:
- Open the Settings app: Click on the Start menu, then the gear icon to open the Settings app.
- Select the “Update & Security” option: In the Settings app, click on “Update & Security” to access the Windows Update settings.
- Navigate to the “Recovery” section: In the left sidebar, click on “Recovery” to access the recovery options.
- Choose the “Reset this PC” option: Under the “Reset this PC” section, click on “Get started” to initiate the reset process.
- Select the desired reset option: You’ll have the choice to either keep your files or remove everything. Choose the option that suits your needs.
- Follow the on-screen instructions: The system will guide you through the reset process, which may take some time to complete.
It’s important to note that resetting Windows 10 will remove all installed applications, so ensure that you have a backup of any important files or programs before proceeding.
After the reset process is complete, your computer will have a fresh installation of Windows 10. You can then reinstall necessary applications and restore your personal files.
Resetting Windows 10 is a drastic step and should be considered as a last resort when all other repair methods have been unsuccessful. It can help resolve complex issues that may have been caused by system corruption or persistent software conflicts.
Now that you understand how to reset Windows 10, we’ll move on to discussing the final method for repairing Windows 10 in the upcoming section.
Part 7: Performing a Clean Install of Windows 10
If you’ve exhausted all other repair methods and are still encountering severe issues with your Windows 10 computer, performing a clean install may be necessary. This process involves completely wiping your system and installing a fresh copy of Windows 10.
Here’s how you can perform a clean install of Windows 10:
- Create a Windows 10 installation media: Download the Windows 10 installation media from the official Microsoft website and create a bootable USB drive or DVD.
- Backup your files: Before proceeding with a clean install, ensure that you have backed up all your important files, as the process will erase everything on your computer.
- Boot from the installation media: Insert the bootable USB drive or DVD into your computer and restart it. Enter the computer’s BIOS or boot menu to set the boot priority to the installation media.
- Follow the installation prompts: The Windows 10 setup will guide you through the installation process. Choose the appropriate options such as language, edition, and installation location.
- Format the hard drive and install Windows 10: During the installation, you will have the option to format the hard drive. Choose the appropriate drive and format it to remove all existing data. Proceed with the installation.
- Enter product key and complete the setup: If prompted, enter your Windows 10 product key to activate your copy of Windows 10. Follow the remaining setup instructions to configure your system.
A clean install of Windows 10 provides a fresh start and ensures that any software-related issues or system corruptions are completely wiped out. It can be a time-consuming process, but it can often result in improved system performance and stability.
Remember to reinstall all necessary software applications and restore your backed-up files after the clean installation is complete.
Performing a clean install of Windows 10 should be done with caution, as it requires the removal of all data on your computer. Make sure you have a backup of all important files and that you have all the necessary installation media and product keys before proceeding.
Now that you’re familiar with performing a clean install of Windows 10, let’s summarize the repair methods discussed in this guide.
Conclusion
Repairing Windows 10 can be a daunting task, but with the methods discussed in this guide, you have various techniques at your disposal to address common issues and restore your system’s performance and stability.
Throughout this guide, we covered several repair methods:
- Backing up your files to prevent data loss
- Basic troubleshooting steps to identify and resolve common issues
- Using System Restore to revert your computer’s state to a previous point
- Repairing corrupted system files using the System File Checker (SFC) and Deployment Image Servicing and Management (DISM) tools
- Utilizing the Windows 10 Repair Tool to automatically diagnose and fix issues
- Performing a reset of Windows 10 to restore your system to its factory settings
- Performing a clean install of Windows 10 to start fresh
Remember, before attempting any repairs or modifications to your system, it’s crucial to back up your important files to avoid potential data loss.
Each repair method is suited for different scenarios, and it’s important to assess the severity of your issue and choose the appropriate method accordingly. In some cases, you may need to proceed from basic troubleshooting steps to more advanced repair methods.
If you’re unsure of how to proceed or encounter any challenges during the repair process, don’t hesitate to seek assistance from Microsoft support or other reliable technical resources.
By following the steps outlined in this guide and using the appropriate repair methods, you can effectively address common problems and ensure that your Windows 10 system runs smoothly and efficiently.
With your newfound knowledge of Windows 10 repairs, you can tackle issues head-on and optimize the performance of your computer.