Introduction
Welcome to the world of PC troubleshooting! If you’ve ever encountered issues with your computer, you may have come across the term “Safe Mode.” Safe Mode is a powerful feature that allows you to start your PC with only the essential drivers and services, which can be incredibly helpful when troubleshooting various problems.
Picture this: you’re working on an important project or playing your favorite game when suddenly your PC starts acting up. Maybe it’s freezing, crashing, or showing unusual error messages. In these situations, starting your computer in Safe Mode can be a lifesaver.
Safe Mode is designed to help diagnose and fix issues by running your PC with minimal resources. It disables unnecessary startup programs and drivers that could be causing conflicts. This allows you to isolate the problem and perform troubleshooting steps without any interference.
Whether you’re a seasoned computer user or a beginner, knowing how to put your PC in Safe Mode is an essential skill. In this guide, we will walk you through the step-by-step process of getting into Safe Mode on different versions of Windows.
So, if you’re ready to become a pro at troubleshooting your PC, let’s dive into the various methods of accessing Safe Mode on Windows 10, 8/8.1, 7, Vista, and even the old faithful Windows XP. By the end of this guide, you’ll have the confidence to tackle any computer issue like a true tech guru!
What is Safe Mode?
Safe Mode is a diagnostic mode in Windows that allows you to start your computer with only the most essential drivers and services. It is a troubleshooting feature designed to help you identify and fix various issues that may be preventing your computer from functioning properly. When you start your PC in Safe Mode, only the basic functions necessary to run the operating system are loaded, which can help you pinpoint and resolve conflicts or software-related problems.
By booting into Safe Mode, you can disable unnecessary startup programs, problematic drivers, or malware that may be causing system instability or other issues. With these potential culprits out of the picture, you can perform a range of troubleshooting tasks, such as repairing corrupted system files, uninstalling problematic software, or updating device drivers.
Safe Mode is especially useful when your computer is experiencing difficulties during the normal boot process. It provides a clean environment where you can identify the root cause of the problem without any external interference. It is important to note that Safe Mode does not fix issues automatically but rather serves as a platform for you to perform diagnostic steps and potential fixes.
In Safe Mode, your desktop may appear different from the regular Windows environment. The screen resolution might be lower, and some advanced graphics features may be disabled. This is because only basic drivers and services are loaded to ensure a stable environment for troubleshooting.
Using Safe Mode is not limited to troubleshooting—it can also be helpful in situations where you need to uninstall a program that refuses to uninstall in normal mode, or when you want to remove a stubborn virus or malware. Safe Mode provides a way to access your computer’s critical functions while minimizing the risk of interference from problematic programs or malicious software.
Now that we’ve covered the concept of Safe Mode, let’s explore the different methods of getting into Safe Mode on various versions of Windows and learn how to troubleshoot common issues effectively.
Why would you need to start your PC in Safe Mode?
There are several scenarios where starting your PC in Safe Mode can prove to be incredibly useful. Here are some common situations where Safe Mode can come to the rescue:
1. Troubleshooting System Issues: If your computer is experiencing frequent crashes, freezes, or blue screen errors, starting in Safe Mode can help you identify if the problem is caused by a faulty driver, conflicting software, or corrupted system files. By eliminating unnecessary programs and drivers, you can isolate the issue and perform the necessary troubleshooting steps.
2. Removing Malware or Viruses: Malicious software can be a major headache, often preventing you from removing it while in normal mode. In Safe Mode, however, you can bypass many of these obstructions, making it easier to scan, detect, and remove viruses or malware that may be causing havoc on your system.
3. Uninstalling Stubborn Programs: There might be instances where a program refuses to uninstall in normal mode due to conflicts or issues. Starting your PC in Safe Mode allows you to remove such programs without any interference, as Safe Mode ensures that only essential drivers and services are running.
4. Resolving Driver Conflicts: If you’re experiencing issues with certain hardware devices, such as sound or graphics cards, starting in Safe Mode can help determine if the problem is related to a driver conflict. By disabling unnecessary drivers and using the basic functionality of the system, you can troubleshoot and update drivers as needed.
5. System Restore or System File Repair: When your operating system is not functioning correctly or certain system files have become corrupted, starting in Safe Mode allows you to perform a system restore or utilize specialized tools to repair damaged files. This can help you restore your PC to a previous working state or fix critical system file errors.
6. Testing Software Installations: If you’re encountering issues after installing new software or updates, starting in Safe Mode can help verify if the problem is caused by the recent installation. By booting into Safe Mode, you can check if the issue persists without the interference of other software or conflicting drivers.
These are just a few examples of why you might need to start your PC in Safe Mode. It serves as a valuable tool for troubleshooting various system issues, removing stubborn software, and resolving conflicts. Now that you understand the importance of Safe Mode, let’s explore how to access it on different versions of Windows.
How to get into Safe Mode in Windows 10
Getting into Safe Mode in Windows 10 has become much easier compared to previous versions. Here are a few methods to access Safe Mode on Windows 10:
Method 1: Using the Settings Menu:
- Click on the Start button and select the Settings cog icon to open the Settings menu.
- Click on “Update & Security.”
- In the left-hand menu, click on “Recovery.”
- Under “Advanced startup,” click on “Restart now.”
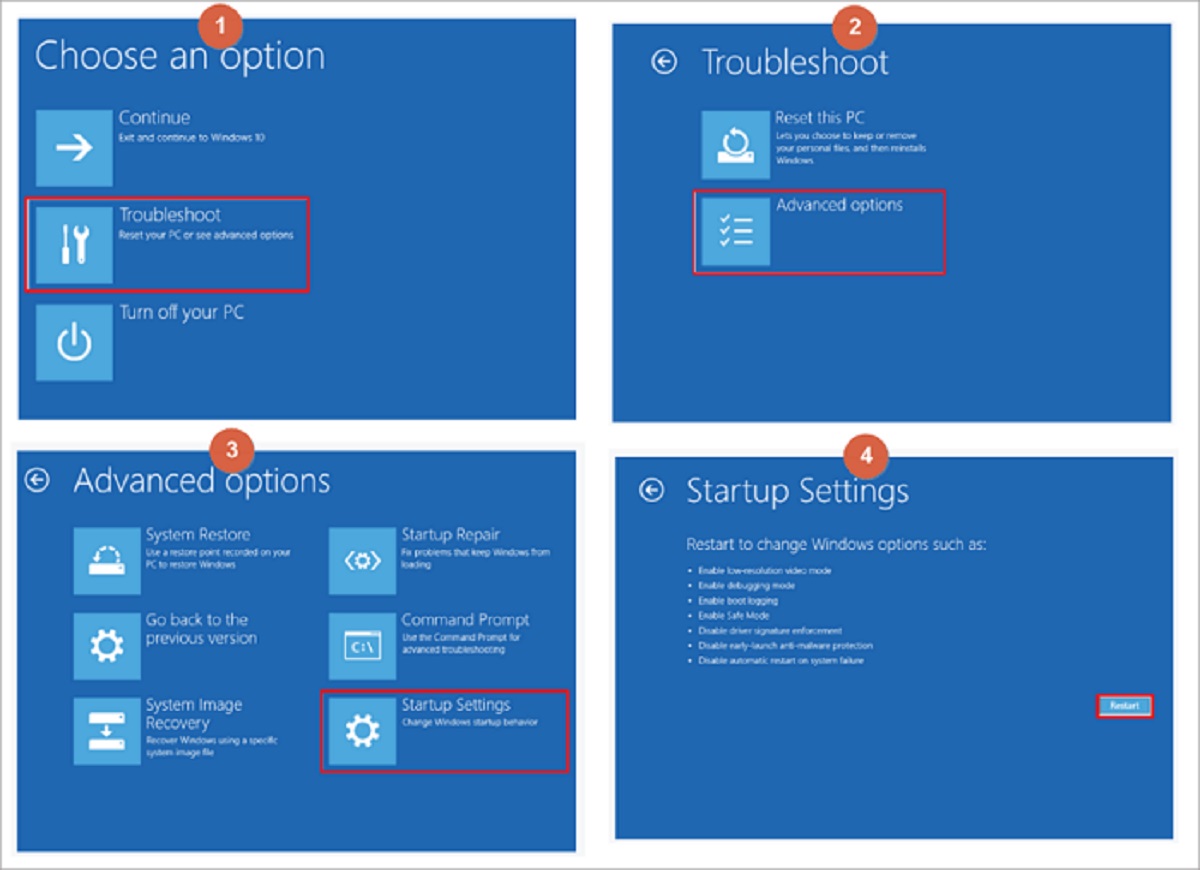
- Your computer will restart, and you’ll see a blue “Choose an option” screen.
- Click on “Troubleshoot,” then “Advanced options,” and finally “Startup Settings.”
- Click “Restart” to enter the Startup Settings menu.
- Once the Startup Settings menu appears, press the number key associated with “Enable Safe Mode” or “Safe Mode with Networking.”
- Your computer will now boot into Safe Mode.
Method 2: Using the Shift + Restart Method:
- Click on the Start button, then hold down the Shift key as you click on “Restart.”
- Your computer will restart, and you’ll see the blue “Choose an option” screen.
- Follow steps 6-9 from Method 1 to access the Startup Settings menu and enter Safe Mode.
Once you’re in Safe Mode, you can troubleshoot various issues, uninstall problematic software, update drivers, or perform system repairs. When you’re done, simply restart your computer in normal mode to exit Safe Mode.
It’s worth noting that the method of accessing Safe Mode may vary depending on the make and model of your computer. If the above methods don’t work for you, try searching for specific instructions related to your device or consult the manufacturer’s support documentation.
Now that you know how to access Safe Mode in Windows 10, let’s move on to exploring how to enter Safe Mode in other versions of Windows, such as Windows 8/8.1, Windows 7, Windows Vista, and even the older Windows XP.
How to get into Safe Mode in Windows 8/8.1
Accessing Safe Mode in Windows 8 and 8.1 can be done using several methods. Here are a few ways to enter Safe Mode in these versions:
Method 1: Using the Shift + Restart Method:
- While on the Windows Start screen, hold down the Shift key on your keyboard.
- Click on the Power button, then select “Restart.”
- Your computer will restart, and you’ll see the blue “Choose an option” screen.
- Click on “Troubleshoot,” then “Advanced options,” and finally “Startup Settings.”
- Click “Restart” to enter the Startup Settings menu.
- Once the Startup Settings menu appears, press the number key associated with “Enable Safe Mode” or “Safe Mode with Networking.”
- Your computer will now boot into Safe Mode.
Method 2: Using the System Configuration Tool (msconfig):
- Press the Windows key + R to open the Run dialog box.
- Type “msconfig” (without quotes) and press Enter.
- In the System Configuration window, click on the “Boot” tab.
- Under the “Boot options” section, check the box next to “Safe boot.”
- Choose either “Minimal” or “Network” for Safe Mode or Safe Mode with Networking respectively.
- Click on “Apply” and then “OK.”
- You will be prompted to restart your computer. Choose “Restart” to enter Safe Mode.
Note: To exit Safe Mode, follow the same steps and uncheck the “Safe boot” option in the System Configuration window. Click “Apply” and then “OK,” and restart your computer in normal mode.
If these methods don’t work for your specific device, you may need to consult your computer’s manufacturer or search for instructions tailored to your model.
Now that you know how to access Safe Mode in Windows 8/8.1, let’s proceed to the next section to learn how to enter Safe Mode in Windows 7.
How to get into Safe Mode in Windows 7
To access Safe Mode in Windows 7, you have a few different options. Here are a couple of methods you can use to enter Safe Mode:
Method 1: Using the F8 Key:
- Restart your computer or turn it on if it’s currently off.
- Before the Windows logo appears, press the F8 key repeatedly on your keyboard.
- You’ll see the Advanced Boot Options menu. Use the arrow keys to highlight “Safe Mode” or “Safe Mode with Networking,” then press Enter.
- Your computer will now boot into Safe Mode.
Method 2: Using the System Configuration Tool (msconfig):
- Press the Windows key + R to open the Run dialog box.
- Type “msconfig” (without quotes) and press Enter.
- In the System Configuration window, click on the “Boot” tab.
- Under the “Boot options” section, check the box next to “Safe boot.”
- Choose either “Minimal” or “Network” for Safe Mode or Safe Mode with Networking respectively.
- Click on “Apply” and then “OK.”
- You will be prompted to restart your computer. Choose “Restart” to enter Safe Mode.
When you’re in Safe Mode, you can troubleshoot issues, remove unwanted programs, scan for malware, or perform system repairs. Remember to restart your computer in normal mode when you’re done.
If you’re having trouble getting into Safe Mode using the F8 key method, you can also try using the System Configuration Tool described above or consult the manufacturer’s documentation for specific instructions.
Now that you know how to access Safe Mode in Windows 7, let’s move on to the next section where we’ll explore how to enter Safe Mode in Windows Vista.
How to get into Safe Mode in Windows Vista
Accessing Safe Mode in Windows Vista can be done using different methods. Here are a couple of ways to enter Safe Mode on a Windows Vista machine:
Method 1: Using the F8 Key:
- Restart your computer or turn it on if it’s off.
- Before the Windows logo appears, press the F8 key repeatedly on your keyboard.
- You’ll see the Advanced Boot Options menu. Use the arrow keys to highlight “Safe Mode” or “Safe Mode with Networking,” and then press Enter.
- Your computer will now start in Safe Mode.
Method 2: Using the System Configuration Tool (msconfig):
- Press the Windows key + R to open the Run dialog box.
- Type “msconfig” (without quotes) and press Enter.
- In the System Configuration window, click on the “Boot” tab.
- Under “Boot options,” check the box next to “Safe boot.”
- Choose either “Minimal” or “Network” for Safe Mode or Safe Mode with Networking respectively.
- Click on “Apply” and then “OK.”
- Restart your computer to enter Safe Mode.
Once you are in Safe Mode, you can perform a variety of troubleshooting tasks, such as uninstalling problematic software, running system scans for malware, or resolving driver conflicts. When you finish troubleshooting, you can restart your computer in normal mode.
If the F8 key method doesn’t work for accessing Safe Mode in Windows Vista, you can use the System Configuration Tool as an alternative, or check with your computer’s manufacturer for any specific instructions related to your device.
Now that you know how to access Safe Mode in Windows Vista, let’s move on to the next section where we’ll explore how to enter Safe Mode in Windows XP.
How to get into Safe Mode in Windows XP
Accessing Safe Mode in Windows XP can be done using a few different methods. Here are a couple of ways to enter Safe Mode on a Windows XP computer:
Method 1: Using the F8 Key:
- Restart your computer or turn it on if it’s off.
- Before the Windows logo appears, press the F8 key repeatedly on your keyboard.
- You’ll see the Windows Advanced Options Menu. Use the arrow keys to highlight “Safe Mode,” and then press Enter.
- Your computer will now start in Safe Mode.
Method 2: Using the System Configuration Utility (msconfig):
- Press the Windows key + R to open the Run dialog box.
- Type “msconfig” (without quotes) and press Enter.
- In the System Configuration Utility window, click on the “BOOT.INI” tab.
- Under “Boot options,” check the box next to “/SAFEBOOT.”
- If you want to enable networking in Safe Mode, select the “Network” option in the dropdown menu.
- Click on “Apply” and then “OK.”
- You’ll be prompted to restart your computer. Choose “Restart” to enter Safe Mode.
Once you’re in Safe Mode, you can troubleshoot various issues, uninstall problematic software, scan for malware, or perform system repairs. Remember to restart your computer in normal mode when you’re done.
If you encounter any difficulties using the F8 key method, you can try the System Configuration Utility as an alternative. Additionally, consulting your computer’s manufacturer or searching for specific instructions related to your device may offer more guidance.
Now that you know how to access Safe Mode in Windows XP, you have a valuable tool to troubleshoot and resolve issues on your computer.
Troubleshooting Common Issues in Safe Mode
Safe Mode is a powerful tool that allows you to diagnose and resolve various issues on your computer. Here are some common problems you can troubleshoot while in Safe Mode:
1. Software or Driver Conflicts: If your computer is experiencing crashes, freezes, or unusual behavior, Safe Mode can help you identify conflicts between software programs or drivers. By disabling unnecessary programs and drivers, you can determine if a specific application or device driver is causing the issue.
2. Malware and Viruses: If you suspect your computer is infected with malware or viruses, starting in Safe Mode can provide a cleaner environment to scan and remove malicious software. In Safe Mode, some persistent malware can be easier to detect and remove as certain start-up programs and processes are disabled.
3. Uninstalling Problematic Software: If you’re unable to uninstall a program in normal mode due to conflicts or errors, Safe Mode can help. By starting your computer in Safe Mode, you can bypass any interference and uninstall problematic software that may be causing issues.
4. Repairing System Files: Safe Mode allows you to access critical system files and perform repairs if they have become corrupted. You can use built-in Windows tools or third-party applications to scan for and fix corrupted files, helping to restore the stability and functionality of your computer.
5. Hardware Troubleshooting: Safe Mode can be useful for diagnosing hardware-related problems. By starting your computer with only the essential drivers and services, you can determine if the issue is caused by faulty hardware. This can include issues with graphics cards, sound devices, or other peripherals.
6. System Restore: If you’re encountering persistent issues with your computer, Safe Mode allows you to perform a System Restore. This feature allows you to roll back your system to a previously saved restore point, effectively undoing recent changes that may have caused problems.
Remember, Safe Mode is a diagnostic tool, and not all features and functionalities will be available. It’s essential to understand that Safe Mode itself does not fix issues automatically, but provides an environment where you can perform troubleshooting steps effectively.
Now that you have an understanding of the common issues you can troubleshoot in Safe Mode, you’ll be better equipped to tackle and resolve problems on your computer when they arise.
Conclusion
Safe Mode is a critical feature in Windows that can help you troubleshoot and resolve a variety of issues on your PC. Whether you’re experiencing crashes, conflicts between software programs, or the presence of malicious software, Safe Mode provides a controlled environment where you can diagnose and fix problems with ease.
In this guide, we explored how to access Safe Mode in different versions of Windows, including Windows 10, 8/8.1, 7, Vista, and XP. We discussed various methods, such as using the F8 key, the Shift + Restart method, and the System Configuration Tool (msconfig). Each version of Windows may have specific nuances, but knowing how to access Safe Mode in your particular operating system is a valuable skill.
Once in Safe Mode, you can troubleshoot common problems like software conflicts, malware infections, driver issues, and even repair system files. Safe Mode allows you to perform tasks with minimal interference from unnecessary processes and programs, providing a clean environment for troubleshooting and problem-solving.
Remember that while Safe Mode can be an effective tool for diagnosing issues, it does not automatically fix problems. It serves as a platform for you to identify, isolate, and resolve the root cause of the issue.
Now that you’re equipped with the knowledge of how to access Safe Mode and troubleshoot common problems, you can confidently handle various issues that may arise on your Windows computer. Don’t be afraid to delve into Safe Mode when needed and use it as a valuable resource to keep your PC running smoothly.