Introduction
Welcome to the world of Windows 10, where troubleshooting and problem-solving become an essential part of everyday computer usage. While the operating system is designed to be user-friendly, there are instances where you may encounter issues that require additional troubleshooting measures. This is where Safe Mode comes into play.
Safe Mode in Windows 10 is a diagnostic mode that allows you to start your computer with a minimal set of drivers and services. It provides a clean environment, free from any unnecessary programs or applications, making it easier to diagnose and fix problems that might be causing issues with the normal operation of your computer.
In Safe Mode, only the essential drivers and services required for the operating system to function are loaded. This means that any third-party software or drivers that might be causing conflicts can be isolated and identified. This makes Safe Mode an invaluable tool for troubleshooting and resolving a wide range of issues, such as malware infections, driver conflicts, system crashes, and more.
In this article, we will guide you through the various methods of accessing Safe Mode in Windows 10. Whether you prefer using the Settings menu, the sign-in screen, or a bootable USB drive, we’ve got you covered. We will also provide some tips on what to do if you are unable to access Safe Mode for any reason.
So, let’s dive into the world of Safe Mode in Windows 10 and learn how to utilize this powerful troubleshooting tool to resolve any issues that may come your way.
What is Safe Mode in Windows 10?
Safe Mode in Windows 10 is a diagnostic mode that allows users to start their computer with a minimal set of drivers and services. It is designed to help troubleshoot and resolve issues that may be causing problems with the normal operation of the computer.
In Safe Mode, only the essential drivers and services required for the operating system to function are loaded. This means that any third-party software or drivers that might be causing conflicts can be isolated and identified. It also prevents unnecessary applications and programs from running, which can sometimes interfere with the troubleshooting process.
Safe Mode is particularly useful when encountering issues such as malware infections, driver conflicts, system crashes, and software compatibility problems. By starting your computer in Safe Mode, you can eliminate these potential causes and focus on resolving the underlying issue.
When in Safe Mode, the desktop may appear different from the normal Windows 10 interface. You might notice that the screen resolution is lower, and certain visual effects, such as transparency and animation, may be disabled. However, these changes are temporary and will revert to normal once you exit Safe Mode and restart your computer.
Note: It’s important to keep in mind that Safe Mode is primarily a troubleshooting tool and not intended for everyday use. Certain features and functionalities, such as networking capabilities and specific drivers, may be limited or disabled in this mode.
Now that you understand what Safe Mode is and its purpose, let’s explore different methods to access Safe Mode in Windows 10. Whether you’re a novice user or have some technical expertise, there’s a Safe Mode option that suits your needs.
Why would you need to go to Safe Mode?
Safe Mode in Windows 10 is an invaluable tool for troubleshooting and resolving various issues that users may encounter with their computers. Here are some common scenarios where you might need to access Safe Mode:
- Malware Infections: If your computer is infected with malware or viruses, starting in Safe Mode can help you isolate and remove the malicious software. Since Safe Mode only loads essential drivers and services, it minimizes the chances of malware being actively running.
- Driver Conflicts: Sometimes, incompatible or corrupt drivers can cause system instability or crashes. By entering Safe Mode, you can disable problematic drivers, allowing you to troubleshoot and identify the culprit.
- Software Compatibility Issues: Certain applications or programs may not work correctly on your system due to incompatibilities. Booting into Safe Mode can help you determine if the issue is related to third-party software, allowing you to troubleshoot and find a workaround.
- System Stability Problems: If your computer frequently crashes or freezes, Safe Mode can help identify if the issue is caused by third-party software or drivers. By starting in Safe Mode, you can eliminate unnecessary programs from running, helping to pinpoint the underlying problem.
- Troubleshooting Updates: Occasionally, Windows updates can cause problems on your system, such as installation failures or compatibility issues. By booting into Safe Mode, you can uninstall problematic updates and prevent them from interfering with your normal system operation.
These are just a few examples of why you might need to access Safe Mode in Windows 10. It provides a secure and controlled environment for troubleshooting and resolving issues, ensuring that you can diagnose and fix any problems with your computer effectively.
Now that you understand the importance of Safe Mode and its various applications, let’s explore different methods to access Safe Mode in Windows 10.
How to go to Safe Mode in Windows 10 using the Settings menu?
Windows 10 provides a straightforward method to access Safe Mode through the Settings menu. Follow these steps to enter Safe Mode using the Settings menu:
- Press the Windows key + I to open the Settings menu.
- Click on the “Update & Security” option.
- In the left sidebar, select “Recovery”.
- Under the Advanced startup section, click on the “Restart now” button.
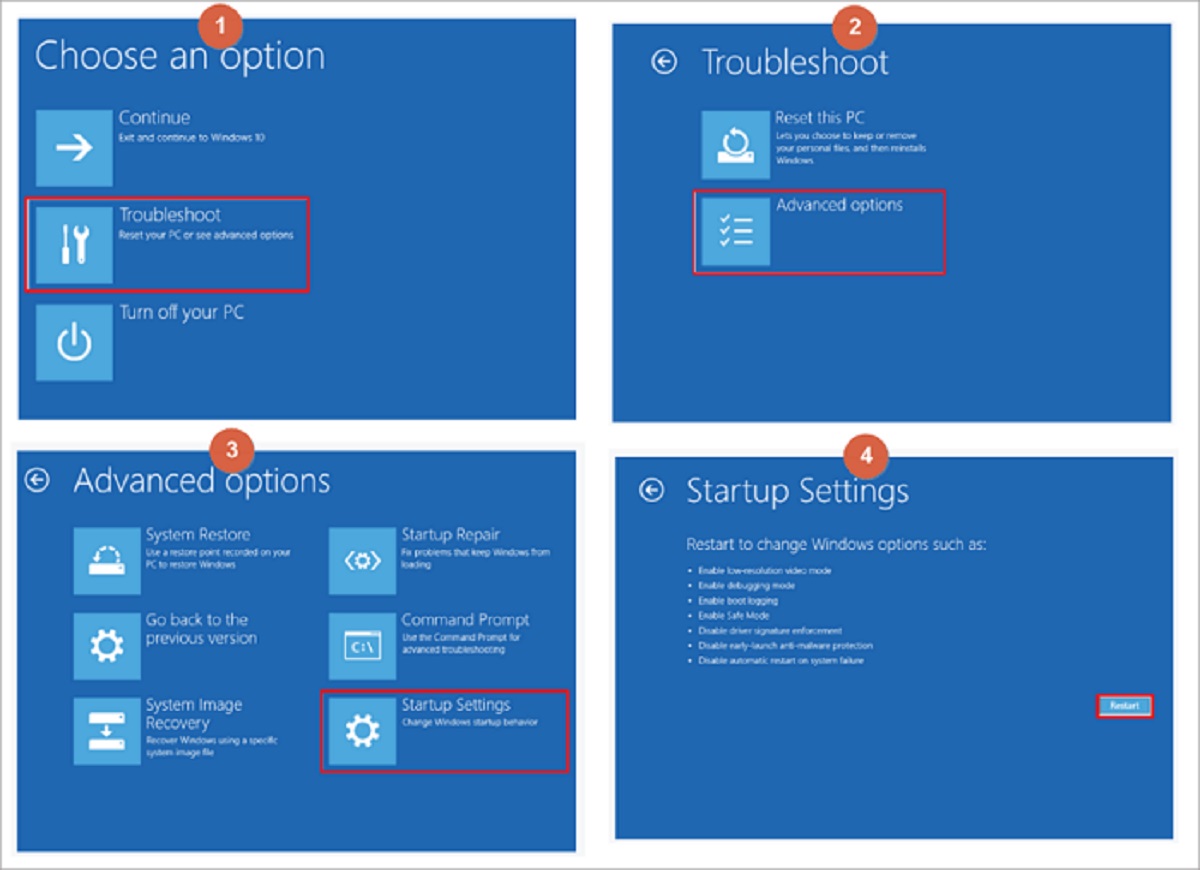
- Your computer will now restart and display the “Choose an option” screen.
- On the Choose an Option screen, click on “Troubleshoot”.
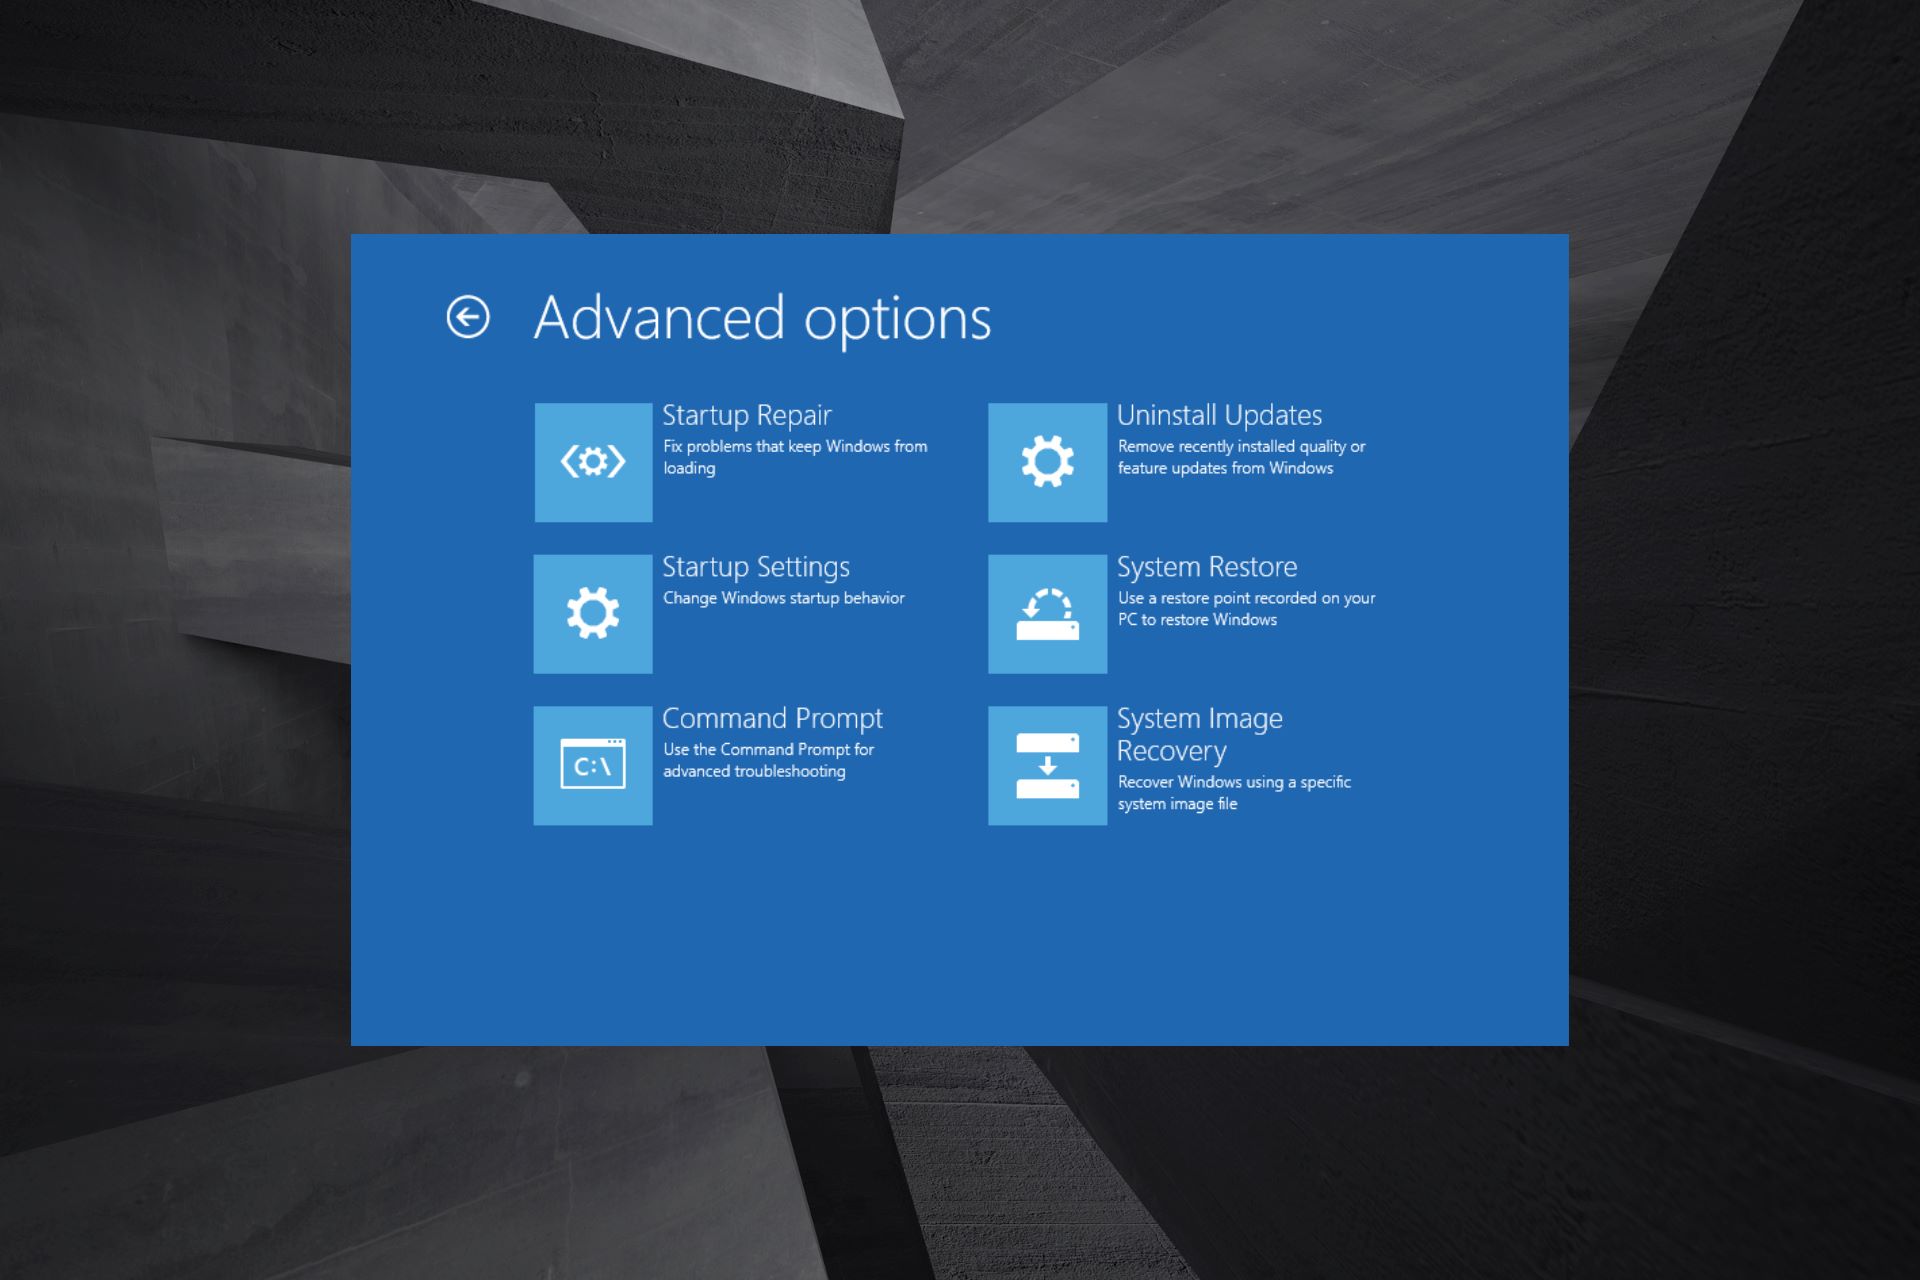
- In the Troubleshoot menu, select “Advanced options”.
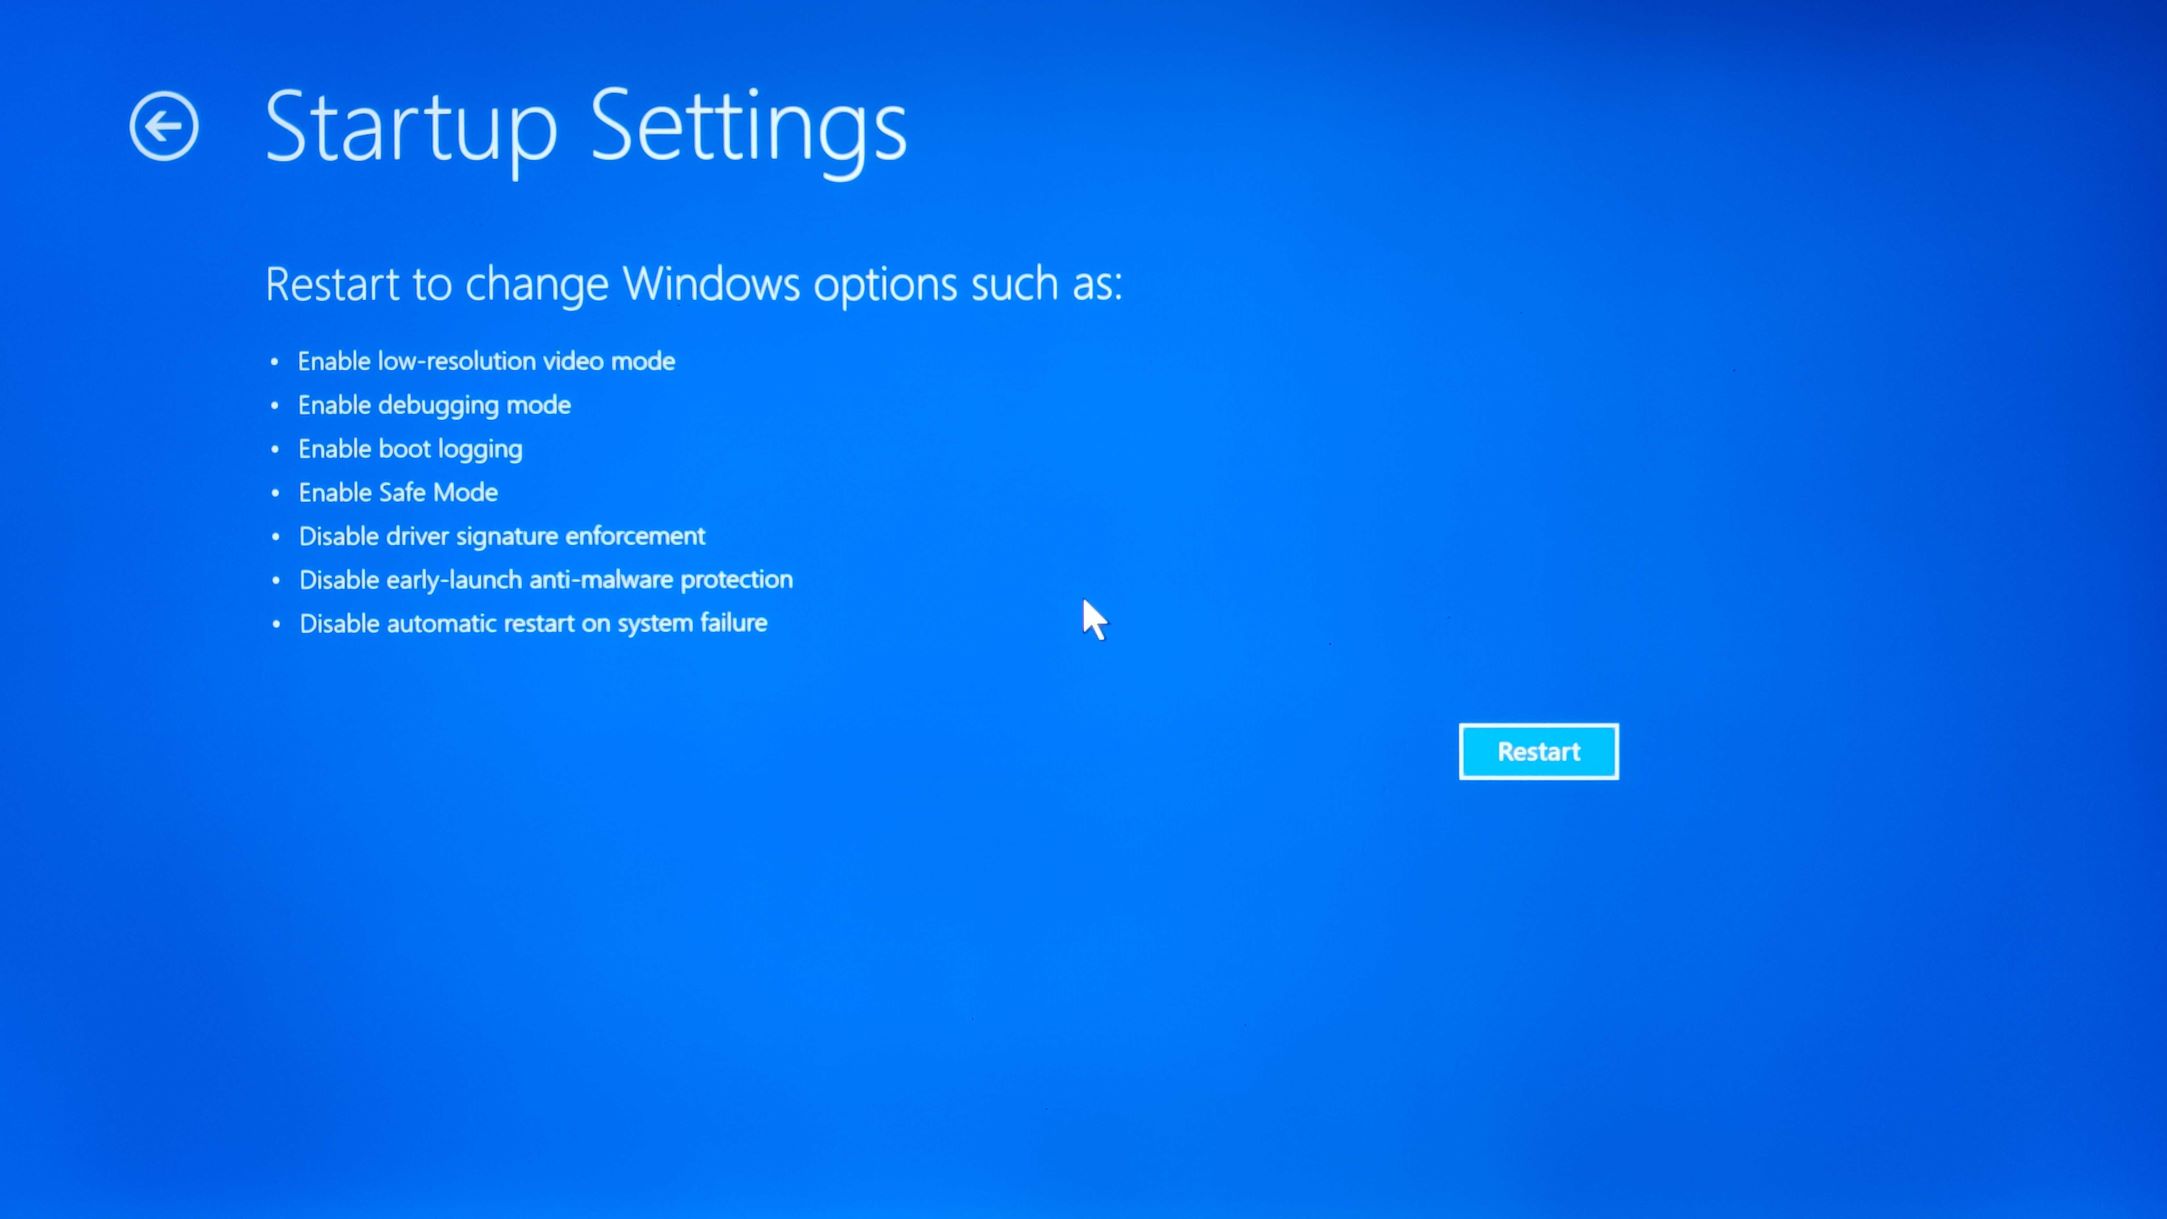
- Click on “Startup Settings”.
- Next, click on the “Restart” button located at the bottom right corner of the screen.
- Your computer will restart once again and display a list of Startup Settings.
- Press the F4 key on your keyboard to enter Safe Mode.
After following these steps, your computer will start in Safe Mode. You will notice that the desktop looks different, with a lower screen resolution and limited visual effects.
In Safe Mode, you can now troubleshoot and resolve any issues on your Windows 10 system. Once you have completed the necessary troubleshooting steps, you can restart your computer to exit Safe Mode and return to normal operation.
This method provides a user-friendly approach to accessing Safe Mode without requiring any technical expertise. However, if you’re not able to access the Settings menu or encounter any issues, there are alternative methods to enter Safe Mode in Windows 10.
Continue reading to explore how to access Safe Mode using the sign-in screen and a bootable USB drive.
How to go to Safe Mode in Windows 10 using the sign-in screen?
If you’re unable to access the Windows 10 Settings menu, or if your system fails to boot up properly, you can still enter Safe Mode using the sign-in screen. Follow these steps to access Safe Mode:
- Start or restart your computer.
- On the sign-in screen, hold down the Shift key on your keyboard.
- While holding the Shift key, click on the “Power” icon in the bottom right corner of the screen.
- From the pop-up menu, select “Restart”.
- Your computer will now restart and display the “Choose an option” screen.
- On the Choose an Option screen, click on “Troubleshoot”.
- In the Troubleshoot menu, select “Advanced options”.
- Click on “Startup Settings”.
- Next, click on the “Restart” button located at the bottom right corner of the screen.
- Your computer will restart once again and display a list of Startup Settings.
- Press the F4 key on your keyboard to enter Safe Mode.
After following these steps, your computer will boot into Safe Mode, bypassing the normal Windows login process. You will see a different desktop layout, indicating that you are in Safe Mode.
In Safe Mode, you can troubleshoot and resolve any issues that may be preventing your system from functioning properly. Once you have completed the necessary troubleshooting steps, you can restart your computer to exit Safe Mode and return to the normal sign-in screen.
This method is useful when you are unable to access the Windows 10 Settings menu but can reach the sign-in screen. However, if you’re still unable to access Safe Mode or encounter any issues, there is an alternative method using a bootable USB drive.
Keep reading to learn how to access Safe Mode using a bootable USB drive.
How to go to Safe Mode in Windows 10 using a bootable USB drive?
If your Windows 10 system fails to start properly or you don’t have access to the Windows 10 Settings menu, you can still enter Safe Mode using a bootable USB drive. Here’s how:
- Create a bootable USB drive with a Windows 10 installation file or recovery tool. You can find instructions on how to create a bootable USB drive on the official Windows website.
- Insert the bootable USB drive into your computer.
- Restart your computer and access the BIOS or UEFI settings by pressing the appropriate key (such as F2 or Del) during the startup process. The key may vary depending on your computer’s manufacturer.
- In the BIOS or UEFI settings, navigate to the boot options and set the USB drive as the first boot device. Save the changes and exit the BIOS or UEFI settings.
- Your computer will now restart and boot from the USB drive.
- Select your language preferences and click on the “Next” button.
- On the next screen, click on “Repair your computer”.
- In the troubleshooting options, select “Advanced options”.
- Choose “Startup Settings”.
- Click on the “Restart” button.
- Your computer will restart and display a list of Startup Settings.
- Press the F4 key on your keyboard to enter Safe Mode.
After following these steps, your computer will boot from the USB drive into Safe Mode. The screen layout and appearance may be different, indicating that you are in Safe Mode.
In Safe Mode, you can troubleshoot and fix any issues affecting your Windows 10 system. Once you have completed the necessary troubleshooting steps, you can remove the USB drive and restart your computer to exit Safe Mode.
Remember to change the boot order in the BIOS or UEFI settings back to the default configuration to ensure your computer starts from the local hard drive in future restarts.
This method allows you to access Safe Mode using a bootable USB drive, providing a way to troubleshoot and resolve issues when other methods are not feasible.
Now that you know how to enter Safe Mode using different methods, let’s discuss what to do if you are unable to access Safe Mode in Windows 10.
What to do if you can’t access Safe Mode in Windows 10?
Sometimes, you may encounter difficulties accessing Safe Mode in Windows 10. This can be frustrating, but don’t worry — there are alternative steps you can take to troubleshoot your computer even if you can’t access Safe Mode. Here are some suggestions:
- Use System Restore: If your computer is still able to start up, you can try using the System Restore feature to revert your system back to a previous working state. This can help resolve issues without the need for Safe Mode. To access System Restore, go to the Windows 10 Settings menu, select “Update & Security,” then “Recovery,” and choose “Open System Restore.”
- Perform Startup Repair: Windows 10 provides a Startup Repair tool that can help diagnose and fix issues preventing your computer from booting properly. To access Startup Repair, follow the steps to access Safe Mode using the sign-in screen or a bootable USB drive. Instead of entering Safe Mode, select “Repair your computer,” then “Troubleshoot,” and click on “Startup Repair.”
- Try Last Known Good Configuration: If your computer started encountering issues after a recent change or system update, you can try using the Last Known Good Configuration feature. Restart your computer, and when the “Choose an option” screen appears, select “Troubleshoot,” then “Advanced options,” and click on “Startup Settings.” From the Startup Settings screen, choose “Last Known Good Configuration.”
- Seek Professional Help: If you’re still unable to resolve the issues preventing access to Safe Mode, it may be best to seek assistance from a professional technician or the customer support of your computer manufacturer. They can provide specialized guidance and help you diagnose and fix the problem.
Remember, Safe Mode is just one method of troubleshooting and resolving issues in Windows 10. There are alternative options available, as mentioned above, which can potentially help you fix your computer even if you can’t access Safe Mode.
By exploring these alternative approaches, you can greatly increase your chances of diagnosing and resolving the issues affecting your Windows 10 system.
Now that you’ve learned what to do if you can’t access Safe Mode, let’s wrap up with a summary of what we’ve discussed.
Conclusion
Safe Mode in Windows 10 is a powerful tool that allows users to troubleshoot and resolve various issues that can arise on their computer. Whether you’re dealing with malware infections, driver conflicts, system crashes, or software compatibility problems, Safe Mode provides a clean and controlled environment to diagnose and fix these issues effectively.
In this article, we explored different methods of accessing Safe Mode in Windows 10. From using the Settings menu to accessing it through the sign-in screen or a bootable USB drive, there are multiple options available to suit your needs and circumstances.
We discussed the importance of Safe Mode, its role in isolating problematic drivers and services, and its ability to provide a secure and controlled environment for troubleshooting. We also highlighted why you might need to go to Safe Mode, covering scenarios such as malware infections, driver conflicts, and system stability problems.
If you encounter any difficulties accessing Safe Mode, we provided alternative steps to try, including utilizing System Restore, performing Startup Repair, and trying Last Known Good Configuration. Additionally, we emphasized the importance of seeking professional help if you’re unable to resolve the issue on your own.
Remember, the goal of Safe Mode is to help you successfully diagnose and troubleshoot your Windows 10 system. Once you’ve resolved the underlying problem, you can restart your computer and resume normal operation.
With the knowledge gained from this article, you are equipped to use Safe Mode effectively, regardless of the situation. The ability to access Safe Mode and troubleshoot issues puts you in control of your Windows 10 computer, enabling you to keep it running smoothly and hassle-free.
So, the next time you encounter a problem with your Windows 10 system, don’t panic. Just follow the steps outlined in this article, and you’ll be able to access Safe Mode and resolve the issue with confidence.