Introduction
Windows 10, the latest operating system from Microsoft, offers a wide range of features and improvements compared to its predecessors. One crucial aspect of maintaining a secure and optimized system is keeping it up to date with the latest software updates. Regular updates not only address bugs and security vulnerabilities but also introduce new features and enhancements.
In this article, we will explore various methods to update Windows 10 and ensure that your system is running smoothly. Whether you prefer manual updates or automatic installations, this guide will provide you with the necessary information to keep your operating system up to date.
Windows 10 provides multiple options to check for updates, including Windows Update, Windows Settings, and third-party software. We will discuss each method in detail to help you find the most convenient and effective way to update your system.
Additionally, this article will also cover essential tips and best practices to optimize your Windows Update experience, troubleshoot any update-related issues, update drivers, and keep third-party software up to date.
Updating your operating system is crucial for maintaining a secure and stable computing experience. It ensures that your computer has the latest security patches, bug fixes, and performance improvements. Moreover, updating your drivers and third-party software enhances compatibility and functionality.
So, let’s dive into the various methods and tips to update your Windows 10 system and ensure it is running at its best.
Checking for Updates
Before updating your Windows 10 system, it is essential to check for any pending updates. Regularly checking for updates ensures that you have the latest security patches, bug fixes, and performance improvements.
Windows 10 provides several options to check for updates:
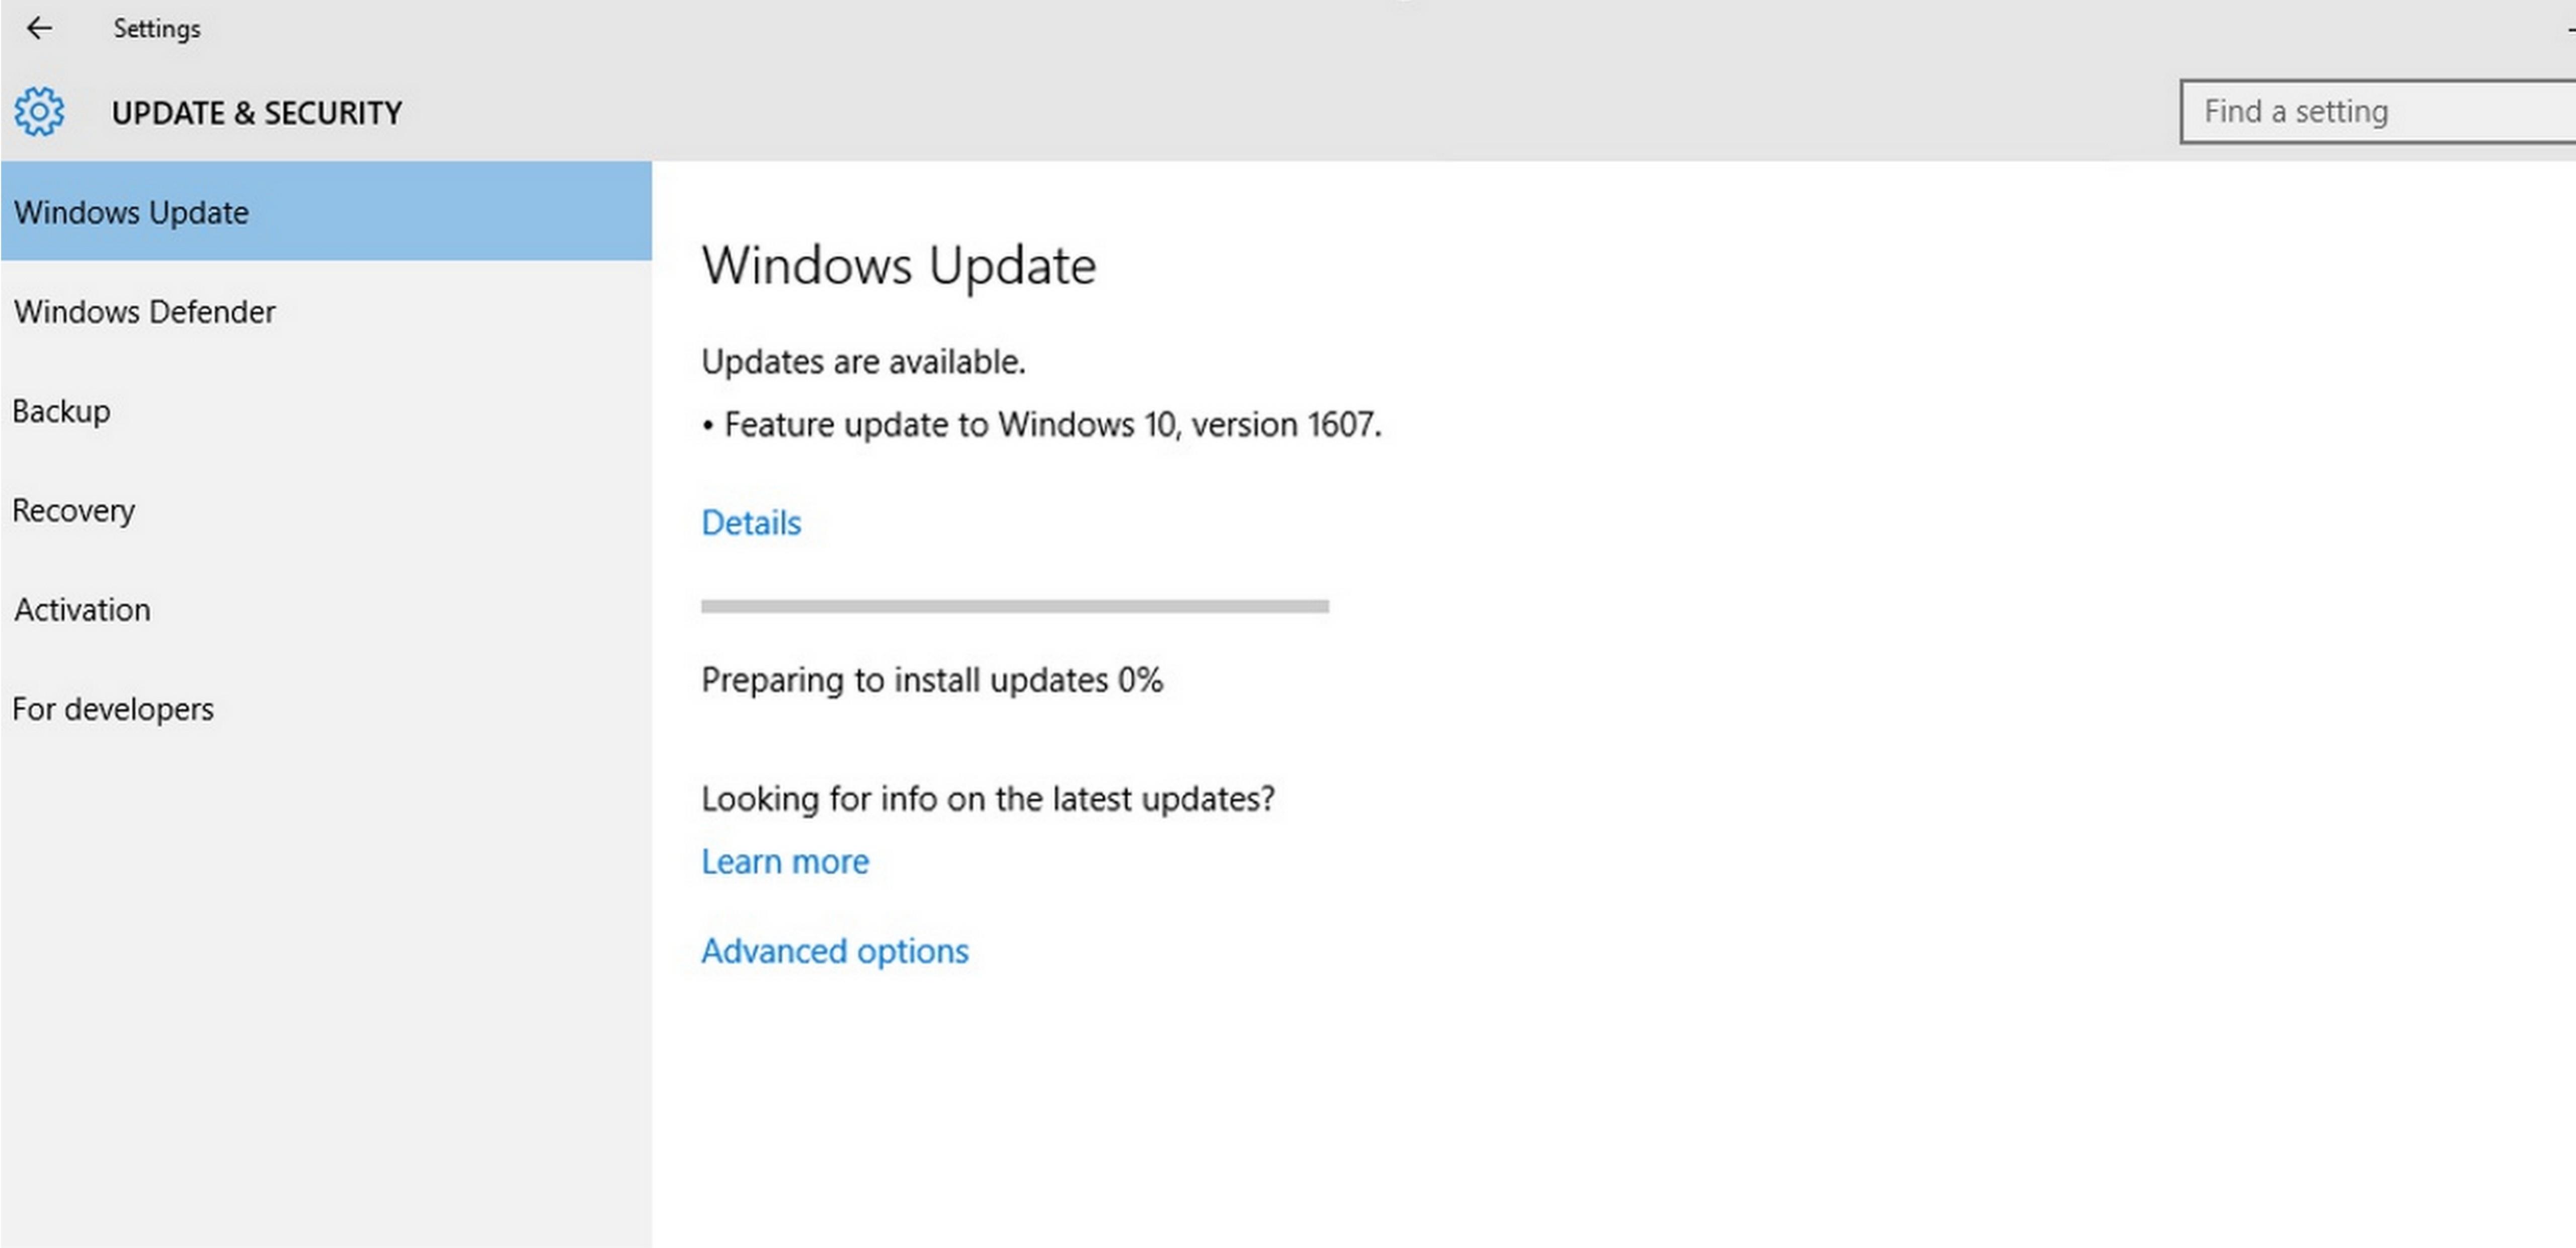
- Windows Update: The most common method to check for updates is through the Windows Update feature. To access it, click on the Start button, then go to Settings > Update & Security. From there, click on “Check for updates” to scan for any available updates. Windows will automatically download and install the updates for you.
- Windows Settings: Another way to access the Windows Update feature is through the Windows Settings app. To do this, open the Settings app by clicking on the Start button and selecting the gear icon. In the Settings app, click on “Update & Security” and then choose the “Windows Update” tab. Click on “Check for updates” to initiate the update process.
- Third-Party Software: Alternatively, you can also use third-party software to check for updates. There are various software options available that can scan your system and notify you of any available updates for your Windows 10 operating system as well as other installed applications. Examples include software like Patch My PC, SUMo (Software Update Monitor), and Ninite.
Once you initiate the update check, Windows will scan for available updates. If there are any updates available, they will be displayed, and you can choose to install them immediately or schedule them for a later time.
It is crucial to note that checking for updates requires an active internet connection, as your system needs to connect to Microsoft’s update servers to download the latest updates. Therefore, ensure that you are connected to the internet before checking for updates.
By regularly checking for updates, you can keep your Windows 10 system secure and optimized, ensuring that you have the latest features and improvements to enhance your computing experience. Let’s now explore the different methods to manually install updates.
Manual Updates
In addition to the automatic update feature, Windows 10 also allows you to manually install updates. This can be useful if you prefer more control over the update process or if automatic updates are not enabled on your system.
To manually install updates in Windows 10, you can follow these steps:
- Windows Update: Open the Windows Update settings by clicking on the Start button, then going to Settings > Update & Security. Click on “Check for updates” to scan for available updates. Once the updates are displayed, you can select the ones you want to install, and then click on “Install now” to initiate the installation process.
- Microsoft Update Catalog: If you are looking for specific updates or if the Windows Update feature does not show the updates you need, you can visit the Microsoft Update Catalog website. There, you can search for specific updates by entering the Knowledge Base (KB) number or keywords related to the update. Once you find the desired update, download it and install it manually by running the downloaded file.
- Driver Updates: Drivers are an essential component of your system, enabling communication between your hardware and software. To manually update drivers, you can visit the manufacturer’s website for each device and download the latest drivers from there. After downloading the driver, run the installer and follow the on-screen instructions to complete the installation process.
When installing updates manually, it is crucial to carefully read the update description and release notes to understand the changes and improvements they bring. Some updates may require a system reboot to apply the changes, so ensure you save any work in progress before initiating the installation process.
Manual updates give you the flexibility to choose which updates to install and when to install them. This can be useful if you want to prioritize critical security updates or if you have limited internet bandwidth and need to manage updates efficiently.
It is worth noting that while manual updates provide more control, it is recommended to enable automatic updates to ensure that your system receives critical security patches in a timely manner. Automatic updates minimize the risk of missing important updates that could leave your system vulnerable to security threats.
Now that we have covered manual updates, let’s move on to automatic updates and how to configure their settings in Windows 10.
Automatic Updates
Windows 10 offers the option to enable automatic updates, ensuring that your system receives the latest updates without any manual intervention. Automatic updates are highly recommended as they help keep your system secure and up to date.
To configure automatic updates in Windows 10, follow these steps:
- Windows Update Settings: Open the Windows Update settings by clicking on the Start button, then going to Settings > Update & Security. From there, click on “Advanced options” under the Windows Update section. In the Advanced options, you will find the option to customize the automatic update settings.
- Choose How Updates Are Installed: In the Advanced options, you can choose how updates are installed on your system. The options include:
- Automatic (recommended): This option automatically downloads and installs updates without any user intervention. It ensures that your system stays up to date with the latest patches and features.
- Notify to schedule restart: With this option, Windows will notify you when updates are available, and you can choose when to install them. A restart will be required to complete the installation.
- Notify to download: This option will notify you when updates are available, but you can choose whether or not to download and install them.
- Defer feature updates: If you prefer to delay major feature updates, you can choose this option. It allows you to postpone feature updates for a certain period, giving you more control over when to install them.
- Active Hours: Another useful feature of automatic updates is the ability to set active hours. These are the hours during which Windows will not automatically restart your system to install updates. You can define your active hours in the same Advanced options section. This prevents interruptions during work or important tasks.
By enabling automatic updates, you can ensure that your Windows 10 system is continuously receiving the latest patches, bug fixes, and security updates. This helps protect your system from potential threats and keeps it running smoothly with the latest features and improvements.
However, if you choose not to enable automatic updates, it is still crucial to regularly check for updates manually to ensure that your system remains secure. Now, let’s explore further settings related to Windows updates in Windows 10.
Windows Update Settings
Windows 10 provides various settings that allow you to customize the way updates are managed on your system. These settings give you control over how updates are installed, whether to receive preview builds, and options for pausing or deferring updates.
To access and customize the Windows Update settings in Windows 10, follow these steps:
- Open the Settings App: Click on the Start button, then select the gear icon to open the Settings app.
- Go to Update & Security: In the Settings app, select “Update & Security” to access the Windows Update settings.
- Choose Update Settings: Under the Windows Update section, click on “Advanced options.” This will open the Update settings page.
On the Update settings page, you will find several options to customize your Windows Update experience:
- Pause Updates: If you want to temporarily pause updates, you can do so by enabling the “Pause updates” toggle switch. This allows you to postpone updates for up to 35 days.
- Preview Builds: Windows 10 offers the option to join the Windows Insider Program and receive early access to preview builds. Preview builds give you the opportunity to test upcoming features and improvements before they are released to the general public. You can enable or disable this feature in the Windows Update settings.
- Delivery Optimization: This setting allows you to control how updates are downloaded and delivered to your system. You can choose to download updates from other PCs on your local network or even from other PCs on the internet to speed up the download process. You can also set limitations on the amount of bandwidth that Windows Update can use.
- Active Hours: As mentioned earlier, active hours allow you to specify the times during which Windows will not automatically restart your system for updates. This feature can be customized in the Windows Update settings.
- Advanced Options: By clicking on “Advanced options,” you can access additional settings such as choosing how updates are installed, receiving updates for other Microsoft products, and deferring feature updates. This gives you further control over the update process and helps customize it to suit your preferences.
Customizing the Windows Update settings in Windows 10 allows you to tailor the update experience to your needs. You can choose when updates are installed, control the delivery of updates, and participate in the Windows Insider Program to get early access to upcoming features.
Now, let’s move on to the next section where we will discuss troubleshooting methods for update-related issues in Windows 10.
Troubleshooting Updates
While updating your Windows 10 system is essential for security and performance, you may encounter issues that prevent updates from installing or cause unexpected behaviors. Fortunately, Windows 10 provides built-in troubleshooting tools to help you resolve these update-related problems.
Here are some common troubleshooting methods for Windows 10 updates:
- Windows Update Troubleshooter: Windows 10 includes a built-in troubleshooter specifically designed to fix issues with Windows Update. To run the troubleshooter, go to Settings > Update & Security > Troubleshoot. Under Troubleshoot, locate Windows Update, click on it, and select “Run the troubleshooter.” The troubleshooter will scan your system for update-related problems and attempt to fix them automatically.
- Reset Windows Update Components: If the troubleshooter does not resolve the issue, you can try resetting the Windows Update components. To do this, open a command prompt with administrative privileges and run the following commands one by one:
net stop wuauserv
net stop cryptSvc
net stop bits
net stop msiserver
ren C:\Windows\SoftwareDistribution SoftwareDistribution.old
ren C:\Windows\System32\catroot2 catroot2.old
net start wuauserv
net start cryptSvc
net start bits
net start msiserver
- Check Disk Space: Insufficient disk space can also cause issues with updates. Ensure that you have enough free space on your system drive (usually the C: drive) for updates to be downloaded and installed. If necessary, delete unnecessary files or move them to an external storage device.
- Update Drivers: Outdated or incompatible drivers can interfere with the update process. Make sure to update your device drivers to the latest versions available from the manufacturer’s website. This can be done manually or by using driver update software.
- Remove Problematic Updates: In some cases, a specific update may cause issues on your system. If you suspect that a particular update is causing problems, you can remove it by going to Settings > Update & Security > Windows Update > View update history. Click on “Uninstall updates” to access the list of installed updates and select the specific update you want to remove.
If none of these troubleshooting methods resolve the update-related issues, you may need to seek further assistance from Microsoft support or consult online forums for additional troubleshooting steps specific to your situation.
By using these troubleshooting methods, you can identify and resolve common issues that may arise during the Windows 10 update process. Now, let’s move on to updating drivers in Windows 10.
Updating Drivers
Keeping your device drivers up to date is essential for optimal performance and compatibility with your hardware and software. Windows 10 provides multiple methods to update drivers, ensuring that your system has the latest drivers installed.
Here are some ways to update drivers in Windows 10:
- Windows Update: Windows Update automatically checks for driver updates along with other system updates. When a new driver is available, Windows Update will download and install it for you. To check for driver updates through Windows Update, go to Settings > Update & Security > Windows Update, and click on “Check for updates.”
- Device Manager: Device Manager is a Windows tool that allows you to manage and update device drivers. To access Device Manager, right-click on the Start button and select “Device Manager” from the menu. In Device Manager, expand the categories to find the device you want to update, right-click on it, and choose “Update driver.” You can then select whether to search for drivers automatically or browse your computer for driver software.
- Manufacturer’s Website: Another reliable method to update drivers is to visit the manufacturer’s website for your device and download the latest drivers from there. Manufacturers often provide dedicated software that can automatically detect and install the appropriate drivers for your specific device model. Make sure to download drivers from trusted sources.
- Driver Update Software: There are third-party driver update software available that can scan your system, identify outdated drivers, and automatically download and install the latest versions. Examples of popular driver update software include Driver Booster, Driver Easy, and Snappy Driver Installer.
When updating drivers, it is recommended to start with critical components such as graphics drivers, network adapters, and chipset drivers, as these affect system performance and stability. However, it is generally beneficial to keep all drivers up to date to ensure compatibility and optimal functionality.
After installing updated drivers, it is a good practice to restart your system to apply the changes effectively. If you encounter any issues after updating drivers, you can use the “Roll Back Driver” option in Device Manager to revert to the previous version.
By keeping your drivers up to date, you can improve system performance, fix compatibility issues, and ensure that your hardware functions properly with the latest software updates. Now, let’s move on to updating third-party software in Windows 10.
Updating Third-Party Software
In addition to the operating system and device drivers, it is essential to keep your third-party software up to date. Updating third-party software ensures that you have the latest features, bug fixes, and security patches installed, providing a more secure and optimized computing experience.
Here are some methods to update third-party software in Windows 10:
- Automatic Updates: Many popular software applications, such as web browsers, media players, and antivirus software, include automatic update features. When enabled, these applications will automatically check for updates and install them in the background. To enable automatic updates for a specific application, check the settings within the application itself.
- Software Updater: Some third-party software comes with built-in updaters or software update managers. These tools help you keep track of available updates for multiple applications and allow you to update them efficiently. Examples of such tools include Patch My PC, SUMo (Software Update Monitor), and Ninite.
- Check Manufacturer’s Website: If an application does not have an automatic update feature, you can manually check the manufacturer’s website for updates. Most software developers provide download sections on their websites where you can find the latest versions of their software.
- App Store or Microsoft Store: For applications that are available through the Microsoft Store or other app stores, updating is typically handled automatically. You can check for available updates through the store’s update section and install them with a few clicks.
Regularly updating third-party software is crucial because outdated software can pose security risks and may not work optimally with the latest operating system updates and security features. Vulnerabilities in outdated software can be exploited by malicious actors. Therefore, staying up to date with the latest versions helps protect your system and data.
It is good practice to periodically review the software installed on your system and ensure that you are running the latest versions. Also, consider uninstalling any unused or outdated software to reduce the attack surface and improve system performance.
Now that you know how to update your third-party software, let’s move on to some tips and best practices to optimize your Windows Update experience.
Windows Update Tips and Best Practices
To ensure a smooth and efficient Windows Update experience, it is recommended to follow these tips and best practices:
- Enable Automatic Updates: Enabling automatic updates ensures that your system receives the latest updates without any manual intervention. This helps keep your system secure and up to date with the latest features and improvements.
- Schedule Update Restart: If you prefer to have more control over when your system restarts to install updates, you can schedule the restart during a time that is convenient for you. Windows allows you to set up active hours to prevent automatic restarts during specific times.
- Regularly Check for Updates: Although automatic updates are recommended, it is a good practice to manually check for updates from time to time, especially if you have disabled automatic updates. This ensures that you don’t miss any critical updates that may require immediate attention.
- Stay Connected to the Internet: Windows Update requires an active internet connection to download and install updates. Ensure that you have a stable and reliable internet connection to avoid issues during the update process.
- Keep System Drivers Up to Date: As mentioned earlier, updating device drivers is crucial for system performance and compatibility. Regularly check for driver updates and install them to ensure optimal functionality.
- Scan for Malware: Before updating your system, it is advisable to run a malware scan to ensure your system is clean. Malware can interfere with the update process and cause issues. Use a reliable antivirus software to scan and remove any potential threats.
- Maintain Sufficient Disk Space: Windows updates require disk space to download and install. Ensure that you have enough free disk space on your system drive for updates to be downloaded and installed. If necessary, remove unnecessary files or move them to an external storage device.
- Create System Restore Points: Before installing major updates or making significant changes to your system, it is recommended to create a system restore point. This allows you to roll back to a previous state in case any issues arise after the update.
- Read Release Notes: When updates become available, it is a good practice to read the release notes or changelogs provided by Microsoft. This helps you understand the changes, improvements, and known issues associated with the update.
Following these tips and best practices can help ensure a smooth and hassle-free Windows Update experience. Regular updates not only keep your system secure but also provide new features and improvements to enhance your overall computing experience.
Now that you are equipped with useful tips and best practices, we can conclude this guide. Remember to stay proactive in keeping your system up to date to enjoy the benefits of a secure and optimized Windows 10 operating system.
Conclusion
Updating your Windows 10 system is crucial for maintaining a secure and optimized computing experience. Regular updates ensure that you have the latest security patches, bug fixes, and performance improvements. Additionally, updating drivers and third-party software enhances compatibility and functionality.
In this guide, we have covered various methods to update Windows 10. Whether you prefer manual updates or automatic installations, there are options available to suit your preferences. We have explored how to check for updates using Windows Update, Windows Settings, and third-party software. We have also provided tips and best practices for troubleshooting update-related issues, updating drivers, and keeping third-party software up to date.
By following these guidelines, you can ensure that your Windows 10 system is continuously receiving the latest updates and improvements. This helps protect your system from security vulnerabilities and ensures optimal performance.
Remember, enabling automatic updates, regularly checking for updates, and keeping drivers and third-party software up to date should be part of your regular system maintenance routine. Additionally, following best practices like maintaining sufficient disk space, scanning for malware, and creating system restore points are essential for a smooth update experience.
Now it’s time to put these insights into action. Keep your Windows 10 system up to date, optimize your drivers, and regularly update third-party software. By doing so, you can enjoy a faster, more secure, and feature-rich computing experience with your Windows 10 system.
Thank you for reading, and may your Windows 10 updates be seamless and hassle-free!