Introduction
Welcome to our guide on how to boot in Safe Mode in Windows 11. When it comes to troubleshooting issues on your computer, Safe Mode can be a valuable tool. Whether you need to diagnose a problem, remove stubborn software, or fix system errors, booting into Safe Mode provides a clean and minimal environment where only the essential Windows services and drivers are loaded.
Safe Mode is a diagnostic mode that allows you to start your computer with a limited set of drivers, services, and startup programs. By booting into Safe Mode, you can narrow down the cause of issues such as startup failures, software conflicts, malware infections, or driver problems. It’s also a useful way to disable unnecessary software that may be interfering with your system.
In Windows 11, the process of entering Safe Mode has changed slightly compared to previous versions. But don’t worry, we will walk you through the different methods you can use to access Safe Mode. Whether you prefer using the Power menu, the Settings app, the System Configuration tool, or the Shift + Restart option, we’ve got you covered.
Before we dive into the various methods of booting into Safe Mode, it is important to note that Safe Mode is designed for troubleshooting purposes and is not intended for regular use. In Safe Mode, you may experience limited functionality, reduced graphics quality, and a lack of network connectivity. However, these limitations allow you to isolate and resolve problems more effectively.
Now that you understand the importance of Safe Mode and its usage, let’s explore the different ways to boot into Safe Mode in Windows 11.
What is Safe Mode?
Safe Mode is a specialized mode in which Windows starts with a minimal set of drivers, services, and startup programs. It is designed to help users diagnose and troubleshoot problems that may prevent their computer from starting normally. By booting into Safe Mode, you can isolate the cause of issues, such as software conflicts, malware infections, or faulty device drivers.
When you start your computer in Safe Mode, Windows loads only the essential files and drivers necessary for the operating system to function. This means that any third-party software, such as antivirus programs or device drivers, that may be causing problems will not be loaded. By doing so, you can determine if the issue you’re experiencing is caused by a specific program or driver.
In Safe Mode, Windows uses a basic display driver and low-resolution settings to ensure compatibility with a wide range of hardware. This allows you to troubleshoot graphics-related issues or driver conflicts that may occur during normal startup. Additionally, network connectivity may be limited in Safe Mode, which can be useful for troubleshooting network-related problems.
Safe Mode is particularly helpful when your computer is facing issues like frequent crashes, blue screen errors, or startup failures. By booting into Safe Mode, you can bypass the problematic software or drivers that may be causing these problems and gain access to your system to perform troubleshooting steps.
It is worth mentioning that Safe Mode is not a permanent solution to fix underlying issues. Instead, it serves as a diagnostic tool to help you identify the cause of the problem. Once you have identified the culprit, you can then take further steps to resolve the issue. This might involve uninstalling problematic software, updating device drivers, or performing system restores.
In the next section, we will discuss why you might need to boot into Safe Mode in Windows 11 and the benefits it provides in troubleshooting various types of problems.
Why Boot in Safe Mode in Windows 11?
Safe Mode is a powerful feature that can be beneficial in various scenarios when using Windows 11. Whether you’re facing software issues, encountering malware infections, or experiencing startup problems, booting into Safe Mode can help you diagnose and resolve these issues effectively.
Here are some common reasons why you might need to boot into Safe Mode in Windows 11:
1. Troubleshoot startup issues: If your computer is not starting up properly and you’re facing frequent crashes or blue screen errors, booting into Safe Mode can help you determine the cause. By loading only essential drivers and services, you can identify if a recently installed software, driver, or system update is causing the problem.
2. Remove stubborn software: There may be instances where a program or driver becomes unresponsive or conflicts with other software, making it difficult to uninstall or modify. Safe Mode allows you to bypass these problematic programs and uninstall them without interference, ensuring a clean removal.
3. Diagnose and fix software conflicts: If certain programs on your computer are not working correctly or causing system instability, booting into Safe Mode can help identify if there are conflicts among installed software. You can disable or remove conflicting programs to restore normal functionality.
4. Scan and remove malware: Malware infections can sometimes be resistant to regular antivirus scans while running in normal mode. By booting into Safe Mode, you can minimize the chances of malware actively running and perform a thorough scan to detect and remove any malicious software.
5. Resolve driver-related issues: Faulty or incompatible device drivers can lead to various issues, such as crashes, hardware malfunctions, or performance problems. Safe Mode allows you to troubleshoot and update drivers in a controlled environment, ensuring stability and compatibility.
6. Perform system maintenance and recovery: Safe Mode provides a clean environment in which you can perform system maintenance tasks, such as disk cleanup, system file repairs, or system restores. These actions can help resolve system errors and restore your computer to a working state.
By utilizing the Safe Mode feature in Windows 11, you have the ability to diagnose and troubleshoot a wide range of problems without the interference of unnecessary programs or drivers. It gives you a more focused and controlled environment to pinpoint the root cause of issues and carry out appropriate solutions.
In the following sections, we will explore the different methods to boot into Safe Mode in Windows 11, so you can apply the most suitable approach for your situation.
How to Boot in Safe Mode in Windows 11
There are multiple methods available to boot into Safe Mode in Windows 11. Below, we will discuss four different approaches you can use:
Method 1: Using the Power menu
1. Click on the Start button or press the Windows key.
2. Click on the Power icon in the Start menu.
3. Press and hold the Shift key on your keyboard.
4. While holding the Shift key, click on the Restart option.
5. Your computer will restart and boot into the Advanced startup menu.
6. From the Advanced startup menu, select Troubleshoot.
7. Click on Advanced options.
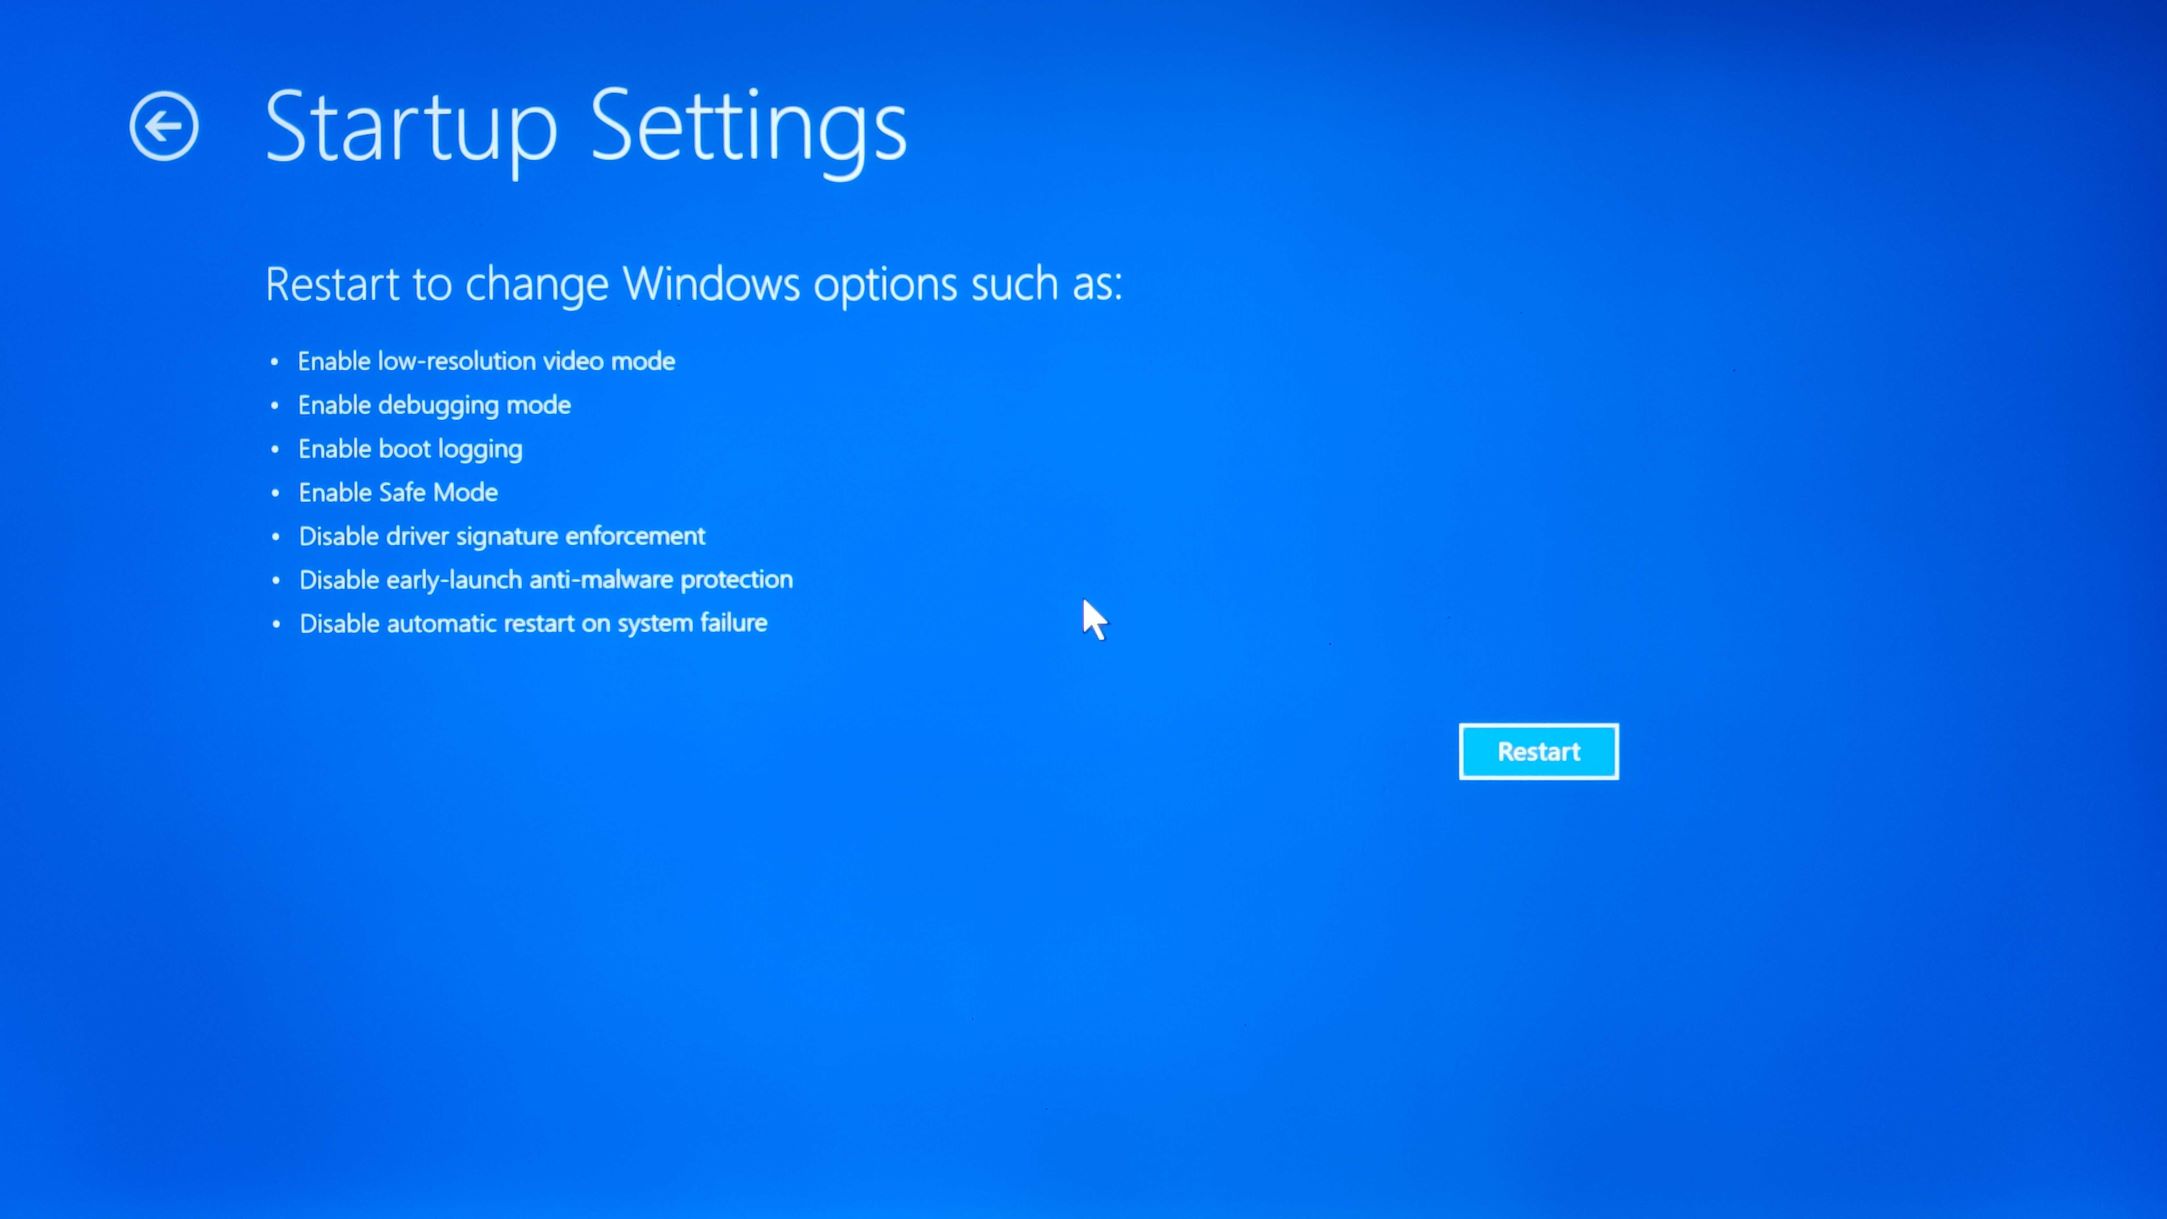
8. In the Advanced options menu, click on Startup Settings.
9. Click on the Restart button.
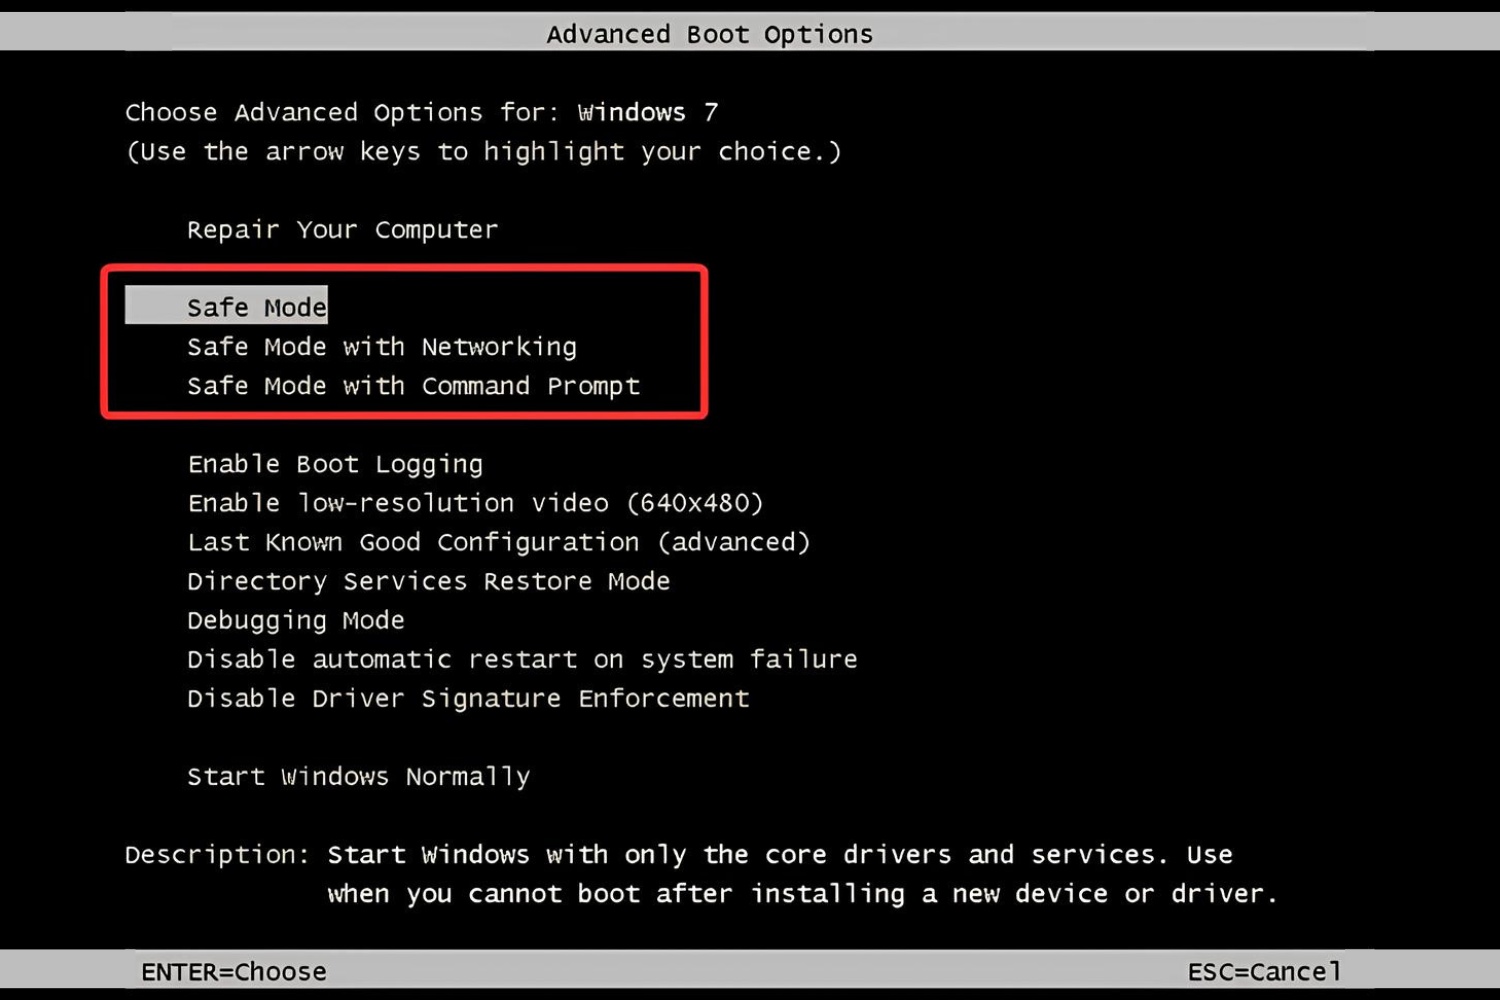
10. When your computer restarts, you will see a list of options. Press the number key corresponding to the Safe Mode option you want to use.
Method 2: Using the Settings app
1. Press Windows key + I to open the Settings app.
2. Click on the System category.
3. In the left sidebar, click on Recovery.
4. Under Advanced startup, click on the Restart now button.
5. Your computer will restart and boot into the Advanced startup menu.
6. Follow steps 6 to 10 from Method 1 to select and boot into Safe Mode.
Method 3: Using the System Configuration tool
1. Press Windows key + R to open the Run dialog box.
2. Type “msconfig” (without quotes) and press Enter.
3. In the System Configuration window, go to the Boot tab.
4. Under the Boot options section, check the “Safe boot” box.
5. Choose the type of Safe Mode you want: Minimal, Alternate shell, or Network.
6. Click on Apply and then OK.
7. You will be prompted to restart your computer. Click on Restart to boot into Safe Mode.
Method 4: Using the Shift + Restart option
1. Click on the Start button or press the Windows key.
2. Click on the Power icon in the Start menu.
3. Press and hold the Shift key on your keyboard.
4. While holding the Shift key, click on the Restart option.
5. Your computer will restart and boot into the Advanced startup menu.
6. Follow steps 6 to 10 from Method 1 to select and boot into Safe Mode.
By following any of these methods, you can successfully boot into Safe Mode in Windows 11. Once in Safe Mode, you can diagnose and troubleshoot various issues, perform system maintenance tasks, or remove problematic software/driver to restore normal functionality.
In the next section, we will conclude our guide and provide some additional tips for using Safe Mode effectively in Windows 11.
Method 1: Using the Power Menu
One of the easiest ways to boot into Safe Mode in Windows 11 is by using the Power menu. This method allows you to access the Advanced startup menu, where you can select Safe Mode as a startup option. Follow the steps below to use this method:
1. Click on the Start button or press the Windows key to open the Start menu.
2. Click on the Power icon located at the bottom-left corner of the Start menu.
3. Press and hold the Shift key on your keyboard.
4. While holding the Shift key, click on the Restart option in the Power menu. This will initiate a system restart.
5. Your computer will now restart and boot into the Advanced startup menu.
At this point, you have successfully accessed the Advanced startup menu using the Power menu method.
6. Within the Advanced startup menu, you will see several troubleshooting options. Click on the Troubleshoot option to proceed.
7. In the Troubleshoot menu, click on the Advanced options.
8. In the Advanced options menu, select Startup Settings.
9. Click on the Restart button to reboot your computer again.
Once your computer restarts, you will see a list of startup settings, including different Safe Mode options.
10. To boot into Safe Mode, press the number key corresponding to the Safe Mode option you want to use. For example, press 4 for Safe Mode, or press 5 for Safe Mode with Networking.
Your computer will now complete the booting process and start in Safe Mode according to your selected option.
Using the Power menu to access Safe Mode is a convenient method, especially if your computer is still operational. Remember to hold the Shift key while clicking on the Restart option to access the Advanced startup menu during the reboot process.
In the next section, we will discuss Method 2, which involves using the Settings app to boot into Safe Mode in Windows 11.
Method 2: Using the Settings App
An alternative method to boot into Safe Mode in Windows 11 is by utilizing the Settings app. This method allows you to access the Advanced startup options directly from the Windows settings. Follow the steps below to use this method:
1. Press the Windows key + I on your keyboard to open the Settings app.
2. In the Settings app, click on the System category.
3. In the left sidebar, click on the Recovery option.
4. Under the Advanced startup section, click on the Restart now button. This initiates a system restart and takes you to the Advanced startup menu.
Once your computer restarts, you will be presented with various troubleshooting options.
5. In the Advanced startup menu, click on Troubleshoot to proceed.
6. From the Troubleshoot menu, select Advanced options.
7. Within the Advanced options menu, click on Startup Settings.
At this point, your computer will display the Startup Settings screen, which allows you to modify boot settings.
8. Click on the Restart button to initiate another system restart.
After the restart, you will be presented with a list of startup options.
9. To enter Safe Mode, press the number corresponding to the desired Safe Mode option. For example, press 4 for Safe Mode, or press 5 for Safe Mode with Networking.
Your computer will now reboot and start in Safe Mode according to your chosen option.
Using the Settings app to access Safe Mode provides a straightforward and easily accessible method. It is particularly useful if you are already within the Windows environment and need to quickly restart into Safe Mode for troubleshooting or resolving issues.
In the next section, we will discuss Method 3, which involves using the System Configuration tool to boot into Safe Mode in Windows 11.
Method 3: Using the System Configuration Tool
Another method to boot into Safe Mode in Windows 11 is by using the System Configuration tool, also known as msconfig. This built-in utility allows you to modify various system settings, including boot options. Follow the steps below to use this method:
1. Press the Windows key + R on your keyboard to open the Run dialog box.
2. In the Run dialog box, type “msconfig” (without quotes) and press Enter. This will open the System Configuration window.
3. In the System Configuration window, navigate to the “Boot” tab.
4. Under the “Boot options” section, check the “Safe boot” box.
5. Choose the type of Safe Mode you want to boot into: “Minimal,” “Alternate shell,” or “Network.”
6. Click on the “Apply” button, and then click on “OK” to save the changes.
7. A prompt will appear, asking if you want to restart your computer. Click on “Restart” to initiate the reboot.
Once your computer restarts, it will boot into Safe Mode based on the option you selected in the System Configuration tool.
Using the System Configuration tool to access Safe Mode provides a convenient method for configuring your boot settings. You can easily enable or disable Safe Mode as needed, allowing for a quick access to the troubleshooting environment when required.
Remember that when you want to return to normal mode, you will need to repeat the steps and uncheck the “Safe boot” option in the System Configuration window.
In the next section, we will discuss Method 4, which involves using the Shift + Restart option to boot into Safe Mode in Windows 11.
Method 4: Using the Shift + Restart Option
The Shift + Restart option is another method to easily boot into Safe Mode in Windows 11. This method allows you to access the Advanced startup menu directly from the Windows login or lock screen. Follow the steps below to use this method:
1. Click on the Start button or press the Windows key to open the Start menu.
2. Click on the Power icon located at the bottom-left corner of the Start menu.
3. Press and hold the Shift key on your keyboard.
4. While holding the Shift key, click on the Restart option in the Power menu. This will initiate a system restart.
5. Your computer will now restart and display the boot options menu.
Once your computer restarts, you will see a list of startup options.
6. From the boot options menu, select Troubleshoot and then click on Advanced options.
7. Within the Advanced options menu, click on Startup Settings.
8. Click on the Restart button to reboot your computer.
After the restart, you will be presented with a list of startup settings.
9. To enter Safe Mode, press the number corresponding to the desired Safe Mode option. For example, press 4 for Safe Mode, or press 5 for Safe Mode with Networking.
Your computer will now restart once again and boot into Safe Mode based on your selected option.
Using the Shift + Restart option to access Safe Mode is a quick and convenient method as it allows you to access the Advanced startup menu directly from the Windows login or lock screen. This method is especially useful if you are unable to enter the Windows environment due to an issue you need to troubleshoot in Safe Mode.
In the next section, we will conclude our guide and provide some additional tips for using Safe Mode effectively in Windows 11.
Conclusion
Safe Mode is a valuable tool in Windows 11 that allows you to troubleshoot and resolve various system issues. Whether you’re dealing with startup problems, software conflicts, malware infections, or driver-related issues, booting into Safe Mode provides a controlled environment where you can diagnose and fix these problems effectively.
In this guide, we discussed four different methods to boot into Safe Mode in Windows 11. These methods include using the Power menu, the Settings app, the System Configuration tool, and the Shift + Restart option. Each method offers a convenient way to access Safe Mode based on your preference and specific situation.
Remember that Safe Mode is not meant for regular use, but rather for diagnosing and resolving system issues. In Safe Mode, only essential drivers and services are loaded, which allows you to isolate and identify the cause of problems. Once you have identified the issue, you can take appropriate actions to fix it, such as uninstalling problematic software, updating drivers, or performing system restores.
When using Safe Mode, it’s important to be patient and cautious. In Safe Mode, certain features and functionalities may be limited, and the overall user experience may be different from normal mode. However, these limitations are necessary to provide a clean and stable environment for troubleshooting.
We hope this guide has provided you with the necessary information to effectively boot into Safe Mode in Windows 11. By following the methods outlined in this guide, you can easily access Safe Mode and successfully troubleshoot and resolve various system issues.
Remember to use Safe Mode as a diagnostic tool and not as a permanent solution. Once you have identified and resolved the underlying issue, you can boot back into normal mode to enjoy the full functionality of your Windows 11 system.
If you encounter any difficulties or have any further questions, consult the Microsoft support documentation or seek assistance from technical professionals.
Happy troubleshooting in Safe Mode!