Introduction
Welcome to this guide on how to use the Windows built-in VPN! In the digital age, privacy and security are of utmost importance. Using a Virtual Private Network (VPN) is a great way to protect your online activities from prying eyes and potential threats. While there are many VPN services available, Windows provides you with a built-in solution that is easy to set up and use.
So, what exactly is a VPN? A VPN is a secure connection that allows you to access the internet privately and anonymously. It encrypts your internet traffic, making it difficult for anyone to intercept and decipher your data. This is especially relevant when using public Wi-Fi networks, where your sensitive information can be vulnerable to hackers.
Now, you might wonder why you should use the Windows built-in VPN instead of opting for a third-party solution. Well, there are several advantages to using the VPN feature that comes bundled with the Windows operating system. First and foremost, it is free and readily available. You don’t need to spend any additional money or go through the hassle of installing separate software.
In addition, the Windows built-in VPN offers a seamless integration with the operating system. It provides a consistent user experience and ensures compatibility with other Windows features. You can easily configure and manage your VPN settings directly from the Windows settings menu, without the need for any external applications.
In this guide, we will walk you through the steps to set up and use the Windows built-in VPN. Whether you are a beginner or an experienced user, this tutorial will help you establish a secure connection and protect your online privacy. Let’s dive in and get started!
What is a VPN?
A Virtual Private Network (VPN) is a technology that allows users to create a secure and encrypted connection over a public network, such as the internet. It works by routing your internet traffic through a remote server and encrypting the data, making it private and secure from prying eyes.
When you connect to the internet through a VPN, your device establishes a tunnel between your computer and the VPN server. All your internet traffic passes through this tunnel, effectively hiding your IP address and encrypting your data. This makes it difficult for anyone to see what websites you visit or intercept your personal information.
So why should you consider using a VPN? Here are a few key benefits:
- Enhanced Privacy: By using a VPN, you can protect your online privacy by keeping your internet traffic private and anonymous. Your IP address is masked, making it difficult for websites and advertisers to track your online activities.
- Data Security: VPNs encrypt your internet traffic, making it impossible for hackers to intercept and decipher your data. This is particularly important when using public Wi-Fi networks, as they are often insecure and vulnerable to cyber attacks.
- Bypass Geographical Restrictions: VPNs allow you to bypass geographical restrictions and access content that might be blocked in your country. By connecting to a server located in a different region, you can appear as if you are browsing from that location.
- Anonymity: VPNs provide a layer of anonymity by masking your IP address and making it difficult to trace your activities back to your device. This can be beneficial if you want to maintain your privacy while browsing the internet.
It’s important to note that while VPNs offer many benefits, they are not a foolproof solution. They can help protect your privacy, but they cannot guarantee complete anonymity. It is always advised to choose a reputable VPN provider that has a strict no-logs policy and uses strong encryption protocols.
In the next sections, we will explore how to use the Windows built-in VPN, which is a convenient and secure option for protecting your online activities. Let’s continue to the next step!
Why Use Windows Built-In VPN?
When it comes to choosing a VPN, you have a plethora of options available in the market. However, utilizing the built-in VPN feature provided by Windows can offer several advantages. Let’s explore why you should consider using the Windows built-in VPN:
1. Seamless Integration: One of the major benefits of using the Windows built-in VPN is its seamless integration with the operating system. Since it is a native feature, you can easily access and configure your VPN settings directly from the Windows settings menu. This integration ensures a smooth user experience and eliminates the need to install additional software or applications.
2. Compatibility: Being a part of the Windows operating system, the built-in VPN feature is designed to work flawlessly with other Windows functionalities. It ensures compatibility with various applications and services, allowing you to use VPN protection across different platforms without any compatibility issues.
3. Free of Cost: Cost can often be a deciding factor when choosing a VPN service. The Windows built-in VPN provides a cost-effective solution as it is available free of charge. Whether you are a home user or a small business owner, you can enjoy the benefits of VPN without any additional financial burden.
4. User-Friendly Interface: Another advantage of the Windows built-in VPN is its user-friendly interface. The settings menu provides clear and intuitive options for setting up and configuring your VPN connection. Even if you are a beginner with limited technical expertise, you can easily navigate through the settings and establish a secure VPN connection.
5. Enhanced Security: Security is a top priority when it comes to choosing a VPN, and the Windows built-in VPN takes this aspect seriously. With robust encryption protocols, it ensures the protection of your data and privacy while browsing the internet. Additionally, it provides built-in firewall capabilities to further enhance the security of your connection.
6. Trusted Provider: Windows is a trusted and widely-used operating system, and its built-in VPN feature follows the same level of reliability. You can have confidence in utilizing a feature provided by Microsoft, a recognized and reputable technology company.
By utilizing the Windows built-in VPN, you can enjoy the convenience, security, and cost savings it offers. In the next sections, we will guide you through the process of setting up and using the Windows built-in VPN, providing you with a secure and private browsing experience. Let’s move on to the next step and start configuring your VPN connection!
Step 1: Setting Up the VPN Connection
Before you can start using the Windows built-in VPN, you need to set up a VPN connection. Here’s how you can do it:
1. Open the Settings menu: Click on the Start menu and select the “Settings” gear icon. Alternatively, you can use the shortcut Windows key + I to open the Settings menu directly.
2. Go to Network & Internet: In the Settings menu, click on “Network & Internet” to access the network settings.
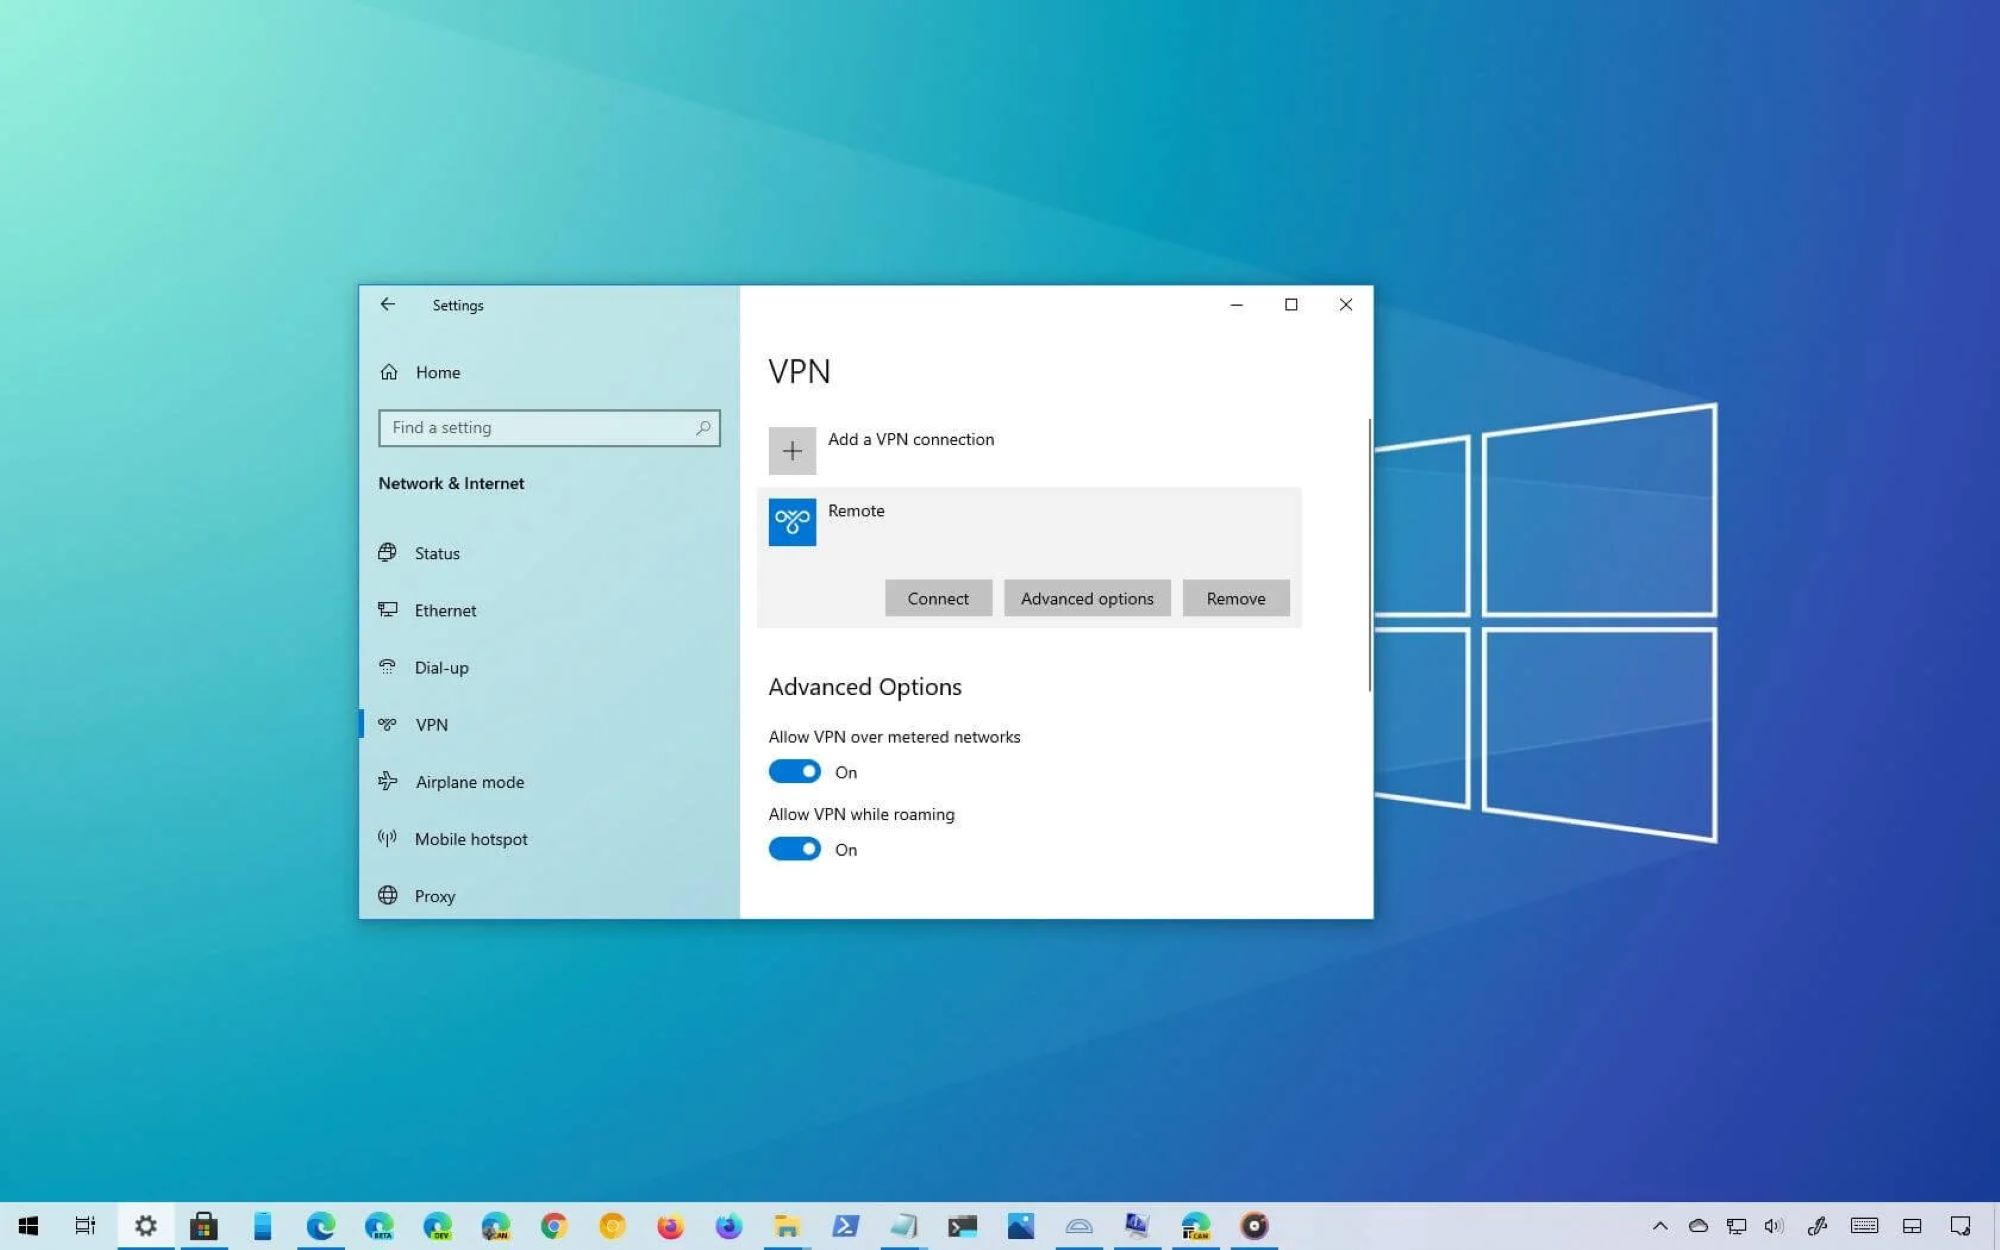
3. Select VPN from the sidebar: In the Network & Internet settings, choose the “VPN” option from the sidebar. This will display the VPN settings on the right side of the window.
4. Click on “Add a VPN connection”: Under the VPN settings, click on the “Add a VPN connection” button. This will open the configuration page to set up your VPN connection.
5. Enter the VPN details: On the VPN configuration page, you need to provide the necessary details for your VPN connection. This includes:
- VPN provider: Select the VPN provider from the drop-down menu. If you are using a third-party VPN, choose the appropriate option. If you are setting up a workplace VPN, select “Windows (built-in)”.
- Connection name: Give a name to your VPN connection. This can be any name that helps you identify the connection.
- Server name or address: Enter the server name or IP address provided by your VPN provider. This information is essential to establish a connection to the VPN server.
- VPN type: Choose the type of VPN connection you are setting up. This can be either “Automatic”, “Point to Point Tunneling Protocol (PPTP)”, “Layer 2 Tunneling Protocol with IPsec (L2TP/IPsec)”, “Secure Socket Tunneling Protocol (SSTP)”, or “Internet Protocol security (IPsec)”. Consult your VPN provider for the recommended VPN type.
- User name and password: Depending on your VPN provider, you may need to enter your VPN login credentials. This includes the user name and password provided by your VPN service.
6. Save the VPN connection: Once you have entered all the necessary details, click on the “Save” button to save the VPN connection settings.
That’s it! You have successfully set up a VPN connection on your Windows system. In the next step, we will configure the VPN connection to ensure it functions as intended. Keep reading to learn more!
Step 2: Configuring the VPN Connection
After setting up the VPN connection in the previous step, it’s time to configure the connection settings to ensure optimal performance. Follow these steps to configure your VPN connection:
1. Open the Network & Internet settings: Open the Settings menu by clicking on the Start button and selecting the “Settings” gear icon. Then choose “Network & Internet” from the options.
2. Select VPN from the sidebar: In the Network & Internet settings, click on “VPN” from the sidebar to access the VPN settings.
3. Click on your VPN connection: Under the VPN settings, you will see a list of all the VPN connections you have created. Click on the VPN connection that you want to configure.
4. Click on “Advanced options”: In the VPN connection settings, click on the “Advanced options” link. This will open the advanced configuration options for your VPN connection.
5. Configure the VPN options: Here, you will find several configuration options to customize your VPN connection. Some of the options you may find include:
- Automatic VPN: Enable this option if you want Windows to automatically establish the VPN connection whenever you connect to an insecure network, such as a public Wi-Fi.
- VPN proxy: If you want to use a proxy server along with your VPN connection, you can enter the proxy settings in this section.
- Clear sign-in info: Click on this option to clear your VPN login credentials from the system. This can be useful if you want to remove saved passwords or change your login details.
- Change adapter options: By clicking on this option, you will be taken to the network connections settings where you can further customize your VPN connection properties.
6. Save the configuration: Once you have made the necessary changes to your VPN connection settings, click on the “Save” button to save the configuration.
That’s it! You have successfully configured your VPN connection settings. In the next step, we will learn how to connect to the VPN. Keep reading to find out more!
Step 3: Connecting to the VPN
Now that you have set up and configured your VPN connection, it’s time to connect to the VPN server. Follow these steps to establish a secure connection:
1. Open the Network & Internet settings: Start by opening the Settings menu. You can do this by clicking on the Start button and selecting the “Settings” gear icon. Then choose “Network & Internet” from the options.
2. Select VPN from the sidebar: In the Network & Internet settings, click on “VPN” from the sidebar to access the VPN settings.
3. Choose your VPN connection: Under the VPN settings, you will see a list of all the VPN connections you have created. Click on the VPN connection that you want to connect to.
4. Click on “Connect”: In the VPN connection settings, click on the “Connect” button to initiate the connection process.
5. Enter your login credentials (if required): Depending on your VPN provider, you may be prompted to enter your login credentials. These are the username and password provided by your VPN service. Enter the required information and click on “OK” or “Connect.”
6. Establish the VPN connection: Once you have entered your login credentials, Windows will attempt to establish a connection to the VPN server. You may see a notification or status indicator confirming that the connection is being established.
7. Verify the connection: Once the connection is established, you can verify its status in the VPN settings. Under the VPN connection, you will see the status as “Connected”. You may also see additional information such as the duration of the connection.
That’s it! You have successfully connected to the VPN server using the Windows built-in VPN. Your internet traffic is now encrypted and protected, providing you with enhanced privacy and security. In the next step, we will learn how to disconnect from the VPN when you no longer need it. Keep reading to find out more!
Step 4: Disconnecting from the VPN
When you no longer need to use the VPN and want to resume normal internet browsing, you can disconnect from the VPN server. Follow these steps to disconnect from the VPN:
1. Open the Network & Internet settings: Start by opening the Settings menu. You can do this by clicking on the Start button and selecting the “Settings” gear icon. Then choose “Network & Internet” from the options.
2. Select VPN from the sidebar: In the Network & Internet settings, click on “VPN” from the sidebar to access the VPN settings.
3. Choose your VPN connection: Under the VPN settings, you will see a list of all the VPN connections you have created. Click on the VPN connection that you want to disconnect from.
4. Click on “Disconnect”: In the VPN connection settings, click on the “Disconnect” button to end the connection to the VPN server.
5. Verify the disconnection: After clicking on “Disconnect”, the VPN connection will be terminated, and your computer will resume normal internet access. You can verify the disconnection by checking the VPN settings, where the status of the connection should be shown as “Not connected”.
It’s important to remember that when you are connected to a VPN, all your internet traffic is routed through the VPN server. Disconnecting from the VPN will revert your traffic back to its normal routing, ensuring that you have unrestricted access to the internet.
Now that you know how to disconnect from the VPN, you can easily switch between using the VPN and regular internet browsing, depending on your needs. In the next section, we will discuss some common troubleshooting issues you may encounter while using the Windows built-in VPN. Keep reading to find out more!
Troubleshooting Common Issues
While using the Windows built-in VPN, you may encounter some common issues. Here are a few troubleshooting steps to help you resolve them:
1. Unable to connect to the VPN: If you are unable to establish a connection to the VPN server, double-check your VPN settings, including the server name or address, VPN type, and login credentials. Ensure that you have a stable internet connection and that your VPN provider’s server is not facing any technical issues. Try restarting your computer and router, as this can sometimes resolve connection problems.
2. Slow internet speed: If you notice a significant decrease in your internet speed while connected to the VPN, try connecting to a different VPN server that is closer to your geographical location. Additionally, verify that your internet connection is stable and not experiencing any bandwidth limitations. Some VPN protocols, such as OpenVPN, may offer faster speeds compared to others.
3. DNS or IP leakage: To ensure that your VPN connection is secure, it is essential to prevent any DNS or IP leaks. You can use online tools to check for any leaks while connected to the VPN. If you detect a leak, make sure that your VPN settings are correctly configured, and consider using DNS leak protection features provided by your VPN service.
4. Firewall or antivirus interference: Sometimes, firewall or antivirus software may interfere with the VPN connection. Temporarily disabling these security features can help identify if they are causing the issue. If disabling them resolves the problem, you can adjust the settings of your firewall or antivirus software to allow the VPN connection.
5. Error messages or authentication issues: If you encounter error messages or face authentication issues while connecting to the VPN, ensure that your VPN client and operating system are up to date. Check for any recent updates and install them if available. If the problem persists, contact your VPN provider’s support team for assistance.
6. VPN compatibility with specific applications: Some applications or services may experience compatibility issues when used with a VPN. In such cases, try adjusting the VPN settings to allow specific application or port access. Alternatively, you can try connecting to a different VPN server or consult your VPN provider for guidance.
If you encounter any other issues while using the Windows built-in VPN, it is always a good idea to check the official Microsoft documentation or seek support from your VPN provider. They can provide specific guidance based on the nature of the problem.
By addressing common issues and applying the troubleshooting steps mentioned above, you can ensure a smooth and hassle-free experience while using the Windows built-in VPN. In the next section, we will conclude this guide. Keep reading to wrap things up!
Conclusion
Using the Windows built-in VPN provides a convenient and secure option for protecting your online activities. Whether you are concerned about privacy, security, or accessing geo-restricted content, the Windows VPN feature offers a reliable solution that is easy to set up and use. Throughout this guide, we have explored the steps to set up, configure, connect, and disconnect from the Windows built-in VPN.
By following the instructions and troubleshooting tips provided, you can establish a secure connection, encrypt your internet traffic, and protect your data from potential threats. The seamless integration with the Windows operating system ensures compatibility and ease of use, while the cost savings of using the built-in solution make it an attractive option for both home users and small businesses.
Remember, while the Windows built-in VPN offers a great level of security and privacy, it is not a foolproof solution. It is essential to choose a reputable VPN provider, follow best practices for online safety, and stay vigilant against potential cybersecurity risks.
We hope this guide has been helpful in guiding you through the process of using the Windows built-in VPN. Whether you are a beginner or an experienced user, the steps outlined here should empower you to establish a secure connection and enjoy the benefits of a VPN without the need for additional software.
By taking control of your online privacy and security, you can browse the internet with confidence and peace of mind. Stay safe, and happy browsing!