Introduction
Welcome to our comprehensive guide on how to upgrade your M.2 SSD without reinstalling Windows. If you’re looking to enhance your computer’s speed and storage capacity, upgrading your M.2 SSD is a great solution. With this step-by-step tutorial, we’ll walk you through the entire process, ensuring a smooth and hassle-free upgrade.
M.2 SSDs, also known as Next Generation Form Factor (NGFF) SSDs, are compact and high-performance storage devices that connect directly to your motherboard. They offer faster data transfer speeds, lower power consumption, and improved reliability compared to traditional hard drives or even SATA SSDs. With their small form factor and impressive performance, M.2 SSDs have become increasingly popular among computer enthusiasts and professionals.
Upgrading your M.2 SSD can bring significant benefits, including faster boot times, quicker application loading, and smoother multitasking. Additionally, with larger storage capacities available, you can store more files, games, and multimedia content without worrying about running out of space.
Before diving into the upgrade process, it’s crucial to prepare yourself and your system to ensure a successful transition. This guide will cover everything you need to know, from backing up your data to verifying the installation. So let’s get started!
Understanding M.2 SSDs
In order to successfully upgrade your M.2 SSD, it’s important to have a solid understanding of what this type of storage device entails. M.2 SSDs, as mentioned earlier, are a type of solid-state drive that uses the M.2 form factor, which is characterized by its small size and direct connection to the motherboard.
One of the key advantages of M.2 SSDs is their impressive speed. These drives utilize the NVMe (Non-Volatile Memory Express) protocol, which allows for significantly faster data transfer rates compared to traditional SATA-based SSDs. This means that tasks such as booting up your computer or loading applications can be completed in a matter of seconds, resulting in a more efficient and responsive system.
Another notable aspect of M.2 SSDs is their compact size. These drives are incredibly thin and small, making them ideal for small form factor systems like laptops and compact desktop builds. The slim profile of M.2 SSDs also allows for better airflow and cooling within your system, ensuring optimal performance even in cramped spaces.
It’s important to note that M.2 SSDs come in different physical sizes. The length of an M.2 SSD can vary from 30mm to 110mm, with the most common sizes being 80mm (Type 2280) and 42mm (Type 2242). The size you choose should be compatible with your system’s M.2 slot. Ensure that you check your motherboard’s specifications and identify the supported M.2 slot key (B, M, or B+M) and length to ensure compatibility.
In terms of storage capacity, M.2 SSDs can offer a wide range of options. Capacities can go as low as 128GB and reach up to multiple terabytes, allowing you to choose the size that best suits your needs. Keep in mind that higher capacity M.2 SSDs tend to be more expensive, so it’s essential to consider your storage requirements and budget when selecting a drive.
Overall, M.2 SSDs are a game-changer when it comes to storage technology. Their combination of speed, compact size, and versatility makes them an ideal choice for anyone looking to upgrade their storage solution. With this knowledge in hand, you’re now ready to dive into the process of upgrading your M.2 SSD without reinstalling Windows.
Preparing for the Upgrade
Before you begin the M.2 SSD upgrade process, it’s essential to properly prepare yourself and your system. Taking the necessary steps beforehand will help ensure a smooth and successful transition without any data loss or compatibility issues. Here are the key steps to follow:
1. Backup Your Data: Before making any hardware changes, it’s crucial to back up all your important data. This includes documents, photos, videos, and any other files you don’t want to lose. You can use an external hard drive, cloud storage, or even a reliable backup software to create a full backup of your system. This precautionary measure will give you peace of mind in case anything goes wrong during the upgrade process.
2. Gather the Required Tools: To perform the M.2 SSD upgrade, you’ll need a few tools. The most important tool is a small Phillips head screwdriver, which is typically used to secure the M.2 SSD to the motherboard. Additionally, it’s helpful to have an antistatic wrist strap to prevent any potential static electricity damage to your sensitive components. Finally, make sure you have a clean and well-lit workspace to work on your computer comfortably.
3. Check for Compatibility: It’s essential to confirm that your system supports an M.2 SSD upgrade. Check your motherboard’s user manual or manufacturer’s website to verify if it has an available M.2 slot and whether it supports the specific size and key type of the M.2 SSD you plan to install. Additionally, check your system’s BIOS version and ensure it’s up to date to ensure compatibility with the new M.2 SSD.
4. Research your Operating System Requirements: Depending on your current operating system, you may need to take additional steps to ensure a smooth transition. If you’re running an older version of Windows, such as Windows 7, you may need to update your system to support NVMe-based SSDs. Check the documentation provided by your operating system to determine if any specific drivers or updates are required.
5. Plan for Temporary Data Storage: Since you’ll be replacing your existing SSD with the new M.2 SSD, you’ll need a temporary storage solution during the cloning process. A spare external hard drive or a USB flash drive with enough capacity to hold your data will suffice. Alternatively, you can connect your existing SSD to another computer using an external enclosure.
By following these essential preparation steps, you’ll ensure a smooth and trouble-free M.2 SSD upgrade. Once you have completed these preparations, you’re ready to move on to the next step of cloning your current SSD to the new M.2 SSD.
Cloning Your Current SSD
Now that you have prepared your system for the M.2 SSD upgrade, it’s time to clone your current SSD to the new M.2 SSD. Cloning allows you to transfer all your files, settings, and operating system to the new drive, ensuring a seamless transition without the need to reinstall Windows. Here’s how to clone your current SSD:
1. Choose a Cloning Software: There are several reliable cloning software options available, such as Clonezilla, Macrium Reflect, or Acronis True Image. Choose the software that best suits your needs and download it onto your system. Make sure to choose a version that supports M.2 SSD cloning.
2. Connect the M.2 SSD: Carefully insert the new M.2 SSD into the M.2 slot on your motherboard. Ensure that it is properly aligned and firmly seated. Use the screw provided with your motherboard to secure the M.2 SSD in place.
3. Launch the Cloning Software: Open the cloning software and follow the on-screen instructions to start the cloning process. Typically, you’ll need to select the source drive (your current SSD) and the destination drive (the new M.2 SSD).
4. Configure the Cloning Options: Before starting the cloning process, you may have the option to adjust some settings. It’s generally recommended to select the option to clone all partitions and to ensure that the destination drive is set as the primary boot drive. Review the cloning software documentation for specific guidance on configuring options.
5. Start the Cloning Process: Once you have configured the cloning options, start the cloning process. The software will begin copying all the data from your current SSD to the new M.2 SSD. This process may take some time, depending on the amount of data being transferred.
6. Verify the Cloning: After the cloning process is complete, it’s essential to verify that the data was successfully copied to the new M.2 SSD. Restart your computer and access the BIOS settings by pressing the appropriate key during startup. Check the list of installed drives to ensure that the new M.2 SSD is detected and listed correctly.
7. Disconnect the Original SSD: Once you have confirmed that the data was cloned successfully, shut down your computer and disconnect the original SSD. This step ensures that the system boots from the new M.2 SSD.
By following these steps, you’ll be able to clone your current SSD to the new M.2 SSD, preserving all your data and settings. Once the cloning process is complete, you’re ready to proceed with installing the new M.2 SSD.
Installing the New M.2 SSD
Now that you have successfully cloned your current SSD to the new M.2 SSD, it’s time to physically install the new drive into your system. Follow these steps to safely install the M.2 SSD:
1. Power off your computer: Before working on the internal components of your system, make sure to shut down your computer and unplug the power cord. This will prevent any potential electrical damage and ensure your safety.
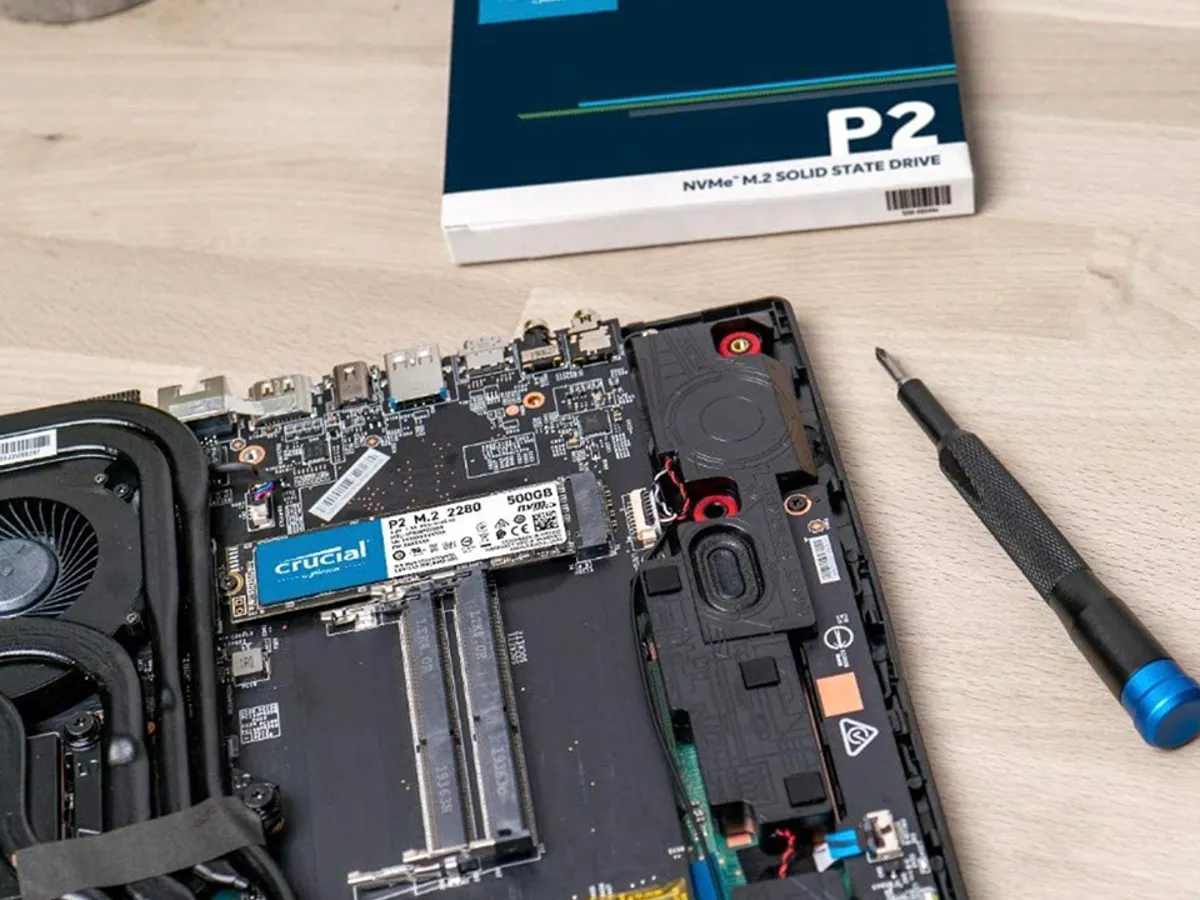
2. Locate the M.2 slot: Identify the M.2 slot on your motherboard where the new SSD will be installed. The slot may be labeled and can usually be found near the PCIe slots or the DIMM slots. Refer to your motherboard’s manual for the exact location.
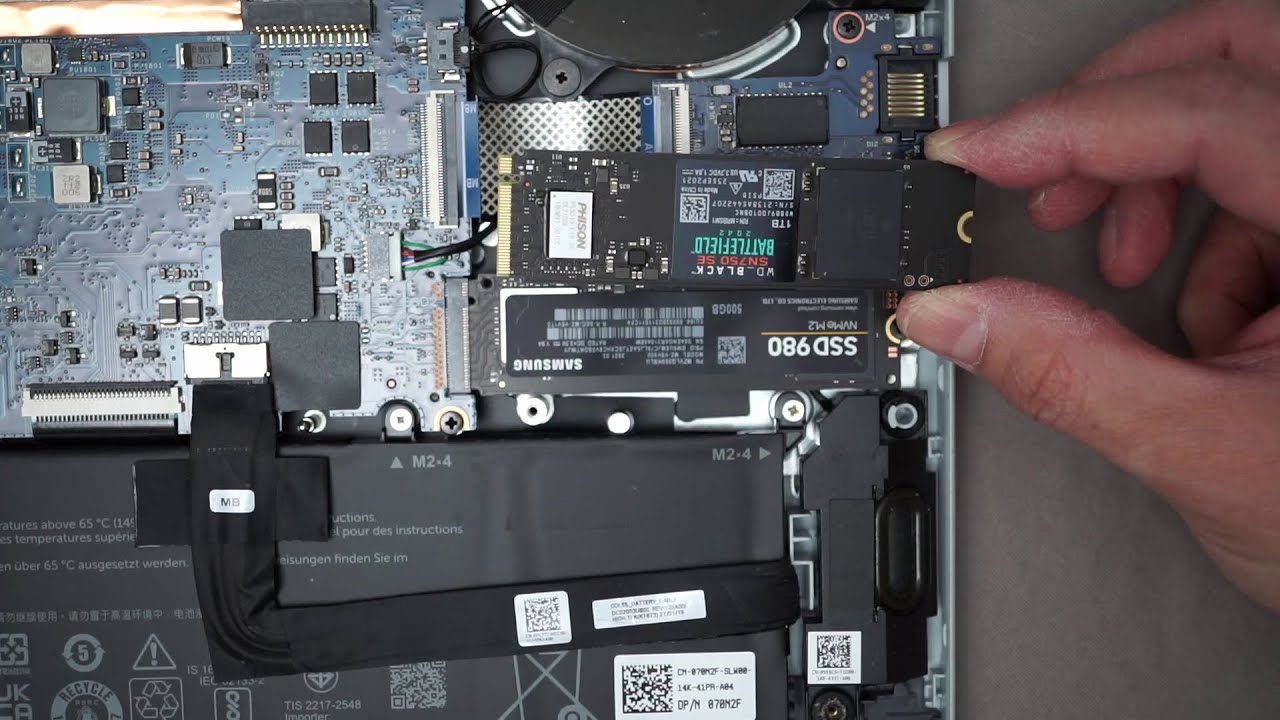
3. Insert the M.2 SSD: Carefully insert the M.2 SSD into the slot at a slight angle. Ensure that the gold connectors on the M.2 SSD are aligned with the socket on the motherboard. Gently press the drive down until it is fully seated in the slot.
4. Secure the M.2 SSD: Some motherboards have screws or retention clips to secure the M.2 SSD in place. Use the provided screw or clip to secure the SSD, ensuring it is firmly attached to the motherboard. Be cautious not to overtighten the screw or apply excessive force.
5. Verify the installation: Double-check the M.2 SSD’s installation by visually inspecting it and making sure it is properly seated in the slot. Additionally, ensure that the screw or retention clip is tightened adequately without damaging the SSD or the motherboard.
6. Reassemble your computer: Now that the M.2 SSD is securely installed, reattach any components you may have removed, such as the computer’s case panel. Ensure that all cables are properly connected, and everything is in place.
7. Power on your computer: Plug in the power cord and turn on your computer. The system should recognize the new M.2 SSD. To confirm this, access the BIOS settings by pressing the appropriate key during startup. Check the list of installed drives to ensure that the new M.2 SSD is detected and listed correctly.
Congratulations! You have successfully installed the new M.2 SSD into your system. Now, it’s time to move on to the next step, where we will guide you through configuring the BIOS settings to optimize your new M.2 SSD.
Verifying the Installation
After installing the new M.2 SSD into your system, it’s crucial to verify the installation to ensure everything is functioning correctly. Verifying the installation will help prevent any potential issues and ensure that the M.2 SSD is recognized and operating at its full potential. Let’s go through the steps to verify the installation:
1. Access the BIOS Settings: Restart your computer and access the BIOS settings by pressing the appropriate key during startup. The key to access the BIOS may vary depending on your motherboard’s manufacturer. Common keys include Del, F2, or F10. Refer to your motherboard’s manual for precise instructions.
2. Check the Installed Drives: Once you are in the BIOS settings, navigate to the storage or drive configuration section. Here, you should see a list of recognized drives. Ensure that the new M.2 SSD is listed and detected correctly. The drive information, such as its model number and capacity, should be displayed.
3. Check the Boot Priority: In the BIOS settings, navigate to the boot options or boot priority section. Confirm that the new M.2 SSD is set as the primary boot drive. This ensures that your computer boots from the M.2 SSD and utilizes its speed and performance benefits.
4. Save and Exit: Once you have verified the M.2 SSD’s presence in the BIOS settings and confirmed the boot priority, save the changes and exit the BIOS. The computer will restart, and the operating system should load from the M.2 SSD.
5. Test System Performance: After your computer boots up, conduct some tests to ensure that the M.2 SSD is functioning correctly. Open applications, browse the web, and perform other tasks to evaluate the overall system performance. You should notice a significant improvement in speed and responsiveness compared to your previous SSD or hard drive.
6. Check Drive Capacity: Verify that the M.2 SSD’s capacity is accurately shown in the operating system. Open the disk management utility in Windows or the equivalent utility in your operating system to check the drive’s capacity and ensure that it matches the specifications of the new M.2 SSD.
By following these steps to verify the installation of the new M.2 SSD, you can confirm that it is properly recognized by the system and operating at its full potential. Next, we will guide you through configuring the BIOS settings to optimize the performance of your new M.2 SSD.
Configuring the BIOS
After verifying the installation of your new M.2 SSD, it’s important to configure the BIOS settings to optimize its performance. Adjusting the BIOS settings will ensure that your system takes full advantage of the speed and capabilities of the M.2 SSD. Follow these steps to configure the BIOS:
1. Access the BIOS Settings: Restart your computer and access the BIOS settings by pressing the appropriate key during startup. The key to access the BIOS may vary depending on your motherboard’s manufacturer. Common keys include Del, F2, or F10. Refer to your motherboard’s manual for precise instructions.
2. Enable the UEFI Mode: In the BIOS settings, navigate to the “Boot” or “Boot Options” section. Look for an option called “Boot Mode” or “Boot Configuration.” Select the UEFI mode if it’s not already enabled. The UEFI mode is required for optimal performance and compatibility with modern hardware.
3. Enable AHCI Mode: AHCI (Advanced Host Controller Interface) mode allows for better performance and more advanced features of the M.2 SSD. In the BIOS settings, navigate to the “SATA Configuration” or “Storage Configuration” section. Look for an option called “SATA Mode” or “SATA Operation.” Select the AHCI mode if it’s not already enabled.
4. Disable Legacy Boot: In the BIOS settings, navigate to the “Boot” or “Boot Options” section. Look for an option called “Legacy Boot” or “Compatibility Support Module (CSM).” Disable the legacy boot option if it’s enabled. This ensures that your system boots in the modern UEFI mode, which provides better compatibility and performance.
5. Save and Exit: Once you have made the necessary changes to the BIOS settings, save the changes and exit the BIOS. The computer will restart, and the new settings will take effect.
By configuring the BIOS settings to enable UEFI mode, AHCI mode, and disable legacy boot, you are optimizing your system for the best performance with the new M.2 SSD. It’s important to note that the specific BIOS settings may vary depending on your motherboard’s manufacturer and model. Refer to the motherboard’s manual or consult the manufacturer’s website for detailed information on BIOS settings specific to your system.
With the BIOS correctly configured, your system is now ready to take full advantage of the speed and performance benefits offered by the M.2 SSD. Next, we’ll guide you through the final step of testing your system to ensure that everything is functioning as expected.
Testing Your System
After completing the M.2 SSD upgrade and configuring the BIOS settings, it’s essential to thoroughly test your system to ensure that everything is functioning as expected. Testing your system will help identify any potential issues and ensure that the new M.2 SSD is providing the desired performance improvements. Follow these steps to test your system:
1. Boot Time: Start by assessing the boot time of your computer. Compare it to the boot time before the M.2 SSD upgrade. You should notice a significant improvement in the time it takes for your system to boot up and become usable.
2. Application Loading: Open various applications and observe the loading times. Applications should launch faster and be more responsive, thanks to the increased read and write speeds of the M.2 SSD.
3. File Transfers: Copy large files or folders to and from the M.2 SSD to test its transfer speeds. The M.2 SSD should provide faster data transfer rates compared to traditional hard drives or SATA-based SSDs.
4. System Responsiveness: Perform regular tasks such as web browsing, media streaming, and multitasking. The system should feel more responsive and snappy, with smoother performance and quicker response times.
5. Benchmarking Software: Use benchmarking software, such as CrystalDiskMark or AS SSD, to measure the read and write speeds of the M.2 SSD. Compare the results to the specifications of the drive to ensure that it is performing within the expected range.
6. Temperature Monitoring: Monitor the temperature of the M.2 SSD using software such as HWiNFO or SSD-specific monitoring tools. Ensure that the temperatures remain within acceptable ranges to prevent any performance degradation or potential hardware issues.
7. Overall System Stability: Continue using your system for an extended period to assess its stability. Monitor for any unusual behavior, crashes, or performance issues. Ensure that all functions and features of your system continue to work correctly.
By thoroughly testing your system, you can confirm that the M.2 SSD upgrade has been successful and that your computer is experiencing the expected performance improvements. If any issues arise during testing, double-check the installation, BIOS settings, and drivers to ensure everything is properly configured.
Once you have completed testing and are satisfied with the performance and stability of your system, you can enjoy the enhanced speed and storage capacity provided by your new M.2 SSD!
Conclusion
Congratulations! You’ve successfully upgraded your M.2 SSD without reinstalling Windows. By following this comprehensive guide, you have learned how to prepare your system, clone your current SSD, install the new M.2 SSD, configure BIOS settings, and test the system for optimal performance.
The upgrade to an M.2 SSD offers numerous benefits, including faster boot times, quicker application loading, and improved overall system responsiveness. The compact form factor and high-speed capabilities of M.2 SSDs make them an excellent choice for those seeking to enhance their computer’s storage and performance.
Throughout the process, you acquired valuable knowledge about M.2 SSDs, their advantages, proper installation techniques, and BIOS configuration settings. By ensuring compatibility, backing up your data, and adhering to proper safety precautions, you have successfully completed the upgrade without the need to reinstall your operating system.
Remember to regularly monitor the performance and temperature of your new M.2 SSD to maintain optimal functionality. Additionally, make a habit of creating backups of your important data to safeguard against any potential hardware or software issues.
We hope this guide has empowered you to confidently upgrade your M.2 SSD, providing you with a powerful and efficient storage solution for your computer. Enjoy the improved performance, increased storage capacity, and faster data access that your new M.2 SSD brings!