Introduction
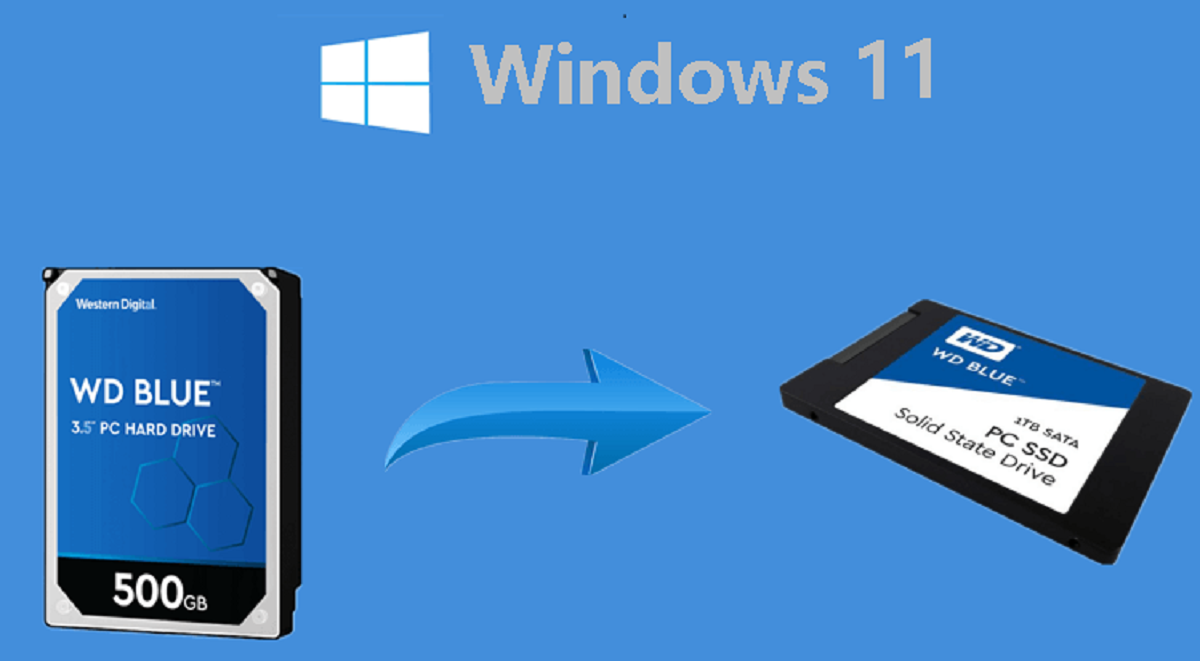
Welcome to the world of solid-state drives (SSDs)! If you’re looking to boost your computer’s performance and speed up your Windows system, you’ve come to the right place. In this article, we’ll explore the benefits of moving Windows to an SSD and guide you through the different methods of accomplishing this task.
Gone are the days of sluggish startup times and pesky loading screens. By migrating Windows to an SSD, you can experience lightning-fast boot times, reduced application launch times, and improved overall system responsiveness. Whether you’re a gamer, a professional, or an everyday user, upgrading to an SSD can significantly enhance your computing experience.
Before we dive into the various methods of moving Windows to an SSD, it’s important to understand the preparations and considerations involved in this process. It’s crucial to back up your data, choose the right cloning or migration software, and ensure that you have the necessary hardware compatibility.
Throughout this article, we’ll discuss the three main methods of moving Windows to an SSD: cloning your existing operating system, using third-party migration software, or performing a fresh installation of Windows. We’ll walk you through the step-by-step procedures, highlight the benefits and limitations of each method, and address some common issues you may encounter during the migration process.
Whether you’re upgrading your existing system or starting from scratch, this guide will provide you with the essential information you need to successfully move Windows to an SSD. Let’s get started and unlock the true potential of your computer!
Benefits of Moving Windows to an SSD
Moving Windows to an SSD can be a game-changer for your computer’s performance. Here are some of the key benefits you can expect when you upgrade to an SSD:
- Improved Speed: One of the most noticeable advantages of using an SSD is the significant improvement in speed. SSDs boast lightning-fast read and write speeds, reducing system boot times and application load times. With an SSD, you’ll experience snappy and responsive performance, allowing you to get tasks done more efficiently.
- Faster File Transfer: With traditional hard drives, transferring large files or copying data can be a time-consuming process. SSDs, on the other hand, excel in data transfer speeds, making file transfers and data backups lightning quick. Whether you’re a content creator, a professional dealing with large datasets, or simply someone who frequently transfers files, an SSD will save you valuable time.
- Reliability: Unlike traditional hard drives that rely on spinning mechanical parts, SSDs have no moving components. This lack of mechanical parts makes SSDs more resistant to physical shock, ensuring greater durability and reliability. You won’t have to worry about mechanical failures or data loss due to accidental drops or vibrations.
- Energy Efficiency: SSDs are not only faster and more reliable; they also consume less power than traditional hard drives. This means improved energy efficiency and battery life for laptops. You’ll be able to work or play on the go for longer periods without needing to plug in your device.
- No Noise: Mechanical hard drives generate noise while in use due to the spinning disks and moving components. Since SSDs have no mechanical parts, they operate silently. Say goodbye to the distracting humming sound coming from your computer and enjoy a quieter computing experience.
- Space Optimization: SSDs come in smaller and more compact form factors than traditional hard drives. This allows for greater flexibility in laptop designs and saves valuable space in desktop setups. If you’re working with limited internal storage options, an SSD can provide a significant boost in speed without sacrificing space.
These are just a few of the many benefits of moving Windows to an SSD. Whether you’re a casual user looking for improved performance or a professional who relies on speed and efficiency, upgrading to an SSD is a worthwhile investment. So, let’s move on to the next section and explore the preparations needed before migrating Windows to an SSD.
Preparations before Moving Windows to an SSD
Before diving into the process of moving Windows to an SSD, there are a few important preparations you should make to ensure a smooth transition. These preparations will help minimize any potential issues and safeguard your data. Here are the key steps to take:
- Back up your data: Before proceeding with any major system changes, it’s crucial to back up all your important data. This includes documents, photos, videos, and any other files that you cannot afford to lose. You can use an external hard drive, a cloud storage service, or a reliable backup software to create a complete backup of your files.
- Check hardware compatibility: Before purchasing an SSD, you need to ensure that your computer’s hardware is compatible. Check the specifications of your motherboard or consult the manufacturer’s website to determine if your system supports SSDs. Additionally, make sure your computer has an available SATA port or M.2 slot for connecting the SSD.
- Select the right SSD: There are various types of SSDs available, including SATA SSDs and NVMe SSDs. It’s essential to choose an SSD that suits your system requirements and budget. SATA SSDs provide a significant performance improvement over traditional hard drives, while NVMe SSDs offer even faster speeds for systems with NVMe support.
- Prepare the migration software: Depending on the method you choose to move Windows to the SSD, you may require cloning or migration software. Research and select a reputable software that supports your specific needs. Popular options include Clonezilla, Macrium Reflect, and EaseUS Todo Backup.
- Clean up your system: Before migrating Windows to an SSD, it’s a good idea to clean up your system and remove any unnecessary files or applications. Use the built-in Disk Cleanup tool in Windows to delete temporary files, empty the Recycle Bin, and free up space on your current hard drive.
Taking these preparatory steps will help ensure a seamless transition to your new SSD and safeguard your data throughout the process. Now that you’re prepared, let’s explore the different methods of moving Windows to an SSD.
Cloning Windows to an SSD
Cloning your existing Windows installation to an SSD is one of the most straightforward methods of migrating your operating system. It involves creating an exact copy, or clone, of your current hard drive onto the SSD. Here’s a step-by-step guide to cloning Windows to an SSD:
- Choose the right cloning software: Select a reliable cloning software that supports disk cloning. Popular options include Clonezilla, Macrium Reflect, and EaseUS Todo Backup. Download and install the software on your computer.
- Connect your SSD: Connect your SSD to your computer using a SATA-to-USB adapter or by directly installing it inside your computer if there is an available slot. Ensure that the SSD is recognized by your system.
- Launch the cloning software: Open the cloning software you installed and follow the instructions to start the cloning process. You may be prompted to select the source disk (your current hard drive) and the destination disk (your SSD).
- Configure the cloning settings: Adjust the cloning settings based on your preferences. You may have the option to resize partitions, clone only certain partitions, or enable sector-by-sector cloning for an exact replica. Review the settings to ensure the clone will fit within the capacity of the SSD.
- Start the cloning process: Once you’re satisfied with the settings, start the cloning process. The software will begin copying all the data from your current hard drive to the SSD. This process may take some time depending on the size of your drive and the speed of your system.
- Verify the clone: Once the cloning process is complete, verify that the clone was successful. Disconnect your old hard drive and restart your computer using the SSD as the boot drive. Ensure that everything functions correctly and that all your data and settings are intact.
Cloning Windows to an SSD offers the advantage of transferring your entire system, including the operating system, applications, and settings, without the need for reinstalling individual programs or reconfiguring preferences. However, keep in mind that the SSD needs to have enough capacity to accommodate the data from your current hard drive.
Now that you understand the process of cloning Windows to an SSD, let’s explore another method of migrating your operating system using third-party migration software.
Migrating Windows to an SSD using Third-Party Software
If you prefer a more streamlined approach to migrating Windows to an SSD, using third-party migration software can be a viable solution. This method involves transferring your operating system and data to the SSD without the need for cloning. Here’s a step-by-step guide:
- Select the right migration software: Research and choose a reputable third-party migration software that suits your needs. Some popular options include Acronis True Image, Paragon Migrate OS, and MiniTool Partition Wizard.
- Install and launch the migration software: Install the chosen software on your computer and open it to begin the migration process.
- Connect your SSD: Connect the SSD to your computer using a SATA-to-USB adapter or by installing it directly if you have an available slot. Ensure that the SSD is recognized by your system.
- Create a migration plan: Follow the prompts in the software to create a migration plan. This plan will determine which files and settings will be transferred to the SSD.
- Select the source and destination disks: Choose your current hard drive as the source disk and the SSD as the destination disk. Make sure to double-check these selections to avoid overwriting any important data.
- Adjust the partition size: If necessary, you may have the option to adjust the partition size on the SSD. You can allocate more or less space to the system partition as per your requirements.
- Start the migration process: Once the migration settings are configured, begin the migration process. The software will copy the necessary files and transfer them to the SSD. The duration of this process will depend on the size of your data.
- Verify the migration: Once the migration is complete, disconnect your old hard drive and restart your computer using the SSD as the boot drive. Check that everything functions properly and make sure all your data and settings have been successfully transferred.
Migrating Windows to an SSD using third-party software offers a convenient way to move your operating system and data without the need for cloning. However, it’s important to choose a reliable software and follow the instructions carefully to ensure a successful migration.
Now that you understand how to migrate Windows to an SSD using third-party software, let’s explore the option of performing a fresh installation of Windows on an SSD.
Fresh Installation of Windows on an SSD
If you prefer starting with a clean slate or want to take advantage of the latest version of Windows, performing a fresh installation on your SSD is an excellent option. Here’s a step-by-step guide to installing Windows on an SSD:
- Create a Windows installation media: First, you’ll need to create a bootable USB or DVD with the Windows installation files. You can download the official Windows installation media creation tool from the Microsoft website and follow the instructions to create the installation media.
- Connect your SSD: Connect the SSD to your computer using a SATA-to-USB adapter or by installing it directly if you have an available slot. Ensure that the SSD is recognized by your system.
- Boot from the installation media: Restart your computer and boot from the Windows installation media. This usually involves pressing a specific key (such as F12 or Del) during startup to access the boot menu and selecting the installation media as the boot device.
- Install Windows: Follow the on-screen prompts to proceed with the installation. Choose your desired language, time zone, and keyboard layout. When prompted to select a disk to install Windows, choose the SSD. You may need to format the SSD and create a new partition for the installation.
- Complete the installation: Sit back and wait while Windows installs on your SSD. The installation process may take some time, depending on the speed of your computer.
- Set up Windows: Once the installation is complete, you’ll need to go through the initial Windows setup. This involves creating a user account, choosing privacy settings, and customizing the system preferences according to your preferences.
- Install drivers and software: After setting up Windows, it’s essential to install the necessary drivers for your hardware components. You can download the latest drivers from the manufacturer’s website and install them on your computer. Additionally, install any required software and applications to get your system up and running.
- Transfer data and settings: If you have backed up your data from the previous Windows installation, you can transfer your files, settings, and applications back to your new Windows installation on the SSD. This can be done using backup and migration tools or by manually copying your files.
A fresh installation of Windows on an SSD provides you with a clean and optimized system, ensuring maximum performance and stability. Make sure to have your product key ready for activation during the installation process.
Now that you know how to perform a fresh installation of Windows on an SSD, let’s explore the process of transferring data and settings to the newly installed Windows on the SSD.
Transferring Data and Settings to the Newly Installed Windows on SSD
After you have successfully installed Windows on your SSD, it’s time to transfer your data and settings from your previous Windows installation. This will help you bring over your files, preferences, and applications to your new system. Here are the steps to transfer data and settings:
- Back up your data: Before transferring any data, ensure that you have a backup of your files. This will safeguard your important information and provide a safety net in case anything goes wrong during the transfer process. You can use an external storage device or cloud storage services for backup purposes.
- Identify the data to transfer: Determine which files and folders you want to transfer to the new Windows installation. This may include documents, photos, music, videos, and other important data. Make a list or create a separate folder to organize the files you need to move.
- Copy data to the SSD: Connect the storage device containing your backed-up data to your computer. Then, copy and paste or drag and drop the selected files and folders to the appropriate locations on the SSD. It’s a good idea to place documents in the Documents folder, photos in the Pictures folder, and so on.
- Reinstall necessary applications: Some applications may not work properly by simply copying over the files. In these cases, you’ll need to reinstall the software on your new Windows installation. Make a list of the applications you use regularly and download the latest versions from the official sources or use installation media if available.
- Transfer application settings: Some applications store settings and configurations in specific locations. To transfer your application settings, you can manually copy the relevant files or folders from your previous installation to the corresponding locations on the SSD. Consult the documentation or support resources for each application to determine the proper transfer method.
- Set up preferences and customizations: Take some time to configure your new Windows installation according to your preferences. This may include personalizing the desktop background, adjusting display and sound settings, installing additional drivers or updates, and configuring privacy settings.
- Test and verify: After transferring data and settings, it’s important to test the functionality of your newly installed Windows. Launch applications, open files, and explore different features to ensure everything is working as intended. Make any necessary adjustments or reinstall applications if needed.
By following these steps, you can seamlessly transfer your data and settings to the newly installed Windows on the SSD. Take the time to organize your files and install essential applications, ensuring a smooth transition to your new system.
Now that you have successfully moved Windows to your SSD and transferred your data and settings, let’s explore some common issues that you may encounter during the migration process and how to troubleshoot them.
Troubleshooting Common Issues during Windows Migration to an SSD
While migrating Windows to an SSD can be a relatively smooth process, you may encounter some common issues along the way. Understanding these issues and their potential solutions will help you overcome any hurdles you may face. Let’s explore some troubleshooting steps for common issues during Windows migration to an SSD:
- SSD not recognized: If your newly installed SSD is not being recognized by your system, ensure that it is properly connected and seated in the SATA port or M.2 slot. Check the BIOS settings to confirm that the SSD is enabled and set as the primary boot device.
- Insufficient disk space: If you encounter a “not enough disk space” error during the migration process, you may need to resize or delete unnecessary files and partitions on either the source drive or the SSD. Use disk management tools or third-party software to adjust the partition sizes and free up space as needed.
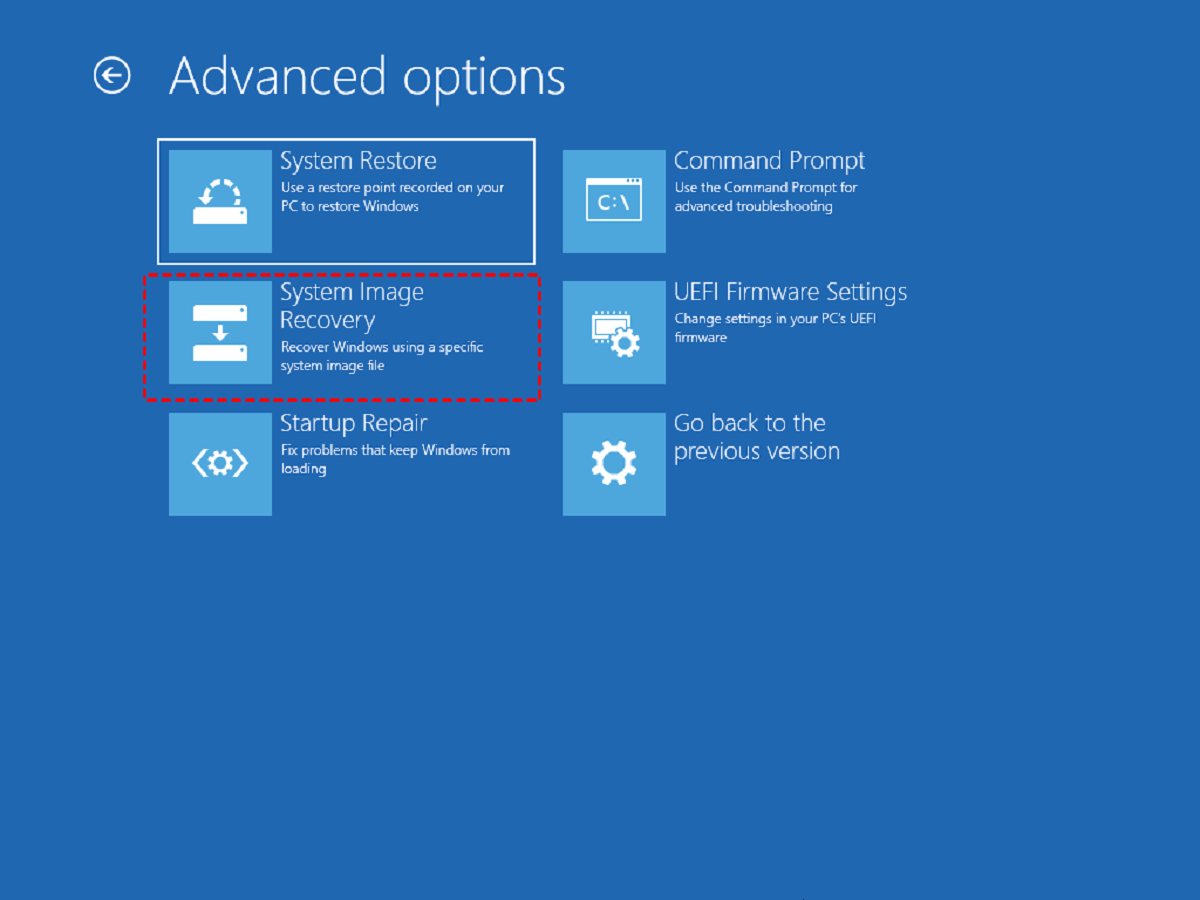
- Boot issues: If you’re having trouble booting from the SSD after migration, ensure that the SSD is properly connected and recognized in the BIOS settings. You may need to set the SSD as the primary boot device. If you still encounter issues, try repairing the boot configuration using the Windows installation media or using the startup repair tool.
- Driver issues: After migrating to a new Windows installation on the SSD, some drivers may need to be updated or installed. Check the manufacturer’s website for the latest drivers and update the necessary ones, especially for critical hardware components such as the graphics card, network adapter, and chipset.
- Activation issues: If your Windows license is not being recognized or activated on the new installation, ensure that you have a valid product key and that you are connecting to the internet during the activation process. If activation still fails, contact Microsoft Support for assistance.
- Incompatible software: Some applications may not work properly or may require reinstallation after migrating to a new Windows installation on an SSD. Check for compatibility issues with your software and ensure that you have the latest versions installed that are compatible with your new Windows version.
- Data loss or corruption: In rare cases, data loss or corruption may occur during the migration process. This highlights the importance of backing up your data before starting the migration. If you experience data loss or corruption, consult professional data recovery services or use data recovery software to attempt to recover your files.
If you encounter any issues during the migration process that are not covered here, it’s recommended to consult online forums, community support, or seek professional assistance to troubleshoot and resolve the problem specific to your situation.
By familiarizing yourself with these common issues and their possible solutions, you’ll be well-prepared to overcome any challenges that may arise during the Windows migration process to an SSD.
Now that we have explored the troubleshooting steps, let’s summarize the key points and conclude our guide to moving Windows to an SSD.
Conclusion
Congratulations! You have reached the end of our guide on moving Windows to an SSD. By upgrading to an SSD, you can experience significant improvements in speed, reliability, and overall performance. Whether you choose to clone your current Windows installation, use third-party migration software, or perform a fresh installation, the benefits of moving to an SSD are undeniable.
Before embarking on the migration process, remember to back up your data, ensure hardware compatibility, and select the right SSD for your needs. The cloning method allows you to transfer your entire system to the SSD, while third-party software offers a streamlined approach. Alternatively, performing a fresh installation provides a clean slate to optimize your new Windows installation.
Once you have successfully migrated Windows to your SSD, you can transfer your data and settings to your new system, ensuring a seamless transition. Don’t forget to troubleshoot common issues that may arise, such as SSD recognition, insufficient disk space, boot issues, driver conflicts, and activation problems.
By following the steps outlined in this guide and remaining prepared for potential challenges, you can unleash the full potential of your computer with improved speed, reliability, and efficiency. Say goodbye to slow startup times, lagging applications, and frustrating loading screens.
Now that you have the knowledge necessary to move Windows to an SSD, it’s time to take the leap and enhance your computing experience. Upgrade your system, enjoy faster performance, and embrace the benefits of SSD technology. Get ready to unlock a whole new level of productivity and enjoyment as you explore the possibilities of your newly optimized Windows system!