Introduction
Welcome to the world of PHP, the powerful scripting language that powers millions of websites on the internet. As technology evolves, it’s important to keep your PHP version up to date to ensure optimal performance, security, and compatibility with the latest web development standards.
Updating your PHP version may sound like a daunting task, but fear not! This article is here to guide you through the process, whether you’re a beginner or an experienced developer.
Before we delve into the specifics of how to update your PHP version, let’s first understand why it’s crucial to keep it up to date.
Why Update PHP Version?
PHP is an open-source language, which means that it’s constantly being improved and updated by a community of developers. These updates not only introduce new features and performance enhancements, but they also address security vulnerabilities that could potentially put your website and data at risk.
Outdated PHP versions may contain bugs and security loopholes that hackers can exploit to gain unauthorized access to your website. By updating to the latest PHP version, you can take advantage of strengthened security measures, ensuring that your website remains protected.
Furthermore, updating your PHP version ensures compatibility with the latest frameworks, libraries, and plugins. Many of these require specific PHP versions to function correctly and take advantage of the latest advancements in web development technology. By staying up to date, you can leverage exciting new features and improvements provided by these tools.
Now that you understand the significance of updating your PHP version, let’s move on to the practical steps you need to take to ensure a smooth update process.
Why Update PHP Version?
Updating your PHP version is not just a recommended practice; it’s an essential step in maintaining the performance, security, and compatibility of your website. Let’s explore some compelling reasons why you should stay up to date with the latest PHP version.
Enhanced Performance
Each new PHP version comes with performance improvements and optimizations that can significantly enhance the speed and efficiency of your website. These optimizations can result in faster page load times, improved response times, and better overall user experience. By updating your PHP version, you can take advantage of these performance benefits and ensure that your website is running at its best.
Increased Security
Keeping your PHP version up to date is crucial for ensuring the security of your website. With each update, the PHP development community addresses security vulnerabilities and releases patches to fix them. These vulnerabilities, if left unaddressed, can make your website susceptible to various attacks, such as SQL injection, cross-site scripting (XSS), and remote code execution. By updating to the latest PHP version, you can proactively protect your website and keep it secure from potential threats.
Compatibility with Modern Technologies
New PHP versions often introduce support for the latest web technologies and standards. This compatibility ensures that your website can take advantage of the newest features, frameworks, and libraries available. It also enables you to use the latest versions of content management systems (CMS) and e-commerce platforms, which may require specific PHP versions to function correctly. By updating your PHP version, you can stay current with evolving web development practices and future-proof your website.
Access to New Features
Each PHP version release brings a host of new features and functionalities that can improve your development workflow and enhance your website’s capabilities. These features may include improved error handling, enhanced database connectivity, support for newer encryption algorithms, and more efficient memory management. By updating your PHP version, you can leverage these new features and ensure that you are working with the latest and most advanced tools available.
Now that you understand the importance of updating your PHP version, it’s time to move on to the next steps: checking your current PHP version and backing up your website.
Check Current PHP Version
Before you can proceed with updating your PHP version, it’s important to know which version you are currently using. Checking your current PHP version is a straightforward process and can be done in a few simple steps.
Method 1: Using PHP Info
One of the easiest ways to determine your PHP version is by using the PHP Info function. Here’s how:
- Create a new PHP file and name it something like `php_info.php`.
- Open the file in a text editor and add the following PHP code:
php
- Save the file and upload it to the root directory of your website using an FTP client or file manager.
- Open a web browser and navigate to `http://www.yourwebsite.com/php_info.php`. Replace `yourwebsite.com` with your actual domain name.
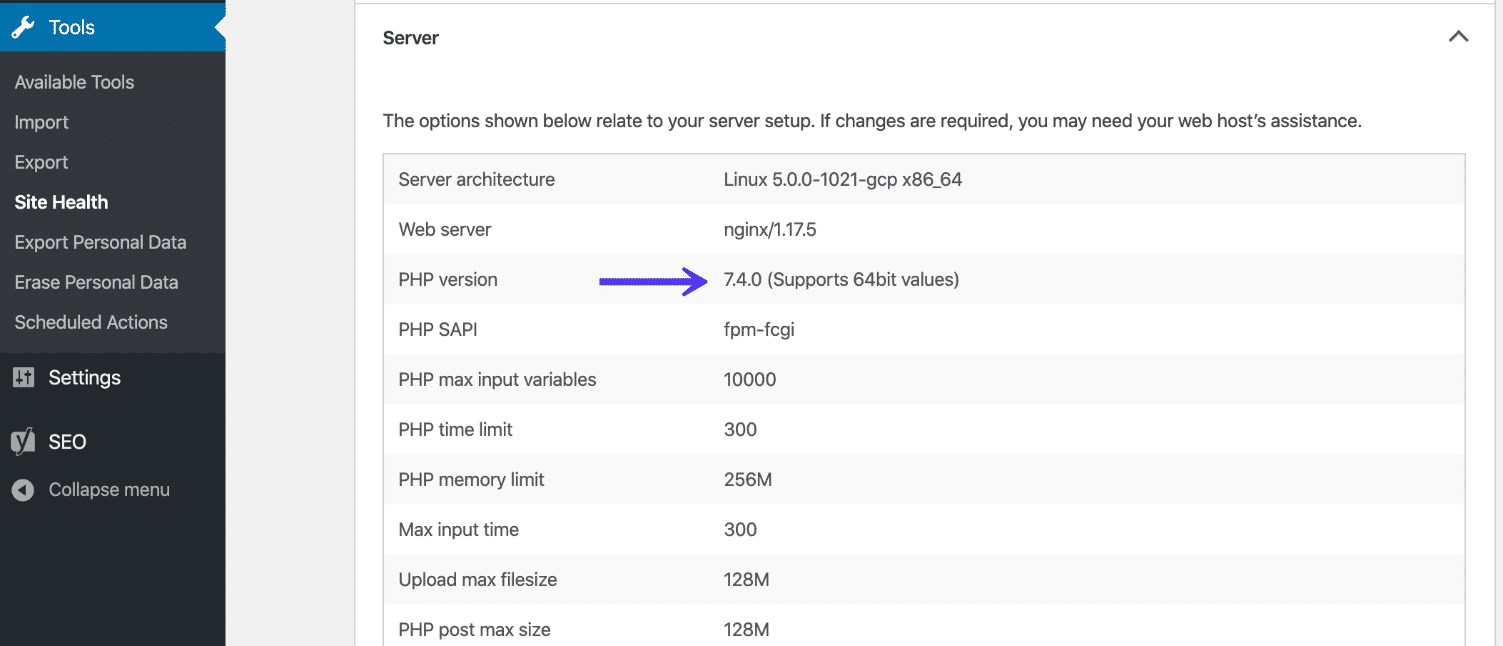
- A page containing detailed information about your PHP configuration will be displayed. Look for the “PHP version” or “PHP Version” section to find your current PHP version.
Method 2: Using Command Line (CLI)
If you have command line access to your server, you can also check your PHP version using the command line:
- Connect to your server via SSH or open the command line interface.
- Type the following command and hit Enter:
bash
php -v
- Your current PHP version will be displayed in the output.
Now that you know your current PHP version, you can proceed to the next step: backing up your website.
Backup Your Website
Before making any changes to your PHP version, it’s crucial to create a backup of your website. This precautionary measure ensures that you can revert to a working version in the event of any issues or complications during the update process.
1. Files Backup
To back up your website’s files, you can use an FTP client or a file manager provided by your hosting provider. Follow these steps:
- Connect to your server using FTP or access your hosting account’s file manager.
- Navigate to the root directory of your website.
- Select all the files and folders in the directory and download them to your computer. This action will create a local backup of your website files.
2. Database Backup
If your website uses a database (e.g., MySQL, MariaDB), it’s essential to back up your database as well. This step ensures that you have a copy of your website’s content and settings. Here’s how to back up your database:
- Access your hosting account’s control panel or use a database management tool like phpMyAdmin.
- Locate your website’s database from the list of databases.
- Choose the “Export” or “Dump” option, depending on the tool you’re using.
- Select all the tables in the database and export them to a file.
- Save the exported file to your computer. This file contains your website’s database backup.
By having both a file backup and a database backup, you can confidently proceed with updating your PHP version, knowing that your website’s data and files are safely stored.
Now that you’ve created backups of your website, let’s move on to the steps for updating your PHP version, depending on your hosting environment.
Updating PHP Locally
If you develop your website locally using a development environment like XAMPP, MAMP, or WAMP, updating your PHP version can be done relatively easily. Here’s how:
1. Check Your Current PHP Version
Before updating, verify the PHP version you are currently using on your local development environment. You can usually find this information in the PHP settings of your development software.
2. Determine the Desired PHP Version
Decide on the specific PHP version you want to update to. Visit the PHP website or consult your project requirements to select the appropriate version.
3. Download and Install the New PHP Version
Go to the PHP website and download the installer for your chosen PHP version. Make sure to select the appropriate package based on your operating system (e.g., Windows, macOS, Linux).
Once downloaded, run the installer and follow the installation instructions carefully. Be sure to overwrite the existing PHP installation with the new version.
4. Update Configuration Files
After installing the new PHP version, you may need to update your development environment’s configuration files to point to the new PHP installation.
For example, if you’re using XAMPP, locate the `httpd.conf` and `php.ini` files and update the paths and configurations to reflect the new PHP installation directory.
5. Restart Your Development Environment
To finalize the PHP update, restart your local development environment. This step ensures that the new PHP version is loaded and that your website runs using the updated PHP version.
With these steps, you have successfully updated your PHP version locally. Test your website thoroughly to ensure everything works as expected. Once you’ve confirmed that everything is functioning correctly, you can proceed with updating PHP on your live hosting server.
Updating PHP on a Shared Hosting Server
If your website is hosted on a shared hosting server, updating the PHP version typically involves interacting with your hosting provider’s control panel. Here’s how you can update PHP on a shared hosting server:
1. Check Hosting Provider’s PHP Options
Before updating PHP, check if your hosting provider offers multiple PHP versions. Some hosting providers allow you to switch between different PHP versions from within their control panel. If this option is available, proceed to the next step; otherwise, contact your hosting support for further assistance.
2. Backup Your Website
Before making any changes, it’s crucial to back up your website files and database. Refer to the earlier section on backing up your website for detailed instructions.
3. Log in to your Hosting Control Panel
Access your hosting account’s control panel, which is usually provided by your hosting provider. This panel allows you to manage various aspects of your hosting account, including changing PHP versions.
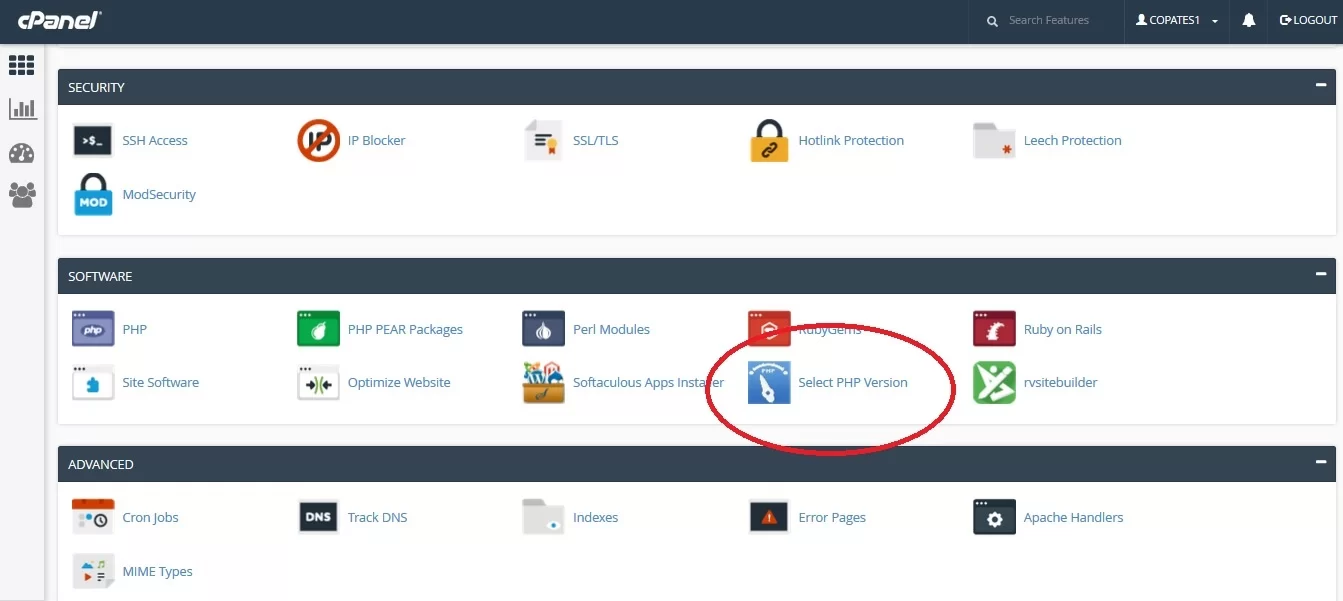
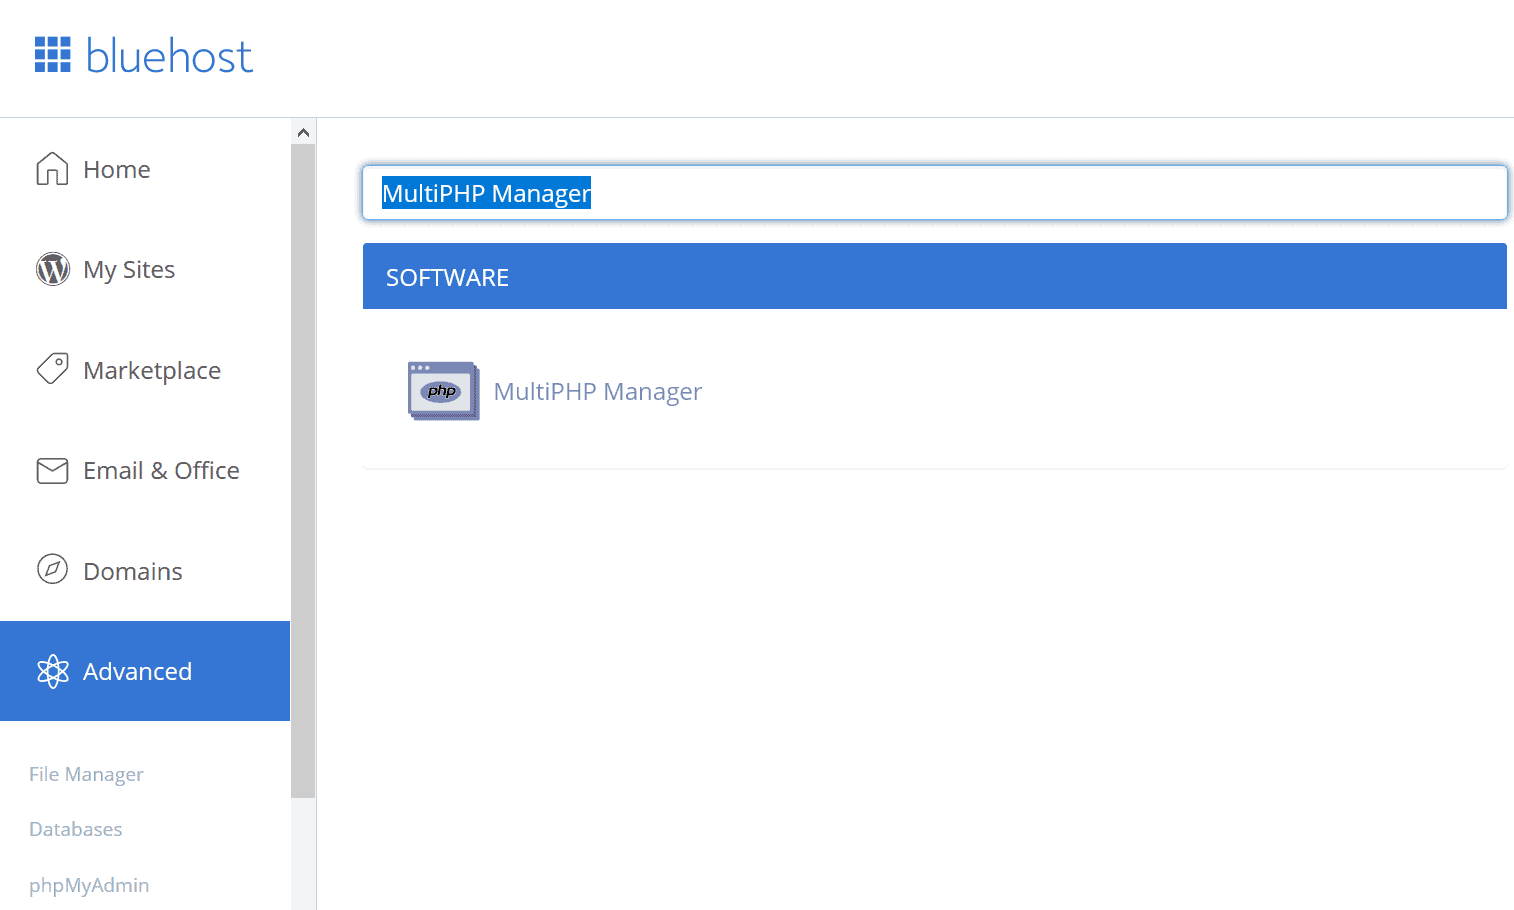
4. Locate PHP Configuration or Settings
Once logged in, navigate to the section of the control panel that manages the PHP settings for your hosting account. This section may be labeled as “PHP Configuration,” “PHP Settings,” or something similar.
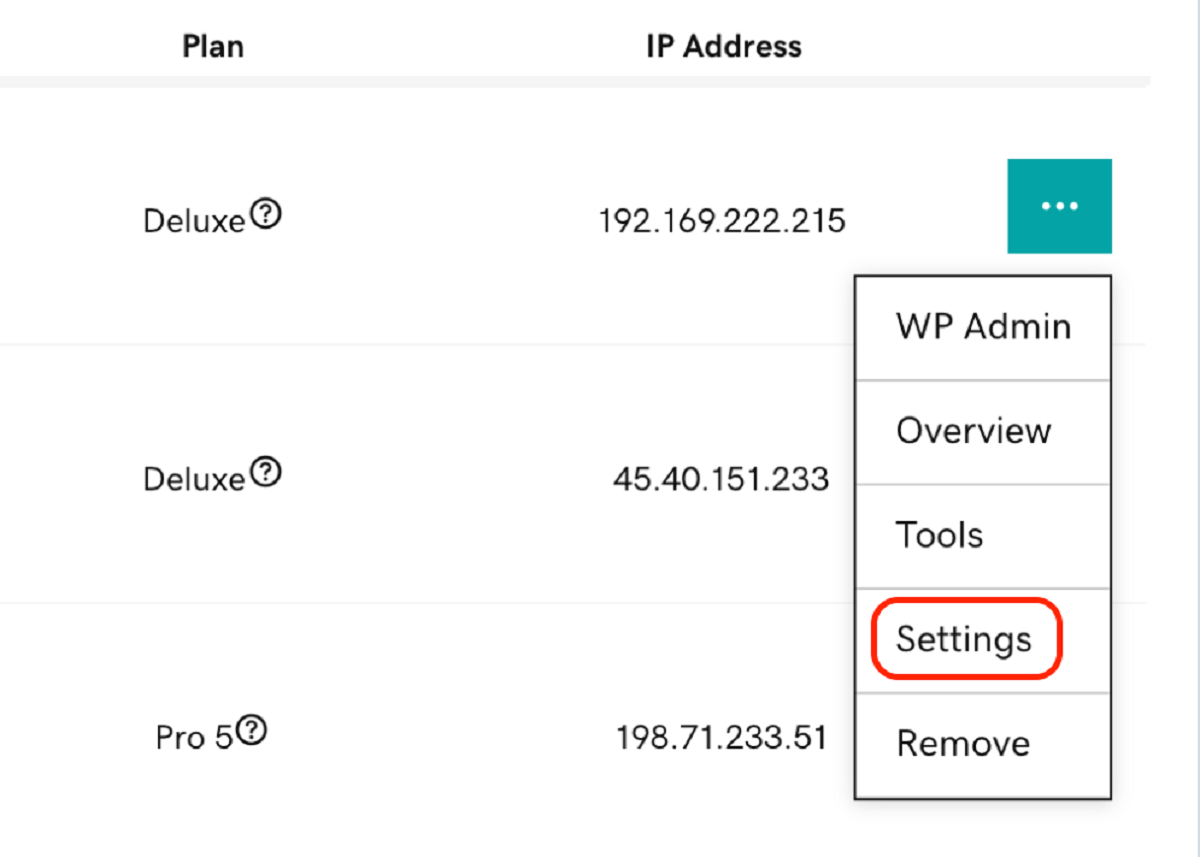
5. Select the Desired PHP Version
Within the PHP configuration settings, look for the option to select a different PHP version. Choose the desired PHP version from the available options.
6. Save Changes and Test Your Website
After selecting the new PHP version, save the changes and exit the control panel. Make sure to thoroughly test your website to ensure that it works correctly with the updated PHP version.
Keep in mind that some shared hosting providers may limit the available PHP versions or have specific guidelines for PHP updates. If you encounter any issues during the update process, reach out to your hosting provider’s support team for assistance.
Now that you’ve successfully updated PHP on your shared hosting server, let’s explore how to update PHP on a VPS or dedicated server.
Updating PHP on a VPS or Dedicated Server
If you have full control over your hosting environment and are using a Virtual Private Server (VPS) or dedicated server, updating the PHP version involves a more manual process. Here’s how you can update PHP on a VPS or dedicated server:
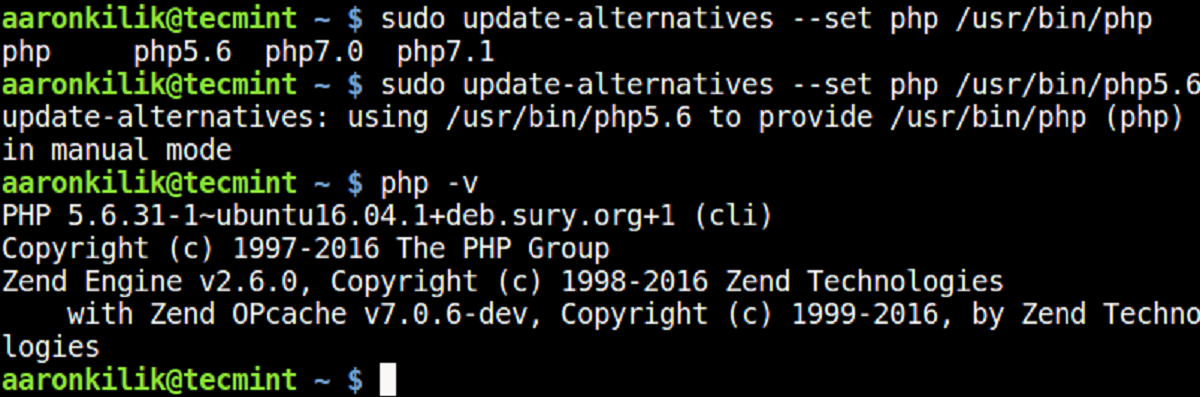
1. Check Current PHP Version
First, determine the current PHP version running on your server. You can do this by executing the following command in the terminal or SSH:
bash
php -v
2. Review the Available PHP Versions
Check the available PHP versions that you can update to. You can typically find this information on the official PHP website or by consulting the documentation provided by your server’s operating system.
3. Update PHP Package Repository
Run the appropriate command to update the PHP package repository on your server. The specific command will depend on the operating system and package manager you are using. For example, if you are using Ubuntu with apt package manager, the command may look like this:
bash
sudo apt update
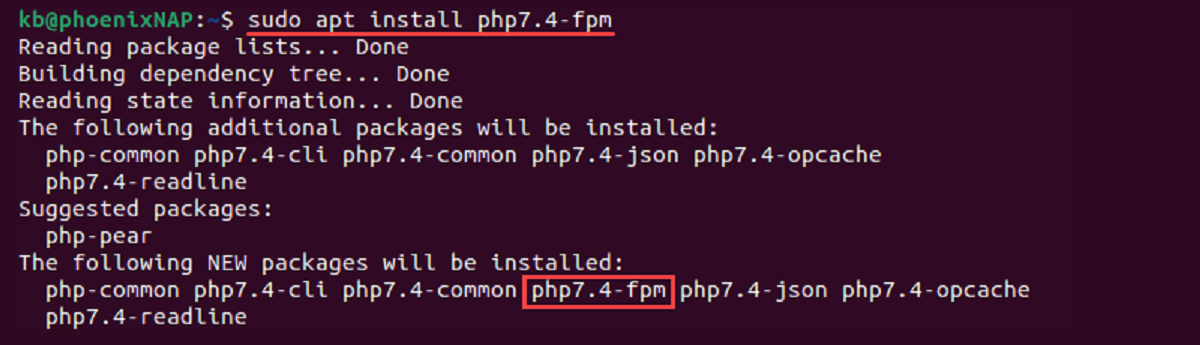
4. Install the New PHP Version
Once the package repository is up to date, install the desired PHP version using the appropriate command. For example, to install PHP 7.4 on Ubuntu, you can use the following command:
bash
sudo apt install php7.4
5. Restart the Web Server
After successfully installing the new PHP version, restart your web server for the changes to take effect. The command to restart the web server will vary depending on the server software you are using. For example, if you are using Apache, you can use the following command:
bash
sudo service apache2 restart
6. Test Your Website
Finally, test your website to ensure that it functions correctly with the updated PHP version. Visit various pages, submit forms, and verify that all website features are working as expected.
It’s worth noting that updating PHP on a VPS or dedicated server may require advanced technical knowledge. If you are not confident in performing these steps yourself, consider consulting with a server administrator or contacting your hosting provider for assistance.
Now that you have successfully updated PHP on your VPS or dedicated server, let’s explore how to update PHP on cloud platforms such as AWS or Google Cloud.
Updating PHP on a Cloud Platform
If your website is hosted on a cloud platform like Amazon Web Services (AWS) or Google Cloud Platform (GCP), updating the PHP version typically involves interacting with the cloud platform’s management console or command-line interface. Here’s a general guide on how to update PHP on a cloud platform:
1. Access your Cloud Platform Dashboard
Log in to the management console or command-line interface provided by your cloud platform. This is the central hub where you can manage various aspects of your cloud infrastructure.
2. Locate your Server Instance
Identify the server instance or virtual machine that is running your website. In the cloud platform’s dashboard, navigate to the section where you can view and manage your server instances.
3. Connect to your Server
Connect to your server instance using SSH or the remote desktop protocol (RDP), depending on the operating system and cloud platform. This will give you command-line access to your server.
4. Check Current PHP Version
Run the following command in the terminal to check the current PHP version running on your server:
bash
php -v
5. Update PHP Packages
To update PHP, use the package manager specific to your server’s operating system. The actual command may vary, so consult the documentation for the package manager used. Here are a few examples:
- For Ubuntu/Debian-based systems:
- For CentOS/RHEL-based systems:
- For Amazon Linux:
bash
sudo apt update
sudo apt upgrade -y php
bash
sudo yum update -y
sudo yum install php
bash
sudo yum update -y
sudo amazon-linux-extras install php7.4
6. Restart the Web Server
After the PHP update, restart your web server to apply the changes. The command to restart the web server depends on the software used, such as Apache or Nginx.
7. Test your Website
Verify that your website works correctly with the updated PHP version. Access various pages, submit forms, and test all website functionalities to ensure they are functioning properly.
Remember that the process may vary depending on your specific cloud platform and the configuration of your server. Consult the official documentation or support resources provided by your cloud platform for detailed instructions tailored to your situation.
Now that you have successfully updated PHP on your cloud platform, you should test your website thoroughly to ensure proper functionality. In the next section, we will cover the importance of testing your website after updating the PHP version.
Test Your Website After Updating PHP Version
After updating your PHP version, it’s crucial to thoroughly test your website to ensure everything is functioning as expected. Here are some essential steps to follow when testing your website:
1. Check Frontend Functionality
Start by checking the frontend functionality of your website. Test different pages, navigation menus, forms, and interactive elements. Ensure that all buttons, links, and images are loading correctly, and there are no visual or layout issues.
2. Verify Data Integrity
If your website is connected to a database, verify that the data is being accessed and displayed correctly after the PHP update. Test various database-driven features, such as user registration, login, content management, and dynamic content displays. Make sure that data is being retrieved, stored, and updated accurately.
3. Test Third-Party Integrations
If your website uses third-party integrations, such as payment gateways, APIs, or social media platforms, verify that these integrations are still functioning properly. Test transactions, API calls, and any other functionality that relies on these integrations to ensure seamless operation.
4. Validate Form Submissions
If your website includes forms, submit test data and verify that the form submissions are being handled correctly. Check that data validation, error messages, and form notifications are working as intended.
5. Review Error Handling and Logging
During testing, intentionally trigger errors and exceptions to ensure that your error handling and logging mechanisms are working correctly. Check that error messages are displayed appropriately and logged for troubleshooting purposes.
6. Test Performance and Page Load Times
Assess the performance of your website after the PHP update. Measure page load times and verify that the update has not introduced any significant performance regressions. Use tools like Google PageSpeed Insights or GTmetrix to analyze your website’s performance and make optimizations if necessary.
7. Test Cross-Browser Compatibility
Check your website’s compatibility across different web browsers, including popular ones like Chrome, Firefox, Safari, and Edge. Ensure that your website displays correctly and functions properly on all major browsers.
By following these testing steps, you can ensure that your website behaves as expected after updating the PHP version. Address any issues that arise during testing promptly to provide a seamless user experience to your visitors.
In the next section, we will cover common errors and troubleshooting techniques you can use if you encounter any issues after updating your PHP version.
Common Errors and Troubleshooting
While updating the PHP version, you may encounter some common errors or issues. Understanding these errors and knowing how to troubleshoot them can help you resolve any potential problems effectively. Here are a few common errors and troubleshooting techniques:
1. Syntax Errors
Syntax errors occur when there is a mistake in the PHP code. These errors can cause your website to display a blank page or a “500 Internal Server Error” message. To troubleshoot syntax errors, carefully review the affected code and check for missing semicolons, parentheses, or unmatched quotes.
2. Deprecated Functions or Features
When updating PHP, certain functions or features may become deprecated or no longer supported. These deprecated elements may result in errors or incompatibilities. To address this issue, review the PHP documentation for the updated version and replace any deprecated functions or features with their recommended alternatives.
3. Extensions or Modules Compatibility
Some PHP updates may introduce changes in the compatibility of certain extensions or modules. If your website relies on specific extensions or modules, check their compatibility with the updated PHP version. Update or replace any incompatible extensions or modules to ensure smooth operation.
4. Configuration File Changes
Updating PHP may require modifications to the configuration file (`php.ini`). If you encounter any issues after the update, review the updated PHP documentation and compare the previous and new configuration settings. Make the necessary changes to the configuration file to resolve any configuration-related errors or conflicts.
5. Memory Limit Exceeded
In some cases, updating PHP may result in increased memory usage, causing your website to exceed the allowed memory limit. If you encounter memory-related errors, such as “Fatal error: Allowed memory size exhausted,” consider increasing the memory limit by adjusting the `memory_limit` setting in the `php.ini` file.
6. Log and Debug
Logging and enabling error reporting can provide valuable information for troubleshooting. Review the PHP error logs or enable error reporting in your development environment to identify the specific error messages and debug any issues that arise.
7. Seek Community Support or Hosting Provider Assistance
If you are unable to resolve the errors after following the troubleshooting steps, consider reaching out to the PHP community forums, developer communities, or your hosting provider’s support team. Explain the issue, provide relevant error messages, and seek advice or assistance from experienced developers.
By understanding these common errors and using effective troubleshooting techniques, you can successfully address any issues arising from updating your PHP version.
In the next section, we will wrap up this article with a brief recap of the importance of updating your PHP version and ensuring your website remains secure and up to date.
Conclusion
Updating your PHP version is crucial for maintaining the performance, security, and compatibility of your website. By staying up to date with the latest PHP version, you can take advantage of improved performance optimizations, security patches, and compatibility with modern web development technologies.
In this article, we’ve covered the importance of updating PHP, how to check your current PHP version, the process of backing up your website, and step-by-step instructions for updating PHP in different hosting environments including shared hosting, VPS/dedicated servers, and cloud platforms.
We emphasized the significance of thorough testing after updating PHP to ensure that all website functionalities, integrations, and third-party extensions work seamlessly. We also discussed common errors that can occur during the update process and provided troubleshooting techniques to help you address these issues effectively.
Remember, keeping your PHP version up to date is an ongoing task. As new updates and security patches are released, it’s essential to regularly check for updates and perform necessary upgrades to maintain the optimal performance and security of your website.
By following the guidelines and best practices outlined in this article, you can confidently update your PHP version and ensure a smooth and secure web development experience.
Thank you for reading, and happy PHP updating!