Introduction
Welcome to our comprehensive guide on how to upgrade to PHP 5.6! As a skilled SEO writer, I’m here to provide you with step-by-step instructions and valuable insights to help you smoothly transition to this version of PHP. PHP 5.6 offers numerous benefits, including improved speed, enhanced security, and support for the latest features.
Before we dive into the upgrade process, let’s briefly discuss why you should consider upgrading to PHP 5.6. PHP is a widely used scripting language for web development, and staying up-to-date with the latest version ensures that your website runs efficiently and remains secure against potential vulnerabilities.
Now, you may wonder how to determine your current PHP version. This information is crucial as it will guide us in the upgrade process. But fret not, as we will cover that in the first step of our guide.
Upgrading to PHP 5.6 involves a series of steps, such as checking PHP version compatibility, updating PHP dependencies, and testing your website after the upgrade. It’s essential to follow each step carefully to avoid any disruptions or compatibility issues with your existing codebase.
Throughout this guide, we will also touch upon backing up your website to ensure that you can restore it in case of any complications during the upgrade. Safety first, right?
Lastly, we recommend performing the upgrade on a testing environment or staging site before implementing it on your live site. This will allow you to identify and resolve any potential problems before affecting your users’ experience.
Now that you have a clear understanding of what lies ahead, let’s move on to the first step in the upgrade process: checking your current PHP version.
Step 1: Check PHP Version
The first step in upgrading to PHP 5.6 is to determine your current PHP version. This information will help us understand whether your existing environment is compatible with the upgrade and guide us in further steps of the process.
To check your PHP version, you can follow these simple steps:
- Open a text editor or code editor of your choice.
- Create a new file and paste the following code snippet into it:
<?php phpinfo(); ?> - Save the file with a .php extension, for example, “php_info.php.
- Upload the file to your website’s root directory using FTP or a file manager provided by your hosting provider.
- Access the file through your web browser by entering the URL of the file, for example, “http://yourdomain.com/php_info.php”.
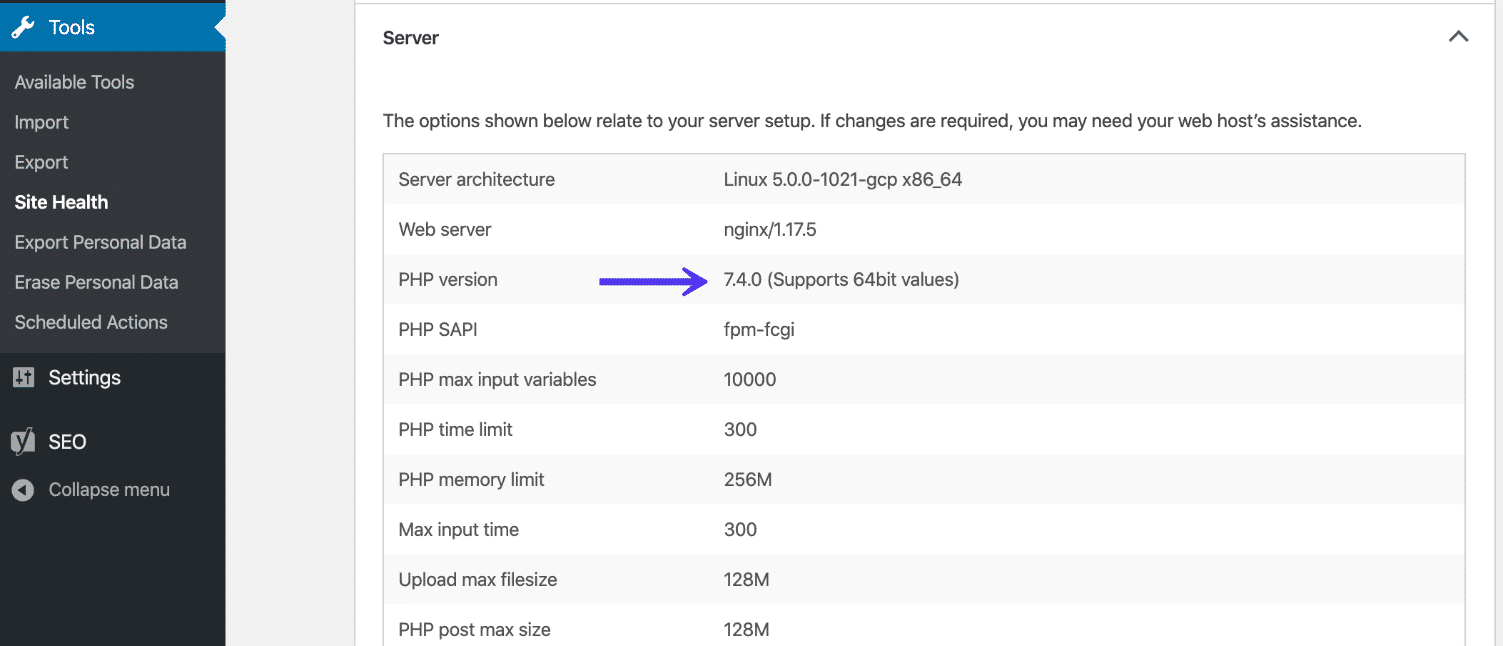
After accessing the file through your browser, you will see a detailed PHP information page. Look for the PHP version information at the top of the page. It should be displayed as “PHP Version X.X.X”. Take note of this version for reference later in the upgrade process.
If your PHP version is already at or higher than 5.6, then congrats! You are already using a compatible version, and no further upgrade is required. However, if your PHP version is lower than 5.6, it’s crucial to proceed with the remaining steps to ensure a smooth upgrade without any compatibility issues.
By checking your PHP version beforehand, you can avoid the possibility of encountering errors or incompatibilities during the upgrade process. Having this information on hand will also allow you to verify that the upgrade has been successful once you complete all the necessary steps.
Now that you know your PHP version, it’s time to move forward to step 2, where we will discuss updating PHP dependencies in preparation for the upgrade.
Step 2: Update PHP Dependencies
Before upgrading to PHP 5.6, it’s important to update your PHP dependencies to ensure compatibility with the new version. PHP dependencies are libraries, extensions, or modules that are used by your website or web application.
Here are the steps to update your PHP dependencies:
- Identify the PHP dependencies used by your website. These can include popular frameworks, content management systems (CMS), plugins, or custom libraries.
- Visit the respective websites or documentation of each dependency to check for updates and compatibility with PHP 5.6. Look for any release notes or announcements regarding PHP 5.6 support.
- If an update is available, download the latest version of the dependency and follow the installation or update instructions provided by the developers.
- Be sure to follow any specific steps or recommendations mentioned for PHP 5.6 compatibility. Some dependencies may require additional configuration or adjustments in order to work seamlessly with PHP 5.6.
- Repeat this process for all the PHP dependencies used by your website. It’s crucial to update all dependencies to their latest versions in order to avoid any compatibility issues during the upgrade.
Updating your PHP dependencies is essential as it ensures that your website’s modules and libraries are up-to-date and compatible with the new PHP version. This step helps prevent any potential errors or conflicts that may arise during the upgrade process.
Remember to take note of any added or modified dependencies during the update process. Keeping a record of these changes will be helpful in case you encounter any unexpected issues after upgrading to PHP 5.6.
With your PHP dependencies updated and compatible with PHP 5.6, you are now ready for the next step: backing up your website. This is an essential precautionary measure to protect your website’s data and files before proceeding with the upgrade.
Step 3: Backup Your Website
Backing up your website is a crucial step before any major upgrade or change. It ensures that you have a copy of your website’s data and files in case something goes wrong during the upgrade process. This way, you can easily restore your website to its previous state.
Here’s how you can backup your website:
- Access your website’s control panel or use an FTP client to connect to your web server.
- Navigate to the root directory of your website where all the files and folders are stored.
- Select all the files and folders and create a compressed archive. You can use tools like WinZip, 7-Zip, or tar to create the backup archive.
- Save the backup archive to a secure location. This can be your computer’s hard drive, an external storage device, or a cloud storage service.
- Consider creating a separate backup of your website’s database if you have dynamic content or use a CMS. Access your database management tool (e.g., phpMyAdmin) and export a copy of your database to a file.
It’s vital to store your backup files in a secure location separate from your website’s server. This ensures that even if your server experiences an issue during the upgrade, you will still have access to your website’s data.
Performing a complete backup gives you peace of mind knowing that you can revert to a functional version of your website if anything goes wrong during the upgrade. It’s better to be safe than sorry!
Now that you have successfully backed up your website, it’s time to move on to step 4, where we will discuss updating your server software in preparation for the PHP 5.6 upgrade.
Step 4: Update Your Server Software
Updating your server software is an important step in preparing for the PHP 5.6 upgrade. This ensures that your server environment is compatible with the new version of PHP and that you can take advantage of its features and improvements.
Here are the key steps to update your server software:
- Identify the server software and components that need to be updated. This includes the web server (such as Apache or Nginx), the database server (such as MySQL or PostgreSQL), and other related software like PHP extensions or modules.
- Visit the official websites or documentation of each software component to check for updates and compatibility with PHP 5.6. Look for release notes or announcements related to PHP 5.6 support.
- If an update is available for any of the server components, follow the provided instructions to download and install the latest version. Be sure to follow any specific steps or recommendations mentioned for PHP 5.6 compatibility.
- After updating each component, test that your server software is functioning properly. Ensure that the web server can serve web pages, the database server can connect and query databases, and all other necessary services are working as expected.
- Repeat these steps for all the server software components that require an update. It’s important to update all relevant software to ensure a seamless upgrade to PHP 5.6.
Updating your server software is crucial as it ensures that your server environment is ready to handle the features and requirements of PHP 5.6. It also helps optimize performance and security by taking advantage of the latest software enhancements.
Remember to take note of any configuration changes or specific instructions required for PHP 5.6 compatibility. Keeping a record of these changes will be helpful in case you encounter any issues or conflicts during the upgrade process.
Now that you have successfully updated your server software, you are ready to move on to the next step: updating PHP to version 5.6. We will cover this in detail in step 5 of our guide.
Step 5: Update PHP to Version 5.6
Now that you have prepared your website, dependencies, and server software, it’s time to upgrade PHP to version 5.6. This step will ensure that you can take advantage of the latest features, performance improvements, and security enhancements offered by PHP 5.6.
Here are the steps to update PHP to version 5.6:
- Contact your hosting provider to inquire about PHP 5.6 availability and the upgrade process. Some hosting providers offer easy one-click PHP version changes, while others may require manual configuration.
- If your hosting provider supports one-click PHP version changes, navigate to your hosting control panel and locate the PHP settings or configuration section.
- Select PHP version 5.6 from the available options and save the changes. This will update the PHP version for your website.
- If manual configuration is required, access your hosting account using FTP or a file manager provided by your hosting provider.
- Locate the root directory of your website and find the PHP configuration file, typically named “php.ini” or “php5.ini”.
- Edit the PHP configuration file and update the following line to set the PHP version to 5.6:
php_version = 5.6 - Save the changes and upload the modified PHP configuration file back to your server.
- After updating PHP to version 5.6, test your website thoroughly to ensure that all functionalities are working as expected.
During the PHP 5.6 upgrade, it’s crucial to monitor your website for any compatibility issues or errors. Check for any deprecated functions, deprecated syntax, or incompatible code that may need to be updated or modified.
If you encounter any issues, refer to the official PHP documentation or seek assistance from the PHP developer community or your hosting provider’s support team. They can provide guidance and solutions to address any specific problems you may face during the upgrade.
Congratulations! You have successfully updated PHP to version 5.6. Now, let’s move on to the final step: testing your website to ensure everything is functioning correctly.
Step 6: Test Your Website
After upgrading PHP to version 5.6, it’s essential to thoroughly test your website to ensure that everything is functioning correctly. Testing allows you to identify any compatibility issues, errors, or missing functionality that may have resulted from the upgrade process.
Here are some steps you can follow to test your website:
- Navigate through your website and ensure that all pages load correctly. Check for any broken links, missing images, or other visual discrepancies.
- Test all forms, including registration, contact, and login forms, to ensure that data is submitted and processed accurately.
- Verify that any dynamic content, such as database-driven content or plugins, is displayed correctly.
- Perform common user actions and workflows, such as adding items to a shopping cart, initiating a checkout process, or updating user information.
- Test any integrations or third-party services, such as payment gateways or APIs, to ensure they are functioning as expected.
- Check website loading speed and performance to ensure that PHP 5.6 has not negatively impacted performance.
During the testing phase, it’s important to pay attention to any error messages, PHP warnings, or unexpected behavior on your website. Any issues should be addressed promptly to provide a smooth user experience.
If you encounter any issues during testing, refer to the error messages and logs for clues on identifying the cause of the problem. Additionally, consult the documentation and support resources of any plugins, themes, or custom code you are using.
By thoroughly testing your website, you can ensure that it is fully functional and optimized in the PHP 5.6 environment. Any issues that arise can be addressed promptly to provide a seamless experience for your website visitors.
With the completion of step 6, you have successfully upgraded to PHP 5.6 and tested your website. It’s time to enjoy the benefits of improved performance, security, and compatibility that PHP 5.6 offers.
Conclusion
Congratulations! You have successfully upgraded your website to PHP 5.6. By following the steps outlined in this guide, you have ensured that your website is now running on a version of PHP that offers improved speed, enhanced security, and support for the latest features.
Throughout the upgrade process, you learned how to check your PHP version, update PHP dependencies, backup your website, update server software, and finally upgrade PHP to version 5.6. Additionally, you tested your website to ensure everything is functioning correctly in the new environment.
Remember to regularly update your PHP dependencies and server software to stay up-to-date and benefit from the latest advancements. Keeping your website well-maintained and using the latest technologies is essential for optimal performance, security, and compatibility.
If you encounter any issues during or after the upgrade, don’t hesitate to seek assistance from the PHP developer community, official documentation, or your hosting provider’s support team. They can provide guidance and solutions tailored to your specific situation.
Thank you for following this comprehensive guide on upgrading to PHP 5.6. We hope it has been helpful in successfully completing the upgrade process. Enjoy the benefits of a faster, more secure, and feature-rich PHP environment for your website!