Introduction
Upgrading PHP to the latest version is essential to ensure the security, performance, and compatibility of your website or web application. With the release of PHP 7.4, you can take advantage of the numerous improvements and new features that enhance the efficiency and functionality of your PHP code.
PHP 7.4 offers faster execution times, reduced memory usage, and improved error handling compared to older versions. Additionally, it introduces exciting features like arrow functions, typed properties, and covariant and contravariant type declarations that can simplify your code and make it more maintainable.
In this guide, we will walk you through the step-by-step process of upgrading PHP to version 7.4. We will cover everything from checking your current PHP version to updating the PHP configuration. By following these steps, you can ensure a smooth and successful upgrade without disrupting the functionality of your website.
Before we begin, it’s important to note that upgrading PHP can have an impact on your website or web application. It is always recommended to test the upgrade in a development or staging environment before implementing it on your production server. This allows you to identify and resolve any compatibility issues or conflicts with your existing codebase.
Now, let’s dive into the step-by-step process of upgrading PHP to version 7.4 and unleash the power of the latest PHP features!
Step 1: Check Current PHP Version
The first step in upgrading PHP to version 7.4 is to check the current PHP version that is installed on your server. Knowing the current version will help you determine if an upgrade is necessary and ensure compatibility with your existing codebase.
To check the PHP version, you can create a simple PHP file and run it on your server. Open a text editor and create a new file with the extension “.php”. For example, you can name it “phpinfo.php”. Insert the following code into the file:
php
Save the file and upload it to your server using FTP or any other file transfer method. Once the file is uploaded, open your web browser and access the file using its URL. For example, if your website is “example.com”, you would enter “http://example.com/phpinfo.php” in the address bar.
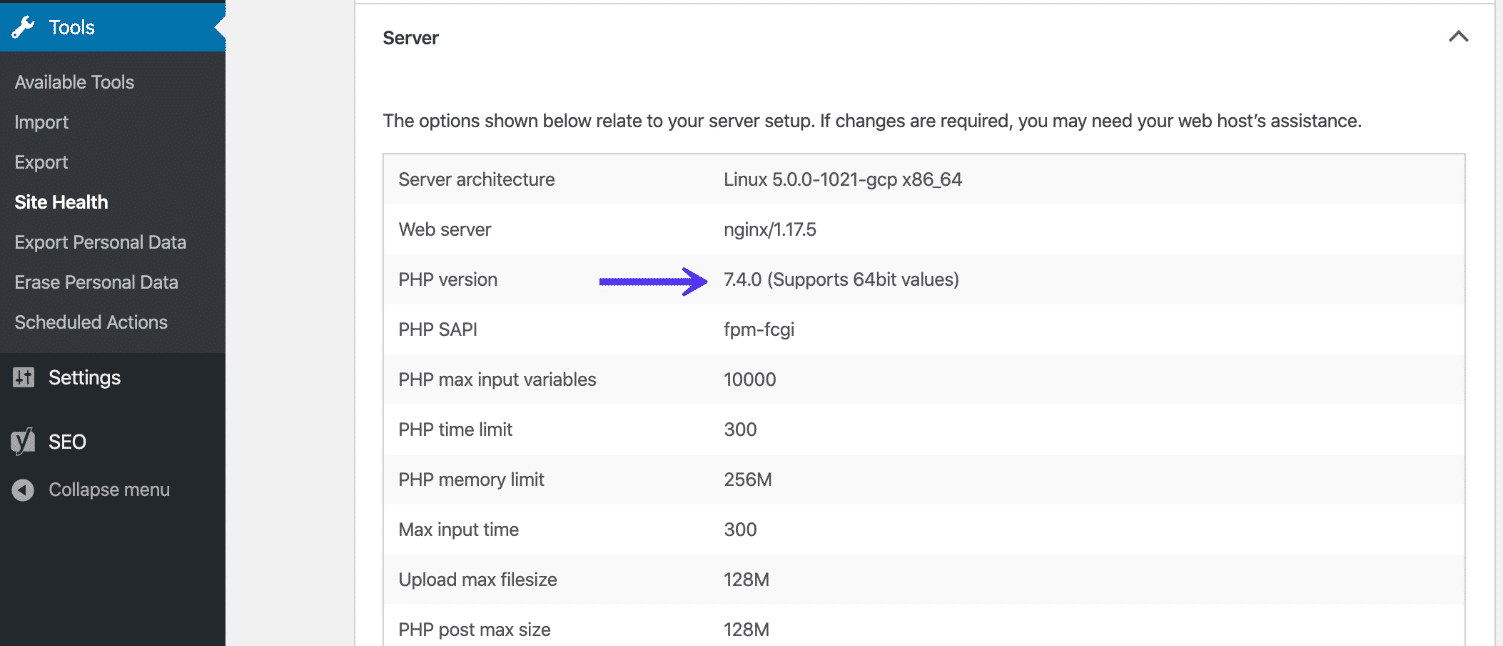
The PHP info page will display a comprehensive overview of the PHP configuration on your server, including the PHP version. Look for the line that says “PHP Version” to find the installed version. If it’s already PHP 7.4, there’s no need to proceed further as you’re already running the latest version.
If the PHP version is older than PHP 7.4, it’s time to proceed with the upgrade process. Upgrading to the newest PHP version will provide you with the latest features, bug fixes, and security patches.
Make sure to take note of any PHP extensions or dependencies your website or application relies on. Some older extensions might not be compatible with the latest PHP version, requiring you to search for alternative solutions or updated versions.
Now that you’ve determined the current PHP version on your server, let’s move on to the next step: backing up your files and database.
Step 2: Backup Files and Database
Before proceeding with the upgrade to PHP 7.4, it’s crucial to create backups of your website files and databases. This ensures that you have a safety net in case anything goes wrong during the upgrade process.
Start by creating a backup of all the files in your website’s directory. This includes all the PHP files, scripts, images, CSS, and any other assets. You can use an FTP client or any file manager provided by your hosting provider to download a zipped copy of the entire directory to your local machine. Alternatively, you can create a backup directly on your server if your hosting package offers such a feature.
Next, it’s important to create a backup of your website’s database. If you are using a database management system like MySQL or PostgreSQL, you can use tools like phpMyAdmin or Adminer to export a copy of your database. Make sure to choose the “Export” option, select the appropriate database, and save it as a SQL file. This backup will serve as a safeguard to restore your website’s data in case of any unforeseen issues during the PHP upgrade process.
Store these backups in a safe location, preferably on a separate storage medium or cloud storage service. This way, you can easily retrieve them if needed.
Remember, taking proper backups is crucial as it allows you to revert to the previous state in case something goes wrong during the upgrade process. It ensures that you don’t lose any important files or data, providing peace of mind during the PHP upgrade.
With your files and database securely backed up, you are now ready to move on to the next step: updating the software and dependencies on your server.
Step 3: Update Software and Dependencies
Before upgrading PHP to version 7.4, it is essential to update the software and dependencies on your server. This ensures that you have the latest versions of the required components and mitigates compatibility issues that may arise during the upgrade process.
Start by checking for updates to your operating system. Depending on your server setup, you may be using Linux, Windows, or macOS. For Linux-based servers, you can use package managers like “apt”, “yum”, or “dnf” to update the system packages to their latest versions. On Windows or macOS, ensure that you have installed the latest updates available.
Next, update your web server software. If you are using Apache, you can update it by running the appropriate command for your Linux distribution. On Windows, you can download and install the latest version of Apache from the official website. The same applies to other web server software like Nginx or Microsoft IIS.
While updating the web server, also ensure that you have the latest version of the server software extensions or modules installed. These often come with new features, bug fixes, and performance improvements.
Furthermore, it is important to update any dependencies or libraries that your website or application relies on. This includes database drivers, caching systems, image processing libraries, and any other third-party components. Consult the documentation for each dependency to learn how to update them to their latest versions.
Keep in mind that updating software and dependencies may require restarting your web server or other services. Make sure you plan for any potential downtime or service interruptions during the upgrade process.
By updating the software and dependencies on your server, you ensure that your system is prepared for the PHP upgrade to version 7.4. You minimize the risk of compatibility issues and ensure a smooth transition to the latest PHP version.
Now that you have updated the necessary software and dependencies, let’s move on to installing PHP 7.4 in the next step.
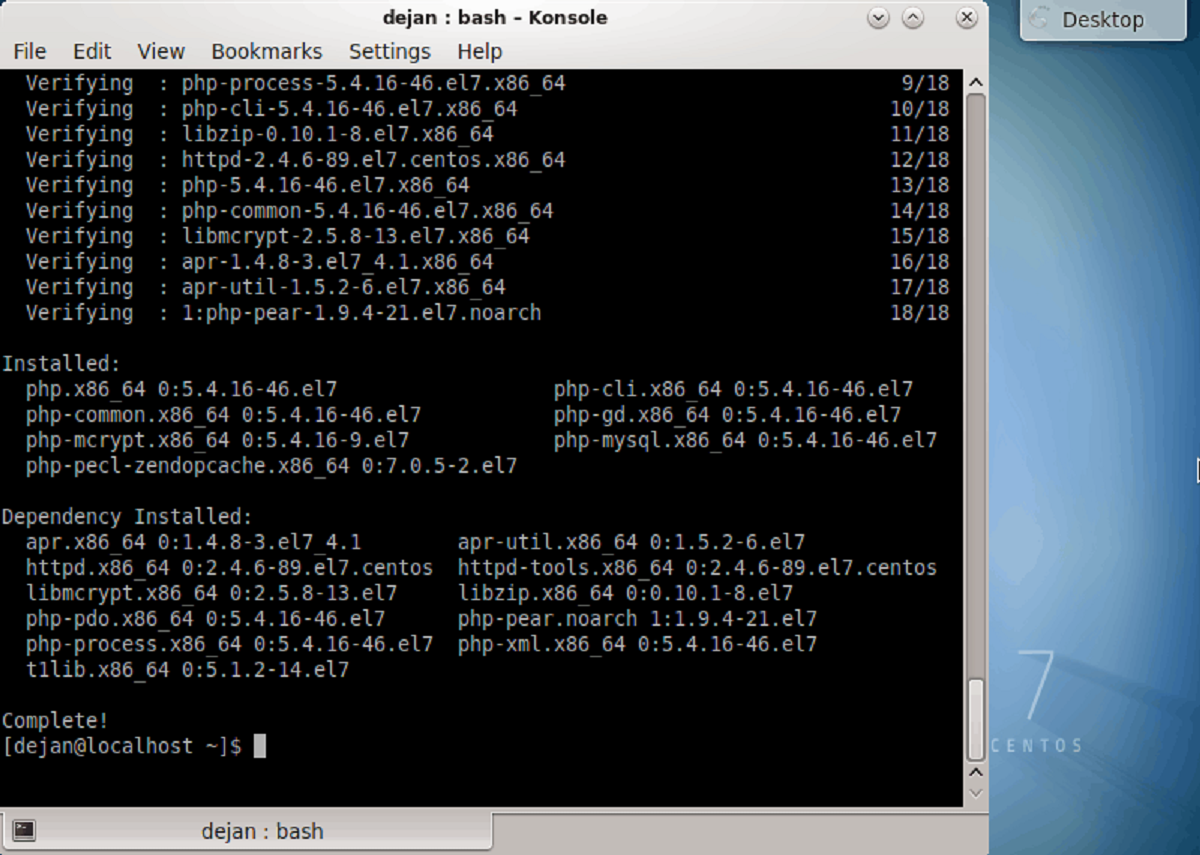
Step 4: Install PHP 7.4
Now that you have updated the software and dependencies on your server, it’s time to install PHP 7.4. The installation process may vary depending on your server environment, but here are some general steps to follow:
- Review the PHP 7.4 requirements: Before proceeding with the installation, make sure your server meets the minimum requirements for PHP 7.4. Check the official PHP documentation or the vendor’s website for the specific requirements.
- Choose the installation method: There are several ways to install PHP 7.4, such as using a package manager, compiler, or pre-packaged binaries. The method you choose depends on your server operating system and personal preference. Consult the official documentation for your operating system or hosting provider for specific instructions.
- Follow the installation steps: Depending on the installation method you have chosen, follow the provided instructions to install PHP 7.4. This may involve running commands in the terminal, selecting packages to install, or configuring settings. Make sure to read and understand each step before proceeding.
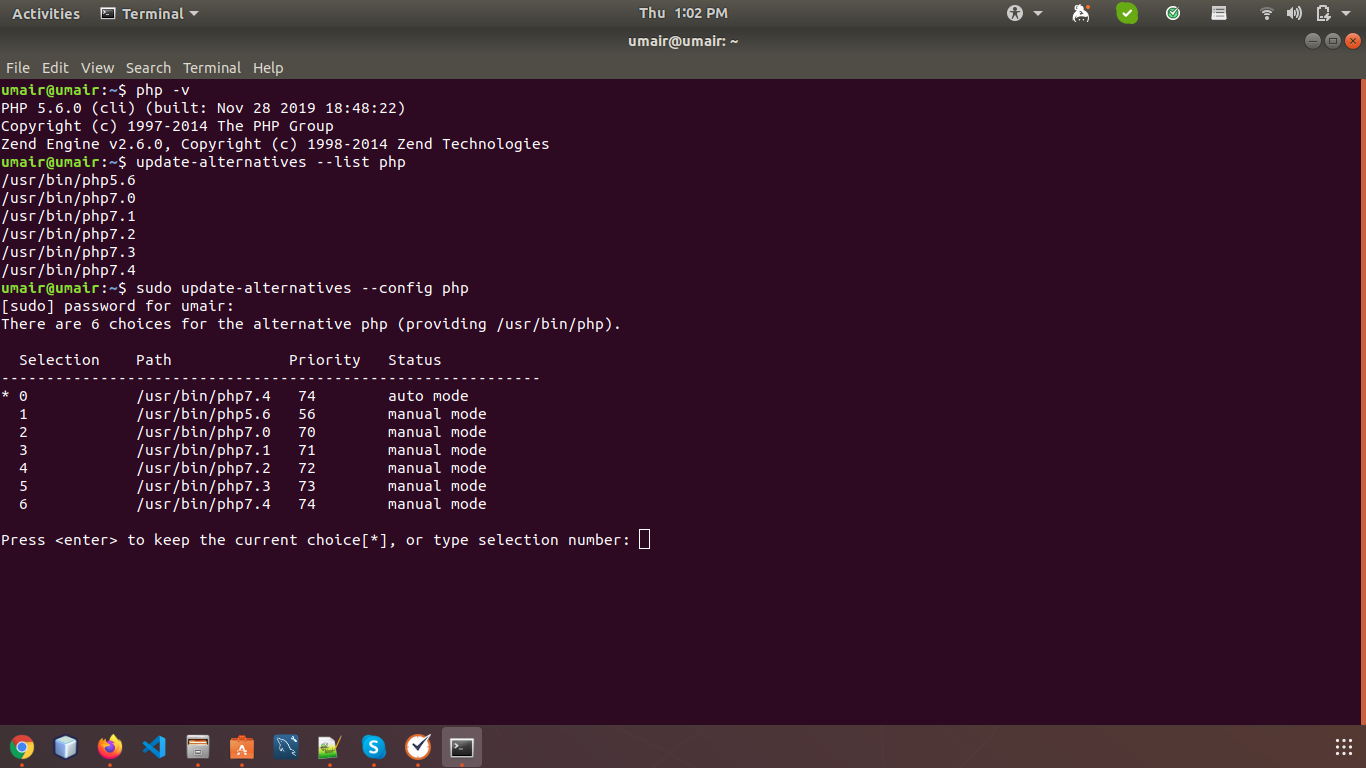
- Verify the installation: Once the installation is complete, you can verify if PHP 7.4 is successfully installed by running the following command in your terminal or command prompt:
- If everything is successful, you should see the PHP 7.4 version information displayed in the output. This confirms that PHP 7.4 is installed and ready to use on your server.
shell
php -v
It’s important to note that during the installation process, you may encounter extension compatibility issues. Some extensions might need to be updated or replaced to work with PHP 7.4. Check the documentation of the extensions you are using and make the necessary adjustments to ensure compatibility.
After installing PHP 7.4, you can proceed to the next step: updating the PHP configuration.
Step 5: Update PHP Configuration
After installing PHP 7.4, it is important to update the PHP configuration to ensure that it is optimized for your website or application. The PHP configuration file, typically named php.ini, contains various settings that control the behavior and performance of PHP.
Here are some key configuration changes to consider when upgrading to PHP 7.4:
- Memory Limit: PHP 7.4 introduces improved memory management, so you may consider increasing the memory limit in the php.ini file. This allows PHP to allocate more memory if needed.
- Error Reporting: PHP 7.4 has improved error handling and reporting capabilities. Set the appropriate error reporting level in your php.ini file to ensure all errors and warnings are properly logged.
- OPcache: PHP 7.4 includes enhancements to its built-in OPcache engine, which improves performance by caching compiled PHP bytecode. Enable OPcache and configure its settings to take advantage of these optimizations.
- Timezone: Update the timezone setting in php.ini to match your server’s timezone. This ensures correct date and time handling in your PHP code.
- Extensions: Review and update any extensions-related configurations in php.ini. Depending on the PHP 7.4 version and the extensions you are using, some configuration directives may have changed. Refer to the extension documentation for any necessary adjustments.
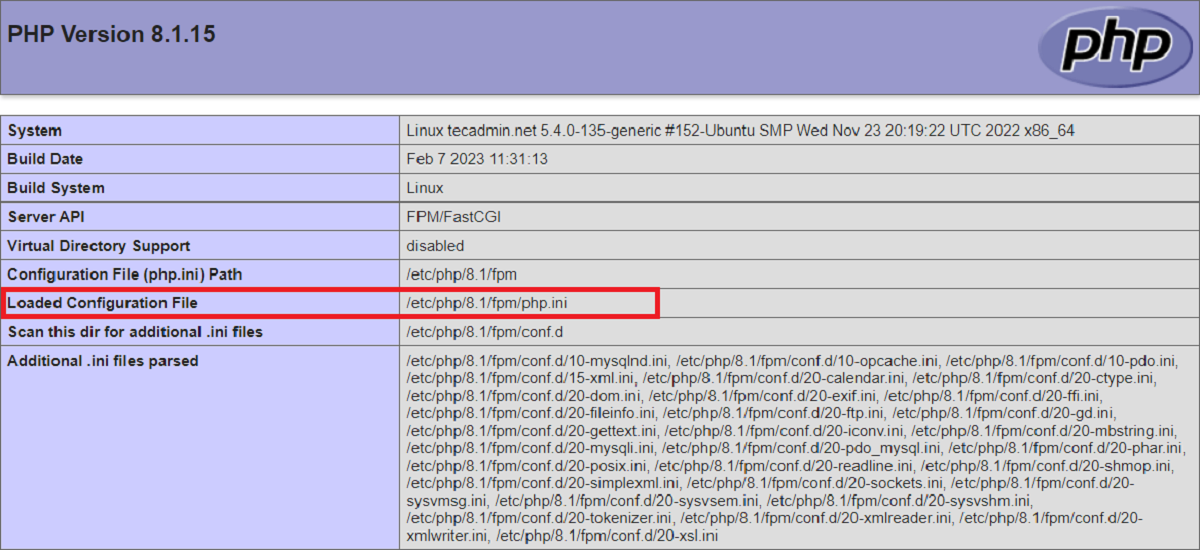
Make the necessary changes to the php.ini file using a text editor. If you are unsure of the location of your php.ini file, you can create a PHP script with the following code:
php
Run this script and look for the “Loaded Configuration File” entry to find the path to your php.ini file.
After updating the php.ini file, restart your web server to apply the configuration changes. This ensures that PHP 7.4 uses the updated settings.
It is recommended to test your website or application thoroughly after updating the PHP configuration to ensure that everything functions as expected. Monitor your log files for any errors or warnings that may indicate configuration issues.
With the PHP configuration updated, you are ready for the final step: testing the PHP upgrade.
Step 6: Test PHP Upgrade
After completing the previous steps of upgrading PHP to version 7.4 and updating the configuration, it is vital to thoroughly test the PHP upgrade before deploying it to your production environment. This step ensures that your website or application functions correctly and avoids any unexpected issues.
Here are some essential tests to perform:
- Functional Testing: Test all the features and functionalities of your website or application, ensuring that they work as expected. Pay particular attention to any areas that heavily rely on PHP code, such as form submissions, database interactions, and API integrations.
- Compatibility Testing: Test your website or application across various browsers and devices to ensure compatibility. PHP 7.4 should not introduce any major compatibility issues, but it’s always prudent to double-check.
- Performance Testing: Benchmark the performance of your website or application before and after the PHP upgrade. Monitor the response times, resource usage, and overall load on your server. PHP 7.4 is designed to be faster and more efficient, so you should observe improvements in performance.
- Error Handling: Trigger various error conditions and ensure that PHP 7.4 handles them correctly. Check if error messages are displayed appropriately, log entries are generated, and error handling mechanisms are functioning correctly.
- Third-Party Integrations: If your website or application relies on third-party libraries or APIs, test their functionality after the PHP upgrade. Verify that your integrations still work seamlessly and that there are no compatibility issues.
During the testing phase, it is essential to closely monitor your log files for any PHP errors or warnings. Pay attention to any deprecated functions or features that could impact your code. Update your code accordingly to utilize the new features and best practices introduced in PHP 7.4.
If you encounter any issues during the testing phase, refer to the PHP documentation, community forums, or seek assistance from experienced PHP developers. They can provide guidance on troubleshooting and resolving any compatibility or performance-related issues.
Once you have thoroughly tested and validated the PHP upgrade, you can confidently deploy the changes to your production environment, knowing that your website or application is running on the latest and optimized PHP version.
Congratulations! You have successfully completed the process of upgrading PHP to version 7.4, ensuring improved performance, security, and compatibility for your website or application.
Conclusion
Upgrading PHP to version 7.4 is a crucial step in ensuring the performance, security, and compatibility of your website or web application. By following the steps outlined in this guide, you can successfully upgrade to PHP 7.4 and take advantage of its numerous benefits.
First, remember to check your current PHP version to determine if an upgrade is necessary. Then, take the time to back up your files and database to safeguard your data. Updating the software and dependencies on your server is essential to ensure compatibility with PHP 7.4.
Next, install PHP 7.4 using your preferred method, whether it’s using a package manager, compiler, or pre-packaged binaries. Once installed, don’t forget to update the PHP configuration to optimize its performance for your specific needs.
After completing the upgrade process, thoroughly test your website or application to ensure everything functions correctly. Perform functional, compatibility, and performance tests to identify and address any issues that may arise. Monitor your error logs and handle any errors or warnings that occur.
Throughout the process, remember to consult the official PHP documentation and seek assistance from the PHP community if needed. Stay up to date with best practices and coding standards to ensure your code is efficient and future-proof.
By successfully upgrading to PHP 7.4, you can take advantage of its improved performance, reduced memory usage, and enhanced error handling. Additionally, you gain access to new features and functionalities that make your code more efficient and maintainable.
Keep in mind that frequent PHP updates are released, and staying up to date with the latest versions is crucial for security and compatibility reasons. Regularly check for new PHP releases and consider implementing a maintenance plan to keep your PHP version and dependencies up to date.
With the upgrade to PHP 7.4 completed, you can rest assured that your website or web application is running on an optimized and secure platform. Enjoy the benefits of improved performance and enhanced features, and continue to evolve your codebase and stay ahead in the dynamic world of PHP development.