Introduction
Welcome to our guide on how to increase your PHP memory limit. If you’ve ever encountered a “PHP memory exhausted” error on your website, you know how frustrating it can be. This error occurs when your PHP scripts require more memory than the default limit set by your server. Fortunately, there are ways to overcome this limitation and avoid any disruptions to your website’s functionality.
PHP, which stands for Hypertext Preprocessor, is a widely-used open-source scripting language that powers dynamic websites and applications. The PHP memory limit refers to the maximum amount of memory that a PHP script can utilize when executing on a server. By default, this limit is set to a relatively low value to prevent misuse or potential security risks.
However, certain circumstances may require you to increase the PHP memory limit. For example, if you’re running resource-intensive applications, such as content management systems (CMS) like WordPress or e-commerce platforms, you might encounter memory errors due to the high demands of these systems. Additionally, complex plugins, themes, or custom code can also put a strain on PHP’s memory limits.
In this guide, we will explore various methods to help you increase your PHP memory limit and keep your website running smoothly. We will also discuss some common mistakes to avoid during the process. So, let’s dive in and find out how to overcome the PHP memory limit hurdle!
What is PHP Memory Limit?
The PHP memory limit refers to the maximum amount of memory that a PHP script is allowed to consume while executing on a server. It is specified in terms of megabytes (MB) and serves as a safeguard to prevent scripts from using excessive memory resources.
When a PHP script is executed, it may need to store and manipulate various data in the server’s memory. This can include variables, arrays, objects, database results, and other temporary data. The memory limit ensures that a script cannot consume an unlimited amount of memory, which could lead to performance issues and potentially crash the server.
By default, most web servers set a relatively low PHP memory limit. The specific default limit can vary depending on the server configuration and hosting provider. Typically, it ranges from 32MB to 128MB, which is generally sufficient for smaller websites with basic functionality.
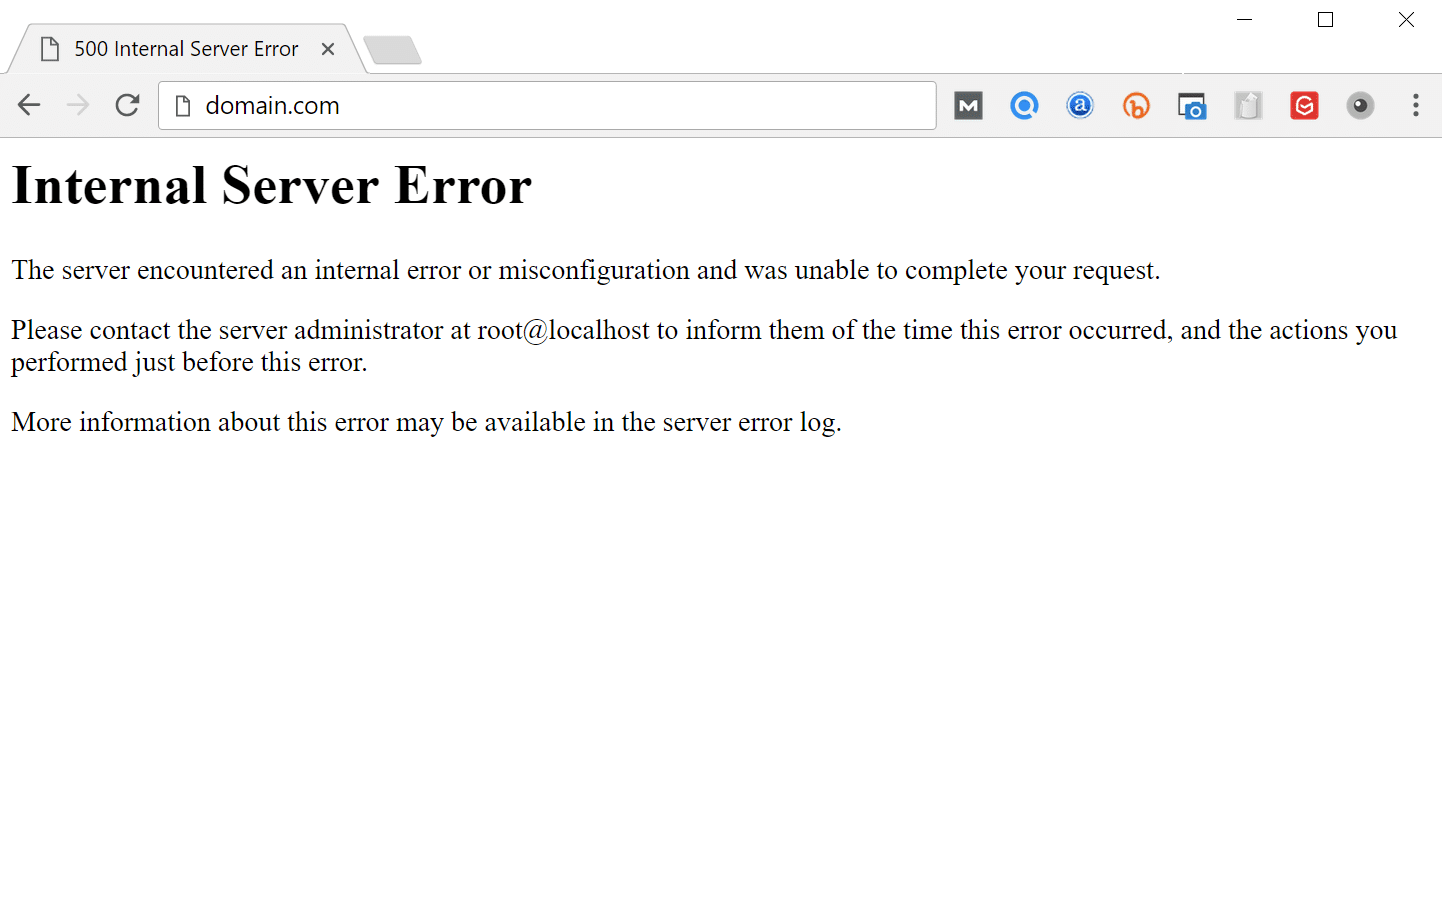
However, as your website grows in complexity or handles more significant traffic, you may encounter situations where the default PHP memory limit is not enough. This can result in memory errors, such as “Fatal error: Allowed memory size of X bytes exhausted,” which can disrupt the proper functioning of your website.
It’s important to note that the PHP memory limit is separate from the server’s physical memory or RAM. The PHP memory limit only applies to the memory allocated for PHP scripts, while the server’s overall memory is used to handle other processes and server operations.
Understanding and being able to modify the PHP memory limit is crucial for web developers and website administrators who want to ensure their applications can handle increasing demands. In the next sections, we will explore why you might need to increase the PHP memory limit and various methods to accomplish this.
Why Increase PHP Memory Limit?
There are several reasons why you might need to increase the PHP memory limit for your website or application. Let’s explore some of the common scenarios where a higher memory limit becomes necessary:
Resource-Intensive Applications: Content management systems (CMS) like WordPress, e-commerce platforms, or web frameworks often require more memory to handle the complex operations and dynamic content they manage. If you’re running such resource-intensive applications, reaching the default memory limit can lead to performance issues or even crashes.
Large Datasets: If your website processes or manipulates large amounts of data, such as when handling extensive databases, image processing, or generating complex reports, it may require additional memory to store and manipulate the data efficiently.
Custom Code or Plugins: If you’re running custom-coded functionality or using third-party plugins that are not optimized for memory usage, it can quickly consume the default memory limit. This is especially true if the code or plugins were not built with memory efficiency in mind.
High Traffic Loads: As the number of concurrent users accessing your website grows, the memory usage can increase significantly. Each user session may require memory to store session data, cache, or process requests. With higher traffic, increasing the memory limit can prevent memory exhaustion and ensure smooth user experiences.
Memory Leaks or Inefficient Code: Memory leaks occur when a portion of memory is allocated but not released, leading to gradual memory consumption over time. Inefficient code structures can also contribute to increased memory usage. Increasing the PHP memory limit can help compensate for memory leaks or inefficiencies in the code while you work on diagnosing and fixing them.
Third-Party Integration: If your website relies on third-party APIs, services, or libraries that require a higher memory limit, you may need to adjust the PHP memory setting accordingly to ensure smooth integration and data processing.
By increasing the PHP memory limit, you provide your website or application with the necessary resources to handle increased demands, complex operations, and data processing. It helps prevent memory errors, crashes, and sluggish performance, ensuring a seamless user experience.
Now that we’ve explored the reasons why you might need to increase the PHP memory limit, let’s move on to checking the current memory limit on your server.
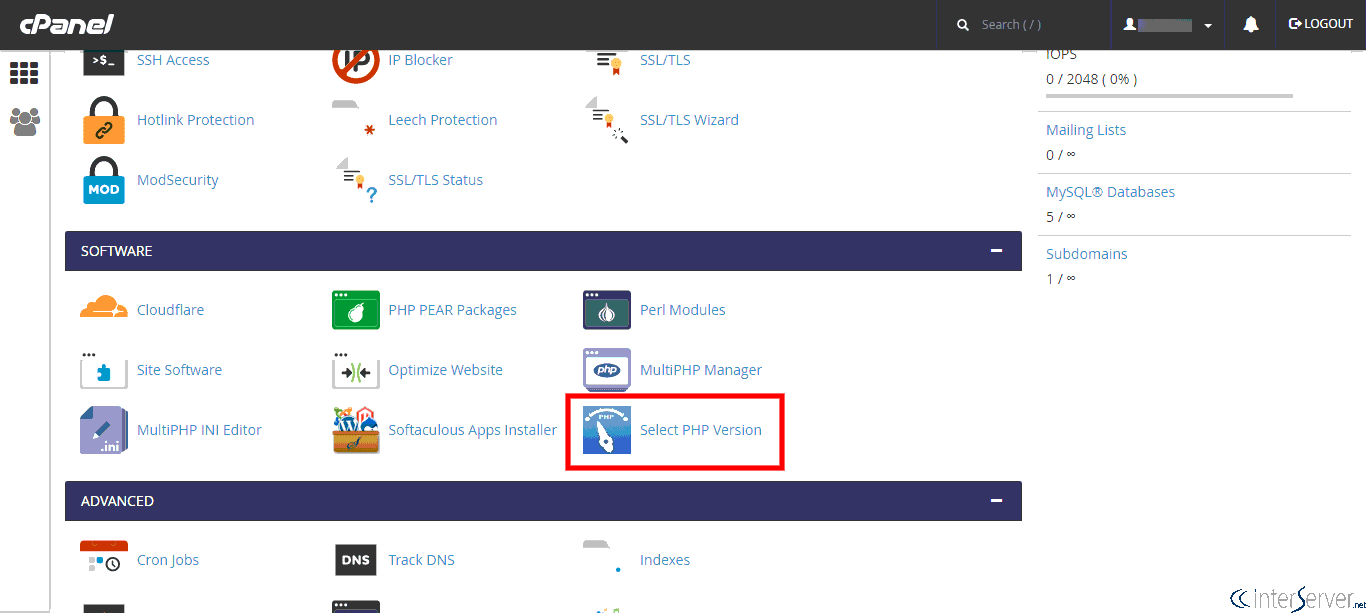
Checking Current PHP Memory Limit
To determine the current PHP memory limit set on your server, you have a few options depending on your level of access and control:
1. Using a PHP Info Page: Create a PHP file with the following code:
Save the file with a “.php” extension and upload it to your server. When you access this file in a browser, it will display comprehensive information about your PHP configuration, including the current memory limit.
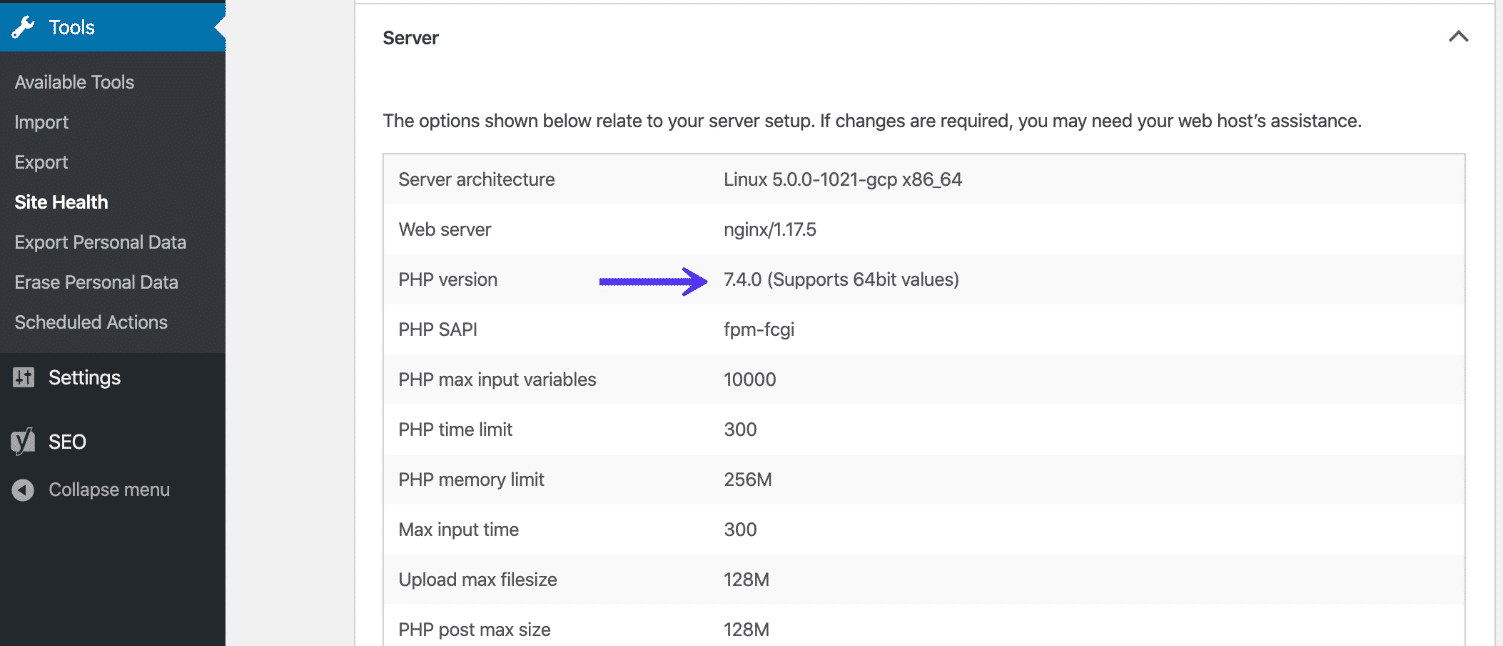
2. Using the WordPress Admin Dashboard: If your website runs on WordPress, you can check the PHP memory limit in the WordPress admin dashboard. Navigate to “Settings” and then click on “System Status” or “Site Health” (depending on the version of WordPress). Here, you can find information about your PHP configuration, including the memory limit.
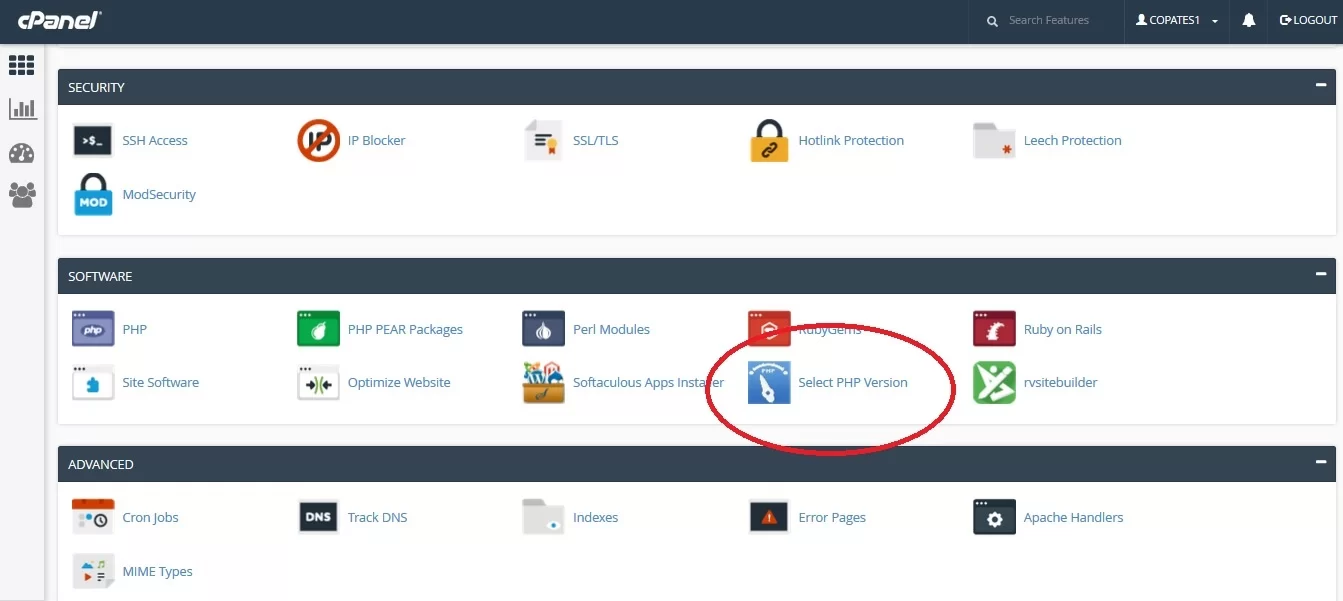
3. Consulting Hosting Documentation or Support: Some hosting providers display the PHP memory limit in their documentation or account control panels. If you’re unsure about how to check the memory limit or don’t have access to make direct changes, reach out to your hosting provider’s support team for assistance.
Once you’ve identified the current PHP memory limit, note down the value for reference. This will help you determine how much to increase the limit to accommodate your website’s requirements.
Now that you’re aware of the current PHP memory limit on your server, it’s time to explore the different methods you can use to increase the memory limit. In the following sections, we will guide you through each method with step-by-step instructions.
Methods to Increase PHP Memory Limit
There are multiple methods you can use to increase the PHP memory limit. The appropriate method for you will depend on your server setup and access levels. Let’s explore several common methods:
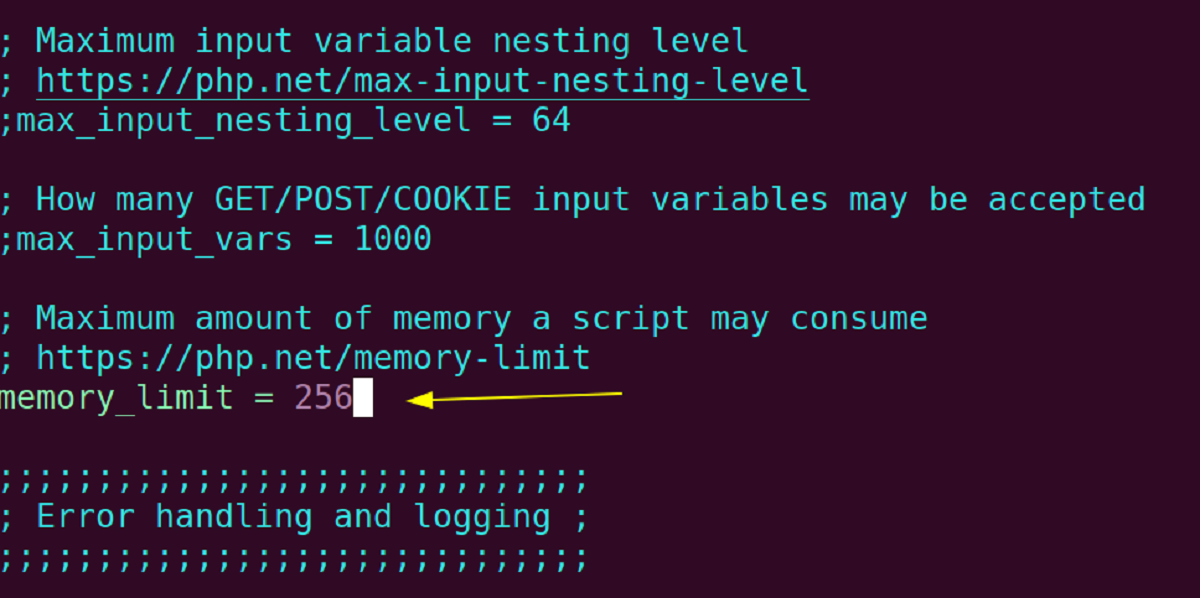
Method 1: Editing php.ini: The php.ini file is the main configuration file for PHP on your server. You can increase the memory limit by modifying this file. Locate the php.ini file on your server, usually in the “etc” or “conf” directory. Look for a line that starts with “memory_limit” and increase the value to your desired limit, such as “256M”. Save the changes and restart your web server for the new limit to take effect.
Method 2: Editing .htaccess file: If you don’t have access to the php.ini file, you can try editing the .htaccess file instead. Add the following line of code to the .htaccess file in your website’s root directory:
php_value memory_limit 256M
Replace “256M” with your desired memory limit. Save the changes, and refresh your website to apply the new memory limit.
Method 3: Editing wp-config.php file (WordPress only): If your website runs on WordPress, you can adjust the memory limit by editing the wp-config.php file. Open the file and add the following line just before the line that says “/* That’s all, stop editing! Happy blogging. */”:
define(‘WP_MEMORY_LIMIT’, ‘256M’);
Save the changes and refresh your website to apply the new memory limit.
Method 4: Contact Your Web Hosting Provider: If you’re not comfortable editing server files or if you have limited access, you can reach out to your web hosting provider. They can assist in increasing the PHP memory limit on your behalf. This is particularly useful if you’re on a shared hosting environment where direct file access is restricted.
It’s important to keep in mind that not all hosting providers allow users to modify the PHP memory limit. If none of the above methods work for you, contact your hosting provider’s support team for guidance.
Now that you’re familiar with different methods to increase the PHP memory limit, it’s crucial to be aware of some common mistakes to avoid during this process. Let’s discuss these mistakes in the next section.
Method 1: Editing php.ini
One of the primary methods for increasing the PHP memory limit is by editing the php.ini file. The php.ini file is a configuration file that contains various settings for PHP on your server. Here’s a step-by-step guide on how to increase the memory limit using this method:
Step 1: Locate the php.ini file: The php.ini file is typically located in the “etc” or “conf” directory on your server. However, the exact location may vary depending on your server setup or hosting provider. If you’re unsure about the location, consult your hosting provider’s documentation or contact their support team.
Step 2: Open the php.ini file: Once you’ve located the php.ini file, open it using a text editor of your choice. It’s a good practice to make a backup of the file before making any changes.
Step 3: Find the “memory_limit” directive: In the php.ini file, look for a line that starts with “memory_limit”. The value next to it represents the current memory limit. It is usually specified in megabytes, such as “128M”.
Step 4: Increase the memory limit: Modify the value of “memory_limit” to your desired limit. For example, if you want to set the memory limit to 256 megabytes, change the line to:
memory_limit = 256M
Step 5: Save the changes: Once you’ve updated the memory limit, save the php.ini file.
Step 6: Restart the web server: To apply the changes, you need to restart the web server. Depending on your server setup, this can be done through the command line or via your hosting provider’s control panel. Restarting the web server ensures that the new memory limit takes effect.
Keep in mind that editing the php.ini file may require administrative access to the server. If you’re on a shared hosting environment or don’t have access to the php.ini file, consider using one of the alternate methods mentioned earlier.
Now that you’ve learned how to increase the PHP memory limit by editing the php.ini file, let’s move on to the next method: editing the .htaccess file.
Method 2: Editing .htaccess file
If you don’t have direct access to the php.ini file, another method to increase the PHP memory limit is by editing the .htaccess file. The .htaccess file is a configuration file used by Apache web servers to control various settings. Follow the steps below to adjust the memory limit using this method:
Step 1: Locate the .htaccess file: The .htaccess file is typically located in the root directory of your website. If you can’t find it, ensure that your file manager or FTP client is set to display hidden files as the .htaccess file is often hidden by default.
Step 2: Open the .htaccess file: Open the .htaccess file using a text editor of your choice. If you don’t have an existing .htaccess file, you can create a new one using any text editor and save it as “.htaccess”.
Step 3: Add the memory limit directive: In the .htaccess file, add the following line of code:
php_value memory_limit 256M
This line specifies the desired memory limit, which in this example is set to 256 megabytes. You can adjust the value according to your requirements.
Step 4: Save the changes: After adding the memory limit directive, save the .htaccess file.
Step 5: Refresh your website: Once you’ve saved the changes, refresh your website to apply the new memory limit. The changes will take effect immediately.
It’s important to note that not all hosting environments allow overriding PHP settings through the .htaccess file. Additionally, some hosting providers may have specific rules or restrictions in place for .htaccess usage. If you encounter any issues or are unsure about using this method, it’s recommended to consult your hosting provider’s support documentation or reach out to their support team for assistance.
Now that you’ve learned how to increase the PHP memory limit by editing the .htaccess file, let’s move on to the next method: editing the wp-config.php file (WordPress only).
Method 3: Editing wp-config.php file
If you’re using WordPress as your website platform, you can increase the PHP memory limit by editing the wp-config.php file. This method is specific to WordPress installations and allows you to define the memory limit directly within your website’s configuration. Follow the steps below to adjust the memory limit using this method:
Step 1: Locate the wp-config.php file: The wp-config.php file is located in the root directory of your WordPress installation. You can access it using a file manager or via FTP.
Step 2: Open the wp-config.php file: Open the wp-config.php file using a text editor of your choice.
Step 3: Add the memory limit constant: In the wp-config.php file, look for the block of code that starts with “/* That’s all, stop editing! Happy blogging. */”. Just above that line, add the following code:
define(‘WP_MEMORY_LIMIT’, ‘256M’);
This line sets the memory limit to 256 megabytes. You can modify the limit based on your requirements.
Step 4: Save the changes: After adding the memory limit constant, save the wp-config.php file.
Step 5: Refresh your website: Once you’ve saved the changes, refresh your website to apply the new memory limit. The changes will take effect immediately for your WordPress installation.
Editing the wp-config.php file allows you to customize various WordPress settings, including the PHP memory limit. By defining the memory limit directly in the wp-config.php file, you ensure that it remains consistent even if you change themes or update plugins.
Remember that this method is applicable only to WordPress websites. If you’re using a different CMS or a custom-built application, refer to the appropriate documentation or consult your developer to determine the appropriate method to adjust the PHP memory limit.
Now that you’ve learned how to increase the PHP memory limit by editing the wp-config.php file, let’s move on to the final method: contacting your web hosting provider for assistance.
Method 4: Contact Your Web Hosting Provider
If you’re unable to directly modify the PHP memory limit through the aforementioned methods, or if you’re not comfortable making the changes yourself, you can always reach out to your web hosting provider for assistance. They have the technical knowledge and access to adjust the PHP memory limit on your behalf.
Step 1: Contact your hosting provider: Reach out to your hosting provider’s support team through their preferred communication channel, such as live chat, ticketing system, or phone support. Explain your requirements and mention that you need to increase the PHP memory limit on your server.
Step 2: Provide necessary details: Be prepared to provide the necessary details that your hosting provider may request, such as your account credentials, domain name, and any specific information related to your server environment.
Step 3: Explain your requirements: Clearly communicate why you need to increase the PHP memory limit. Mention any resource-intensive applications, large datasets, or high traffic requirements that necessitate a higher memory allocation.
Step 4: Follow instructions or allow support staff to make changes: Your hosting provider will guide you on the necessary steps to increase the PHP memory limit or will make the changes for you. They may require some time to implement the changes, so be patient and allow them to complete the process.
Step 5: Test the increased memory limit: Once your hosting provider has made the necessary adjustments, it’s a good practice to test the increased PHP memory limit. Ensure that your website or application is functioning as expected and that any previous memory-related errors or issues have been resolved.
Remember that the process may vary depending on your hosting provider’s policies and infrastructure. Not all hosting providers allow direct modification of PHP settings by their customers, especially in shared hosting environments. However, their support team should be able to assist you in finding a suitable solution to increase the PHP memory limit.
By contacting your web hosting provider, you can leverage their expertise and ensure that the PHP memory limit is adjusted correctly without making any potentially risky changes yourself.
Now that you’ve learned about the different methods to increase the PHP memory limit, let’s discuss some common mistakes to avoid during the process.
Common Mistakes to Avoid
When increasing the PHP memory limit, it’s important to be aware of common mistakes that can potentially cause issues or have unintended consequences. By avoiding these mistakes, you can ensure a smooth and successful adjustment of the memory limit. Here are some key pitfalls to avoid:
1. Setting an excessively high memory limit: While it may be tempting to set a very high memory limit to avoid any potential issues, it’s generally unnecessary and can lead to resource wastage. Set the memory limit based on your actual requirements and regularly monitor your website’s memory usage to optimize efficiency.
2. Making changes to the wrong configuration files: Ensure that you are modifying the correct configuration file, whether it’s the php.ini file, .htaccess file, or wp-config.php file. Making changes to the wrong file can cause unexpected errors and may not have any effect on the PHP memory limit.
3. Neglecting to restart the web server: After making changes to configuration files like php.ini or .htaccess, it’s crucial to restart the web server for the changes to take effect. Failing to restart the server may result in the updated memory limit not being applied.
4. Not checking for memory limit restrictions: Some hosting providers impose restrictions on the maximum memory limit that can be set by customers. Before attempting to increase the memory limit, check with your hosting provider’s documentation or support to ensure that the desired limit is within the allowed range.
5. Modifying memory limit in the wrong location within files: When editing configuration files like php.ini or wp-config.php, make sure you place the memory limit directive in the correct section or position within the file. Placing it incorrectly can cause syntax errors or unexpected behavior.
6. Overlooking memory optimization techniques: Increasing the memory limit should not be the sole solution for memory-related issues. It’s essential to optimize your code, plugins, and website performance to minimize memory usage. Consider implementing caching mechanisms, removing unnecessary plugins, or optimizing database queries to reduce the overall memory footprint.
7. Not testing the increased memory limit: After increasing the PHP memory limit, thoroughly test your website or application to ensure that it functions as expected. Pay attention to any error messages or unusual behavior that may indicate further adjustments or optimizations are needed.
By avoiding these common mistakes, you can increase the PHP memory limit effectively and minimize the likelihood of encountering issues or disruptions on your website.
Now that you’re aware of the common mistakes to avoid, it’s time to test the increased PHP memory limit. Let’s discuss the importance of testing in the next section.
Testing the Increased PHP Memory Limit
After increasing the PHP memory limit, it is crucial to thoroughly test your website or application to ensure that it is functioning as expected. Testing helps you identify any potential issues or errors that may arise due to the increased memory limit. Here are some steps you can follow to effectively test the increased PHP memory limit:
1. Test all website functionalities: Go through all the different features and functionalities of your website or application. Test features that are memory-intensive, such as generating dynamic content, uploading files, or processing large amounts of data. Verify that these functionalities are working correctly and that they do not exceed the new memory limit.
2. Monitor memory usage: Use server monitoring tools or plugins to monitor the memory usage of your website or application. Keep an eye on memory usage trends and ensure that it remains within the allocated limit. If you notice unusually high memory usage, investigate and address any potential memory leaks or inefficiencies in your code.
3. Load and stress testing: Conduct load and stress tests to simulate high levels of traffic and activity on your website. This can help you identify any performance bottlenecks or issues related to the increased memory limit. Various load testing tools are available that can simulate concurrent user activity and measure the impact on memory usage.
4. Evaluate error logs: Check the error logs of your website or application for any PHP memory-related errors or warnings. If you encounter any errors, investigate their causes and take appropriate action to resolve them. Error logs can provide valuable insights into potential areas for optimization or further adjustments to the memory limit.
5. User feedback: Encourage your website users or application users to provide feedback on performance, speed, or any issues they may encounter. User feedback can help uncover any hidden memory-related problems that may not be apparent during internal testing.
6. Test across different devices and browsers: Ensure that you test your website or application on various devices and browsers to account for different user environments. Memory usage and performance can vary across different platforms, so thorough testing across multiple devices is essential.
By conducting comprehensive testing, you can gain confidence in the increased PHP memory limit and ensure that your website or application is capable of handling the necessary memory requirements. If any issues or errors are identified during the testing phase, address them promptly to optimize memory usage and improve overall performance.
Now that you’ve successfully tested the increased PHP memory limit and verified the smooth functioning of your website or application, you’re ready to enjoy the benefits of the enhanced memory allocation.
Conclusion
Increasing the PHP memory limit can be a crucial step in ensuring optimal performance and functionality for your website or application. Through this guide, we have explored various methods to increase the PHP memory limit, including editing the php.ini file, modifying the .htaccess file, adjusting the wp-config.php file (for WordPress sites), and contacting your web hosting provider for assistance. We have also discussed the importance of testing the increased memory limit to identify and resolve any potential issues.
Understanding your website’s memory requirements and choosing an appropriate memory limit based on those needs is essential. While increasing the PHP memory limit can address certain memory-related errors, it is equally important to implement memory optimizations in your code, plugins, and overall website performance to avoid unnecessary resource consumption.
Remember to avoid common mistakes, such as setting excessively high memory limits, making changes to the wrong configuration files, neglecting to restart the web server, and overlooking memory optimization techniques. By adhering to best practices and testing the increased memory limit thoroughly, you can ensure a smooth and uninterrupted user experience.
If you encounter any difficulties or have limited technical knowledge, don’t hesitate to reach out to your web hosting provider for support. They can guide you through the process or make the necessary adjustments on your behalf.
Increasing the PHP memory limit is an effective solution to overcome memory constraints and enable your website or application to handle resource-intensive tasks, large datasets, high traffic loads, and complex functionality. By taking the necessary steps outlined in this guide, you can enhance the memory allocation and provide a seamless browsing experience for your users.
So go ahead and increase your PHP memory limit, optimize your website or application, and enjoy improved performance and stability!