Introduction
When it comes to running a WordPress website, there may come a time when you need to increase the PHP post max size. This parameter determines the maximum file size that can be uploaded through the WordPress dashboard, including media files, plugins, and themes. However, by default, the PHP post max size in WordPress may not be sufficient for your needs.
Imagine you’re trying to upload a high-resolution video or a large plugin file, only to receive an error message stating that the file exceeds the maximum allowed size. Frustrating, right? That’s where increasing the PHP post max size comes in handy.
By increasing the PHP post max size, you can easily upload larger files and prevent any limitations when managing your WordPress website. Fortunately, there are multiple methods to accomplish this, including editing the php.ini file, modifying the .htaccess file, editing the wp-config.php file, or using a dedicated plugin.
In this article, we’ll explore each method in detail and guide you through the process of increasing the PHP post max size in WordPress. Whether you’re a beginner or an experienced WordPress user, we’ll provide step-by-step instructions to help you overcome any obstacles.
So, whether you’re a blogger wanting to include high-quality images, a developer keen on uploading large files, or an e-commerce store owner needing to handle product images, this guide will assist you in increasing the PHP post max size to meet your specific requirements.
What is PHP Post Max Size?
The PHP post max size is a configuration setting that determines the maximum size of files that can be posted to a PHP script. In the context of WordPress, it refers to the maximum file size that can be uploaded through the WordPress dashboard. This includes files such as images, videos, plugins, and themes.
When you attempt to upload a file in WordPress, the PHP post max size limit is checked. If the file size exceeds this limit, you will encounter an error message and the upload will fail. This limit is in place to prevent the server from being overwhelmed by excessively large files and to ensure efficient system performance.
The PHP post max size is typically measured in bytes, although it is common to see it represented in kilobytes (KB) or megabytes (MB) for ease of understanding. For example, if the PHP post max size is set to 10MB, any file larger than 10MB will be rejected during the upload process.
It is worth mentioning that the PHP post max size is just one of several upload-related variables in PHP configuration. Other related variables include upload_max_filesize (determines the maximum file size that can be uploaded) and max_execution_time (sets the maximum time allowed for a PHP script to execute). These variables work in conjunction with each other to ensure a smooth and secure uploading experience.
It’s important to note that the PHP post max size limit can vary depending on the web hosting provider or server configuration. Some hosting providers may set a relatively low limit by default, while others may have higher limits or allow you to modify the limit yourself.
In the next section, we will discuss why you might need to increase the PHP post max size in WordPress and the potential benefits it can bring to your website.
Why Increase PHP Post Max Size in WordPress?
There are several reasons why you might need to increase the PHP post max size in WordPress. Let’s explore some of the common scenarios where increasing the file upload limit can be beneficial.
1. Uploading high-resolution media files: If you’re a photographer, graphic designer, or content creator, you may need to upload high-resolution images or videos to showcase your work. These files tend to be larger in size, and if the PHP post max size limit is too low, it can prevent you from uploading your media files without compromising their quality.
2. Installing large themes or plugins: Some premium WordPress themes and plugins may come bundled with various assets such as images, fonts, or demo content. If the PHP post max size limit is too small, it can prevent you from installing these themes or plugins smoothly, as they often have larger file sizes.
3. Managing e-commerce store: If you’re running an online store using WordPress, you may need to upload multiple product images. These images can quickly accumulate and become large in size, especially if you are selling products that require high-resolution images. Increasing the PHP post max size allows you to manage your online store more effectively and showcase your products in the best possible way.
4. Handling file uploads in forms: WordPress allows you to create forms using plugins or custom code. In some cases, you may want to enable file uploads in these forms, such as job applications, resume submissions, or image submissions. If the PHP post max size limit is too restrictive, it can hinder the submission of larger files and disrupt the user experience.
5. Future scalability: Even if you’re not currently facing any issues with the default PHP post max size limit, it’s a good practice to increase the limit with future scalability in mind. As your website grows and your needs evolve, you may encounter situations where larger file uploads become necessary. By proactively increasing the PHP post max size, you save yourself from potential headaches down the line.
By increasing the PHP post max size in WordPress, you can overcome these limitations and manage your website more effectively. In the following sections, we will explore different methods to increase the PHP post max size, allowing you to choose the one that best suits your needs.
Checking Current PHP Post Max Size
Before you proceed to increase the PHP post max size in WordPress, it’s important to check the current limit set on your server. This will give you a baseline to work with and determine how much you need to increase the limit by.
There are several ways you can check the current PHP post max size value:
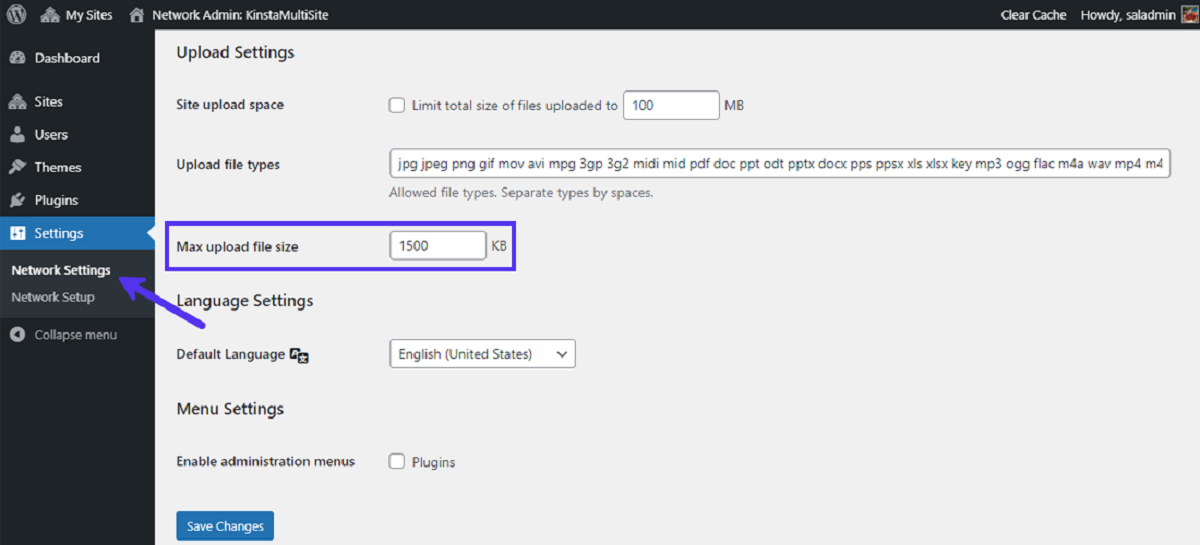
- Using the WordPress Admin Area: Log in to your WordPress dashboard and navigate to ‘Media’ > ‘Add New.’ Look for the ‘Maximum upload file size’ or ‘Upload Max Filesize’ label. This will display the current PHP post max size limit in either kilobytes (KB) or megabytes (MB).
- Using a PHP Info File: Create a new PHP file in a text editor and add the following code:
      <?php
      phpinfo();
      ?>
Save the file as ‘phpinfo.php’ and upload it to your website’s root directory using FTP or a file manager provided by your hosting provider. Access the file in your web browser by navigating to ‘http://yoursite.com/phpinfo.php.’ This will display a comprehensive PHP information page, including the current PHP post max size value.
- Using a PHP Function: If you have access to your website’s theme files or a custom plugin, you can use the following PHP function to retrieve the current PHP post max size limit:
      <?php
      echo ini_get('post_max_size');
      ?>
Place this code in a template file such as ‘header.php’ or ‘functions.php’ and view your website in the browser. The PHP function will output the current PHP post max size limit on the front-end.
Once you have determined the current PHP post max size value, take note of it as you will need it later when increasing the limit using one of the methods we will discuss in the following sections.
With the current PHP post max size known, you can confidently proceed to increase the limit and ensure a smooth and efficient file upload experience in WordPress.
Increasing PHP Post Max Size in WordPress
Now that you are aware of the current PHP post max size limit on your server, let’s explore the various methods to increase it in WordPress. Whether you have access to your server’s configuration files or prefer to use a plugin, there is a solution that suits your needs.
Method 1: Editing the php.ini File
One of the most common ways to increase the PHP post max size in WordPress is by editing the php.ini file. This file contains various PHP settings and is located in your server’s configuration.
To increase the PHP post max size using this method:
- Locate the php.ini file on your server. This might be in the root directory or a folder named ‘etc’ or ‘conf’.
- Open the php.ini file in a text editor.
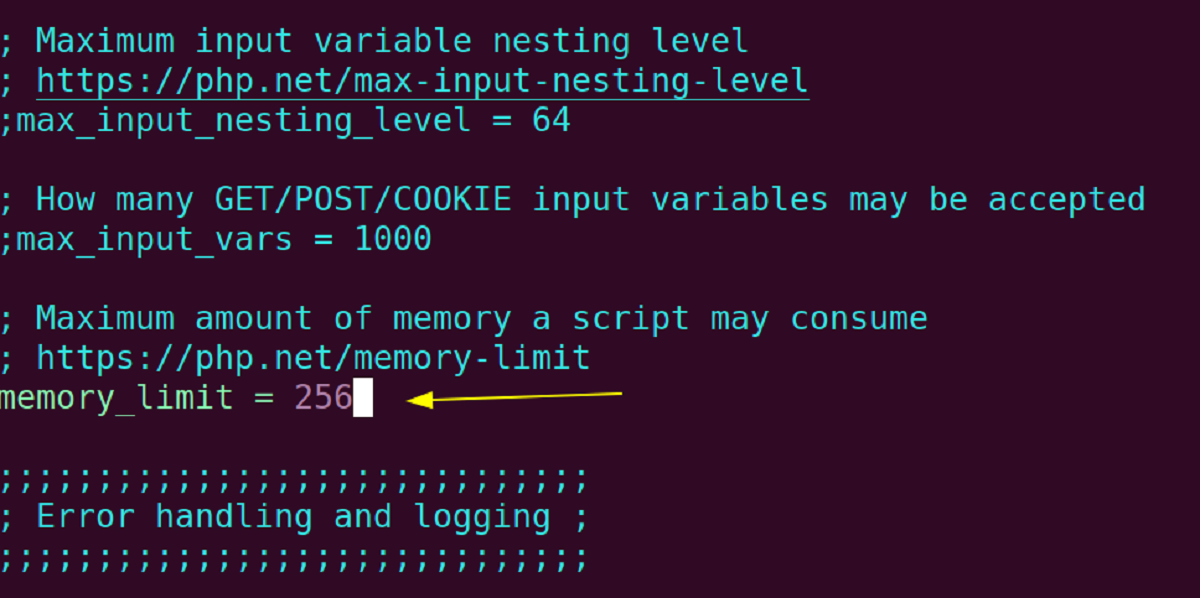
- Find the line that starts with ‘post_max_size=’.
- Modify the value next to it to the desired size. For example, ‘post_max_size=64M’ sets the limit to 64 megabytes.
- Save the changes and restart your web server for the new configuration to take effect.
Method 2: Editing the .htaccess File
If you don’t have access to the php.ini file, another method to increase the PHP post max size is by editing the .htaccess file. This file controls various server directives and is located in the root directory of your WordPress installation.
To increase the PHP post max size using this method:
- Using an FTP client or a file manager, navigate to your WordPress installation’s root directory.
- Locate the .htaccess file and download it to your computer as a backup.
- Open the .htaccess file in a text editor.
- Add the following line at the beginning or end of the file:
php_value post_max_size 64MReplace ’64M’ with the desired size, such as ’32M’ or ‘128M’.
- Save the changes and upload the modified .htaccess file back to your server, overwriting the existing one.
Method 3: Editing the wp-config.php File
If you prefer to modify a WordPress-specific file, you can increase the PHP post max size by editing the wp-config.php file. This file contains important configuration settings for your WordPress installation.
To increase the PHP post max size using this method:
- Using an FTP client or a file manager, navigate to your WordPress installation’s root directory.
- Locate the wp-config.php file and download it to your computer as a backup.
- Open the wp-config.php file in a text editor.
- Add the following line before the ‘/* That’s all, stop editing! Happy blogging. */’ line:
@ini_set( 'post_max_size', '64M' );Replace ’64M’ with the desired size, such as ’32M’ or ‘128M’.
- Save the changes and upload the modified wp-config.php file back to your server, overwriting the existing one.
Method 4: Using a Plugin
If you prefer a more user-friendly approach without directly modifying files, you can use a dedicated plugin to increase the PHP post max size. There are various plugins available in the WordPress plugin repository that allow you to modify PHP settings from within your WordPress dashboard.
To increase the PHP post max size using a plugin:
- Go to your WordPress dashboard and navigate to ‘Plugins’ > ‘Add New’.
- Search for a plugin that allows you to modify PHP settings, such as ‘PHP Settings’ or ‘Easy PHP Settings’.
- Install and activate the plugin of your choice.
- Once installed, locate the plugin settings within your WordPress dashboard.
- Find the option to increase the PHP post max size and adjust it to your desired value.
- Save the changes and the plugin will handle updating the necessary configurations for you.
After applying any of the above methods, the PHP post max size in WordPress should be increased accordingly. However, it’s important to note that the method you choose may depend on your hosting environment and the level of access you have to your server’s configuration files.
In the next section, we will discuss how to verify that the PHP post max size has been successfully increased on your WordPress website.
Method 1: Editing the php.ini File
One of the methods to increase the PHP post max size in WordPress is by editing the php.ini file. The php.ini file contains various settings for PHP, including the post_max_size parameter.
To increase the PHP post max size using this method, follow the steps below:
- Locate the php.ini file on your server. The location of the php.ini file may vary depending on the server configuration and hosting provider. In some cases, it may be located in the root directory or in a folder named “etc” or “conf”.
- Open the php.ini file using a text editor.
- Look for the line that starts with “post_max_size”. This line determines the current post max size value.
- Edit the value next to “post_max_size” to increase the limit. For example, if the current value is “8M” (eight megabytes), you can increase it to “16M” (sixteen megabytes) or any other desired size. Make sure to specify the size in bytes, kilobytes (KB), megabytes (MB), or gigabytes (GB).
- Save the changes to the php.ini file.
- If you have access to the server, restart the web server for the changes to take effect. This step is crucial in order for the new PHP post max size to be applied.
By editing the php.ini file and increasing the post_max_size parameter, you are effectively raising the limit for file uploads in PHP. Once the changes are saved and the web server is restarted, WordPress will be able to handle larger file uploads according to the new PHP post max size.
It’s important to note that not all hosting providers allow direct access to the php.ini file. Some shared hosting environments may not provide this level of access, and in such cases, you may need to reach out to your hosting provider for assistance. Alternatively, you can explore other methods mentioned in this article to increase the PHP post max size in WordPress.
In the next section, we will discuss another method to increase the PHP post max size by editing the .htaccess file in WordPress.
Method 2: Editing the .htaccess File
If you don’t have direct access to the php.ini file or prefer not to modify it, another method to increase the PHP post max size in WordPress is by editing the .htaccess file. The .htaccess file is a configuration file that allows you to modify server directives and override certain settings.
To increase the PHP post max size using this method, follow the steps below:
- Access your WordPress installation’s root directory either through an FTP client or a file manager provided by your hosting provider.
- Locate the .htaccess file in the root directory. If you can’t find it, make sure to enable the “Show Hidden Files” option, as the .htaccess file might be hidden by default.
- Create a backup of the .htaccess file by downloading it to your local computer. This will ensure that you can revert back to the original file if needed.
- Open the .htaccess file using a text editor.
- Add the following line of code at the beginning or the end of the file:
php_value post_max_size 64MReplace “64M” with the desired size you want to set for the PHP post max size. You can use a different value, such as “32M” or “128M”, depending on your requirements.
- Save the changes to the .htaccess file.
- Upload the modified .htaccess file back to your website’s root directory, replacing the existing one.
By adding the “php_value post_max_size” directive to the .htaccess file, you are instructing the server to set the specified value as the PHP post max size for your WordPress website. This method allows you to override the default server settings without having access to the php.ini file.
Once you have saved and uploaded the modified .htaccess file, the new PHP post max size limit will be applied to your WordPress site. You can now proceed to upload files with sizes that adhere to the increased limit.
Please note that some hosting providers may restrict the ability to modify certain directives in the .htaccess file for security reasons. In such cases, you might need to consider using alternative methods or consult your hosting provider for assistance.
In the next section, we will discuss another method to increase the PHP post max size by editing the wp-config.php file in WordPress.
Method 3: Editing the wp-config.php File
If you prefer to modify a WordPress-specific file instead of the server configuration files, you can increase the PHP post max size by editing the wp-config.php file. This file contains important configuration settings for your WordPress installation and provides an alternative method for increasing the limit.
To increase the PHP post max size using this method, follow the steps below:
- Access your WordPress installation’s root directory either through an FTP client or a file manager provided by your hosting provider.
- Locate the wp-config.php file in the root directory.
- Create a backup of the wp-config.php file by downloading it to your local computer.
- Open the wp-config.php file using a text editor.
- Look for the following line in the wp-config.php file:
/* That's all, stop editing! Happy blogging. */Add the following line of code just above the mentioned line:
@ini_set( 'post_max_size', '64M' );Replace “64M” with the desired size you want to set for the PHP post max size.
- Save the changes to the wp-config.php file.
- Upload the modified wp-config.php file back to your website’s root directory, replacing the existing one.
By adding the “@ini_set(‘post_max_size’, ’64M’);” line to the wp-config.php file, you are instructing PHP to set the specified value as the PHP post max size for your WordPress website. This method allows you to override the default PHP configuration settings specifically for your WordPress site.
Once you have saved and uploaded the modified wp-config.php file, the new PHP post max size limit will be applied to your WordPress site. You can now proceed to upload files with sizes that adhere to the increased limit.
Please note that any changes made to the wp-config.php file should be done with caution as it contains critical settings for your WordPress installation. Make sure to create a backup of the original file before making any modifications and double-check the syntax to ensure the correct placement of the code.
In the next section, we will discuss another method to increase the PHP post max size by using a plugin specifically designed for this purpose.
Method 4: Using a Plugin
If you prefer a user-friendly and hassle-free method to increase the PHP post max size in WordPress, using a dedicated plugin can be an effective solution. There are several plugins available in the WordPress plugin repository that allow you to modify PHP settings, including the post max size limit, directly from your WordPress dashboard.
To increase the PHP post max size using a plugin, follow the steps below:
- Log in to your WordPress dashboard.
- Navigate to the “Plugins” section and click on “Add New”.
- In the search bar, type in a keyword such as “PHP settings” or “post max size”.
- From the search results, choose a plugin that suits your needs and has good ratings and reviews.
- Click on “Install Now” and then activate the plugin.
- Once the plugin is activated, locate its settings section. This can usually be found under “Settings” or in a separate tab labeled with the plugin’s name.
- In the plugin settings, you will typically find an option to increase the PHP post max size. Set the desired value, such as “64M” or “128M”, according to your requirements.
- Save the changes made in the plugin settings.
By using a dedicated plugin for modifying PHP settings, you can easily increase the PHP post max size without the need to manually edit configuration files. These plugins provide a more accessible and user-friendly interface for managing such settings in WordPress.
It’s worth noting that while plugins offer convenience, it’s important to choose reputable and regularly updated plugins from trusted sources. Additionally, always ensure that the plugins you use are compatible with your WordPress version to avoid any conflicts or compatibility issues.
With the PHP post max size limit successfully increased using the plugin, you can now proceed to upload larger files to your WordPress site without encountering any restrictions.
In the next section, we will discuss how to verify that the PHP post max size has been successfully increased on your WordPress website.
Verifying the Increased PHP Post Max Size
After following one of the methods mentioned earlier to increase the PHP post max size in WordPress, it’s important to verify whether the changes have been applied successfully. By confirming the new PHP post max size, you can ensure that your WordPress website is now capable of handling larger file uploads.
To verify the increased PHP post max size, you can follow these steps:
- Access your WordPress dashboard.
- Navigate to the Media section and click on “Add New”.
- Look for the “Maximum upload file size” or “Upload Max Filesize” label. It should display the new PHP post max size limit you have set.
- Try uploading a file that exceeds the previous limit. For instance, if your previous limit was 8MB and you have increased it to 64MB, attempt to upload a file larger than 8MB.
- If the file upload is successful without any error messages, it indicates that the PHP post max size has been increased and the changes have taken effect.
Verifying the increased PHP post max size is crucial to ensure that any changes made to the configuration or files have been implemented correctly. It provides the assurance that your WordPress website can now handle larger file uploads according to the new limit you have set.
If, during the verification process, you encounter any error messages or the file upload fails, it could indicate that the PHP post max size has not been increased successfully. In such cases, you may need to reconsider the method you have used or recheck the modifications made in the respective files or plugin settings.
By confirming the successful increase in the PHP post max size, you can now enjoy the benefits of handling larger file uploads in your WordPress website without encountering any limitations.
In the concluding section, we will wrap up the article by summarizing the methods discussed and emphasizing the importance of optimizing the PHP post max size in WordPress.
Conclusion
In this article, we explored various methods to increase the PHP post max size in WordPress. By modifying the PHP post max size limit, you can overcome the default restrictions and enable your website to handle larger file uploads smoothly.
We discussed four methods that you can use to increase the PHP post max size:
- Editing the php.ini file: This method allows you to directly modify the server’s PHP configuration file to increase the limit.
- Editing the .htaccess file: This method enables you to override server directives by adding a specific line of code to the .htaccess file in your WordPress installation’s root directory.
- Editing the wp-config.php file: By adding a line of code to the wp-config.php file, you can increase the PHP post max size specifically for your WordPress site.
- Using a plugin: Plugins designed for modifying PHP settings offer a more user-friendly approach, allowing you to increase the PHP post max size directly from your WordPress dashboard.
It’s important to choose the method that best suits your needs and aligns with your level of access to the server’s configuration files.
After increasing the PHP post max size, it is crucial to verify that the changes have been successfully applied. This can be done by checking the maximum file upload size in the WordPress dashboard and attempting to upload a file that exceeds the previous limit.
Increasing the PHP post max size in WordPress is beneficial for various scenarios such as uploading high-resolution media files, installing large themes or plugins, managing e-commerce stores, and handling file uploads in forms. By raising the limit, you can enhance the functionality and user experience of your website.
Remember, however, that increasing the PHP post max size should be done with consideration for server resources and your hosting provider’s limitations. It’s important to strike a balance between accommodating larger file uploads and ensuring the overall performance and stability of your website.
We hope this article has provided you with valuable insights and guidance on increasing the PHP post max size in WordPress. Now, armed with these methods, you can confidently manage larger file uploads and optimize your WordPress website to meet your specific needs.