Overview
Transferring Chrome extensions from one computer to another can be a hassle, especially if you have customized your browser with essential extensions. However, there are a few methods you can use to transfer Chrome extensions easily and efficiently. In this article, we will explore two popular methods: transferring extensions manually and using Chrome Sync.
Manually transferring Chrome extensions involves locating the extension files on your computer and copying them to the new device. This method gives you more control over the transfer process, but it requires some technical knowledge. On the other hand, using Chrome Sync allows you to seamlessly sync your extensions across multiple devices as long as you are signed in to your Google account. While this method is more straightforward, it requires an internet connection.
Whether you prefer a manual transfer or the convenience of Chrome Sync, we will guide you through the steps to successfully transfer your Chrome extensions. So, let’s dive in and explore these methods in detail.
Method 1: Transferring Chrome Extensions Manually
If you prefer a hands-on approach and have some technical knowledge, manually transferring Chrome extensions is a great option. This method allows you to directly copy the extension files from one computer to another, ensuring a seamless transition. Follow the step-by-step guide below to transfer your Chrome extensions manually.
Step 1: Open Chrome Extensions
First, open Google Chrome on the computer that currently has the extensions you want to transfer. Next, click on the three vertical dots in the top-right corner of the browser window and select “More tools” from the dropdown menu. From the extended menu, choose “Extensions.”
Step 2: Enable Developer Mode
In the Extensions settings window, locate the “Developer mode” toggle at the top-right corner of the window. Toggle it to the right to enable Developer mode. Enabling Developer mode allows you to access the extension files on your computer.
Step 3: Locate the Extension Files
Once Developer mode is enabled, you will see additional options for each installed extension. Locate the extension you want to transfer and click on the “Details” button beneath it. This will expand the extension’s details and reveal its file path.
Step 4: Copy the Extension Folder
With the extension’s details expanded, look for the “Extension” section. You will see the file path of the extension. Copy the entire folder containing the extension’s files, including any sub-folders or files within it.
Step 5: Transfer the Extension to Another Computer
Now, it’s time to transfer the extension to the new computer. You can use external storage devices like USB drives or cloud storage services like Google Drive to move the extension folder to the new device. Place the folder in a location where you can easily access it later.
Once you have successfully transferred the extension folder to the new computer, repeat the first three steps of this method on the new device. After enabling Developer mode and accessing the Extensions settings, you can simply drag the extension folder from its location and drop it directly into the Extensions settings window. This will install the extension on the new computer.
By following these steps, you can transfer Chrome extensions manually and retain your customized browsing experience on a different device. If you prefer a more automated and convenient method, continue reading to learn how to use Chrome Sync to transfer your extensions.
Step 1: Open Chrome Extensions
The first step in manually transferring Chrome extensions is to open the Chrome Extensions settings. This allows you to access the list of installed extensions on your computer and perform necessary actions.
To open Chrome Extensions, start by launching the Google Chrome browser on the computer that currently has the extensions you want to transfer. Ensure that the browser is up to date for the smoothest experience. Once Chrome is open, look towards the top right-hand corner of the browser window.
There, you will see three vertical dots arranged in a column. Click on these dots to open the main Chrome menu. A drop-down menu will appear with several options listed under it.
Scroll down the menu and hover your cursor over the “More tools” option. A new list will extend from “More tools,” offering additional options for you to choose from.
From the extended menu, select “Extensions.” Clicking on this option will open a new tab in the Chrome browser dedicated to managing your installed extensions.
Alternatively, you can directly access the Chrome Extensions settings by typing “chrome://extensions/” in the address bar of your browser. Press Enter, and the Extensions settings page will load.
Now that you have successfully opened the Chrome Extensions settings, you can proceed to the next step in the manual transfer process. Enabling Developer mode will unlock additional options and make it possible for you to locate the extension files on your computer.
Step 2: Enable Developer Mode
In order to access and transfer Chrome extension files, you need to enable Developer mode in the Chrome Extensions settings. Enabling Developer mode unlocks additional options that allow you to delve deeper into the extension files and make changes if necessary.
Once you have the Chrome Extensions settings tab open, look towards the top-right corner of the window. You will notice a toggle switch labeled “Developer mode.” By default, this switch is turned off, disabling Developer mode and limiting the control you have over the extensions.
To enable Developer mode, simply click on the toggle switch. You will see the switch slide to the right, indicating that Developer mode is now activated.
Enabling Developer mode is a crucial step in manually transferring Chrome extensions because it grants you access to important features, such as detailed extension information, file paths, and the ability to make changes if needed.
Once Developer mode is enabled, you will find additional options displayed under each installed extension. These options will allow you to manage and interact with the extension files.
Keep in mind that Developer mode should be used with caution, as it provides the ability to modify and make changes to extension files. Unless you have specific knowledge or requirements, it is generally advisable to only transfer the extension files without modifying them.
With Developer mode now enabled, you are ready to proceed with the next step in manually transferring your Chrome extensions. In the next step, we will locate the extension files on your computer, allowing you to copy them for transfer to another device.
Step 3: Locate the Extension Files
Now that you have enabled Developer mode in the Chrome Extensions settings, it’s time to locate the extension files on your computer. This step is crucial for manually transferring Chrome extensions, as it allows you to find the files that need to be copied for the transfer process.
Once you are in the Chrome Extensions settings tab, you will see a list of all the installed extensions. Each extension will be displayed as a separate box, containing its name, a brief description, and some options.
To locate the extension files, find the specific extension that you want to transfer to another computer. Click on the “Details” button beneath the extension’s description.
By clicking on the “Details” button, you will expand the extension’s details, revealing additional information and options for that specific extension.
Among these expanded details, you will see the “Extension” section, which displays the file path of the extension on your computer. The file path will typically look something like “C:\Users\YourUsername\AppData\Local\Google\Chrome\User Data\Default\Extensions\extensionID”.
Take note of the file path of the extension you want to transfer, as you will need it to locate and copy the extension files.
Please remember that each extension will have a unique file path, so make sure you are copying the correct files for the desired extension.
With the extension files located, you are now ready to proceed with the next step of manually transferring your Chrome extensions. In the next step, we will guide you through the process of copying the extension folder to prepare for the transfer.
Step 4: Copy the Extension Folder
With the file path of the extension identified, it’s time to copy the extension folder from your computer. This step is crucial in ensuring a successful transfer of your Chrome extension to another device.
Once you have located the extension files in the Chrome Extensions settings, focus on finding the extension folder. The extension folder contains all the necessary files for the extension to function properly.
To copy the extension folder, you will first need to navigate to the file path that you noted previously. Open the file explorer on your computer and paste the file path into the address bar. Press Enter to go directly to the extension’s folder.
Once you are inside the extension folder, the next step is to copy it. Right-click on the extension folder and select the “Copy” option from the context menu that appears. Alternatively, you can use the Ctrl + C keyboard shortcut to copy the folder.
After copying the extension folder, you can paste it in a convenient location for the transfer process. You can use external storage devices like USB drives or cloud storage services to move the extension folder to the new computer. Ensure that you choose a location where you can easily access the folder later.
It is essential to copy the entire extension folder, including any sub-folders or files within it. This ensures that all the necessary components of the extension are included in the transfer.
Once you have successfully copied the extension folder, you are now ready to proceed to the final step of transferring Chrome extensions manually. In the next step, we will guide you on how to transfer the extension to another computer and install it successfully.
Step 5: Transfer the Extension to Another Computer
Now that you have successfully copied the extension folder from your computer, it’s time to transfer it to another computer. This step is crucial to ensure that the Chrome extension can be installed and used seamlessly on the new device.
There are different methods for transferring the extension folder to another computer. You can use external storage devices such as USB drives, email the folder to yourself, or utilize cloud storage services like Google Drive or Dropbox.
Choose the transfer method that is most convenient for you and transfer the extension folder to the new computer.
Once the extension folder is on the new computer, follow these steps to install the extension:
- Open the Google Chrome browser on the new computer.
- In the top-right corner, click on the three vertical dots to open the Chrome main menu.
- From the drop-down menu, select “More tools” and then click on “Extensions.”
- In the Extensions settings, make sure that Developer mode is enabled. If not, enable it by toggling the switch to the right.
- Next, locate an empty area within the Extensions settings window, click and hold the mouse button, and drag the extension folder from its location on your computer.
- Release the mouse button and drop the extension folder directly into the Extensions settings window.
- Chrome will automatically install the extension onto the new computer.
After the installation is complete, you should see the newly transferred extension listed among the installed extensions.
Repeat these steps for any other extensions you want to transfer to the new computer. Each extension should have its own respective folder that you copied and transferred.
By following these steps, you can successfully transfer Chrome extensions from one computer to another manually. Enjoy your customized browsing experience on the new device with all your favorite extensions available.
Method 2: Using Chrome Sync
If you prefer a more automated and convenient method for transferring Chrome extensions, you can take advantage of Chrome Sync. Chrome Sync allows you to sync your extensions, along with other browsing data, across multiple devices as long as you are signed in to your Google account. This method eliminates the need for manual file transfers and ensures that your extensions are seamlessly available on any device you use.
To transfer your Chrome extensions using Chrome Sync, follow the step-by-step guide below:
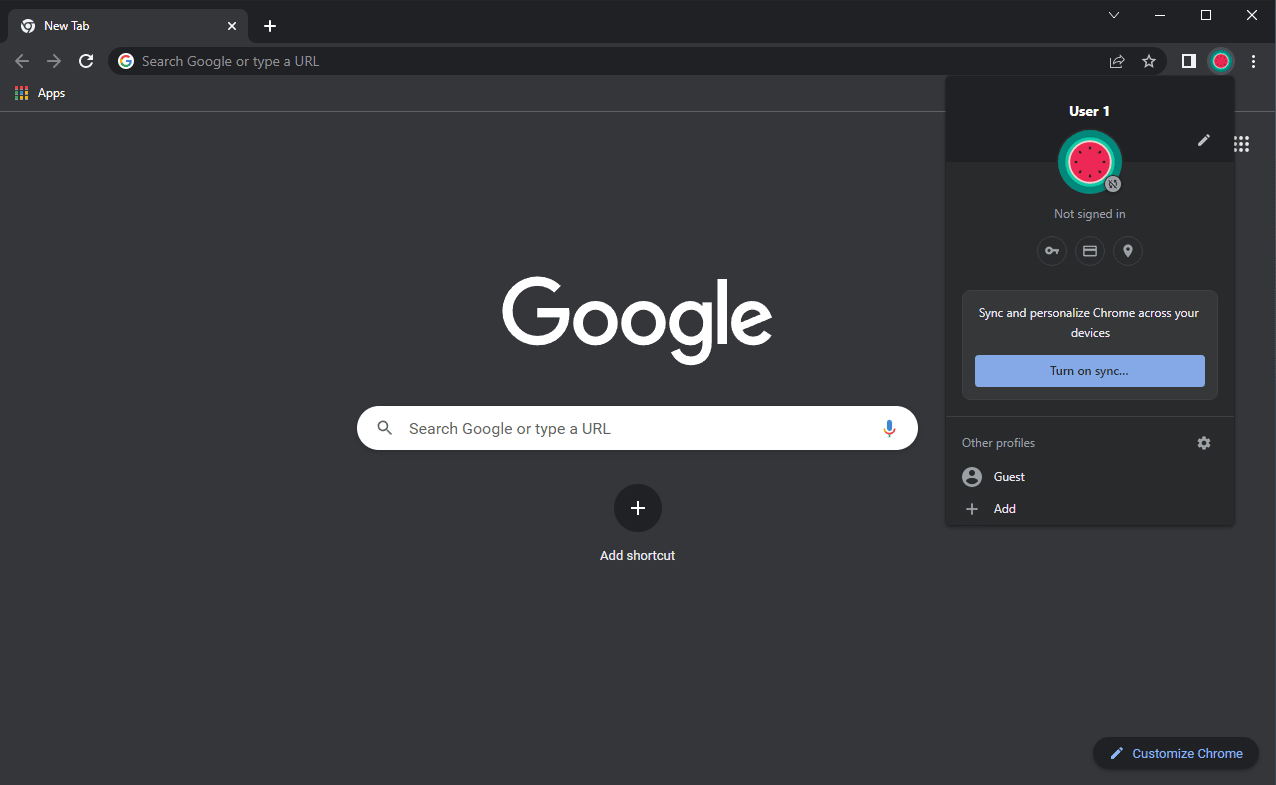
Step 1: Sign in to Chrome
On the computer that currently has the extensions you want to transfer, ensure that you are signed in to your Google account in the Chrome browser. This will enable Chrome Sync to synchronize your extensions with your Google account.
Step 2: Enable Chrome Sync
In the Chrome browser, click on the three vertical dots in the top-right corner to open the Chrome main menu. From the menu, select “Settings.” Alternatively, you can type “chrome://settings/” in the address bar and press Enter to directly access the Chrome settings.
In the Settings tab, scroll down and click on “Sync and Google services.” Here, you will find the option to enable Chrome Sync. Toggle the switch to the right to enable Chrome Sync.
Step 3: Install Chrome on Another Computer
On the new computer where you want to transfer your Chrome extensions, install the Chrome browser if it is not already installed. You can download the latest version of Chrome from the official Google Chrome website.
Step 4: Sign in to Chrome and Sync Extensions
Launch Chrome on the new computer and sign in to the same Google account that you used in Step 1. This will allow your Chrome settings, including extensions, to be synchronized with your account. Ensure that Chrome Sync is enabled in the settings on this device as well.
Once you are signed in and Chrome Sync is enabled, your extensions will begin to sync automatically. This process may take some time, depending on the number of extensions and your internet connection speed.
After the synchronization is complete, you will see your transferred extensions listed among the installed extensions in the Chrome browser on the new computer.
Using Chrome Sync to transfer Chrome extensions provides a convenient and automated approach. It ensures that your extensions are always up-to-date and available across all your devices.
By following these steps, you can easily transfer your Chrome extensions using Chrome Sync. Enjoy a seamless browsing experience with your favorite extensions on any device!
Step 1: Sign in to Chrome
The first step in using Chrome Sync to transfer your Chrome extensions is to sign in to the Chrome browser with your Google account. Signing in with your account allows you to seamlessly synchronize your extensions and other browsing data across multiple devices.
To sign in to Chrome, follow the steps below:
- Launch the Chrome browser on the computer where you currently have the extensions you want to transfer.
- In the top-right corner of the browser window, click on the three vertical dots to open the Chrome menu.
- From the menu, select “Settings.” This will open the Chrome settings in a new tab.
- In the Settings tab, scroll down and click on “Sign in to Chrome.” If you are already signed in, you will see your Google account name displayed here.
- A sign-in window will appear. Enter your Google email address or phone number associated with your Google account and click “Next.”
- Enter your password and click “Next” to proceed.
- If you have two-factor authentication enabled, follow the additional prompts to complete the sign-in process.
- Once you have successfully signed in, you will see your Google account name displayed in the “Sign in to Chrome” section of the settings.
Signing in to Chrome with your Google account is essential for Chrome Sync to work effectively. It allows your extensions and other browsing data to be securely synchronized and accessible on any device where you sign in to Chrome with the same account.
By signing in to Chrome, you ensure that your extensions will be available to transfer and sync to another computer. This seamless synchronization process saves you time and effort in manually transferring extensions, as Chrome Sync takes care of it automatically.
With Step 1 complete, you are now ready to proceed to the next step and enable Chrome Sync in the Chrome settings. This will allow your extensions to be synced across multiple devices effortlessly.
Step 2: Enable Chrome Sync
Once you have signed in to Chrome with your Google account, the next step is to enable Chrome Sync. Enabling Chrome Sync allows your extensions, browsing history, bookmarks, settings, and other data to be synchronized across multiple devices seamlessly. By enabling this feature, you can easily transfer your Chrome extensions to another computer.
To enable Chrome Sync, follow these steps:
- Open the Chrome browser on the computer where you are signed in to Chrome.
- Click on the three vertical dots in the top-right corner of the browser window to open the Chrome menu.
- In the menu, select “Settings.” This will open the Chrome settings page in a new tab.
- Scroll down the settings page until you find the “Sync and Google services” section.
- Within the “Sync and Google services” section, you will see the option for “Sync.” Toggle the switch to the right to enable Chrome Sync.
- Once Chrome Sync is enabled, you may see a prompt asking you to sign in again to confirm your account. Enter your password if prompted, and click “OK” or “Continue” to proceed.
- Chrome Sync will start synchronizing your data, including your installed extensions, with your Google account.
Enabling Chrome Sync ensures that all your extensions and other browsing data are backed up and accessible on any device where you use Chrome and are signed in with the same Google account.
With Chrome Sync enabled, your extensions are now ready to be transferred to another computer effortlessly. The synchronization process will ensure that the extensions you use on the current computer will be available and up to date on the new device.
By following these steps, you can conveniently enable Chrome Sync and prepare your extensions for transfer. In the next step, we will guide you through installing Chrome on the new computer as part of the transfer process.
Step 3: Install Chrome on Another Computer
After enabling Chrome Sync on the computer where you have your extensions, the next step is to install the Chrome browser on the new computer. By installing Chrome on the new computer, you will be able to easily transfer and sync your extensions across devices.
To install Chrome on another computer, follow these steps:
- On the new computer, open a web browser and navigate to the official Google Chrome website (https://www.google.com/chrome/).
- On the website, you will see a big blue button that says “Download Chrome.” Click on this button to initiate the download process.
- Once the file is downloaded, locate it on your computer and double-click on it to start the installation process.
- Follow the on-screen prompts to install Chrome on the new computer. You may need to choose installation preferences and agree to the terms of service.
- Once the installation is complete, you can launch Chrome on the new computer.
After launching Chrome, ensure that you are connected to the internet as Chrome will require an internet connection to synchronize your extensions and other data.
By installing Chrome on the new computer, you have created an environment where your extensions can be transferred from the computer where you have enabled Chrome Sync.
With Chrome successfully installed, you are now ready to proceed to the next step and sign in to Chrome on the new computer, syncing your extensions and other data.
Note that the installation process may vary slightly depending on your operating system. The steps provided are general guidelines to help you get Chrome set up on another computer.
After completing Step 3, you are one step closer to transferring your Chrome extensions to the new computer. In the next step, we will guide you through the process of signing in to Chrome on the new computer and syncing your extensions.
Step 4: Sign in to Chrome and Sync Extensions
After installing Chrome on the new computer, the next step is to sign in to Chrome with your Google account and synchronize your extensions. This will ensure that all your extensions are transferred and available on the new device.
To sign in to Chrome and sync your extensions, follow these steps:
- Launch the Chrome browser on the new computer.
- In the top-right corner of the Chrome window, click on the three vertical dots to open the Chrome menu.
- From the menu, select “Settings.” This will open the Chrome settings page.
- In the settings page, scroll down to the “Sign in” section.
- Click on the “Sign in to Chrome” button. A sign-in window will appear.
- Enter the email address or phone number associated with your Google account and click “Next.”
- Enter your password and click “Next” to proceed.
- If you have two-factor authentication enabled, follow the additional prompts to complete the sign-in process.
- Once you are signed in, make sure that Chrome Sync is enabled in the settings. If not, toggle the switch to the right to enable it.
- Your extensions will start syncing automatically, and you should see a notification indicating the progress of the synchronization.
By signing in to Chrome and enabling Chrome Sync, your extensions and other browsing data will be synchronized with your Google account.
Allow the synchronization process to complete, as this may take some time depending on the number of extensions and your internet connection speed.
After syncing is complete, you will find your transferred extensions listed among the installed extensions in the Chrome browser on the new computer.
With Step 4 completed, you have successfully signed in to Chrome and synced your extensions on the new computer. You can now enjoy a seamless browsing experience with all your extensions available.
In the final step, we will summarize the key points and conclude the process of transferring Chrome extensions to another computer.
Conclusion
Transferring Chrome extensions from one computer to another is made easy with the methods outlined in this guide. By following the manual transfer method or utilizing Chrome Sync, you can seamlessly transfer and sync your extensions, ensuring a consistent browsing experience across multiple devices.
In the manual transfer method, you learned how to locate the extension files, copy the extension folder, and transfer it to another computer. This hands-on approach gives you more control but requires some technical knowledge to execute.
If you prefer a more automated method, using Chrome Sync allows you to sync your extensions across devices effortlessly. By signing in to Chrome with your Google account and enabling Chrome Sync, your extensions and other browsing data are synchronized, eliminating the need for manual transfers.
Whether you choose the manual transfer method or Chrome Sync, both options provide a convenient way to transfer your extensions and maintain a personalized browsing experience on a new computer.
Remember to sign in to Chrome and enable Chrome Sync on both the source and target computers to ensure a successful transfer. Keep in mind that an active internet connection is required for Chrome Sync to work effectively.
Take advantage of these methods to transfer your Chrome extensions without hassle. Enjoy the convenience of accessing your favorite extensions on any device, enhancing your browsing experience and productivity.
With these steps and methods in mind, you can confidently transfer your Chrome extensions, allowing you to work and browse seamlessly on any computer you use.
Now that you are equipped with the knowledge to transfer Chrome extensions, go ahead and make the most of your browsing experience across devices!