Introduction
Welcome to our guide on how to stop programs running in the background in Windows 11. Have you ever noticed your computer running slower than usual or experiencing performance issues? One common culprit for these problems is programs running in the background.
Background programs are applications or processes that continue to run even when you’re not actively using them. They can consume valuable system resources like CPU power, memory, and network bandwidth, causing your computer to slow down and become less responsive.
While some background programs are necessary for the smooth functioning of your operating system, others may be unnecessary or unwanted. These programs can come installed with your computer or be added when you install new software. So, how do you stop these programs from running in the background and regain control over your system’s performance?
In this article, we will explore various methods to help you stop programs running in the background on Windows 11. These methods will allow you to selectively disable or remove unwanted programs, giving you more control over your computer’s resources and improving its overall speed and responsiveness.
By following the steps outlined in this guide, you’ll learn how to identify the programs running in the background, stop them from automatically launching at startup, and even uninstall unnecessary software. Whether you’re a computer novice or a tech-savvy user, these methods are easy to implement and can make a significant difference in optimizing your computer’s performance.
So, if you’re tired of sluggishness, lag, and unresponsive applications, let’s dive into the various methods you can use to put an end to programs running in the background in Windows 11. Are you ready to reclaim your computer’s speed and efficiency? Let’s get started!
Why should you stop programs running in the background?
If you’ve ever wondered why your computer is running slower than usual or experiencing performance issues, one of the first things you should investigate is the presence of programs running in the background. These background programs can consume valuable system resources and negatively impact your computer’s performance. Here are a few reasons why you should consider stopping programs running in the background:
- System resource utilization: Background programs can consume significant system resources, including CPU power, memory, and network bandwidth. When multiple programs are running simultaneously in the background, they can put a strain on your system, resulting in sluggishness and reduced overall performance.
- Speed and responsiveness: Programs running in the background can impact the speed and responsiveness of your computer. When these programs are using a significant amount of system resources, it can cause delays and lags when you’re performing tasks or running applications. By stopping unnecessary background programs, you can improve your computer’s speed and ensure a more responsive user experience.
- Battery life: Background programs running on laptops or portable devices can also drain your battery more quickly. Certain applications or processes may continue to run in the background even when your device is in sleep mode or idle. By stopping these programs, you can extend your battery life and ensure that your device lasts longer on a single charge.
- Security and privacy: Some background programs may run without your knowledge or consent, potentially posing a security risk or compromising your privacy. Malware or unwanted software can hide in the background, silently collecting your personal information or performing malicious activities. By stopping suspicious or unnecessary background programs, you can enhance the security and privacy of your computer.
- User control: Stopping programs running in the background gives you more control over your computer and the resources it utilizes. You can prioritize the programs that are essential to your workflow and ensure that they receive the necessary system resources. This level of control can lead to a smoother and more enjoyable computing experience.
With these reasons in mind, it becomes clear why it is important to stop programs running in the background on your Windows 11 computer. By minimizing the number of background programs and optimizing your system’s resources, you can enhance your computer’s speed, responsiveness, security, and overall user experience. So, let’s explore the different methods you can use to stop these programs and take back control of your computer.
Method 1: Stop programs using the Task Manager
One of the easiest ways to stop programs running in the background on Windows 11 is by using the Task Manager. The Task Manager is a built-in utility that allows you to monitor and manage the processes and programs running on your computer. Here’s how you can use the Task Manager to stop background programs:
- Open the Task Manager: You can open the Task Manager by right-clicking on the taskbar and selecting “Task Manager” from the context menu. Alternatively, you can press
Ctrl + Shift + Escon your keyboard to quickly launch the Task Manager. - Identify the background programs: Once the Task Manager is open, go to the “Processes” or “Details” tab, depending on your Windows version. Here, you’ll find a list of all the processes running on your computer. Look for the programs that you want to stop, which may be listed by their names or their respective process IDs (PIDs).
- Stop the background programs: To stop a program, simply right-click on it and select “End Task” or “End Process”. You may receive a warning message indicating that closing the program may cause data loss or system instability. If you’re sure you want to proceed, click “End Task” or “End Process” to stop the program.
- Confirm the program has stopped: After ending the task or process, check the Task Manager to ensure that the program has stopped running. If it’s still listed, try ending the process again or consider an alternative method to stop the program.
By following these steps, you can easily stop programs running in the background using the Task Manager in Windows 11. However, it’s important to note that ending certain system processes or critical programs may cause instability or unexpected behavior in your computer. Exercise caution when stopping programs in the Task Manager and only end processes that you’re familiar with or that you know are unnecessary.
Now that you’ve learned how to stop background programs using the Task Manager, let’s explore another method that allows you to disable programs from launching at startup.
Method 2: Disable programs from startup settings
Another effective way to prevent programs from running in the background on Windows 11 is by disabling them from the startup settings. Many programs are set to automatically launch when you start your computer, causing them to run in the background and consume system resources. Disabling programs from startup can help optimize your computer’s performance. Here’s how you can disable programs from the startup settings:
- Open the Task Manager: You can open the Task Manager in Windows 11 by right-clicking on the taskbar and selecting “Task Manager” from the context menu. Alternatively, you can press
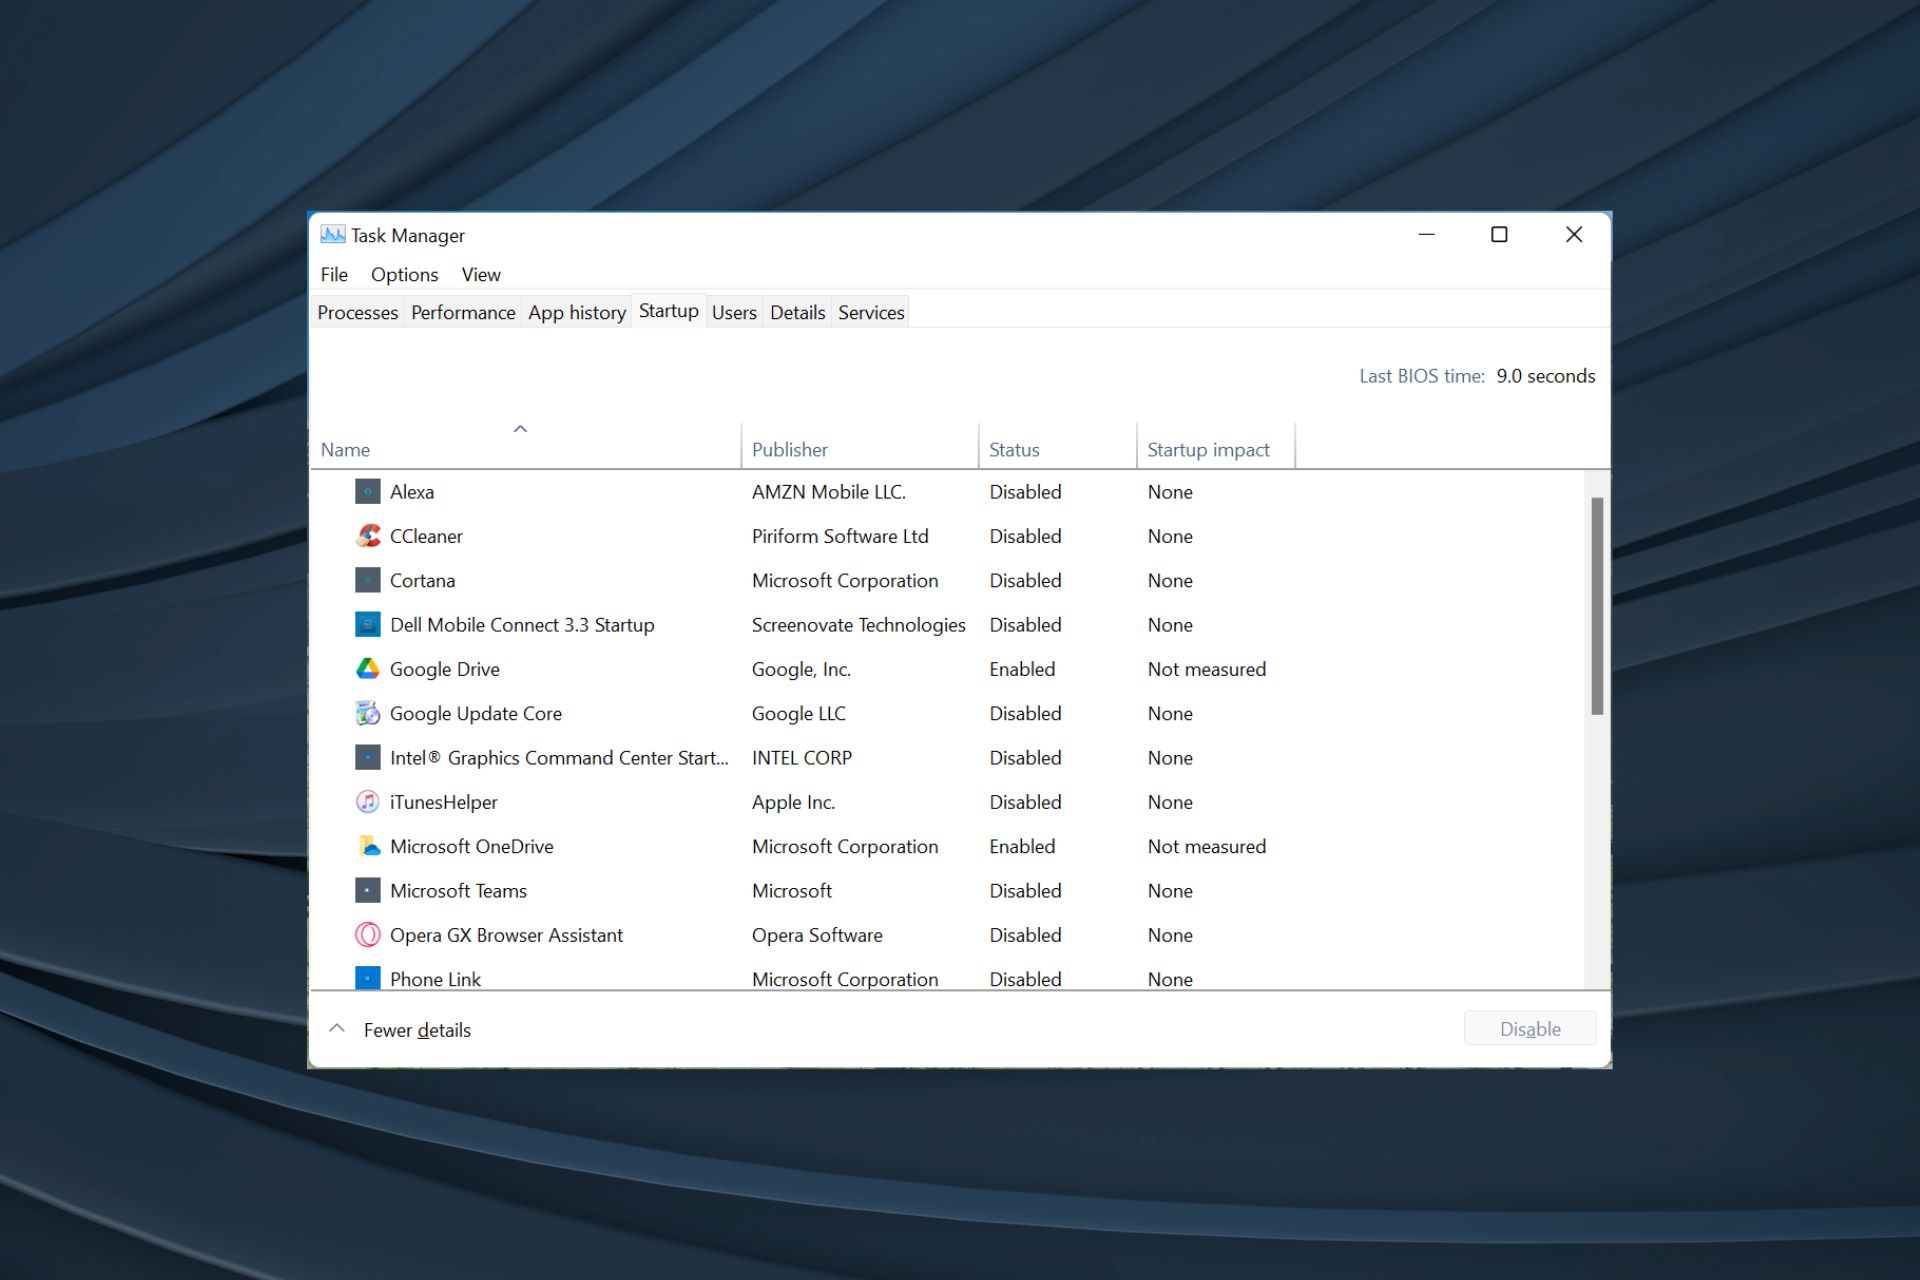
Ctrl + Shift + Escon your keyboard to quickly launch the Task Manager. - Go to the Startup tab: In the Task Manager window, navigate to the “Startup” tab. Here, you’ll find a list of programs that are set to start automatically when your computer boots up.
- Disable the programs: To disable a program from starting up, simply right-click on it and select “Disable”. This will prevent the program from running in the background when you start your computer.
- Confirm the changes: After disabling the programs, restart your computer to apply the changes. When your computer boots up, the disabled programs will no longer launch automatically, freeing up system resources and improving performance.
Keep in mind that not all programs listed in the Startup tab are necessary for the functioning of your computer. Some programs are added to the startup list by default and may not be essential for everyday use. Disabling these unnecessary programs can help streamline your computer’s startup process and improve overall performance.
If you later decide that you want a previously disabled program to start automatically again, you can go back to the Startup tab in the Task Manager and re-enable it.
Now that you know how to disable programs from the startup settings, you can selectively prevent background programs from running when you start your computer. However, if you want to permanently remove unwanted programs from your system, you can consider uninstalling them, which we’ll discuss in the next method.
Method 3: Uninstall unwanted programs
If you have programs running in the background that you no longer need or want, uninstalling them from your computer is a great way to stop them from consuming system resources. Uninstalling unwanted programs not only frees up valuable disk space but also improves the overall performance and efficiency of your Windows 11 system. Here’s how you can uninstall unwanted programs:
- Open the Settings app: You can open the Settings app by clicking on the Start button and selecting the gear icon, or by pressing
Windows Key + Ion your keyboard. - Go to the Apps section: In the Settings app, click on the “Apps” category. This will take you to the Apps & Features page, where you can manage the installed programs on your computer.
- Identify the unwanted programs: On the Apps & Features page, you’ll see a list of all the installed programs on your computer. Scroll through the list or use the search bar to find the programs that you want to uninstall.
- Uninstall the programs: To uninstall a program, click on it in the list, and then click on the “Uninstall” button. Follow the prompts and instructions to complete the uninstallation process. Repeat this step for each unwanted program you want to remove from your computer.
- Restart your computer: After uninstalling the programs, it’s a good idea to restart your computer to ensure that any related processes or services are completely terminated. Restarting your computer also allows your system to refresh and apply any necessary changes.
It’s important to note that certain programs may require administrator privileges to uninstall. If prompted, enter your admin password or provide confirmation to proceed with the uninstallation.
By uninstalling unwanted programs, you can permanently remove them from your computer and prevent them from running in the background. This not only frees up system resources but also reduces clutter and improves the overall performance of your Windows 11 system.
Now that you have learned how to uninstall unwanted programs, let’s explore another method that involves using third-party software to manage startup programs.
Method 4: Use third-party software to manage startup programs
In addition to using the built-in tools in Windows 11, you can also leverage third-party software to manage and control startup programs more efficiently. These software solutions offer advanced features and functionality, allowing you to easily identify and disable unnecessary programs running in the background. Here’s how you can use third-party software to manage startup programs:
- Choose a reputable third-party software: There are several popular third-party software options available for managing startup programs, such as CCleaner, Autoruns, or Startup Delayer. Research and choose a software solution that suits your needs and has positive reviews.
- Download and install the software: Visit the official website of the software and download the installer. Once the download is complete, run the installer and follow the on-screen instructions to install the software on your computer.
- Launch the software: After installation, launch the third-party software. Depending on the software you choose, you may find options and settings related to managing startup programs in the main interface or through specific tools or features.
- Explore the available features: Take some time to familiarize yourself with the software’s interface and features. These tools often provide detailed information about each startup program, allowing you to easily identify unnecessary programs and disable them with a few clicks.
- Disable unwanted programs: Use the software’s interface to disable or remove unwanted programs from the list of startup programs. The specific steps may vary depending on the software you’re using, but it usually involves selecting the program and choosing an option like “Disable” or “Remove”.
- Apply the changes: Once you have disabled or removed the unwanted programs, remember to apply the changes. Some software solutions may require you to restart your computer for the changes to take effect.
Using third-party software to manage startup programs can provide you with more advanced features and a user-friendly interface, making it easier to identify and disable unnecessary background programs. These tools often offer additional functionalities like system optimization, disk cleanup, and performance metrics, making them versatile applications for managing your computer’s performance.
Remember to download and install third-party software from trusted sources, and be cautious when granting access or permissions to these applications. It’s always a good practice to research and read reviews before installing any software on your computer.
Now that you know how to use third-party software to manage startup programs, you have more flexibility and control over the programs running in the background. By selectively disabling or removing unnecessary programs, you can optimize your computer’s performance and enhance your overall user experience.
Conclusion
In this guide, we explored various methods to stop programs running in the background on Windows 11. By implementing these methods, you can regain control over your computer’s resources, improve system performance, and enhance your overall user experience.
We began by understanding the importance of stopping background programs and the negative impact they can have on system resources, speed, responsiveness, battery life, security, and user control. Recognizing the need to take action, we then delved into four effective methods to address this issue.
First, we learned how to stop programs using the Task Manager, a built-in utility that allows you to identify and terminate specific processes or tasks. This method provides a simple and direct way to end background programs that are currently running.
Next, we explored how to disable programs from the startup settings. By preventing selected programs from automatically launching when your computer starts, you can significantly reduce the number of background programs running and improve system performance from the moment you power on your device.
In the third method, we discussed the process of uninstalling unwanted programs. This method permanently removes unnecessary programs from your computer, freeing up valuable disk space and eliminating the resource burden caused by background processes associated with these programs.
Finally, we examined the option of using third-party software to manage startup programs. These applications offer advanced features and a user-friendly interface, presenting a comprehensive solution for identifying, disabling, and managing background programs.
By combining these methods, you can tailor your computer’s startup process according to your needs and eliminate unwanted background programs, resulting in a faster, more efficient, and smoother computing experience.
Remember to exercise caution when applying these methods and only disable or uninstall programs that you no longer need or recognize. It’s important to strike a balance between eliminating unnecessary background programs and maintaining the functionality and stability of your system.
Now that you have the knowledge and tools to stop programs running in the background in Windows 11, take the necessary steps to optimize your computer’s performance and enjoy a more productive computing environment.