Introduction
Chrome bookmarks are a handy feature that allows users to save and organize their favorite websites for quick and easy access. Whether you use Google Chrome as your primary web browser or just for occasional browsing, bookmarks can be a lifesaver when it comes to keeping track of important webpages, articles, or resources.
For users who have recently switched to Windows 10 or those who are new to Chrome, finding the location of Chrome bookmarks on Windows 10 may seem like a daunting task. However, it’s actually quite simple once you know where to look.
In this article, we will explore the various methods to locate the storage location of Chrome bookmarks on a Windows 10 PC. Whether you want to backup your bookmarks, transfer them to another device, or simply satisfy your curiosity, we’ve got you covered.
By familiarizing yourself with the methods outlined in this article, you can easily find the location of your Chrome bookmarks and access them as needed. So, let’s dive in and uncover the hidden storage location of Chrome bookmarks on Windows 10!
Understanding Chrome Bookmarks
Before we delve into locating the storage location of Chrome bookmarks on a Windows 10 PC, it’s important to have a basic understanding of what bookmarks are and how they function within the Chrome browser.
Chrome bookmarks are essentially shortcuts that allow users to save the URLs (website addresses) of their favorite webpages. By bookmarking a webpage, you can easily access it later without having to remember or search for the URL again. Bookmarks act as a convenient way to organize and navigate through your preferred online destinations.
When you bookmark a webpage in Chrome, it is stored within the browser’s bookmarks system. This system maintains a collection of all your saved bookmarks, enabling you to quickly access them from the bookmarks bar, bookmarks menu, or bookmarks manager.
Chrome also offers additional features to enhance the bookmarking experience. For instance, you can create folders within your bookmarks to categorize them by topic or purpose. This allows for better organization and makes it easier to find specific bookmarks when you have a large collection.
Furthermore, Chrome bookmarks can be synced across multiple devices if you have signed in to your Google account. This means that your bookmarks will be accessible from any device where you are signed in to Chrome, including laptops, tablets, or smartphones.
Now that we have a solid understanding of what Chrome bookmarks are and how they work, let’s move on to exploring the methods for locating their storage location on a Windows 10 PC.
Where are Chrome Bookmarks Stored on Windows 10?
If you’re using Google Chrome on a Windows 10 PC, you might be wondering where the bookmarks are actually stored on your computer’s hard drive. Knowing the storage location can be helpful for purposes such as backing up your bookmarks or transferring them to another device.
Chrome bookmarks on Windows 10 are stored in a specific location within your user profile. The exact location may vary depending on the version of Chrome you are using, but generally, you can find them in the following directories:
C:\Users\YourUsername\AppData\Local\Google\Chrome\User Data\Default
In the above file path, “YourUsername” represents your actual Windows username. The AppData folder is a hidden folder in Windows, so you’ll need to enable the option to view hidden files and folders to access it.
Within the Default folder, you will find several files with the “.bak” extension. These files contain your bookmark data. The main file to look for is called “Bookmarks”, which stores the bookmarks you have saved in the browser.
It’s important to note that modifying or deleting any of these files manually may result in data loss or corruption. Therefore, it is recommended to backup the “Bookmarks” file before making any changes.
Now that you have learned where Chrome bookmarks are stored on Windows 10, let’s explore different methods for locating and accessing your bookmarks.
Method 1: Locating Bookmarks from Chrome Settings
If you prefer a more user-friendly and straightforward approach to finding your Chrome bookmarks on Windows 10, you can utilize the built-in Chrome settings to locate and manage your bookmarks. Here’s how:
- Launch the Google Chrome browser on your Windows 10 PC.
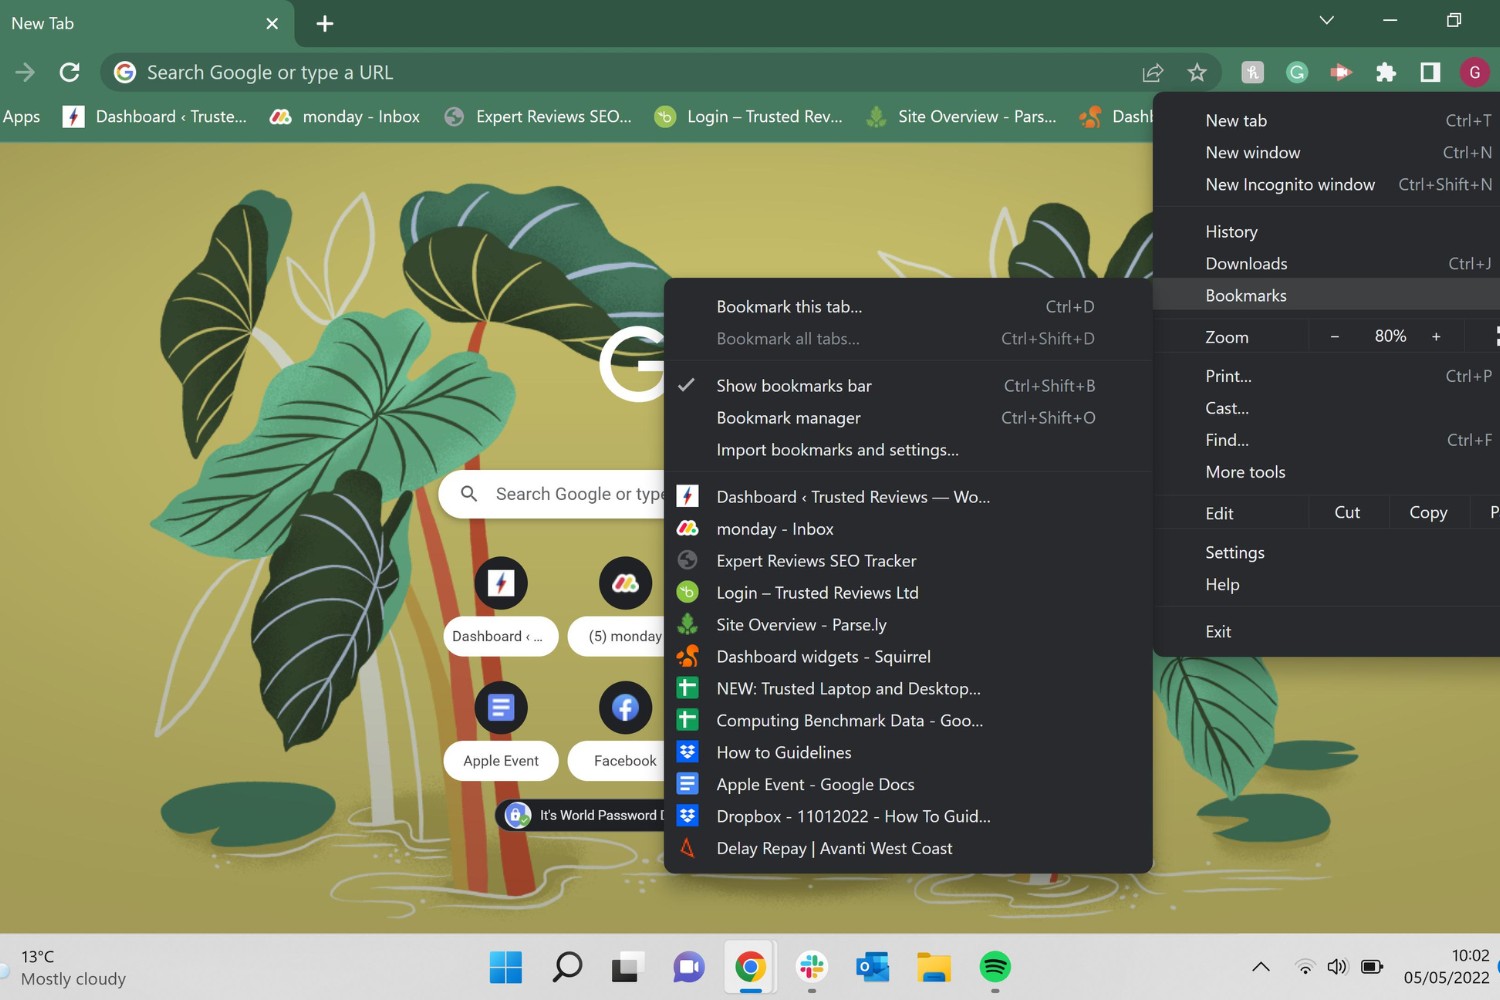
- Click on the three-dot menu icon at the top-right corner of Chrome to open the menu.
- From the menu, hover over the “Bookmarks” option and then select “Bookmark manager” from the submenu. Alternatively, you can use the shortcut key combination “Ctrl+Shift+O” (letter O) to directly open the bookmark manager.
- A new tab will open, displaying the Chrome bookmark manager. Here, you will find a list of all your saved bookmarks organized in folders or as individual bookmarks.
- You can explore your bookmarks by clicking on the folders or scrolling through the list. You can also utilize the search bar at the top of the bookmark manager to find specific bookmarks quickly.
- When you locate the bookmark you want to access, simply click on it to open the webpage in a new tab.
Using the bookmark manager within Chrome’s settings is a convenient way to access and manage your bookmarks. It provides a visually appealing interface with various options for organizing, editing, and deleting bookmarks.
Additionally, if you are signed in to Chrome with your Google account, any changes you make to your bookmarks through the bookmark manager will be synced across your devices, ensuring that your bookmarks are always up to date and accessible from anywhere.
Now that you know how to find your Chrome bookmarks using the built-in settings, let’s move on to the next method, which involves manually locating the bookmark files on your Windows 10 computer.
Method 2: Finding Bookmarks Manually
If you want a more hands-on approach to locating your Chrome bookmarks on Windows 10, you can follow these steps to find the bookmark files manually:
- Open File Explorer on your Windows 10 PC by clicking on the folder icon in the taskbar or by pressing the Windows key + E.
- In the File Explorer window, navigate to the following file path, replacing “YourUsername” with your actual Windows username:
C:\Users\YourUsername\AppData\Local\Google\Chrome\User Data\Default
- In the Default folder, you will find various files that store your Chrome data. Look for a file named “Bookmarks”. This file contains your bookmark data.
- You can either double-click the “Bookmarks” file to open it in a text editor, or you can right-click it and select “Open with” to choose a specific program or web browser to view the file.
- If you choose to open the “Bookmarks” file in a text editor, you will see a list of bookmarks and their corresponding URLs. Scroll through the file to locate the specific bookmark you are looking for.
Manually locating the bookmark files on your Windows 10 PC gives you direct access to the raw data and allows for more advanced editing or backup options. However, it’s essential to exercise caution when modifying these files, as any incorrect changes can lead to data loss or corruption.
Now that you know how to find your Chrome bookmarks manually, let’s explore another method that involves retrieving bookmarks from a backup.
Method 3: Retrieving Bookmarks from Backup
If you have previously created a backup of your Chrome bookmarks on Windows 10, you can easily retrieve them using the backup files. Here’s how:
- Open File Explorer on your Windows 10 PC by clicking on the folder icon in the taskbar or by pressing the Windows key + E.
- Navigate to the backup location where you have saved your Chrome bookmarks. This could be an external storage device, cloud storage, or a specific folder on your computer.
- Locate the backup file that contains your Chrome bookmarks. It is typically named “Bookmarks” or “Bookmarks.bak”.
- Copy the backup file by right-clicking on it and selecting “Copy” from the context menu.
- Now, navigate to the following file path on your Windows 10 PC, replacing “YourUsername” with your actual Windows username:
C:\Users\YourUsername\AppData\Local\Google\Chrome\User Data\Default
- Paste the backup file into the Default folder. If prompted to overwrite or replace an existing file, proceed with caution and make sure to backup the existing “Bookmarks” file just in case.
- Once the backup file is pasted into the Default folder, you can relaunch Google Chrome.
- If everything is done correctly, your previously backed up bookmarks should now be restored in Chrome.
Retrieving your Chrome bookmarks from a backup provides a reliable method to restore previously saved bookmarks in case of accidental deletion, system crashes, or when switching to a new device. It’s always a good practice to regularly backup your bookmarks to avoid losing valuable information.
Now that you know how to retrieve your Chrome bookmarks from a backup, let’s move on to the final method, which involves syncing your bookmarks with a Google account.
Method 4: Syncing Chrome Bookmarks with a Google Account
To ensure seamless access to your Chrome bookmarks across multiple devices, you can sync them with your Google account. By doing so, you can easily retrieve your bookmarks whenever you sign in to Chrome on any device. Here’s how to sync your Chrome bookmarks with a Google account:
- Open Google Chrome on your Windows 10 PC.
- Click on the three-dot menu icon at the top-right corner of Chrome to open the menu.
- From the menu, select “Settings” to open the Chrome settings page.
- In the Settings menu, scroll down and click on “Sync and Google services”.
- Make sure the toggle switch next to “Sync” is turned on. This enables the synchronization of your Chrome data, including bookmarks, with your Google account.
- Sign in to Chrome using your Google account credentials. If you don’t have a Google account, you can create one by clicking “Create account” and following the prompts.
- Once signed in, Chrome will automatically sync your bookmarks and other data to your Google account.
Now, whenever you sign in to Chrome using the same Google account on any device, your bookmarks will be automatically synced and available for access. This allows for a seamless browsing experience across multiple devices, ensuring that you always have your bookmarks at your fingertips.
It’s important to note that syncing your Chrome bookmarks with a Google account requires an active internet connection and may take some time to complete the initial sync, depending on the size of your bookmark collection.
By syncing your Chrome bookmarks with a Google account, you can easily backup and restore bookmarks, switch devices without losing data, and enjoy a consistent browsing experience across various platforms.
Now that you have learned how to sync your Chrome bookmarks with a Google account, let’s summarize the methods we have covered so far.
Conclusion
Locating and accessing your Chrome bookmarks on Windows 10 can be essential for managing your favorite websites, organizing resources, and enhancing your browsing experience. In this article, we explored various methods to help you find the storage location of your Chrome bookmarks on a Windows 10 PC.
We started by understanding the concept of Chrome bookmarks and how they function within the browser. With a clear understanding of bookmarks, we proceeded to explore different methods for finding their storage location.
In Method 1, we learned how to use the built-in bookmark manager in Chrome settings to conveniently locate and manage our bookmarks. This method offers a user-friendly interface and options for organizing and editing bookmarks.
In Method 2, we discovered how to find Chrome bookmarks manually by navigating to the specific file path where the bookmarks are stored on a Windows 10 computer. This hands-on approach provides direct access to the bookmark data, allowing for advanced editing and backup options.
Furthermore, Method 3 demonstrated how to retrieve bookmarks from a backup, ensuring the restoration of previously saved bookmarks in case of data loss or device migration.
Finally, Method 4 emphasized the importance of syncing Chrome bookmarks with a Google account. By enabling synchronization, you can access your bookmarks seamlessly across multiple devices, ensuring a consistent browsing experience.
Each method offers its own advantages and may be suitable depending on your specific needs and preferences. By understanding and utilizing these methods, you can effortlessly locate and manage your Chrome bookmarks on a Windows 10 PC.
Remember, managing your bookmarks effectively can save you time and effort, allowing you to access your favorite websites with just a few clicks. Whether you prefer a straightforward approach, a hands-on method, or syncing with your Google account, the choice is yours.
Now that you have the knowledge and tools to locate your Chrome bookmarks on Windows 10, you can make the most out of this useful feature and enhance your browsing experience.