Introduction
As a frequent user of Google Chrome, you have likely amassed a large collection of bookmarks that you rely on for quick access to your favorite websites and online resources. These bookmarks can be a valuable asset and you may want to back them up or transfer them to an external hard drive for safekeeping or to use them on another device. In this article, we will guide you through the process of exporting your bookmarks from Chrome to an external hard drive.
Exporting your bookmarks allows you to create a backup of your saved websites and ensures that you don’t lose them in case of a computer malfunction or when switching to a new device. It also gives you the flexibility to access your bookmarks from different computers or browsers, providing convenience and continuity in your browsing experience.
By following the steps outlined in this guide, you will be able to export your bookmarks from Google Chrome and transfer them to an external hard drive quickly and easily. Whether you are upgrading your computer, need to access your bookmarks on multiple devices, or simply want the peace of mind that comes with having a backup, exporting your bookmarks is a practical solution.
Before we dive into the steps, make sure you have an external hard drive ready and connected to your computer. You will also need to have Google Chrome installed on your computer as this guide is specific to Chrome’s bookmark management system.
Step 1: Open Chrome’s Bookmark Manager
The first step in exporting your bookmarks from Google Chrome to an external hard drive is to open the Bookmark Manager. The Bookmark Manager is a built-in feature in Chrome that allows you to view, edit, and organize your bookmarks.
To open the Bookmark Manager, you have a couple of options. The easiest way is to click on the three-dot menu icon in the top-right corner of your browser window. From the dropdown menu, hover over “Bookmarks” and then click on “Bookmark Manager.”
Another option is to use a keyboard shortcut. Press “Ctrl + Shift + O” (Windows) or “Cmd + Shift + O” (Mac) to open the Bookmark Manager directly.
Once you have opened the Bookmark Manager, you will see a window displaying all your bookmarks. The Bookmark Manager provides a clear and organized interface where you can view your bookmarks in a list format or organized by folders.
At this stage, take a moment to review your bookmarks and ensure they are in the desired order and properly organized. If you need to make any changes or modifications, you can do so before proceeding to the next step.
By opening the Bookmark Manager, you have successfully completed the first step towards exporting your bookmarks from Chrome to an external hard drive. Now, let’s move on to the next step!
Step 2: Export Bookmarks as an HTML File
Once you have opened the Bookmark Manager in Google Chrome, the next step is to export your bookmarks as an HTML file. This format allows you to easily transfer and access your bookmarks on any browser or device that supports HTML bookmark importing.
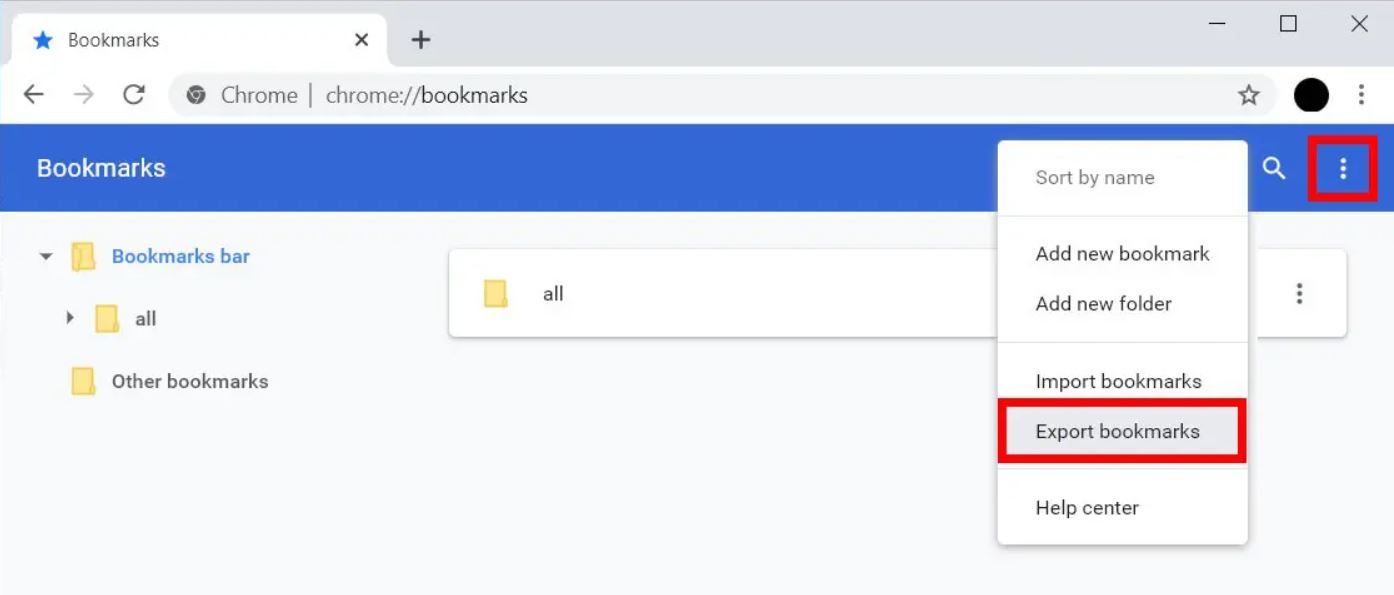
To export your bookmarks, click on the three-dot menu icon in the top-right corner of the Bookmark Manager window. From the dropdown menu, hover over “Export bookmarks” and then select “Export bookmarks to HTML file…”.
A file explorer window will appear, allowing you to choose a location to save the exported bookmarks file. Select a location on your computer where you can easily locate it, such as your desktop or a dedicated folder for exported files.
Next, choose a recognizable and descriptive name for the file. This will make it easier to identify and locate the file in the future. Ideally, use a name that reflects the content of the bookmarks or the purpose of the export.
Once you have selected a location and given the file a name, click on the “Save” button. Google Chrome will then export your bookmarks as an HTML file and save it to the designated location on your computer.
Depending on the number of bookmarks you have and the size of your bookmark collection, the export process may take a few seconds to complete. It is important to let the process finish before moving on to the next steps.
Congratulations! You have successfully exported your bookmarks from Google Chrome as an HTML file. In the next step, we will guide you through the process of transferring this file to your external hard drive.
Step 3: Connect the External Hard Drive to your Computer
With your bookmarks exported as an HTML file, it’s time to connect your external hard drive to your computer. This step allows you to transfer the exported bookmarks file to the external hard drive, ensuring that your bookmarks are safely stored and accessible whenever you need them.
Start by locating the USB port on your computer where you can connect the external hard drive. Most computers have multiple USB ports, usually located on the sides or back of the device. Insert the USB cable from the external hard drive into an available USB port on your computer.
Once you have connected the external hard drive, your computer will typically recognize it and assign it a drive letter. This drive letter represents the external hard drive’s file system and allows you to access and transfer files to and from the device.
You can verify if the external hard drive is successfully connected by checking your computer’s file explorer. Open the file explorer and look for the newly connected drive. It will usually be labeled with the drive letter assigned to it, such as “E:”, “F:”, or “G:”.
Take a moment to ensure that the external hard drive is functioning correctly. You can do this by copying a small file to the drive or accessing some existing files on the drive. This simple check ensures that the drive is accessible and ready to receive the exported bookmarks file.
Once you have confirmed that the external hard drive is properly connected and functional, you are now ready to transfer the exported bookmarks file in the next step. Keep the external hard drive connected to your computer throughout the remaining steps to ensure a smooth transfer of your bookmarks.
Step 4: Copy and Paste Exported Bookmarks File to the External Hard Drive
With your external hard drive connected and ready, it’s time to transfer the exported bookmarks file from your computer to the external hard drive. This step ensures that your bookmarks are safely stored on the external device and can be easily accessed whenever needed.
To begin, open your computer’s file explorer and navigate to the location where you saved the exported bookmarks file. This is the file that you created in Step 2 and saved with a recognizable name and an HTML file extension.
Select the bookmarks file by clicking on it once. Then, right-click on the file and choose the “Copy” option from the context menu that appears. Alternatively, you can use the keyboard shortcut “Ctrl + C” (Windows) or “Cmd + C” (Mac) to copy the file.
Next, navigate to your external hard drive in the file explorer. You should see the drive letter assigned to the external hard drive, such as “E:”, “F:”, or “G:”. Double-click on the drive letter to open the external hard drive.
Inside the external hard drive, you can create a new folder to store your exported bookmarks file for better organization. Right-click on an empty space in the external hard drive window and select the “New Folder” option from the context menu. Give the folder a descriptive name, such as “Bookmarks Backup” or “Chrome Bookmarks”.
Once you have created the new folder, double-click on it to open it. Right-click inside the folder and choose the “Paste” option from the context menu. Alternatively, you can use the keyboard shortcut “Ctrl + V” (Windows) or “Cmd + V” (Mac) to paste the exported bookmarks file into the folder.
The file transfer process may take a few seconds, depending on the size of the exported bookmarks file. You will see a progress bar or a notification indicating the progress of the file transfer.
Once the file transfer is complete, you have successfully copied and pasted the exported bookmarks file to your external hard drive. Your bookmarks are now safely stored on the external device, providing a backup and ensuring easy access whenever needed.
Step 5: Safely Eject the External Hard Drive
After successfully transferring the exported bookmarks file to your external hard drive, it is important to safely eject the device to prevent data loss or corruption. Safely ejecting the external hard drive ensures that all pending read or write operations are completed and that it is safe to disconnect the device from your computer.
Before ejecting the external hard drive, make sure that all file transfer operations are complete and that there are no active processes involving the device. This includes saving any other files or closing any applications that may be accessing the external hard drive.
To safely eject the external hard drive, locate the drive letter assigned to the device in your file explorer. Right-click on the drive and select the “Eject” or “Safely Remove” option from the context menu. This action signals to your computer that you are ready to disconnect the external hard drive.
After clicking the “Eject” or “Safely Remove” option, you may receive a notification indicating that it is safe to remove the external hard drive. Some operating systems also display a visually distinct icon for the external hard drive, indicating that it is ready for removal.
Once you have received confirmation that it is safe to remove the external hard drive, you can physically disconnect it from your computer. Carefully remove the USB cable from the USB port while ensuring that there is no ongoing file transfer or active use of the device.
It is important to note that abruptly disconnecting the external hard drive without properly ejecting it may lead to data corruption or loss. Safely ejecting the device ensures the integrity and safety of your stored bookmarks and other files.
By following this final step and safely ejecting the external hard drive, you have completed the process of exporting and transferring your bookmarks from Google Chrome. Your bookmarks are now securely stored on the external hard drive, ready to be accessed whenever you need them.
Conclusion
Exporting your bookmarks from Google Chrome to an external hard drive is a simple yet important process that allows you to safeguard your valuable collection of saved websites. By following the steps outlined in this guide, you can easily transfer your bookmarks and ensure that they are accessible on any device or browser that supports HTML bookmark importing.
We started by opening Chrome’s Bookmark Manager, where you can organize and review your bookmarks. From there, we exported the bookmarks as an HTML file, which serves as a portable format. Next, we connected the external hard drive to our computer and ensured that it was functioning properly.
Then, we copied and pasted the exported bookmarks file onto the external hard drive, providing a safe backup and easy access to our bookmarks. Finally, we safely ejected the external hard drive to ensure the integrity of our stored data.
Exporting your bookmarks to an external hard drive offers the flexibility to access your favorite websites on multiple devices, protect against data loss, and easily transfer your bookmarks when upgrading your computer or switching to a new device.
Remember to regularly update your bookmarks and export them to an external hard drive to maintain an up-to-date backup of your valuable collection. This practice will ensure that you can quickly restore your bookmarks in case of computer failure or accidental deletion.
Now that you have successfully exported your bookmarks from Google Chrome to an external hard drive, you can enjoy the peace of mind that comes with having a secure backup of your bookmarks. Whether you’re a casual user or a power browser, having your bookmarks readily available allows for a seamless and efficient online browsing experience.
So, don’t wait any longer. Follow these steps today and protect your valuable bookmarks by exporting them to an external hard drive. Happy browsing!