Introduction
Exporting bookmarks from your Chrome browser is a convenient way to safeguard your favorite websites and seamlessly transfer them to another browser or device. Whether you're switching to a new browser, upgrading your system, or simply looking to create a backup, the process of exporting bookmarks in Chrome is straightforward and user-friendly. By following a few simple steps, you can ensure that your carefully curated collection of bookmarks remains safe and accessible whenever and wherever you need it.
In this article, we will guide you through the process of exporting bookmarks from Chrome, providing clear and easy-to-follow instructions. You'll learn how to access the bookmark manager, navigate the menu options, and choose the ideal location to save your exported bookmarks. By the end of this guide, you'll have the confidence and knowledge to export your bookmarks efficiently, empowering you to manage your online resources with ease.
Whether you're a seasoned Chrome user or new to the world of web browsers, understanding how to export bookmarks is a valuable skill that can streamline your online experience. So, let's dive into the step-by-step process and unlock the potential of exporting bookmarks in Chrome.
Step 1: Open Chrome and access the bookmarks
To begin the process of exporting bookmarks in Chrome, the first step is to open the Chrome browser on your computer. Once Chrome is launched, you can proceed to access your bookmarks by following these simple steps.
-
Launch Chrome: Open the Chrome browser by clicking on its icon in the taskbar, desktop, or application folder. Upon opening Chrome, you will be greeted by the familiar interface, featuring the address bar, tabs, and various navigation controls.
-
Access the Bookmarks: To access your bookmarks, look for the bookmarks bar located just below the address bar. The bookmarks bar typically displays icons or names of your saved bookmarks, providing quick access to your favorite websites. If the bookmarks bar is not visible, you can enable it by clicking on the three-dot menu in the top-right corner of the Chrome window, selecting "Bookmarks," and then checking the "Show bookmarks bar" option.
-
Explore Bookmarks: Once the bookmarks bar is visible, you can explore your saved bookmarks by clicking on the individual icons or names. This allows you to quickly navigate to your favorite websites and review the content of your bookmarks.
By following these steps, you can easily open Chrome and access your bookmarks, setting the stage for the subsequent steps involved in exporting your bookmarks. With the bookmarks readily accessible, you are now prepared to proceed to the next phase of the exporting process, which involves navigating the Chrome menu to initiate the export action.
Step 2: Click on the three-dot menu
After accessing your bookmarks in Chrome, the next crucial step in the process of exporting bookmarks involves clicking on the three-dot menu, which is a key element of the Chrome interface. The three-dot menu, also known as the "More" or "Options" menu, is a versatile tool that provides access to a wide range of browser functions and settings. By clicking on this menu, you can unlock additional options and commands, including those related to managing your bookmarks.
To locate and utilize the three-dot menu, follow these steps:
-
Identify the Three-Dot Icon: Look towards the top-right corner of the Chrome window, just to the right of the address bar. You will see a small icon consisting of three vertically aligned dots. This icon serves as the gateway to a wealth of additional features and functionalities within Chrome.
-
Click on the Three-Dot Icon: Using your mouse or trackpad, click once on the three-dot icon. This action will trigger the display of a dropdown menu, presenting a variety of options for customizing and controlling your browsing experience.
-
Explore the Menu Options: Upon clicking the three-dot icon, a menu will appear, showcasing a range of options such as "New tab," "New window," "History," "Downloads," and more. This menu serves as a central hub for accessing various browser features and managing your browsing activities.
By clicking on the three-dot menu, you gain access to a wealth of tools and options that can enhance your browsing experience and streamline your interactions with Chrome. This menu serves as a gateway to a multitude of features, including those directly related to managing and exporting your bookmarks. With the three-dot menu now at your disposal, you are primed to progress to the subsequent steps in the process of exporting bookmarks from Chrome.
Step 3: Select "Bookmarks" and then "Bookmark Manager"
Once you have accessed the three-dot menu in Chrome, the next step in the process of exporting bookmarks involves selecting the "Bookmarks" option and then navigating to the "Bookmark Manager." This critical stage allows you to delve deeper into the management of your bookmarks and paves the way for initiating the export process.
Here's a detailed breakdown of this step:
-
Click on "Bookmarks": After opening the three-dot menu, hover your cursor over the "Bookmarks" option in the dropdown menu. This action will reveal a secondary menu containing additional bookmark-related functions and tools. By clicking on "Bookmarks," you signal your intent to engage with the bookmark management features offered by Chrome.
-
Navigate to "Bookmark Manager": Within the "Bookmarks" submenu, locate and click on the "Bookmark Manager" option. This action directs you to the dedicated Bookmark Manager interface, where you can view, organize, and manipulate your bookmarks with precision and ease. The Bookmark Manager serves as a centralized hub for overseeing your bookmark collection and executing various management tasks.
Upon selecting "Bookmarks" and then "Bookmark Manager," you gain access to a wealth of tools and functionalities designed to streamline the management of your bookmarks. This includes the ability to organize bookmarks into folders, edit bookmark names and URLs, and of course, export your bookmarks to a secure location of your choice.
By successfully navigating to the Bookmark Manager, you are now poised to proceed to the subsequent steps in the process of exporting bookmarks from Chrome. This pivotal stage sets the foundation for the final steps that culminate in the successful exportation of your valuable bookmark collection.
With the "Bookmark Manager" now within reach, you are well-positioned to advance to the next phase of the export process, which involves accessing the export functionality within the Bookmark Manager interface.
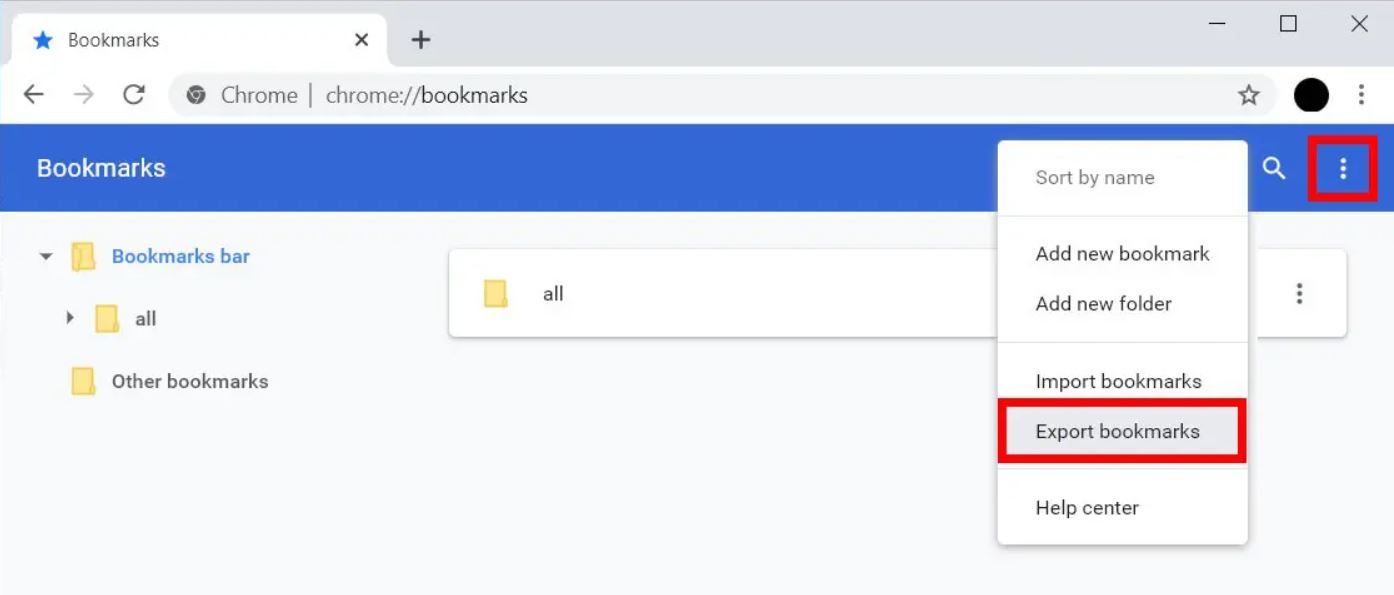
Step 4: Click on the three-dot menu in the Bookmark Manager
Once you have accessed the Bookmark Manager in Chrome, the next crucial step in the process of exporting bookmarks involves clicking on the three-dot menu within the Bookmark Manager interface. The three-dot menu, a familiar feature across various Chrome functionalities, serves as a gateway to a host of additional options and commands specifically tailored to bookmark management. By clicking on this menu, you can unlock a range of powerful tools designed to enhance your control over your bookmark collection.
Here's a detailed breakdown of this step:
-
Locate the Three-Dot Icon: Within the Bookmark Manager interface, direct your attention to the top-right corner of the window. Here, you will find the three-dot icon, denoting the presence of a menu containing supplementary options for managing your bookmarks.
-
Click on the Three-Dot Icon: Using your mouse or trackpad, click once on the three-dot icon. This action triggers the display of a dropdown menu, presenting a variety of options specifically tailored to bookmark management. The menu that appears is distinct from the general Chrome menu, focusing solely on bookmark-related functions and features.
-
Explore the Menu Options: Upon clicking the three-dot icon within the Bookmark Manager, a menu will unfold, showcasing a range of bookmark-specific options and commands. These options may include functions such as creating new folders, organizing bookmarks, and, most importantly, initiating the export process.
By clicking on the three-dot menu within the Bookmark Manager, you gain access to a suite of tools and functionalities dedicated to the precise management and control of your bookmarks. This menu serves as a central hub for executing various bookmark-related tasks, including the pivotal action of exporting your bookmarks to a designated location.
With the three-dot menu now at your disposal within the Bookmark Manager, you are primed to progress to the subsequent steps in the process of exporting bookmarks from Chrome. This critical stage sets the stage for the final steps that culminate in the successful exportation of your valuable bookmark collection.
Step 5: Choose "Export Bookmarks" from the menu
After clicking on the three-dot menu within the Bookmark Manager, the next pivotal step in the process of exporting bookmarks from Chrome involves choosing the "Export Bookmarks" option from the menu. This critical action initiates the actual export process, allowing you to save your carefully curated collection of bookmarks to a designated location on your computer. By selecting "Export Bookmarks," you set in motion the transfer of your valuable online resources, ensuring that they remain accessible and secure for future use.
Here's a detailed breakdown of this step:
-
Locate "Export Bookmarks": Upon opening the three-dot menu within the Bookmark Manager, carefully scan the menu options for the "Export Bookmarks" command. This option may be positioned among a list of bookmark-related functions, typically denoted by a clear and descriptive label.
-
Click on "Export Bookmarks": Once you have located the "Export Bookmarks" option, use your mouse or trackpad to click directly on this command. This action triggers the commencement of the export process, prompting Chrome to generate a file containing your bookmarks and prepare it for download.
-
Confirm Export Location: After clicking "Export Bookmarks," Chrome may prompt you to confirm the location where you wish to save the exported bookmarks file. Depending on your system settings, you may be presented with a standard file-saving dialog box, allowing you to specify the folder or directory where the exported bookmarks file will be stored.
By choosing "Export Bookmarks" from the menu, you take a significant step towards safeguarding your valuable bookmark collection and ensuring its availability across different platforms and browsers. This action empowers you to maintain control over your online resources, enabling seamless access to your favorite websites and online destinations.
With the export process now initiated, you are well-positioned to proceed to the final step, which involves confirming the location to save the exported bookmarks file. By following these steps diligently, you can successfully export your bookmarks from Chrome, preserving your digital preferences and enhancing your browsing experience.
Step 6: Choose the location to save the exported bookmarks
After initiating the export process by selecting "Export Bookmarks" from the menu, the subsequent step involves choosing the location where the exported bookmarks file will be saved. This critical stage allows you to define the storage destination for your valuable bookmark collection, ensuring that it is readily accessible and securely preserved for future use.
Upon clicking "Export Bookmarks," Chrome typically prompts you to specify the location where the exported bookmarks file will be stored. This prompt may manifest as a standard file-saving dialog box, presenting you with the opportunity to navigate through your computer's directory structure and designate the ideal location for the exported file.
When choosing the location to save the exported bookmarks, consider the following factors to ensure optimal organization and accessibility:
-
Selecting a Recognizable Folder: Opt for a location that is easily identifiable and aligned with your organizational preferences. Creating a dedicated folder for exported bookmarks can streamline future retrieval and management.
-
Accessible Directory: Choose a directory that is easily accessible and does not require navigating through multiple layers of subfolders. This facilitates convenient access to the exported bookmarks file when needed.
-
Backup Considerations: If the purpose of exporting bookmarks is to create a backup, consider saving the file in a location that aligns with your backup strategy. This may involve storing the file in a designated backup drive or cloud storage service for added redundancy.
-
Cross-Platform Compatibility: If you intend to import the exported bookmarks into a different browser or on another device, ensure that the chosen location is accessible across different platforms. This may involve saving the file to a cloud storage service with synchronization capabilities.
-
Security and Privacy: Prioritize a location that aligns with your security and privacy preferences. If the exported bookmarks contain sensitive or personal information, consider saving the file in a secure, password-protected directory.
By carefully considering these factors and selecting the appropriate location to save the exported bookmarks, you can effectively preserve your valuable online resources and ensure their seamless availability across different platforms and browsing environments.
Once you have designated the location for saving the exported bookmarks file, proceed to confirm the selection and finalize the export process. With the exported bookmarks securely stored in the chosen location, you have successfully completed the process of exporting bookmarks from Chrome, empowering you to maintain control over your digital preferences and enhance your browsing experience.
Conclusion
In conclusion, mastering the art of exporting bookmarks in Chrome empowers you to safeguard your digital preferences and seamlessly transfer them across different browsers and devices. By following the step-by-step process outlined in this guide, you have gained the knowledge and confidence to navigate the intricacies of Chrome's bookmark management features and initiate the exportation of your valuable online resources.
The ability to export bookmarks from Chrome serves as a valuable skill that enhances your control over your browsing experience. Whether you are transitioning to a new browser, upgrading your system, or simply seeking to create a backup of your bookmarks, the export process ensures that your carefully curated collection remains secure and accessible.
By opening Chrome and accessing the bookmarks, clicking on the three-dot menu, navigating to the Bookmark Manager, and choosing the "Export Bookmarks" option, you have embarked on a journey to preserve your digital preferences with precision and ease. The subsequent step of selecting the location to save the exported bookmarks file further solidifies your control over your online resources, allowing for seamless access and organization.
As you conclude the export process, it's important to recognize the significance of maintaining a well-organized and secure collection of bookmarks. The chosen location for saving the exported bookmarks file should align with your organizational preferences, accessibility needs, backup strategy, cross-platform compatibility, and security considerations. By carefully considering these factors, you ensure that your exported bookmarks remain readily available and protected.
In the dynamic landscape of digital browsing, the ability to export bookmarks in Chrome represents a fundamental aspect of maintaining control and continuity in your online activities. Whether for personal, professional, or academic pursuits, your bookmark collection reflects your digital footprint and preferences. By mastering the export process, you assert your authority over this aspect of your online presence, ensuring that your favorite websites and resources are always within reach.
In essence, the process of exporting bookmarks in Chrome transcends mere technical functionality; it embodies the preservation of your digital identity and preferences. By embracing this capability, you fortify your ability to navigate the vast expanse of the internet with confidence and convenience, knowing that your cherished bookmarks are securely preserved and ready to enrich your online journey.