Introduction
Google Chrome is a popular web browser known for its user-friendly interface and powerful features. One of the essential functionalities it offers is the ability to manage and organize bookmarks, allowing users to save and access their favorite websites with ease. However, there are instances when you may need to export your bookmarks from Google Chrome, whether it's for backup purposes, migrating to a new browser, or sharing them with others.
In this comprehensive guide, we will walk you through the step-by-step process of exporting bookmarks in Google Chrome. Whether you're a seasoned Chrome user or just getting started, this tutorial will equip you with the knowledge to effortlessly export your bookmarks and ensure that your valuable collection of saved websites remains safe and accessible.
So, let's dive into the world of Google Chrome bookmarks and learn how to export them seamlessly. Whether you're a casual internet surfer or a dedicated researcher, having the ability to export your bookmarks can be a game-changer in managing your online resources. Let's embark on this journey to unlock the full potential of your browsing experience with Google Chrome.
Step 1: Open Google Chrome
To begin the process of exporting bookmarks in Google Chrome, the first step is to open the browser on your computer. Whether you're using a Windows PC, Mac, or Linux system, launching Google Chrome is the initial action that sets the stage for managing your bookmarks effectively.
You can open Google Chrome using various methods, depending on your operating system. If you have a shortcut icon on your desktop, simply double-click on it to launch the browser. Alternatively, you can access Google Chrome from the Start menu on Windows or the Applications folder on a Mac.
For Windows users, you can also use the search bar located at the bottom left corner of the screen. Simply type "Chrome" and select the Google Chrome app from the search results to open the browser.
On a Mac, you can utilize the Spotlight search feature by pressing Command + Spacebar, typing "Chrome" in the search bar, and hitting Enter to launch the browser.
Once Google Chrome is open, you will be greeted by the familiar interface, featuring the address bar, tabs, and various menu options. Take a moment to ensure that you are running the latest version of Google Chrome to access all the latest features and security enhancements.
By following this first step and opening Google Chrome, you are now ready to proceed with the next steps to access the Bookmark Manager and export your valuable collection of bookmarks. With the browser up and running, you are one step closer to effectively managing and safeguarding your bookmarks for future use.
Now that Google Chrome is at your fingertips, let's move on to the next step and delve into the process of accessing the Bookmark Manager to initiate the bookmark exportation process.
Step 2: Access the Bookmark Manager
Accessing the Bookmark Manager in Google Chrome is a fundamental step in the process of exporting bookmarks. The Bookmark Manager serves as a centralized hub where users can view, organize, and manage their collection of saved bookmarks. By navigating to this dedicated section within the browser, you gain the ability to perform various actions, including exporting bookmarks to a file for backup or sharing purposes.
To access the Bookmark Manager in Google Chrome, you can utilize the following methods:
-
Using the Menu Bar:
- At the top-right corner of the Google Chrome window, you will find the three-dot menu icon, also known as the "More" icon. Click on this icon to reveal a dropdown menu.
- Within the dropdown menu, navigate to the "Bookmarks" option. Upon hovering over the "Bookmarks" option, a secondary menu will appear, presenting you with the "Bookmark Manager" link. Click on "Bookmark Manager" to access the dedicated section.
-
Using the Address Bar:
- An alternative method to access the Bookmark Manager is by directly entering the following URL into the address bar of Google Chrome:
chrome://bookmarks/. Press Enter after typing the URL to instantly navigate to the Bookmark Manager page.
- An alternative method to access the Bookmark Manager is by directly entering the following URL into the address bar of Google Chrome:
Upon accessing the Bookmark Manager, you will be presented with an organized view of your bookmarks, including folders and individual bookmarked websites. The interface provides a user-friendly environment where you can review, edit, and organize your bookmarks according to your preferences.
By reaching this pivotal stage in the process, you have successfully gained entry into the Bookmark Manager, setting the stage for the subsequent steps involved in exporting your bookmarks from Google Chrome. With the Bookmark Manager at your disposal, you are now prepared to proceed to the next step and initiate the exportation of your valuable collection of bookmarks.
Now that you have accessed the Bookmark Manager, let's move forward and explore the subsequent steps to export your bookmarks seamlessly, ensuring that your valuable online resources are safeguarded and readily accessible whenever you need them.
Step 3: Export Bookmarks
After accessing the Bookmark Manager in Google Chrome, the next crucial step is to initiate the process of exporting your bookmarks. This step is essential for creating a backup of your valuable collection of saved websites or for transferring them to another browser. By exporting your bookmarks, you ensure that your carefully curated list of favorite websites remains accessible, even in the event of browser reinstallation or when transitioning to a different browsing platform.
To export your bookmarks from Google Chrome, follow these straightforward steps:
-
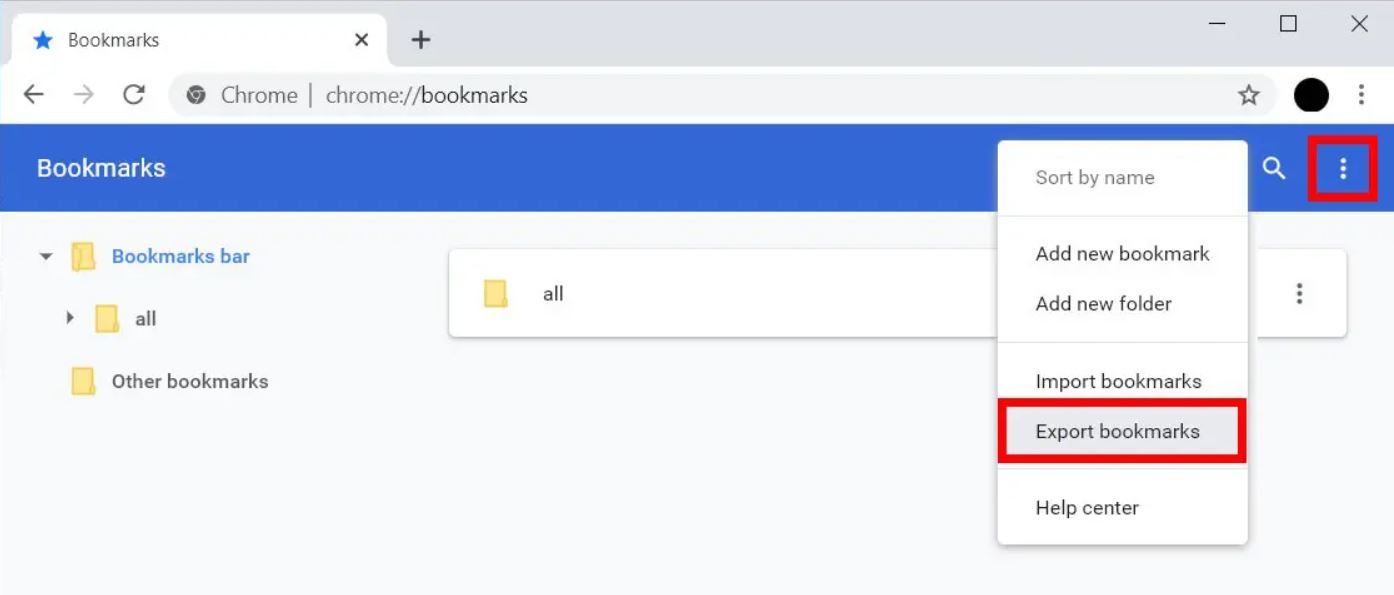
Click on the Three-Dot Menu:
At the top-right corner of the Bookmark Manager page, you will find the three-dot menu icon. Click on this icon to reveal a dropdown menu containing various options for managing your bookmarks. -
Select the "Export Bookmarks" Option:
Within the dropdown menu, locate and hover over the "Export Bookmarks" option. Clicking on this option will prompt a file explorer window to appear, allowing you to choose the destination for saving your bookmarks file. -
Choose the Export Location:
Upon clicking "Export Bookmarks," a file explorer window will open, enabling you to select the location where you want to save the bookmarks file. You can choose a specific folder on your computer or an external storage device, ensuring that the exported bookmarks file is easily accessible and safely stored. -
Name the Bookmarks File:
After choosing the export location, you will be prompted to provide a name for the bookmarks file. It's advisable to use a descriptive and recognizable name that reflects the content of the bookmarks, making it easier to identify the file when needed. -
Save the Bookmarks File:
Once you've named the bookmarks file and selected the export location, click the "Save" button within the file explorer window. This action finalizes the export process, creating a file containing all your bookmarks in a format that can be imported into other browsers or re-imported into Google Chrome when needed.
By following these steps, you can effectively export your bookmarks from Google Chrome, ensuring that your valuable collection of saved websites is securely backed up and ready for use in other browsers or future browsing sessions. This process provides peace of mind, knowing that your bookmarks are safeguarded and easily transferable, enhancing your browsing experience and productivity.
With the bookmarks successfully exported, you have taken a proactive step in managing your online resources, ensuring that your favorite websites are always within reach, regardless of the circumstances.
Step 4: Choose the Export Location
Choosing the export location for your bookmarks file is a critical aspect of the exportation process in Google Chrome. This step allows you to determine where the file containing your valuable collection of bookmarks will be saved, ensuring easy accessibility and safekeeping for future use. By selecting the appropriate export location, you can streamline the process of managing and transferring your bookmarks to other browsers or devices, enhancing the flexibility and convenience of your browsing experience.
When prompted to choose the export location after initiating the bookmark exportation process, you are presented with a file explorer window that enables you to navigate through your computer's directory structure and select the desired destination for saving the bookmarks file. This file explorer window provides a familiar interface, allowing you to browse through folders, drives, and external storage devices to pinpoint the ideal location for storing your exported bookmarks.
It's essential to consider several factors when choosing the export location for your bookmarks file. Firstly, opt for a location that aligns with your organizational preferences and ensures easy retrieval of the bookmarks file when needed. Selecting a dedicated folder specifically designed for storing browser-related data or creating a new folder for bookmarks can help maintain a structured and organized approach to managing your exported bookmarks.
Furthermore, consider the accessibility and backup aspects when choosing the export location. Storing the bookmarks file in a location that is regularly backed up, such as a designated backup drive or cloud storage service, can provide an additional layer of security and peace of mind. This approach safeguards your bookmarks against potential data loss scenarios, ensuring that they remain intact and accessible even in the event of unforeseen circumstances.
Additionally, if you intend to transfer the exported bookmarks to another device or import them into a different browser, selecting a location that is easily accessible from the target device or browser is crucial. This consideration facilitates a seamless transition of your bookmarks, allowing you to effortlessly import them into the new environment without encountering unnecessary hurdles or complexities.
By carefully considering these factors and selecting the appropriate export location, you can ensure that your exported bookmarks are stored in a manner that aligns with your organizational preferences, enhances accessibility, and provides an added layer of security through regular backups. This proactive approach empowers you to maintain control over your valuable collection of saved websites, enabling smooth transitions between browsers and devices while preserving the integrity of your bookmarks.
Step 5: Save the Bookmarks File
After naming the bookmarks file and selecting the export location, the final step in the process of exporting bookmarks from Google Chrome is to save the file. This pivotal action solidifies the exportation process, creating a file that encapsulates your entire collection of saved websites in a format that is easily transferable and importable across different browsers and devices.
Upon reaching this stage, you are presented with the file explorer window, where you have the opportunity to review the chosen export location and the name of the bookmarks file. This window provides a last-minute confirmation of the export settings, allowing you to ensure that everything is in order before finalizing the exportation process.
To save the bookmarks file, simply click the "Save" button within the file explorer window. This action triggers the creation of the bookmarks file in the specified export location, encapsulating all your saved websites in a single, easily manageable file. The file format typically used for exporting bookmarks from Google Chrome is HTML, a widely supported format that can be imported into various web browsers with ease.
By clicking "Save," you complete the exportation process, empowering you with a comprehensive backup of your valuable collection of bookmarks. This file serves as a safeguard for your favorite websites, ensuring that they remain accessible and intact, even in scenarios where browser settings are reset, or when transitioning to a different browsing platform.
It's important to note that the saved bookmarks file retains the hierarchical structure and organization of your bookmarks, including any folders and subfolders you may have created. This preservation of structure ensures that when the bookmarks file is imported into another browser or re-imported into Google Chrome, the original organization of your bookmarks is maintained, allowing for a seamless and familiar browsing experience.
With the bookmarks file successfully saved, you have effectively completed the process of exporting your bookmarks from Google Chrome. This proactive action ensures that your valuable collection of saved websites is securely backed up and readily transferable, providing peace of mind and convenience in managing your online resources.
By following these steps and saving the bookmarks file, you have taken a proactive step in safeguarding your online resources, ensuring that your favorite websites are always within reach, regardless of the circumstances.
Conclusion
In conclusion, the ability to export bookmarks in Google Chrome is a valuable feature that empowers users to safeguard their favorite websites and seamlessly transfer them to other browsers or devices. By following the step-by-step process outlined in this guide, you have gained the knowledge and proficiency to effectively manage and export your collection of saved websites, ensuring that they remain accessible and secure.
The process begins with opening Google Chrome, a familiar and user-friendly browser that serves as the gateway to managing your bookmarks. Accessing the Bookmark Manager, a centralized hub for organizing and reviewing bookmarks, sets the stage for initiating the exportation process. From there, you are guided through the essential steps of exporting bookmarks, including choosing the export location, naming the bookmarks file, and saving it for future use.
By exporting your bookmarks, you create a comprehensive backup of your valuable online resources, providing peace of mind and flexibility in managing your browsing experience. Whether you need to transfer your bookmarks to a new browser, share them with others, or simply ensure that they are safely backed up, the exportation process in Google Chrome equips you with the necessary tools to accomplish these tasks effortlessly.
Furthermore, the exported bookmarks file retains the hierarchical structure and organization of your bookmarks, preserving the familiar layout and accessibility of your favorite websites. This ensures a seamless transition when importing the bookmarks into another browser or re-importing them into Google Chrome, maintaining the integrity and familiarity of your browsing experience.
In essence, the process of exporting bookmarks in Google Chrome empowers users to take control of their online resources, ensuring that their carefully curated collection of saved websites remains intact and accessible. This proactive approach enhances the resilience of your browsing experience, allowing you to navigate the web with confidence, knowing that your favorite websites are securely backed up and readily transferable.
By mastering the art of exporting bookmarks in Google Chrome, you have unlocked a valuable skill that enhances your browsing experience and provides a safety net for your online resources. Whether you're a casual internet user or a dedicated researcher, the ability to export bookmarks ensures that your favorite websites are always within reach, ready to enrich your online journey whenever you need them.