Introduction
In today’s fast-paced digital world, having quick and easy access to your favorite applications and files is essential. One of the most convenient ways to access them is by creating desktop shortcuts. With a desktop shortcut, you can simply double-click an icon on your desktop and instantly launch the desired program or open a specific file.
Windows 11, the latest operating system developed by Microsoft, offers several methods to create desktop shortcuts. Whether you want to create a shortcut for frequently used software or important documents, Windows 11 provides multiple ways to do so.
In this article, we will explore five different methods to create desktop shortcuts in Windows 11. These methods include using the context menu, the Run dialog box, File Explorer, the Start menu, and the Send To menu. By following these step-by-step instructions, you’ll be able to create desktop shortcuts in no time.
Creating desktop shortcuts can provide various benefits. Firstly, it allows you to declutter your desktop by organizing your applications and files in a more efficient manner. Instead of searching through numerous folders, you can have direct access to your desired items with a single click.
Furthermore, desktop shortcuts enable you to save time and effort. Instead of manually navigating through your system to launch an application or open a file, you can simply click on the shortcut on your desktop. This not only makes the process more convenient but also increases your productivity.
Lastly, desktop shortcuts offer a personalized and customizable experience. You can choose the location, icon, and name of the shortcut, making it easier to identify and access the program or file you need. With the ability to create multiple shortcuts, you can tailor your desktop to suit your preferences and work more efficiently.
Now that we understand the importance and advantages of desktop shortcuts, let’s dive into the various methods available in Windows 11 to create them. With these simple steps, you’ll have shortcuts for your most-used applications and files right at your fingertips.
Method 1: Creating a Desktop Shortcut using the Context Menu
The context menu provides a quick and easy way to create a desktop shortcut in Windows 11. Follow these steps to create a desktop shortcut using the context menu:
- Navigate to the file or application for which you want to create a desktop shortcut.
- Right-click on the file or application icon to open the context menu.
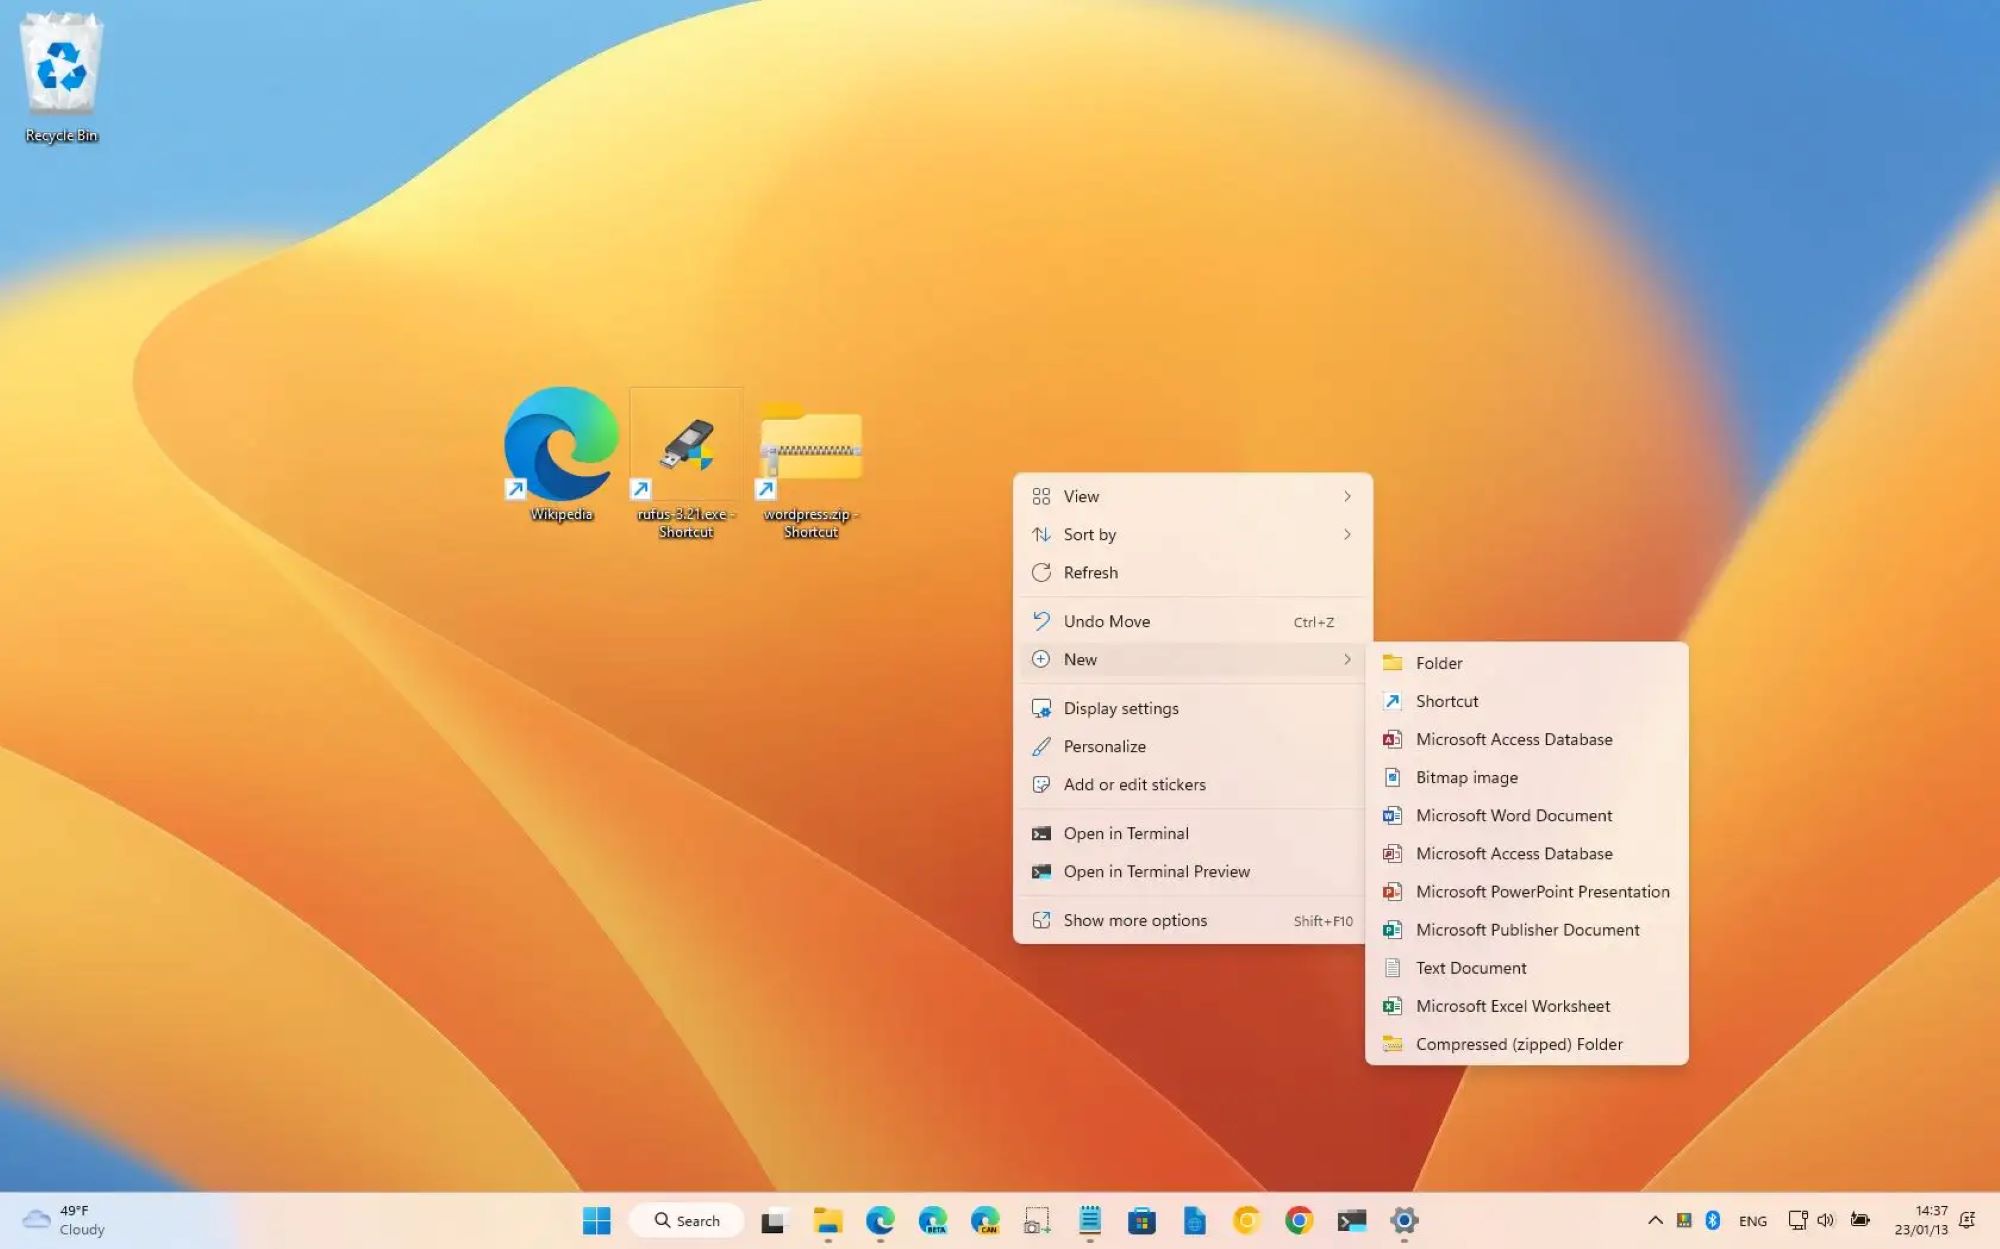
- In the context menu, hover over the “Send to” option.
- In the submenu that appears, select “Desktop (create shortcut)”.
- A shortcut for the file or application will now be created on your desktop.
- To customize the shortcut, right-click on the newly created shortcut icon on your desktop and select “Properties” from the context menu.
- In the Properties window, you can change the name of the shortcut, assign a different icon, or specify additional properties as desired.
- Click “Apply” and then “OK” to save your changes.
Creating desktop shortcuts using the context menu is a convenient method, especially when you want to quickly create shortcuts for specific files or applications. It eliminates the need to navigate through several menus or search for the file location. The shortcut is instantly created on your desktop, allowing for easy access.
Moreover, this method provides flexibility in customizing the shortcut properties. You can change the name of the shortcut to make it more descriptive, assign a unique icon to easily identify it, or even assign specific keyboard shortcuts for quick access.
Remember, the context menu method works for both files and applications, making it versatile for creating shortcuts for various types of content. Whether it’s a document, a program, or a folder, you can create a desktop shortcut with just a few clicks.
Now that you know how to create desktop shortcuts using the context menu, you can streamline your workflow and have your most frequently used files and applications readily available on your desktop.
Method 2: Creating a Desktop Shortcut using the Run Dialog Box
The Run dialog box is a powerful tool in Windows 11 that allows you to quickly execute commands and launch programs. You can also use it to create desktop shortcuts effortlessly. Follow these steps to create a desktop shortcut using the Run dialog box:
- Press the Windows key + R on your keyboard to open the Run dialog box.
- Type the file path or the executable name of the program you want to create a shortcut for.
- Press Enter or click on the “OK” button to run the command.
- The program or file will now open. Right-click on its icon in the taskbar or system tray.
- In the context menu, select “More” and then choose “Open file location”.
- The File Explorer window will open, showing the location of the program or file.
- Right-click on the program or file, and in the context menu, select “Create shortcut”.
- A shortcut for the program or file will be created in the same location.
- Now, copy the shortcut and paste it onto your desktop or any other desired location.
- Optionally, you can customize the shortcut by right-clicking on it, selecting “Properties”, and modifying the properties according to your preferences.
The Run dialog box method allows you to quickly locate the program or file you want to create a shortcut for and directly create the shortcut from its file location. This eliminates the need to navigate through multiple folders or search for the file manually.
Furthermore, by accessing the program or file’s location via the “Open file location” option, you ensure that the shortcut is created accurately. This method is particularly useful for programs or files that do not have a visible shortcut option in their context menus.
Creating desktop shortcuts using the Run dialog box method is efficient and saves you valuable time. Whether it’s a frequently used program or a specific file you need quick access to, using the Run dialog box streamlines the process and allows you to have your shortcuts conveniently located on your desktop.
Now that you know how to create desktop shortcuts using the Run dialog box, you can easily create shortcuts for your favorite programs and files, speeding up your workflow and enhancing your productivity.
Method 3: Creating a Desktop Shortcut from File Explorer
File Explorer, the primary file management tool in Windows 11, provides a straightforward method to create desktop shortcuts. Follow these steps to create a desktop shortcut from File Explorer:
- Open File Explorer by pressing the Windows key + E on your keyboard or by clicking the File Explorer icon in the taskbar.
- Navigate to the location of the file or folder for which you want to create a desktop shortcut.
- Once you’ve located the file or folder, right-click on it to open the context menu.
- In the context menu, hover over the “Send to” option.
- In the submenu that appears, select “Desktop (create shortcut)”.
- A shortcut for the file or folder will be created on your desktop.
- To customize the shortcut, right-click on the newly created shortcut icon on your desktop and select “Properties” from the context menu.
- In the Properties window, you can change the name of the shortcut, assign a different icon, or specify additional properties as desired.
- Click “Apply” and then “OK” to save your changes.
Creating desktop shortcuts from File Explorer is intuitive and allows you to create shortcuts for files and folders that you frequently access. It simplifies the process of navigating to specific locations and eliminates the need to remember complex file paths.
Moreover, this method provides flexibility in customizing the shortcut properties. Alter the name of the shortcut to make it more descriptive, assign a unique icon for easy identification, or specify additional properties to enhance the functionality of the shortcut.
Creating desktop shortcuts from File Explorer enhances your productivity by providing quick access to frequently used files and folders. Instead of searching through various folders, you can have them conveniently located on your desktop, making them readily accessible with just a click.
Now that you are familiar with the steps to create desktop shortcuts from File Explorer, you can optimize your workflow and save time by organizing your frequently accessed files and folders for easy access on your desktop.
Method 4: Creating a Desktop Shortcut from the Start Menu
The Start menu in Windows 11 is a central hub for accessing programs, apps, and settings. It also provides a convenient method to create desktop shortcuts. Follow these steps to create a desktop shortcut from the Start menu:
- Click on the Start button in the taskbar or press the Windows key on your keyboard to open the Start menu.
- Navigate to the program or app for which you want to create a desktop shortcut.
- Right-click on the program or app to open the context menu.
- In the context menu, select “More” and then choose “Open file location”.
- A File Explorer window will open, showing the location of the program or app.
- Right-click on the program or app, and in the context menu, select “Create shortcut”.
- A shortcut for the program or app will be created in the same location.
- Now, copy the shortcut and paste it onto your desktop or any other desired location.
- Optionally, you can customize the shortcut by right-clicking on it, selecting “Properties”, and modifying the properties according to your preferences.
Creating desktop shortcuts from the Start menu is convenient, as it offers a centralized location to access and create shortcuts for your favorite programs and apps. It eliminates the need to search for the program or app’s file location manually.
This method is especially useful for programs or apps that are primarily accessed through the Start menu. It allows you to quickly create shortcuts for them, making it easier to launch them directly from your desktop.
Customizing the shortcut properties provides added flexibility. You can change the name of the shortcut to make it more descriptive, assign a unique icon for quick identification, or specify additional properties to further enhance the functionality of the shortcut.
Creating desktop shortcuts from the Start menu streamlines your workflow and ensures easy access to your frequently used programs and apps. With your preferred shortcuts conveniently located on your desktop, you can launch them with just a click, saving time and increasing productivity.
Now that you know how to create desktop shortcuts from the Start menu, you can easily organize your programs and apps for quick accessibility and optimize your daily tasks.
Method 5: Creating a Desktop Shortcut using the Send To Menu
The Send To menu in Windows 11 provides a convenient way to create desktop shortcuts for files and folders. Follow these steps to create a desktop shortcut using the Send To menu:
- Navigate to the file or folder for which you want to create a desktop shortcut.
- Right-click on the file or folder to open the context menu.
- In the context menu, hover over the “Send to” option.
- In the submenu that appears, select “Desktop (create shortcut)”.
- A shortcut for the file or folder will be created on your desktop.
- To customize the shortcut, right-click on the newly created shortcut icon on your desktop and select “Properties” from the context menu.
- In the Properties window, you can change the name of the shortcut, assign a different icon, or specify additional properties as desired.
- Click “Apply” and then “OK” to save your changes.
Creating desktop shortcuts using the Send To menu is a simple and effective method for quickly accessing frequently used files and folders. It eliminates the need to manually navigate through various directories to locate specific items.
This method is particularly useful when you want to create shortcuts for specific files or folders that you frequently use in different contexts. By utilizing the Send To menu, you can create shortcuts that are easily accessible and can be used in multiple scenarios.
Customizing the shortcut properties allows you to personalize the shortcut based on your preferences. You can modify the shortcut name to make it more descriptive, assign a distinct icon for easy identification, or specify additional properties to enhance the shortcut’s functionality.
Creating desktop shortcuts using the Send To menu enhances your productivity by providing quick access to essential files and folders. You can easily locate and open them with just a click, without the need to search through multiple directories.
Now that you know how to create desktop shortcuts using the Send To menu, you can efficiently organize your frequently used files and folders, saving time and streamlining your daily tasks.
Conclusion
Creating desktop shortcuts in Windows 11 is a powerful way to enhance productivity and streamline your workflow. By having quick and easy access to your favorite applications and files, you can save time and effort in navigating through multiple folders or searching for specific items.
In this article, we explored five different methods to create desktop shortcuts in Windows 11. We learned how to create shortcuts using the context menu, the Run dialog box, File Explorer, the Start menu, and the Send To menu. Each method offers its own advantages and can be tailored to your specific needs.
Desktop shortcuts not only help declutter your desktop and organize your files but also provide a personalized and customizable experience. With the ability to change shortcut names, assign unique icons, and specify additional properties, you can create a desktop environment that suits your preferences and improves your efficiency.
Whether you’re a professional needing quick access to frequently used programs or a student looking to streamline your study materials, desktop shortcuts are an invaluable tool. By following the step-by-step instructions outlined in this article, you can easily create shortcuts for your most-used applications and files, making your daily tasks more seamless and efficient.
Remember to regularly review and update your desktop shortcuts to ensure they reflect your current needs and workflow. As your usage of certain programs or files changes, it’s important to modify or remove shortcuts accordingly, keeping your desktop organized and optimized.
Now that you’re equipped with the knowledge of creating desktop shortcuts in Windows 11, take advantage of these methods and unleash the full potential of your workspace.