Introduction
Welcome to the world of Windows 11, a sleek and modern operating system that offers a host of exciting features and enhancements. One of the standout features of Windows 11 is the ability to create and switch between multiple desktops. Whether you’re a multitasker or just want to keep your work and personal life separate, the desktops feature can greatly enhance your productivity and organization.
Imagine having different desktops for work-related tasks, entertainment, or personal projects, each tailored to your specific needs and preferences. With Windows 11, this is now a reality. You can easily switch between virtual desktops, giving you a clean slate and a clutter-free environment as you move from one task to another.
In this guide, we will explore the various ways to switch between desktops in Windows 11 and make the most out of this incredible feature. Whether you’re a seasoned Windows user or new to the system, you’ll find valuable tips and tricks to help you navigate and optimize your desktop experience.
Step 1: Understanding Desktops in Windows 11
Before we dive into how to switch between desktops in Windows 11, let’s first understand what exactly desktops are and how they function within the operating system.
In Windows 11, a desktop is a virtual workspace that allows you to organize and separate your open windows and applications. Each desktop functions as an independent workspace, with its own set of open windows and taskbar. For example, you can have one desktop dedicated to work-related tasks, another for personal projects, and yet another for entertainment.
Desktops offer a convenient way to keep your workflows separate and avoid clutter. By grouping related tasks and applications on different desktops, you can maintain focus and switch between them effortlessly, improving your productivity and organization.
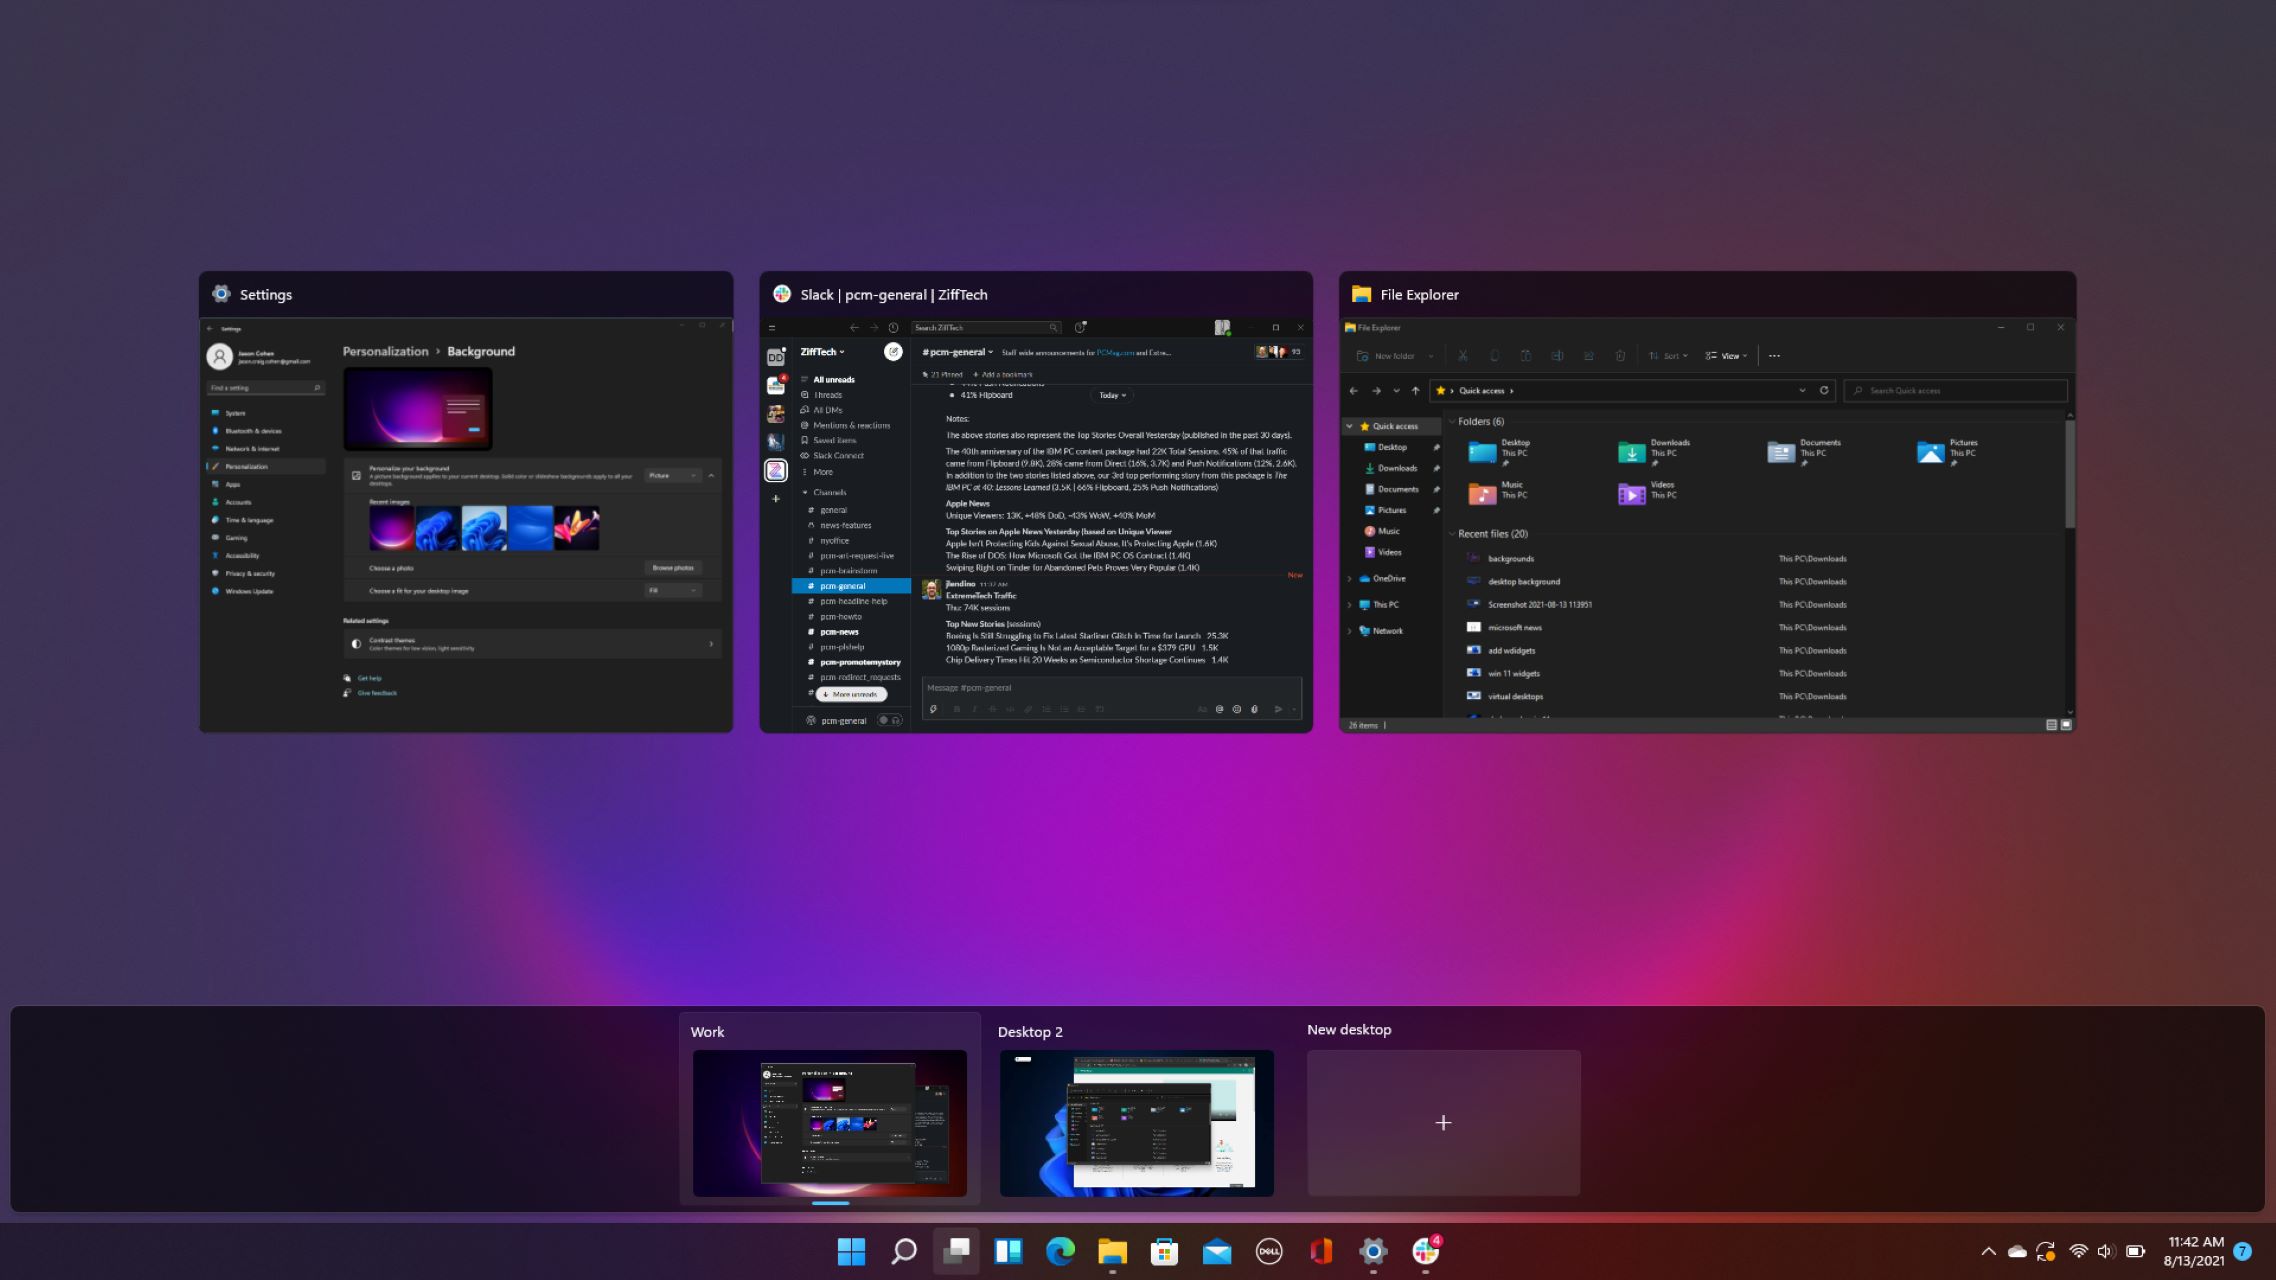
To view the available desktops in Windows 11, you can click on the “Task View” button on the taskbar or press the “Windows key + Tab” keyboard shortcut. This will open the Task View interface, where you can see the thumbnails of all your active desktops.
You can also switch between desktops by using the “Desktops” button on the taskbar. Clicking on this button will display a thumbnail view of all your desktops, allowing you to click on the desired desktop to switch to it.
It’s important to note that each desktop maintains its own set of open windows and applications. This means that if you open a program on one desktop, it won’t be visible on the other desktops unless you manually move it.
Now that we have a basic understanding of desktops in Windows 11, let’s move on to the next step and explore how to switch between them using different methods.
Step 2: Switching Between Desktops
Switching between desktops in Windows 11 is a simple and seamless process. There are several ways to accomplish this, depending on your preference and the input devices you have available. Let’s explore a few methods:
1. Using the Task View Button: The Task View button on the taskbar, denoted by an icon that looks like two overlapping squares, provides a quick and easy way to switch between desktops. Simply click on the Task View button, and a thumbnail view of all your desktops will appear. From there, you can click on the desired desktop to switch to it.
2. Using Keyboard Shortcuts: Windows 11 offers a set of handy keyboard shortcuts for navigating between desktops. Pressing “Windows key + Ctrl + Left Arrow” will switch to the desktop on the left, while “Windows key + Ctrl + Right Arrow” will switch to the desktop on the right. This method is especially useful for power users who prefer to keep their hands on the keyboard.
3. Using Touch Gestures (Tablet and Touchscreen Devices): If you’re using a tablet or a touchscreen device, you can switch between desktops by swiping left or right with four fingers on the screen. This gesture will move you to the adjacent desktop in the corresponding direction.
4. Using the Taskbar Preview: Another way to switch between desktops is by utilizing the taskbar preview feature. Hover your mouse cursor over the “Desktops” button on the taskbar, and a thumbnail view of all your desktops will appear. Simply click on the thumbnail of the desktop you want to switch to.
With these methods at your disposal, navigating between desktops in Windows 11 becomes effortless. Choose the method that suits your workflow and input preferences, and enjoy the flexibility and organization that multiple desktops provide.
Step 3: Using Keyboard Shortcuts to Switch Desktops
If you’re someone who prefers using keyboard shortcuts for increased efficiency, Windows 11 offers a variety of shortcut options to quickly switch between desktops. These shortcuts are easy to remember and can be a game-changer for your productivity. Here are some keyboard shortcuts to help you navigate between desktops:
1. Windows key + Ctrl + Left Arrow: Pressing this combination will switch you to the desktop on the left of your current desktop. You can use this shortcut repeatedly to cycle through multiple desktops.
2. Windows key + Ctrl + Right Arrow: Similar to the previous shortcut, this combination allows you to switch to the desktop on the right of your current desktop.
Using these keyboard shortcuts, you can effortlessly move between desktops without the need for a mouse or touch gestures. They provide a quick and convenient way to switch to the desktop you need, allowing for a seamless multitasking experience.
It’s worth noting that these keyboard shortcuts are customizable in Windows 11. If you prefer different key combinations or want to assign specific shortcuts to specific desktops, you can modify them in the Windows Settings. Simply go to “Settings” > “System” > “Multitasking” > “Virtual desktops” and click on “Customize” to customize your keyboard shortcuts.
By utilizing these keyboard shortcuts, you can streamline your workflow and effortlessly switch between desktops in Windows 11. Whether you’re a power user who prefers to keep their hands on the keyboard or simply looking to maximize your efficiency, these shortcuts are a valuable tool in your desktop management arsenal.
Step 4: Adding or Removing Desktops
In Windows 11, you have the flexibility to add or remove desktops based on your needs. This allows you to customize your workspace and create separate environments for different tasks. Here’s how you can add or remove desktops:
Adding a Desktop:
1. Open the Task View interface by either clicking on the “Task View” button on the taskbar or pressing “Windows key + Tab” on your keyboard.
2. In the Task View interface, click on the button labeled “New Desktop.” This will create a new blank desktop, ready for you to personalize and populate with applications.
3. You can repeat this process to create multiple desktops based on your requirements. Windows 11 allows you to have multiple desktops running simultaneously, each with its own set of open windows and applications.
Removing a Desktop:
1. Open the Task View interface.
2. Hover your mouse cursor over the thumbnail of the desktop you want to remove.
3. Click on the “X” button that appears on the top-right corner of the thumbnail to close and remove the desktop. This action will close all the open windows and applications associated with that desktop, so make sure to save your work before removing a desktop.
By adding and removing desktops, you can easily adapt to your changing workflows and maintain a clutter-free environment. Whether you need separate desktops for work, personal use, or specific projects, Windows 11 provides you with the flexibility to create and manage multiple desktops with ease.
Step 5: Moving Windows Between Desktops
As you work across different desktops in Windows 11, you may find the need to move specific windows or applications from one desktop to another. Fortunately, Windows 11 offers a simple method to facilitate this process. Here’s how you can move windows between desktops:
1. Open the Task View interface by clicking on the “Task View” button on the taskbar or pressing “Windows key + Tab” on your keyboard.
2. In the Task View interface, locate the window you want to move to a different desktop.
3. Click and hold the window with your mouse cursor, then drag it to the thumbnail of the desired desktop in the Task View interface.
4. Release the mouse button to drop the window onto the chosen desktop. The window will now appear on the selected desktop, while remaining hidden on the other desktops.
Alternatively, you can also use a keyboard shortcut to move windows between desktops. With the window you want to move active and in focus, press “Windows key + Shift + Left Arrow” to move it to the desktop on the left, or “Windows key + Shift + Right Arrow” to move it to the desktop on the right.
By moving windows between desktops, you can better organize your workspace and keep related applications and tasks together. This can help enhance productivity and reduce distractions by keeping your desktops focused on specific projects or workflows.
Remember, when you close a desktop or switch to a different desktop, the windows and applications associated with that desktop will remain hidden until you return to that desktop. This allows you to maintain a clean and uncluttered workspace, with each desktop dedicated to its specific purpose.
Now that you know how to move windows between desktops in Windows 11, you can easily tailor your workspace to your needs and efficiently manage your open applications.
Step 6: Customizing Desktop Names and Backgrounds
In Windows 11, you have the option to customize the names and backgrounds of your desktops, allowing you to personalize your workspace and make it more visually appealing. Here’s how you can customize desktop names and backgrounds:
Customizing Desktop Names:
1. Open the Task View interface by clicking on the “Task View” button on the taskbar or pressing “Windows key + Tab” on your keyboard.
2. In the Task View interface, hover your mouse cursor over the thumbnail of the desktop you want to customize.
3. Click on the “More options” (three dots) button that appears on the top-right corner of the thumbnail.
4. From the drop-down menu, select “Rename” and type in the desired name for your desktop.
5. Press Enter or click outside the text box to save the new name.
By customizing the names of your desktops, you can give them meaningful titles that reflect their purpose or content. This makes it easier to identify and switch between desktops based on your workflow or project needs.
Customizing Desktop Backgrounds:
1. Right-click on an empty area of the desktop you want to customize.
2. From the context menu, select “Personalize.”
3. In the Settings app that opens, click on “Background” in the left-hand menu.
4. Under the “Background” section, you can choose a predefined picture, select a solid color backdrop, or even use a slideshow of your favorite images for the desktop background.
5. Make your selection and close the Settings app. The chosen background will now be applied to the selected desktop.
By customizing the backgrounds of your desktops, you can add a personal touch and create a visually appealing environment that suits your preferences and aesthetics.
With the ability to customize desktop names and backgrounds, Windows 11 allows you to create a workspace that reflects your unique style and helps you stay organized and motivated.
Step 7: Managing Apps on Different Desktops
Managing apps on different desktops in Windows 11 is a key aspect of effectively utilizing multiple workspaces. Here’s how you can efficiently handle apps on various desktops:
Opening Apps on Specific Desktops:
To open an app directly on a specific desktop:
1. Open the Task View interface by clicking on the “Task View” button on the taskbar or pressing “Windows key + Tab” on your keyboard.
2. In the Task View interface, navigate to the desktop where you want to open the app.
3. Launch the app from the Start menu, taskbar, or any other method you prefer.
This ensures that the app opens exclusively on the selected desktop, making it easier to keep your workspaces organized and focused on specific tasks.
Moving Apps Between Desktops:
To move an app from one desktop to another:
1. Open the Task View interface.
2. Locate the app’s window in the thumbnail view.
3. Click and hold the window with your mouse cursor, then drag it to the thumbnail of the desired desktop.
4. Release the mouse button to drop the app’s window onto the chosen desktop.
The app will now appear on the selected desktop, and its window will be hidden on other desktops.
Closing Apps on Specific Desktops:
If you want to close an app on a particular desktop:
1. Switch to the desktop where the app is open.
2. Select the app’s window and click on the “X” button on the top-right corner to close it.
By managing apps on different desktops, you can keep your workspaces organized and decluttered, helping you stay focused on specific tasks without distractions.
Remember, each desktop in Windows 11 maintains its own set of open apps and windows. So, when you switch to another desktop, the apps and windows associated with that particular desktop will be hidden until you return.
Mastering the art of managing apps on different desktops in Windows 11 allows you to create a well-structured and efficient workflow, maximizing productivity and minimizing distraction.
Conclusion
Windows 11’s desktops feature provides a powerful tool for organizing your workflow, boosting productivity, and minimizing clutter. By understanding how to switch between desktops, leverage keyboard shortcuts, add or remove desktops, move windows, customize names and backgrounds, and manage apps on different desktops, you can create a personalized and efficient workspace.
By utilizing the Task View interface, you can easily switch between desktops with just a click or a keyboard shortcut, allowing for seamless transitions and focused work sessions. Customizing desktop names and backgrounds adds a personal touch and helps you quickly identify and navigate your different workspaces.
Moving windows between desktops lets you organize tasks and applications, ensuring that each desktop remains dedicated to a specific purpose or project. With the ability to manage apps on different desktops, you can stay focused on specific tasks without distractions, enhance productivity, and maintain an organized workspace.
Whether you’re a multitasker, a creative professional, or simply someone who values a well-managed digital environment, Windows 11’s desktops feature offers a versatile solution to tailor your workspace to your needs. By incorporating these tips and techniques into your workflow, you can harness the full potential of this feature and optimize your productivity in Windows 11.
So, go ahead and explore the world of desktops in Windows 11, and discover the joys of an organized and efficient workspace. Get creative, stay organized, and enjoy the elevated productivity that multiple desktops can bring to your computing experience.