Introduction
Welcome to the world of Mac! Congratulations on your new MacBook Pro. With its sleek design, powerful performance, and intuitive operating system, it’s no wonder that the MacBook Pro is the go-to choice for professionals, students, and creatives alike. Whether you’re new to the Mac ecosystem or transitioning from a different device, setting up your MacBook Pro is an exciting step towards experiencing the best that Apple has to offer.
In this guide, we’ll walk you through the essential steps to set up your MacBook Pro and personalize it to suit your needs. From unboxing your new device to configuring preferences and installing software, we’ll cover everything you need to know to get started.
Setting up your MacBook Pro is a straightforward process that ensures you have access to all the features and functionalities of your device. During the setup, you’ll have the opportunity to customize your settings, connect to your preferred Wi-Fi network, sign in with your Apple ID, and transfer data from your previous device, among other things. By following these steps, you’ll be able to optimize your Mac experience and make the most out of your new MacBook Pro.
So, let’s dive in and begin the setup process. Get ready to unleash the full potential of your MacBook Pro!
Step 1: Unboxing your new MacBook Pro
Congratulations on receiving your brand new MacBook Pro! The first step in setting up your device is unboxing it. Apple takes great care in creating a premium unboxing experience, so let’s get started.
When you receive your MacBook Pro, you’ll notice a sleek and sturdy box. Carefully remove the plastic wrap and slide the box out of its sleeve. You’ll find that the box opens like a book, revealing the MacBook Pro nestled snugly inside. Lift the laptop out of the box and place it on a clean and flat surface.
Beneath the MacBook Pro, you’ll find a smaller box containing the power adapter and charging cable. Gently lift the smaller box and remove these essential accessories. You’ll also find some documentation and guides. Take a moment to browse through these materials, which include important information about your MacBook Pro’s features and setup process.
Inspect your MacBook Pro for any visible signs of damage during shipping. While it’s rare, if you notice any dents, scratches, or other issues, it’s best to contact Apple Support immediately for further assistance.
Once you’ve checked the condition of your MacBook Pro, locate the power button, typically located in the top right corner of the keyboard. Press and hold the power button for a few seconds until you hear a startup chime and see the Apple logo appear on the screen.
Congratulations! You have successfully unboxed your new MacBook Pro and powered it on. In the next step, we’ll guide you through the initial setup process to ensure your MacBook Pro is ready for use.
Step 2: Powering on your MacBook Pro
Now that you’ve unboxed your MacBook Pro, it’s time to power it on and start the setup process. The power button is located at the top right corner of the keyboard.
To power on your MacBook Pro, press and hold the power button for a few seconds. You will hear a startup chime, and the Apple logo will appear on the screen. This indicates that your MacBook Pro is booting up and preparing for the initial setup.
Once the startup process is complete, you will be greeted with the macOS Welcome screen. From here, you can choose your language preference and click the “Continue” button to proceed to the next step.
It’s worth noting that if you are upgrading from an older MacBook or have an iOS device nearby, you can use the Quick Start feature to expedite the setup process. Simply bring the iOS device or your previous Mac close to your new MacBook Pro, and a Quick Start prompt will appear on the screen. Follow the on-screen instructions to transfer your settings, files, and preferences seamlessly to your new MacBook Pro.
If Quick Start is not applicable or you prefer to set up your MacBook Pro manually, you can continue with the regular setup process. After selecting your preferred language, you will be prompted to choose a country or region. This selection will determine your keyboard layout, timezone, and other regional preferences.
Once you’ve chosen your country or region, click the “Continue” button to move on to the next step in the setup process. In the next section, we’ll guide you through configuring your language and region preferences on your MacBook Pro.
Step 3: Setting up your language and region preferences
After powering on your MacBook Pro and selecting your preferred language, it’s time to set up your language and region preferences to ensure an optimal user experience. This step helps customize your MacBook Pro based on your location, time zone, keyboard layout, and other regional settings.
On the macOS Welcome screen, click on the arrow button to proceed to the next step. You will be presented with a list of countries or regions. Scroll through the list or use the search bar to find your desired location and click on it.
Next, you’ll be prompted to choose your keyboard layout. Select the appropriate option based on the keyboard type you will be using with your MacBook Pro. If you’re unsure, you can always use the “Show All” option to view all keyboard layouts available and make the best choice for your needs.
After selecting your keyboard layout, you’ll have the option to enable or disable the accessibility features. If you require any accessibility settings, you can choose to enable them at this stage. Otherwise, you can skip this step and proceed to the next.
Following the accessibility settings, you will be prompted to choose your Wi-Fi network. Select your preferred network from the list of available options. If your network is password-protected, enter the password when prompted. Once connected, click on the “Continue” button to proceed.
Now, your MacBook Pro will verify your network connection, and if all goes well, you will be directed to the “Data & Privacy” screen. This screen offers you the option to transfer information, settings, and documents from another Mac, Time Machine backup, or even a Windows PC. You can choose to transfer the data at this stage or opt to do it later.
Once you’ve made your choice, click on the “Continue” button to proceed. In the next section, we will guide you through signing in with your Apple ID, an essential step to fully utilize the features and functionalities of your MacBook Pro.
Step 4: Connecting to Wi-Fi
Having a stable internet connection is crucial for your MacBook Pro to access online services, download software updates, and browse the web. In this step, we’ll guide you through the process of connecting your MacBook Pro to Wi-Fi.
After setting up your language and region preferences, you will be prompted to choose a Wi-Fi network. The available networks will be displayed on the screen, and you can click on the name of your preferred network.
If your network is password-protected, enter the password when prompted. Make sure to double-check for any typos or mistakes while entering the password. You can also opt to show the password to ensure accuracy.
Once you’ve entered the correct password, click on the “Join” or “Connect” button. Your MacBook Pro will attempt to establish a connection to the selected Wi-Fi network. It may take a few moments to connect, so be patient.
If the connection is successful, you will see a confirmation message, and the Wi-Fi symbol will appear in the menu bar at the top right corner of the screen. This indicates that your MacBook Pro is now connected to the Wi-Fi network.
It’s important to note that if you have a hidden or manually-configured network, you may need to select the “Join Other Network” option and manually enter the network name and security settings.
In case you encounter any issues or your network does not appear on the list, make sure your Wi-Fi router is turned on and functioning correctly. You may also try restarting your router or contacting your internet service provider for further assistance.
Now that your MacBook Pro is successfully connected to Wi-Fi, you can proceed with the setup process and sign in with your Apple ID. The next section will guide you through the steps to take full advantage of your Apple ecosystem and access various services and features provided by Apple.
Step 5: Signing in with your Apple ID
Your Apple ID is the key that unlocks the full potential of your MacBook Pro. It allows you to access the App Store, iCloud, Apple Music, and a host of other services and features. In this step, we’ll guide you through the process of signing in with your Apple ID.
After connecting to Wi-Fi, your MacBook Pro will prompt you to sign in with your Apple ID. If you already have an Apple ID, enter your email address and password in the provided fields. If you don’t have an Apple ID, click on the “Create new Apple ID” option to set up a new account.
If you’re not sure if you have an Apple ID or can’t remember the details, you can click on the “Forgot your Apple ID?” link or “Forgot your password?” link for assistance in recovering your account information.
Once you’ve entered your Apple ID details, click on the “Next” button to proceed. Your MacBook Pro will verify your account information and may prompt you to enter a verification code sent to your trusted devices or phone number associated with your Apple ID for added security.
If you have two-factor authentication enabled, you’ll need to provide the verification code to proceed. This ensures that only you can access your account, even if someone has your password.
If you prefer not to set up two-factor authentication, you can choose to receive a verification code via text message or phone call. Simply select the appropriate option and follow the on-screen instructions to complete the verification process.
Once your Apple ID and verification process are successfully completed, you’ll be presented with the option to personalize your MacBook Pro settings. You can choose whether to enable Siri, select your preferred appearance (Light or Dark mode), and decide whether to share diagnostics and usage data with Apple.
Take a moment to review and customize these settings to suit your preferences. Once you’re satisfied, click on the “Continue” button to proceed to the next step.
With your Apple ID signed in and personalized settings configured, you’re now ready to transfer data from your previous Mac or device if desired. The next step will guide you through this process to ensure a seamless transition to your new MacBook Pro.
Step 6: Transferring data from another Mac or device
Transferring data from your previous Mac or device to your new MacBook Pro is a convenient way to migrate your files, documents, settings, and preferences. In this step, we’ll guide you through the process of transferring data from another Mac or device.
During the setup process, you will reach the “Data & Privacy” screen. On this screen, you’ll have the option to transfer your data from another Mac, Time Machine backup, or even a Windows PC. Choose the appropriate option based on your previous device.
If you are transferring data from another Mac, make sure both devices are in close proximity. You’ll need to have both Macs powered on and connected to Wi-Fi or Ethernet. Choose the option to transfer data from another Mac and follow the on-screen instructions to establish a connection between the two devices.
If you are transferring data from a Time Machine backup, click on the appropriate option and connect your Time Machine drive to your MacBook Pro. Follow the prompts to select the specific backup you want to restore from and proceed with the transfer.
For those migrating from a Windows PC, select the option to transfer data from a Windows PC. Apple provides a utility called the “Migration Assistant for Windows” that helps transfer your files, folders, and other data seamlessly. You’ll need to download and install this utility on your Windows PC and follow the instructions to initiate the transfer.
Depending on the amount of data being transferred and the speed of your devices and connection, the process might take some time. It’s important to remain patient and allow the transfer to complete without interruption.
Once the data transfer is finished, your MacBook Pro will begin organizing and indexing the transferred files. This may take a little while, but it’s a necessary step to ensure optimal performance as you start using your new MacBook Pro.
Keep in mind that if you choose not to transfer data during the initial setup process, you can always use the “Migration Assistant” utility later to transfer your files and settings from another device.
Congratulations! You have successfully transferred your data from another Mac or device to your new MacBook Pro. In the next step, we’ll guide you through setting up Touch ID, a convenient and secure way to unlock your MacBook Pro and authorize purchases.
Step 7: Setting up Touch ID (if applicable)
If your MacBook Pro model is equipped with Touch ID, you have the option to set up this convenient feature during the initial setup process. Touch ID allows you to unlock your MacBook Pro, make secure purchases, and authorize app installations using your fingerprint.
To set up Touch ID, follow these steps:
1. On the setup screen, click on the “Set Up Touch ID Later” option if you prefer to set it up at a later time.
2. If you choose to set up Touch ID, you’ll be prompted to place your finger on the Touch ID sensor, located at the right end of the Touch Bar or on the power button on older MacBook Pro models. Follow the instructions on the screen and lift your finger when prompted.
3. After the initial fingerprint scan, you’ll be prompted to adjust your grip and scan your fingerprint from various angles. This helps improve the accuracy and reliability of Touch ID.
4. Repeat the scanning process for each finger you’d like to use for Touch ID. It’s recommended to scan at least two different fingers to ensure convenience and flexibility when using the feature.
5. Once you’ve scanned all desired fingers, click on the “Continue” button to proceed to the next step in the setup process.
Setting up Touch ID provides the added benefit of authorizing Apple Pay purchases with the touch of a finger. If you’re interested in using Apple Pay, you’ll be prompted to set it up during the initial setup process as well. Apple Pay is a secure and convenient way to make purchases online and in-store using your MacBook Pro.
If you choose to skip the Touch ID setup during the initial setup process, don’t worry. You can always set it up later by going to “System Preferences” and selecting the “Touch ID” option. From there, you can follow the on-screen instructions to set up Touch ID and enjoy its benefits.
With Touch ID set up on your MacBook Pro, you’ll experience the ease and security of using your fingerprint to unlock your device and authorize various actions. In the next step, we’ll guide you through enabling FileVault to enhance the security of your data.
Step 8: Enabling FileVault for enhanced security
Protecting your personal and sensitive data is of utmost importance, especially on a device as personal as your MacBook Pro. FileVault is a built-in feature in macOS that provides encryption for your data, ensuring that it remains secure even in the event of unauthorized access or theft.
To enable FileVault on your MacBook Pro, follow these steps:
1. Go to the Apple menu at the top left corner of the screen and select “System Preferences”.
2. In the System Preferences window, click on the “Security & Privacy” icon.
3. Within the “Security & Privacy” settings, select the “FileVault” tab.
4. Click on the lock icon in the bottom left corner of the window and enter your administrator password when prompted.
5. With the lock unlocked, click on the “Turn On FileVault” button.
6. You’ll be presented with options to unlock your encrypted disk. Choose the option that suits you best, such as using your iCloud account, your user account password, or creating a recovery key.
7. Follow the on-screen instructions to complete the setup process, including setting up a password hint for your FileVault recovery key.
8. Once you’ve finalized the setup, click on the “Restart” button to allow your MacBook Pro to restart and apply the FileVault encryption.
Once FileVault is enabled, your MacBook Pro’s data will be automatically encrypted, and any new files or changes you make will be encrypted in real-time as well. This ensures that even if someone gains unauthorized access to your device’s storage, your data is protected and unreadable without the correct encryption key.
It’s essential to note that enabling FileVault may cause a slight performance impact, as the encryption and decryption process occurs in the background. This impact is typically minimal, but it’s worth considering if you have specific performance requirements.
By enabling FileVault, you take an important step towards safeguarding your data and protecting your privacy on your MacBook Pro. In the next step, we’ll guide you through setting up iCloud Drive, Apple’s cloud storage and synchronization service.
Step 9: Setting up iCloud Drive
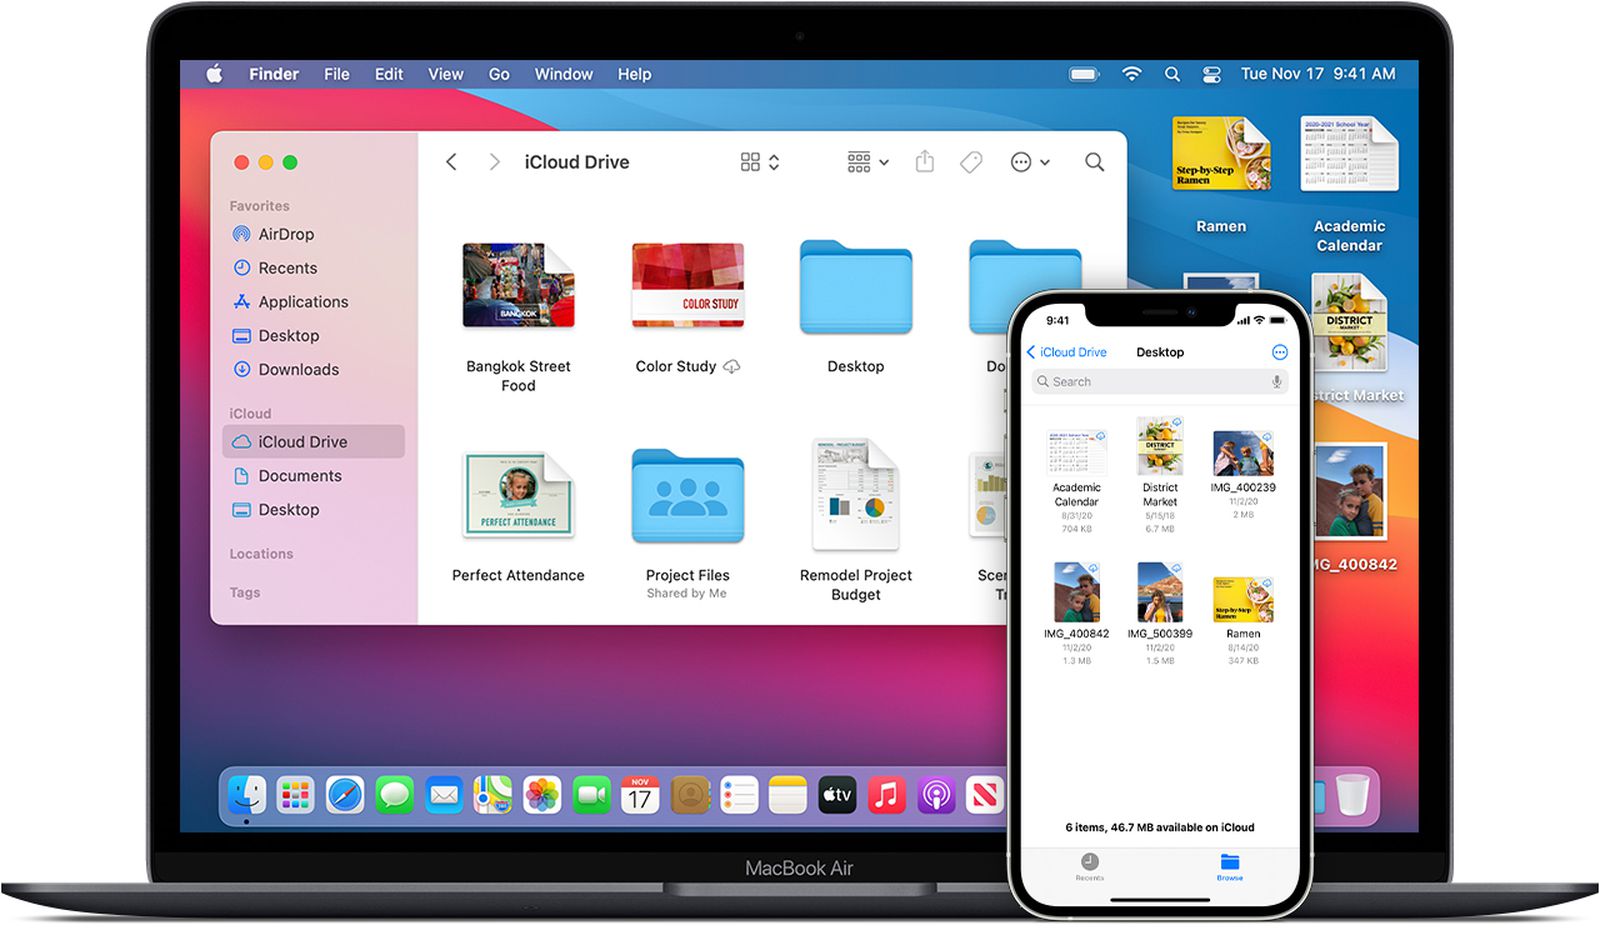
iCloud Drive is Apple’s cloud storage and synchronization service that allows you to access your files and documents across multiple devices. By setting up iCloud Drive on your MacBook Pro, you can easily store and sync your important files, ensuring that they are readily available whenever you need them.
To set up iCloud Drive on your MacBook Pro, follow these steps:
1. Click on the Apple menu at the top left corner of the screen and select “System Preferences”.
2. In the System Preferences window, click on the “Apple ID” icon.
3. Within the Apple ID settings, click on the “iCloud” tab.
4. If prompted, enter your Apple ID and password to sign in to your iCloud account.
5. Check the box next to “iCloud Drive” to enable it on your MacBook Pro.
6. If you want to optimize storage on your MacBook Pro, you can choose to enable the “Optimize Mac Storage” option. This feature automatically stores your less frequently accessed files in iCloud to free up local storage space on your device.
7. You can also click on the “Options” button next to iCloud Drive to customize which apps and documents are stored and synced with iCloud.
8. Once you’ve made your desired selections, click on the “Done” button to save the changes.
Your MacBook Pro will now start syncing your files and documents with iCloud Drive. Depending on the size of your files and the speed of your internet connection, the initial sync may take some time. It’s best to ensure you have a stable internet connection while the initial sync is in progress.
Once iCloud Drive is set up, you can start saving files and documents to your iCloud Drive folder. Any changes or additions you make to these files will automatically sync across all your devices connected to the same iCloud account.
iCloud Drive also enables seamless collaboration as you can share files and folders with others, allowing multiple people to work on the same document in real-time. This feature is especially useful for group projects or when collaborating with colleagues or clients.
With iCloud Drive set up on your MacBook Pro, you can enjoy a seamless and effortless file storage and synchronization experience. In the next step, we’ll guide you through customizing System Preferences to optimize your MacBook Pro’s performance and personalize your user experience.
Step 10: Customizing System Preferences
System Preferences is where you can personalize various settings on your MacBook Pro, allowing you to customize your user experience and optimize your device’s performance. In this step, we’ll guide you through the process of customizing System Preferences.
To access System Preferences, click on the Apple menu at the top left corner of the screen and select “System Preferences” from the dropdown menu.
Once in the System Preferences window, you’ll find several categories that allow you to customize different aspects of your MacBook Pro. Here are a few key categories and settings you may want to consider customizing:
– Appearance: In this category, you can choose between Light and Dark mode to change the overall look and feel of your MacBook Pro’s interface. Select the mode that resonates with your personal preferences and helps reduce eye strain.
– Dock & Menu Bar: Customize the appearance and behavior of your Dock, such as its position, size, and whether it should automatically hide or show. You can also customize the icons and layout of your Menu Bar, including the visibility of specific icons.
– Trackpad: If your MacBook Pro has a trackpad, you can fine-tune its behavior in this category. Adjust settings related to scrolling, tapping, and gestures to make your trackpad experience more tailored to your liking.
– Security & Privacy: Explore additional security settings, such as enabling the firewall, managing your privacy preferences, and configuring various privacy-related controls.
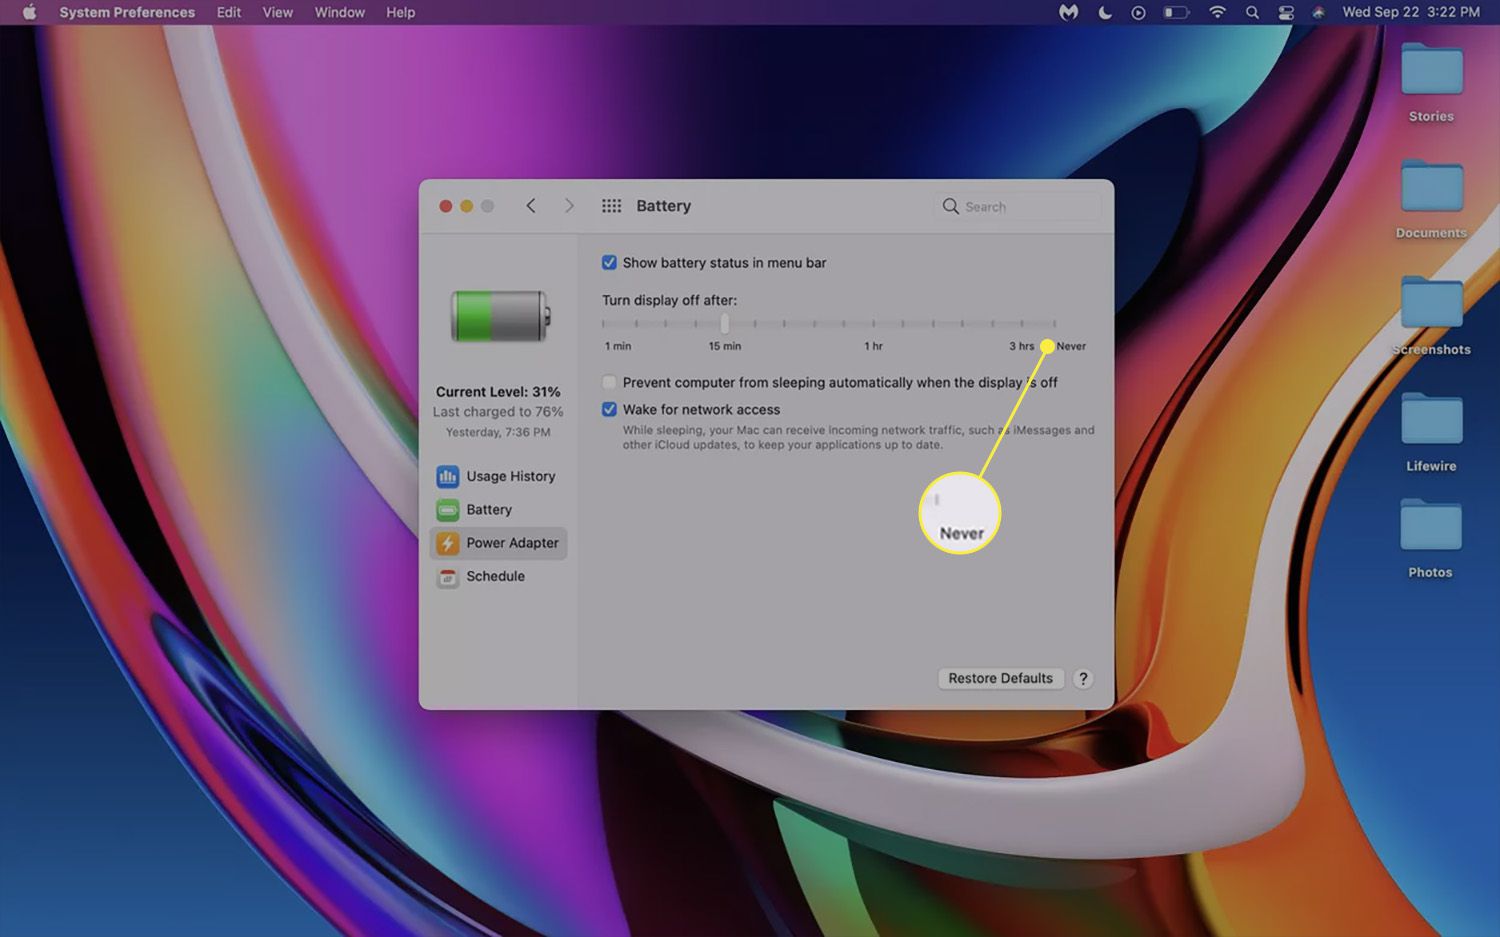
– Energy Saver: Customize power-related settings to optimize your MacBook Pro’s battery life. Adjust the display sleep, disk sleep, and other power-related settings to suit your usage patterns and preferences.
– Keyboard: Tailor keyboard settings to enhance your typing experience. Adjust settings like key repeat, keyboard backlighting, and customize shortcut keys for increased efficiency.
These are just a few examples of the customization options available in System Preferences. Feel free to explore other categories and settings to customize your MacBook Pro according to your needs and preferences.
Remember, customization is about personalizing your user experience and making your MacBook Pro work the way you want it to. Take some time to experiment with different settings and find what works best for you.
With System Preferences customized to your liking, your MacBook Pro will feel more like a reflection of your personality and workflow. In the next step, we’ll guide you through installing essential software updates to ensure your MacBook Pro is up to date and secure.
Step 11: Installing essential software and updates
Keeping your MacBook Pro’s software up to date is crucial for optimal performance, security, and access to the latest features and improvements. In this step, we’ll guide you through the process of installing essential software updates.
Apple regularly releases software updates, including macOS updates, security patches, and updates for built-in apps. These updates address bugs, enhance performance, and provide new features. To check for and install updates on your MacBook Pro, follow these steps:
1. Click on the Apple menu at the top left corner of the screen and select “System Preferences” from the dropdown menu.
2. In the System Preferences window, click on the “Software Update” icon.
3. Your MacBook Pro will check for available updates. If any updates are found, they will be displayed along with a brief description of the changes they bring.
4. To install the updates, click on the “Update Now” button. Your MacBook Pro will begin downloading and installing the updates.
5. Depending on the size of the updates and the speed of your internet connection, the installation process may take some time. Ensure that your MacBook Pro is connected to a stable power source during this process.
6. Once the updates are installed, your MacBook Pro may restart to complete the installation process. This is normal, and your device will automatically boot up once the installation is complete.
It’s important to regularly check for and install software updates to ensure that your MacBook Pro’s operating system and apps are up to date. This helps protect your device from security vulnerabilities, enhances performance, and ensures compatibility with the latest software and services.
In addition to operating system updates, you may also need to update third-party apps that you have installed. Many apps provide their own update mechanism, often found in the app’s preferences or settings. It’s recommended to check for updates for your most frequently used apps and install them as needed.
By regularly keeping your MacBook Pro’s software up to date, you can ensure that your device runs smoothly, remains secure, and benefits from the latest improvements and features. In the next step, we’ll guide you through configuring Time Machine for regular backups to safeguard your important files and data.
Step 12: Configuring Time Machine for regular backups
Configuring Time Machine is essential to ensure regular backups of your MacBook Pro’s data. Time Machine is a built-in backup feature in macOS that automatically copies and saves your files, documents, and system settings to an external storage device. In this step, we’ll guide you through the process of setting up Time Machine for regular backups.
To configure Time Machine, follow these steps:
1. Connect an external storage device, such as an external hard drive or network-attached storage (NAS), to your MacBook Pro. Ideally, use a storage device with ample capacity to accommodate your backups.
2. Click on the Apple menu at the top left corner of the screen and select “System Preferences” from the dropdown menu.
3. In the System Preferences window, click on the “Time Machine” icon.
4. Time Machine will automatically detect the connected storage device and present it as an option for backups. Click on the “Select Backup Disk” button.
5. Choose the external storage device you connected for Time Machine backups and click on the “Use Disk” button to proceed.
6. If prompted, you can choose to encrypt your backups for added security. This ensures that your data remains secure even if the external storage device falls into the wrong hands.
7. Once you’ve selected the backup disk and made any desired encryption choices, click on the “Back Up Automatically” checkbox to enable automatic backups.
8. Optionally, you can exclude specific items from being backed up by clicking on the “Options” button. This allows you to exclude large files, folders, or system files that you don’t need to backup.
9. With the backup disk selected and automatic backups enabled, Time Machine will start the initial backup process. This may take some time, depending on the amount of data being backed up.
It’s essential to keep your external storage device connected to your MacBook Pro to ensure regular backups. Time Machine will automatically create incremental backups, saving only the changes made since the last backup. This allows for efficient use of storage space.
By configuring Time Machine for regular backups, you can have peace of mind knowing that your important files and data are safeguarded. In the event of accidental file deletion, hardware failure, or data loss, you can restore your MacBook Pro to a previous state using Time Machine backups.
In the next step, we’ll guide you through the process of installing additional apps and software to further enhance your MacBook Pro’s capabilities.
Step 13: Installing additional apps and software
While your MacBook Pro comes preloaded with useful apps and software, you may want to install additional applications to suit your specific needs and preferences. In this step, we’ll guide you through the process of installing additional apps and software on your MacBook Pro.
There are several ways to install apps on your MacBook Pro, and here are a few popular methods:
1. Mac App Store: The Mac App Store is the official marketplace for macOS apps. Open the Mac App Store from the Dock or by searching in Spotlight. Browse the categories, search for specific apps, and click on the “Get” or “Buy” button to download and install the desired apps. You may be prompted to sign in with your Apple ID to complete the installation process.
2. Developer Websites: Many developers offer direct download options for their software on their websites. Simply visit the developer’s website, locate the desired application, and look for a download link or button. Follow the on-screen instructions to download and install the app.
3. Package Installers: Some apps come bundled in package installers (.pkg files) that you download and run to install the application. These installers often guide you through the installation process and may require you to enter your user credentials or provide permission for the installation to proceed.
4. Third-party Marketplaces: Apart from the Mac App Store, there are other third-party marketplaces such as Setapp or Homebrew that offer curated collections of applications. These platforms provide a convenient way to discover and install popular and niche applications.
Prioritize installing essential applications based on your specific needs, such as productivity tools, creative software, or security applications. Consider popular apps like Microsoft Office, Adobe Creative Cloud, antivirus software, cloud storage clients, and communication tools.
When installing apps, it’s essential to be mindful of the source. Stick to trusted sources like official app stores, reputable developers, and well-known marketplaces to ensure the integrity and security of the applications you install.
As you install apps, pay attention to any additional settings or customizations during the installation process. Take the time to read through the prompts and make informed choices to avoid installing unnecessary or unwanted software on your MacBook Pro.
Remember to periodically update your installed applications as new versions are released. Many apps offer automatic update functionality, or you can manually check for updates within the app or through the app store where you downloaded it from.
By installing additional apps and software on your MacBook Pro, you can tailor your device to your specific needs and make the most of its capabilities. In the next step, we’ll guide you through configuring iCloud settings for synced data across your devices.
Step 14: Configuring iCloud settings for synced data
iCloud is Apple’s cloud-based service that allows you to sync and access your data, such as photos, documents, emails, contacts, and more, across all your Apple devices. Configuring iCloud settings on your MacBook Pro enables seamless synchronization and access to your data from any device. In this step, we’ll guide you through the process of configuring iCloud settings on your MacBook Pro.
To configure iCloud settings, follow these steps:
1. Click on the Apple menu at the top left corner of the screen and select “System Preferences” from the dropdown menu.
2. In the System Preferences window, click on the “Apple ID” icon.
3. Within the Apple ID settings, click on the “iCloud” tab.
4. You’ll see a list of apps and services that can be synced with iCloud. Toggle on or off the respective options for the apps and data you want to sync across your devices.
5. Some apps may require additional configuration. For example, if you want to sync your Photos library, you can choose the “Options” button next to “Photos” and select the specific albums or libraries you want to sync.
6. iCloud also provides services like iCloud Drive, iCloud Keychain, Find My, and more. Explore the options available and enable or disable the features based on your preferences and needs.
7. If you have multiple Apple devices, you can enable iCloud syncing for specific apps or services to seamlessly access your data across all devices. This ensures that your emails, contacts, calendars, notes, and other information are always up to date.
8. If you have limited iCloud storage, you can manage your storage by clicking on the “Manage…” button. From there, you can view and delete unnecessary files and manage your storage plan if needed.
Once you’ve configured your iCloud settings, your MacBook Pro will start syncing your data with iCloud. Depending on the amount of data and your internet speed, the initial sync may take some time. It’s best to ensure you have a stable internet connection while the initial sync is in progress.
With iCloud configured on your MacBook Pro, you can access your data seamlessly across all your Apple devices, ensuring that you have the latest information at your fingertips. Any changes you make to your synced data on one device will be reflected on all your other devices.
Remember to periodically check and manage your iCloud storage to ensure that you have enough space for your data. You can upgrade your iCloud storage plan if needed to accommodate your growing needs.
In the next step, we’ll guide you through setting up email accounts on your MacBook Pro, so you can conveniently access and manage your emails directly from the Mail app.
Step 15: Setting up email accounts
The Mail app on your MacBook Pro allows you to conveniently manage all your email accounts in one place. Whether you have a personal email or multiple work accounts, setting them up on your MacBook Pro ensures efficient communication. In this step, we’ll guide you through the process of setting up email accounts on your MacBook Pro.
To set up email accounts, follow these steps:
1. Open the Mail app on your MacBook Pro. You can find it in the Dock or by searching for “Mail” using Spotlight.
2. The Mail app will prompt you to add an account. If you’re not prompted, click on “Mail” in the top menu bar and then select “Add Account”.
3. Choose the type of email account you want to add. The most common types are “iCloud”, “Google”, “Microsoft Exchange”, or “Other Mail Account”. Select the appropriate option based on your email provider.
4. Enter your email address and password when prompted. If you have two-factor authentication enabled on your email account, you may need to provide an additional verification code. Follow the on-screen instructions to complete the setup process.
5. The Mail app will attempt to automatically configure the account settings based on your email address. If successful, click “Done” to complete the setup. If not, you may need to enter additional information such as incoming and outgoing server details. Consult your email provider’s documentation or contact their support for accurate settings.
6. Repeat the process for each additional email account you want to add to the Mail app. You can add multiple accounts from different providers to manage them all in one place.
7. Once your accounts are added, the Mail app will start synchronizing your email folders and downloading any existing messages. Depending on the amount of data, it may take some time to sync initially. Ensure you have a stable internet connection during this process.
The Mail app on your MacBook Pro provides a unified inbox, allowing you to easily view and respond to emails from all your accounts in one place. You can organize your emails into folders, set up rules and filters, and customize notifications to fit your preferences.
With your email accounts set up on your MacBook Pro, you can conveniently access and manage your emails directly from the Mail app. Stay organized, respond promptly, and keep track of important conversations without the need for separate email apps or web browsers.
In the next step, we’ll guide you through configuring Messages and FaceTime, so you can easily communicate with your contacts using your MacBook Pro.
Step 16: Configuring Messages and FaceTime
Messages and FaceTime are essential communication tools on your MacBook Pro, allowing you to stay connected with friends, family, and colleagues. In this step, we’ll guide you through the process of configuring Messages and FaceTime on your MacBook Pro.
To configure Messages and FaceTime, follow these steps:
1. Open the Messages app on your MacBook Pro. You can find it in the Dock or by searching for “Messages” using Spotlight.
2. If you haven’t already signed in with your Apple ID, the Messages app will prompt you to do so. Enter your Apple ID and password to sign in. If you have two-factor authentication enabled, you may need to provide an additional verification code.
3. Once signed in, you can start sending and receiving text messages, photos, and videos with other Apple and non-Apple users. Messages sent to your iPhone or other Apple devices will also be synchronized across all your devices.
4. To configure FaceTime, open the FaceTime app on your MacBook Pro. Again, sign in with your Apple ID to proceed.
5. Once signed in, you can make audio and video calls with other FaceTime users on Apple devices. FaceTime also supports conference calls, screen sharing, and more.
6. Both Messages and FaceTime offer several customization options. To access the settings, click on the “Messages” or “FaceTime” menu in the top menu bar, and then select “Preferences”. From there, you can adjust notifications, ringing settings, blocked contacts, and more.
7. If you have an iPhone or other Apple devices, you can choose whether to use your phone number or Apple ID for calls and messages by going to “Settings” on your MacBook Pro and selecting “Phone” or “Messages” respectively. This allows for seamless integration across all your devices.
With Messages and FaceTime configured, you can easily communicate and stay connected with your contacts. Whether it’s sending messages, making audio or video calls, or even hosting conference calls, these apps make it convenient to communicate with others, both within and outside the Apple ecosystem.
Remember to keep your MacBook Pro connected to a stable internet connection to ensure uninterrupted communication through Messages and FaceTime.
In the next step, we’ll guide you through organizing and customizing the dock and desktop on your MacBook Pro for a personalized and efficient workflow.
Step 17: Organizing and customizing the dock and desktop
The dock and desktop on your MacBook Pro serve as the central hub for quick access to your favorite apps and files. Organizing and customizing these elements can enhance your workflow and productivity. In this step, we’ll guide you through the process of organizing and customizing the dock and desktop on your MacBook Pro.
To organize the dock:
1. The dock is located at the bottom of the screen. To add frequently used apps to the dock, simply drag and drop their icons from the Applications folder or Launchpad onto the dock.
2. You can also remove apps from the dock by clicking and dragging them out of the dock.
3. To rearrange the apps in the dock, click and drag an app’s icon to the desired position.
4. You can customize the dock’s appearance by right-clicking on the dock and selecting “Dock Preferences”. From there, you can adjust the size, position, and other display options.
To customize the desktop:
1. The desktop is where files, folders, and shortcuts are displayed. To add icons, simply drag and drop files or folders from other locations onto the desktop. You can also create new folders or documents on the desktop for quick access.
2. To remove icons from the desktop, simply drag them to the trash or right-click and select “Move to Trash”. Remember, moving items to the trash removes them from the desktop but does not delete them permanently.
3. You can organize icons on the desktop by dragging and dropping them into logical groups or folders. This helps keep your desktop clutter-free and makes finding files easier.
4. If you prefer a clean desktop, you can hide desktop icons by going to “Finder” in the menu bar, selecting “Preferences”, and unchecking “Show these items on the desktop” for the desired items.
By organizing and customizing the dock and desktop, you can create a personalized and efficient workspace on your MacBook Pro. Having quick access to your favorite apps and frequently used files improves your productivity and helps you find what you need easily.
Take some time to experiment with different arrangements and settings to find what works best for your workflow. Remember, you can always adjust and modify the dock and desktop settings based on your changing needs and preferences.
In the next step, we’ll guide you through connecting peripherals and accessories to your MacBook Pro to expand its capabilities.
Step 18: Connecting peripherals and accessories
Your MacBook Pro is designed to seamlessly connect with various peripherals and accessories, allowing you to expand its capabilities and enhance your productivity. In this step, we’ll guide you through the process of connecting peripherals and accessories to your MacBook Pro.
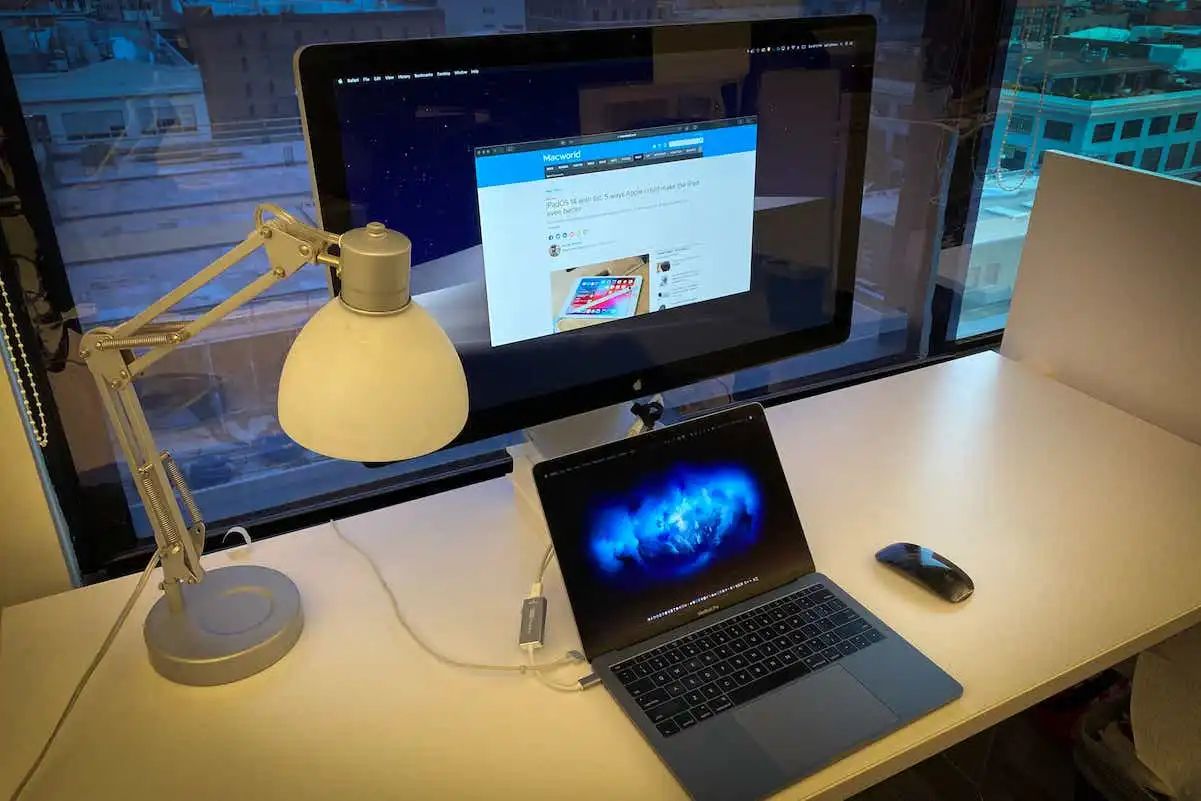
1. Connect external displays: If you want to connect an external display to your MacBook Pro, you can use the available Thunderbolt 4/USB 4 or USB-C ports. Depending on the display, you may need to use an appropriate adapter or cable to establish the connection. Once connected, your MacBook Pro will automatically detect and configure the display settings.
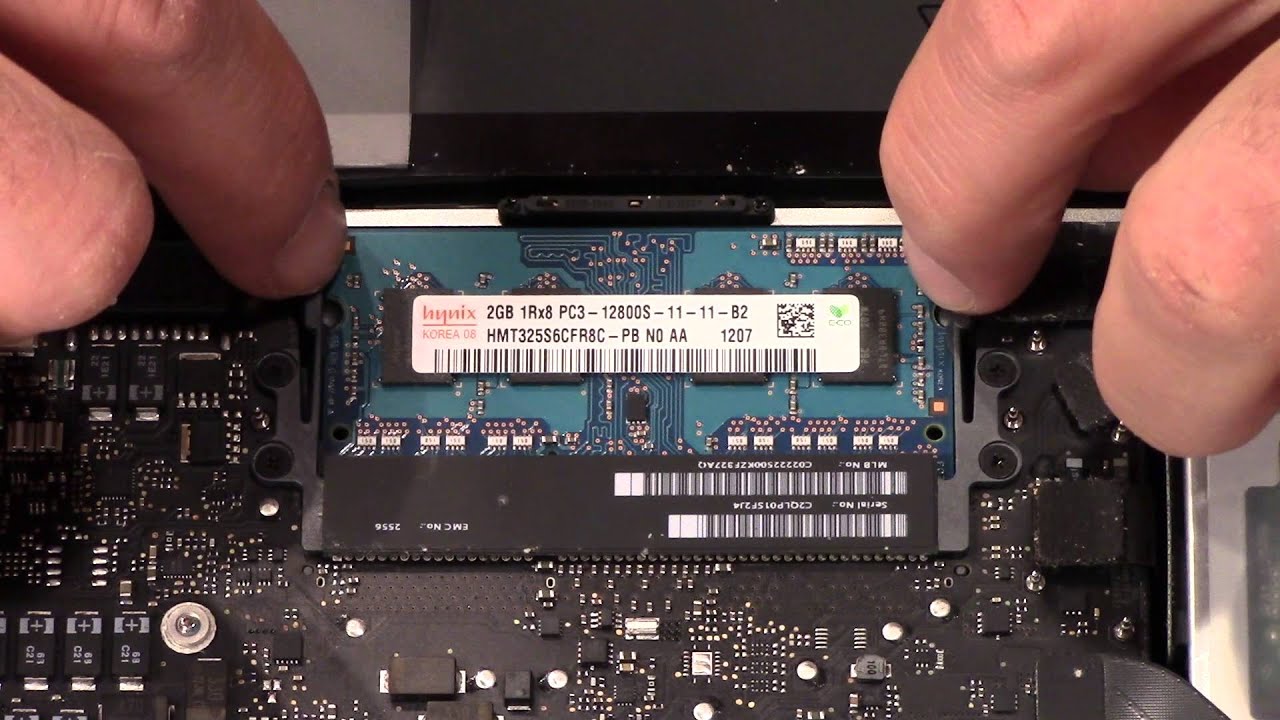
2. Connect external storage devices: To expand your storage capacity, connect external hard drives, solid-state drives (SSDs), or USB flash drives to your MacBook Pro. Simply plug the storage device into a USB, Thunderbolt, or USB-C port, and your MacBook Pro will recognize the device, allowing you to access and manage the files.
3. Connect printers and scanners: To connect a printer or scanner to your MacBook Pro, use the appropriate USB, Thunderbolt, or wireless connection. Your MacBook Pro should automatically detect the printer or scanner and install the necessary drivers. Some printers may require you to download additional software or drivers from the manufacturer’s website.
4. Connect audio devices: Whether it’s headphones, speakers, or microphones, you can connect audio devices to your MacBook Pro. The MacBook Pro usually supports standard audio jacks and USB connections for these devices. When connected, choose the audio input and output settings in the “Sound” preferences within the “System Preferences” to configure and use the audio device.
5. Connect input devices: Connect keyboards, mice, or trackpads to your MacBook Pro for more comfortable input options. Most wired or wireless keyboards and mice should work seamlessly with your MacBook Pro without the need for additional drivers. However, specialized gaming mice or keyboards may require specific software or drivers from the manufacturer.
6. Connect other peripherals: You can connect a wide range of other peripherals, such as USB hubs, external DVD drives, webcams, drawing tablets, MIDI keyboards, and more. Simply ensure that the peripheral uses a compatible connection, such as USB or Thunderbolt, and follow the manufacturer’s instructions for installation, if necessary.
When connecting peripherals, it’s important to use high-quality cables and adapters to ensure reliable and stable connections. Be mindful of the power requirements of certain peripherals, as they may need an additional power source or adapter to work properly with your MacBook Pro.
By connecting peripherals and accessories to your MacBook Pro, you can expand its capabilities and customize your setup to suit your specific needs. This allows you to take advantage of a wider range of features and functionalities that enhance your productivity and overall user experience.
In the next step, we’ll guide you through adjusting display and sound settings to optimize your MacBook Pro’s visual and audio output.
Step 19: Adjusting display and sound settings
Adjusting the display and sound settings on your MacBook Pro can significantly enhance your viewing and listening experience. In this step, we’ll guide you through the process of adjusting display and sound settings to optimize your MacBook Pro’s visual and audio output.
Adjusting Display Settings:
1. Brightness: Adjust the screen brightness by pressing the brightness keys (F1 or F2) on your MacBook Pro’s keyboard or by going to “System Preferences” > “Displays” and adjusting the brightness slider. Find a comfortable brightness level that suits your environment and reduces eye strain.
2. Resolution: Choose the appropriate screen resolution for your needs. To adjust the resolution, go to “System Preferences” > “Displays” and select the “Display” tab. From there, you can select the desired resolution. Higher resolutions provide more screen real estate, while lower resolutions may result in larger text and icons.
3. Display Arrangement: If you’re using multiple displays with your MacBook Pro, you can arrange and customize their positioning by going to “System Preferences” > “Displays” > “Arrangement”. Drag and drop the displays to match their physical placement on your desk, and adjust their relative positioning and alignment.
4. Night Shift: Night Shift reduces the amount of blue light emitted by your MacBook Pro’s display, which can help improve your sleep patterns. You can enable Night Shift by going to “System Preferences” > “Displays” > “Night Shift” and schedule it to turn on during specific hours or enable it manually.
Adjusting Sound Settings:
1. Volume: Adjust the speaker volume by using the volume keys (F11 or F12) on your MacBook Pro’s keyboard. You can also click on the volume icon in the menu bar at the top right corner of the screen and drag the slider to adjust the volume level. Ensure the volume is at a comfortable level for your listening experience.
2. Sound Output: To modify the sound output settings, go to “System Preferences” > “Sound” > “Output”. Choose the desired device, such as internal speakers or connected headphones or speakers, from the list of available options. You can also adjust the balance between the left and right speakers or enable/disable sound effects.
3. Audio Input: If you’re using external microphones or other audio input devices, go to “System Preferences” > “Sound” > “Input”. Select the appropriate device from the list of available options. Ensure the input volume is at an appropriate level and adjust it if needed.
4. Sound Effects: Customize sound effects settings by going to “System Preferences” > “Sound” > “Sound Effects”. Enable or disable specific system sounds and adjust the volume for alerts, notifications, and other audio feedback.
By adjusting the display and sound settings on your MacBook Pro, you can create an optimized audiovisual experience tailored to your preferences. Take the time to explore different settings and find the combination that best suits your needs for work, entertainment, or any other activities.
In the next step, we’ll guide you through personalizing your MacBook Pro by selecting wallpapers that reflect your style and aesthetic.
Step 20: Personalizing your MacBook Pro with wallpapers
Personalizing your MacBook Pro with wallpapers is a great way to add a touch of your own style and make your device feel truly yours. In this step, we’ll guide you through the process of selecting and setting wallpapers to customize the look and feel of your MacBook Pro.
To personalize your MacBook Pro with wallpapers, follow these steps:
1. Open the “System Preferences” by clicking on the Apple menu at the top left corner of the screen and selecting “System Preferences” from the dropdown menu.
2. In the “System Preferences” window, click on the “Desktop & Screen Saver” icon.
3. Within the “Desktop & Screen Saver” settings, you’ll find various options to customize your desktop background.
4. For Apple’s preloaded wallpapers, click on the “Desktop” tab and browse through the available categories on the left sidebar. Click on a category to view the wallpapers within that category, and then select the one you like. The chosen wallpaper will be applied to your desktop background instantly.
5. If you have your own images that you want to use as wallpapers, click on the “+” (plus) sign below the left sidebar. Navigate to the location where your image is saved, select it, and click “Choose”. The selected image will be set as your desktop background.
6. If you want to use a slideshow as your wallpaper, select the “Dynamic Desktop” or “Screen Saver” tab in the “Desktop & Screen Saver” settings. From there, you can choose a collection of images or a specific folder to create a slideshow that changes your desktop background automatically at a set interval.
7. You can also choose to use a solid color as your desktop background. To do this, select the “Solid Colors” option in the “Desktop & Screen Saver” settings and choose your desired color.
Experiment with different wallpapers to find the ones that resonate with your style and preferences. You can change the wallpaper as often as you like to keep your MacBook Pro’s look fresh and inspiring.
Remember, personalization goes beyond wallpapers. You can also customize other elements of your MacBook Pro, such as icons, fonts, and system appearance, using various third-party customization tools available.
By personalizing your MacBook Pro with wallpapers, you can create a visually appealing and inspiring environment that reflects your personality and style. Take the time to explore and choose wallpapers that resonate with you and make your MacBook Pro a truly unique device.
Your MacBook Pro is now fully set up and customized to meet your needs and preferences. Enjoy using your personalized device to its fullest potential!
Conclusion
Congratulations! You’ve successfully set up and personalized your MacBook Pro, transforming it into a powerful tool tailored to your needs and preferences. Through the steps we’ve covered, you’ve unboxed your new MacBook Pro, powered it on, configured language and region preferences, connected to Wi-Fi, signed in with your Apple ID, transferred data, set up Touch ID (if applicable), enabled FileVault for enhanced security, configured iCloud settings, set up email accounts, configured Messages and FaceTime, organized and customized the dock and desktop, connected peripherals and accessories, adjusted display and sound settings, and personalized your MacBook Pro with wallpapers.
By following these steps, you’ve not only optimized the performance and security of your MacBook Pro but also made it an extension of your own style and workflow. You can now enjoy the seamless integration of Apple’s ecosystem, the convenience of data synchronization, efficient communication through various channels, and a truly customized user experience.
Remember to regularly install software updates and keep your apps and system up to date. This ensures that your MacBook Pro continues to operate optimally, benefits from new features, and remains secure against potential vulnerabilities.
As you continue to use your MacBook Pro, don’t hesitate to explore additional features, customization options, and advanced functionalities. Apple’s ecosystem offers a vast range of possibilities to enhance your productivity, creativity, and entertainment experiences.
Thank you for following this guide, and we hope that it has provided you with valuable insights and assistance in setting up your MacBook Pro. Enjoy your journey with your newly personalized device, and make the most of its capabilities!