Introduction
Welcome to this comprehensive guide on how to upgrade the RAM in your MacBook Pro. If you’re looking to improve the performance and multitasking capabilities of your beloved MacBook Pro, upgrading the RAM is a great way to achieve that.
Random Access Memory (RAM) plays a crucial role in the functioning of your computer. It allows your MacBook Pro to quickly access and store data that is actively being used, which in turn leads to smoother and faster performance. By upgrading the RAM, you can ensure that your MacBook Pro can handle more demanding tasks and applications without experiencing lag or slowdowns.
There could be many reasons why you’re considering a RAM upgrade for your MacBook Pro. Perhaps you’re experiencing sluggishness when running multiple applications simultaneously, or you’re noticing a delay in processing large files. Maybe you’re a creative professional working with resource-intensive software like video editing or 3D rendering applications. Whatever the reason, upgrading the RAM can provide a significant performance boost for your MacBook Pro.
Before diving into the step-by-step process of upgrading your RAM, it’s important to understand the compatibility and requirements. MacBook Pro models have different RAM specifications, so it’s crucial to ensure that the RAM module you choose is compatible with your specific model. Additionally, the maximum RAM capacity that your MacBook Pro can support will also determine the upgrade options available to you.
In the following sections, we’ll walk you through the necessary steps to upgrade the RAM in your MacBook Pro. We’ll cover everything from preparing the tools you’ll need for the process to installing the new RAM module and testing its functionality. So, grab your screwdriver and let’s get started on enhancing the performance of your MacBook Pro!
Reasons to Upgrade RAM in MacBook Pro
Upgrading the RAM in your MacBook Pro can have numerous benefits and can greatly enhance your overall computing experience. Here are some compelling reasons why you might consider upgrading your MacBook Pro’s RAM:
- Improved Performance: One of the primary reasons to upgrade your MacBook Pro’s RAM is to boost its performance. With more RAM, your MacBook Pro can handle multiple tasks and applications simultaneously without experiencing slowdowns or lag, resulting in a smoother and more efficient workflow.
- Enhanced Multitasking: If you often find yourself juggling between multiple applications, such as running virtual machines, editing videos, or working with large datasets, upgrading the RAM will allow your MacBook Pro to handle these demanding tasks more effectively. It enables you to switch between applications seamlessly and work more efficiently.
- Increased System Responsiveness: With additional RAM, your MacBook Pro can store more data in its memory, reducing the need to rely on slower storage drives. This results in quicker access to frequently used information, making your system more responsive and reducing loading times.
- Future-Proofing: As technology advances and software becomes more resource-intensive, upgrading your MacBook Pro’s RAM now can help future-proof your device. By investing in additional RAM, you’re ensuring that your MacBook Pro can handle the demands of newer applications, allowing you to get more mileage out of your device.
- Optimized Performance for Specific Applications: Certain software applications, like video editing programs or graphic design tools, can benefit greatly from increased RAM. With more available memory, these applications can run more smoothly, handle larger files, and perform complex operations more efficiently.
- Cost-Effective Upgrade: Upgrading the RAM in your MacBook Pro is a cost-effective way to enhance its performance compared to buying a new machine. While RAM upgrades are typically less expensive than purchasing a completely new MacBook Pro, they can deliver significant improvements in performance and extend the life of your current device.
These are just a few reasons why upgrading the RAM in your MacBook Pro can be a wise decision. Now, let’s move on to the next section, where we’ll guide you through the process of checking compatibility and requirements before upgrading your MacBook Pro’s RAM.
Checking Compatibility and Requirements
Before diving into the process of upgrading the RAM in your MacBook Pro, it’s essential to ensure compatibility and understand the requirements for the upgrade.
Start by identifying your MacBook Pro model and its specifications. You can do this by clicking on the Apple menu in the upper-left corner of your screen, then selecting “About This Mac.” Here, you’ll find information about your MacBook Pro’s model, processor, and installed RAM.
Next, determine the maximum RAM capacity that your MacBook Pro can support. Different MacBook Pro models have different RAM limitations, so it’s crucial to check the specifications for your specific model.
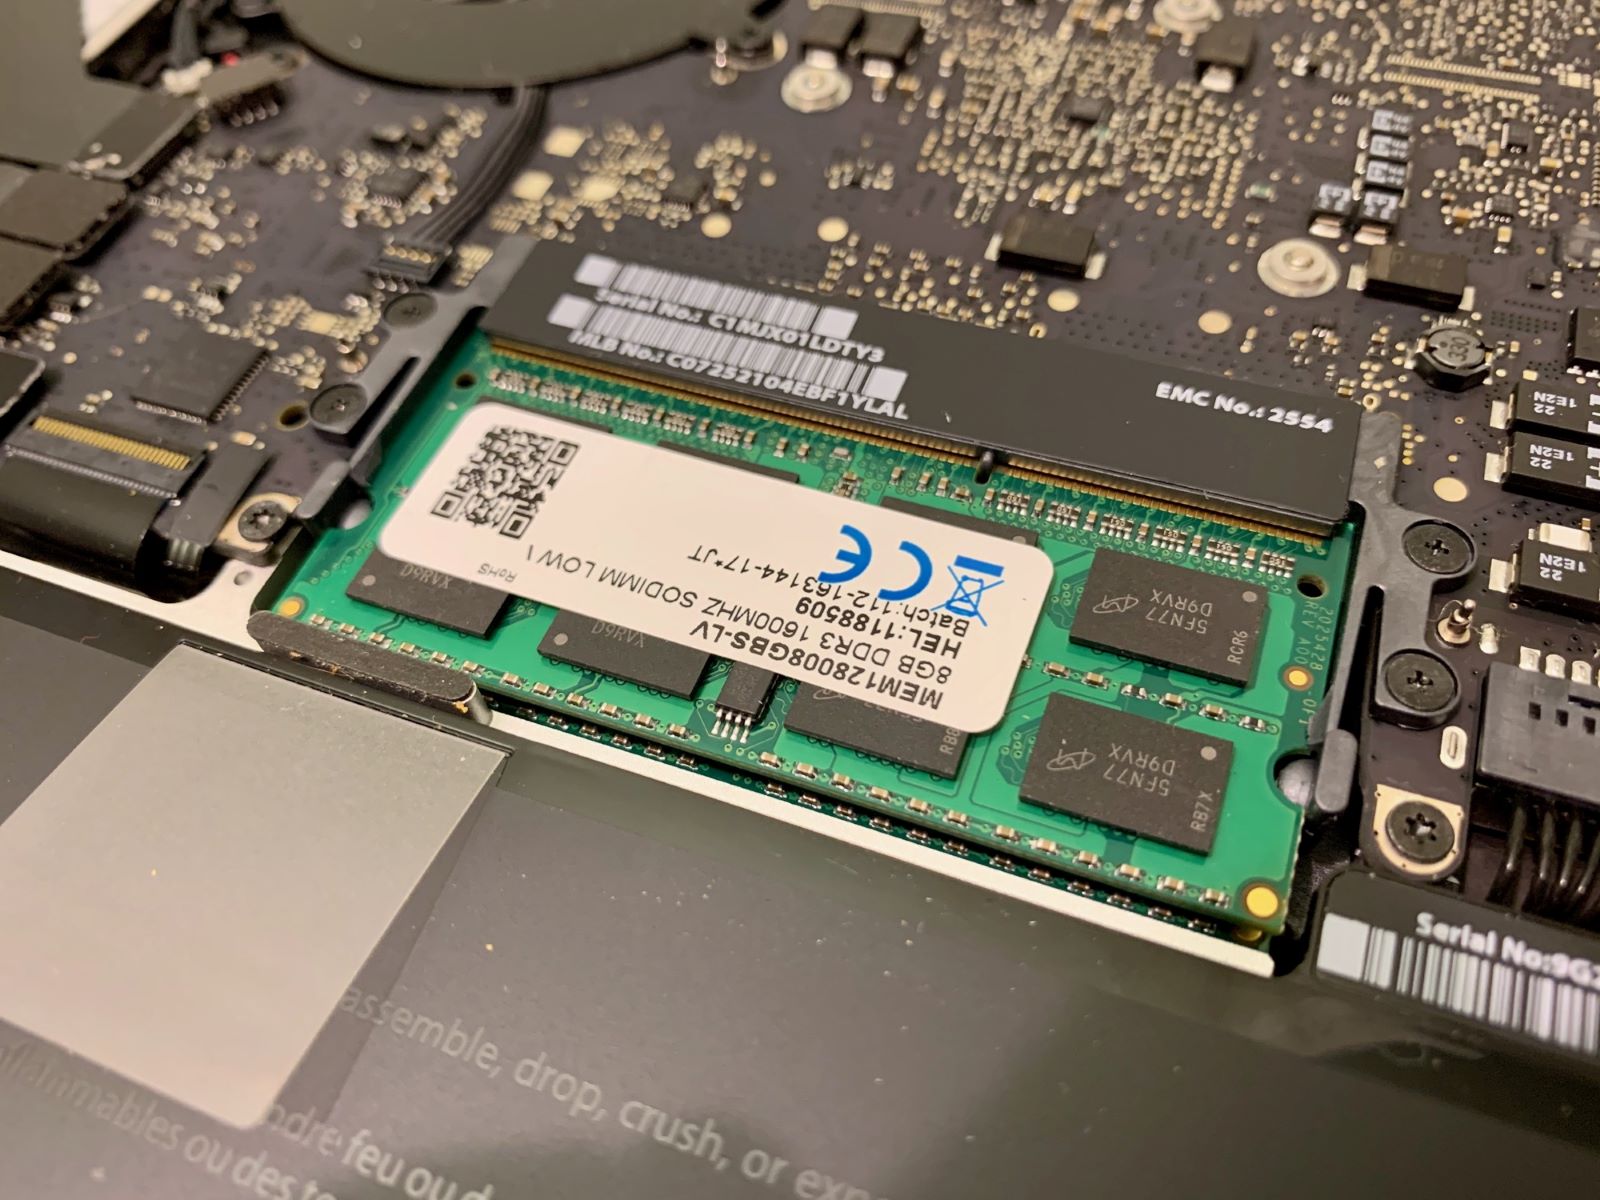
Once you know your MacBook Pro’s model and maximum RAM capacity, it’s time to consider the type and speed of RAM that is compatible with your device. MacBook Pro models typically use DDR3 or DDR4 RAM, with varying speeds depending on the model and year of release. Ensure that the RAM module you choose matches the specifications outlined by Apple for your MacBook Pro model.
It’s also important to consider the number of RAM slots available in your MacBook Pro. Some models have two slots, while others have soldered RAM, meaning they cannot be upgraded. Determine how many slots your MacBook Pro has and how many are currently occupied by RAM modules.
Additionally, keep in mind the recommended or minimum RAM capacity for the software applications and tasks you frequently use. Consult the system requirements for those applications or tasks to determine the optimal amount of RAM for the best performance.
Finally, consider the warranty and any potential impact on it. Upgrading the RAM on your MacBook Pro yourself might void the warranty, so it’s essential to check the terms and conditions outlined by Apple. If your MacBook Pro is still under warranty, consider taking it to an authorized service center for the RAM upgrade.
By checking the compatibility and requirements before proceeding with the RAM upgrade, you’ll ensure that you choose the right RAM module and have a smooth upgrading process. In the next section, we’ll walk you through the step-by-step instructions for upgrading the RAM in your MacBook Pro.
Steps to Upgrade RAM in MacBook Pro
Now that you’ve checked the compatibility and requirements for upgrading the RAM in your MacBook Pro, it’s time to proceed with the actual upgrade. Follow these step-by-step instructions to successfully upgrade the RAM in your MacBook Pro:
- Prepare necessary tools: Gather the required tools, including a small screwdriver, an antistatic wrist strap (optional but recommended), and the new RAM module that is compatible with your MacBook Pro model.
- Backup your data: Before proceeding with any hardware modification, it’s always a good idea to back up your important data. This ensures that your files are safely secured in case of any unforeseen issues during the RAM upgrade process.
- Shut down your MacBook Pro: Power off your MacBook Pro and disconnect any connected peripherals.
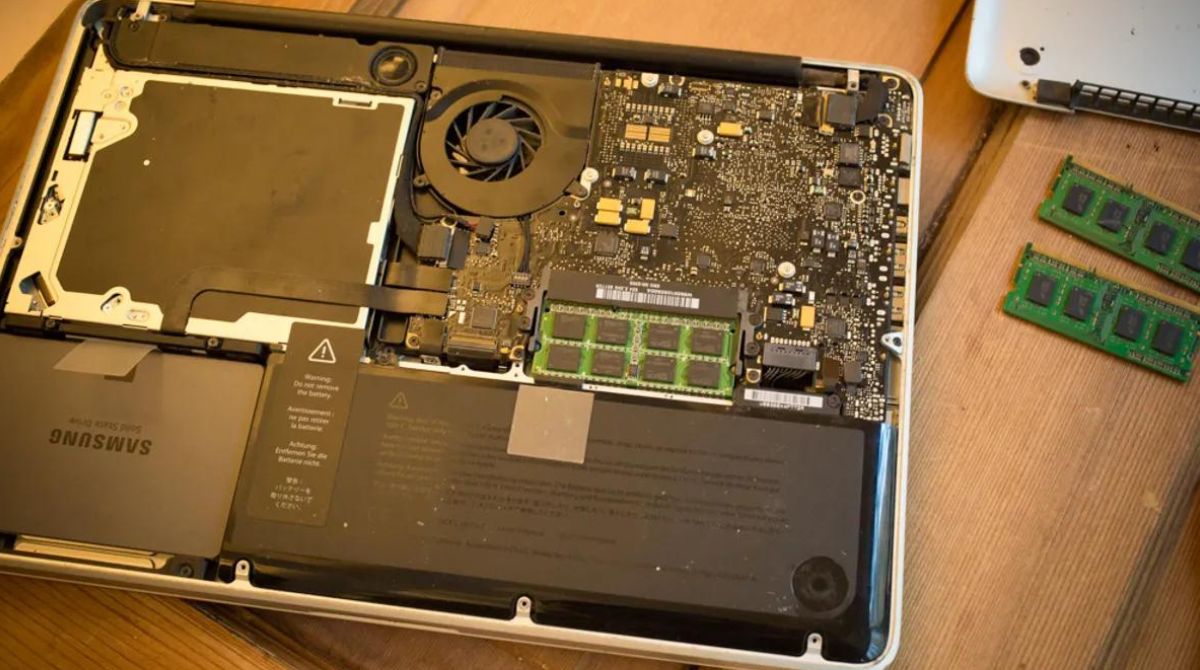
- Remove the bottom case: Using the screwdriver, carefully remove the screws that secure the bottom case of your MacBook Pro. Set the screws aside in a safe place and gently lift the bottom case off the device.
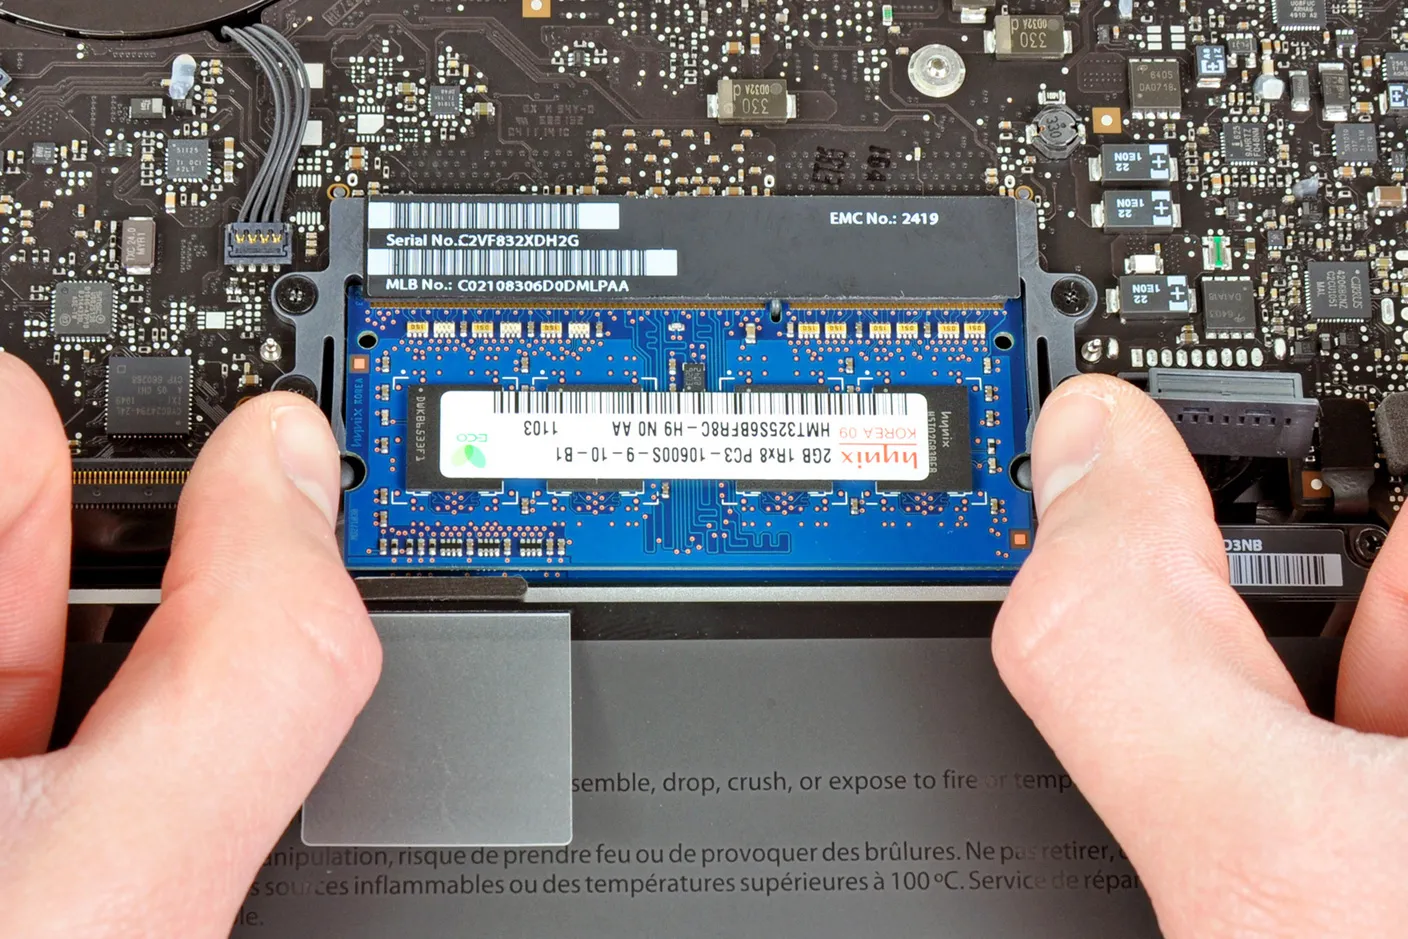
- Locate and remove the existing RAM module: Identify the existing RAM module(s) inside your MacBook Pro. If there are multiple modules, gently spread the retaining clips on each side to release the module. Carefully remove the module from its slot, keeping it in a safe location.
- Install the new RAM module: Take the new RAM module and align it with the slot. Insert it at a 45-degree angle and firmly press it down until the retaining clips snap into place. Ensure that the module is securely seated in the slot.
- Replace the bottom case: Place the bottom case back onto your MacBook Pro and align it with the screw holes. Carefully tighten the screws to secure the bottom case in place, being cautious not to overtighten.
- Power on your MacBook Pro and test the new RAM: Once you’ve replaced the bottom case, power on your MacBook Pro. Check the system information to confirm that the new RAM has been recognized and is functioning correctly. Test your MacBook Pro’s performance by running multiple applications or tasks to ensure a smooth and improved experience.
By following these steps, you’ll be able to successfully upgrade the RAM in your MacBook Pro. Enjoy the enhanced performance and multitasking capabilities of your upgraded device!
Prepare Necessary Tools
The first step in upgrading the RAM in your MacBook Pro is to gather the necessary tools. Having the right tools on hand will ensure a smooth and successful RAM upgrade process. Here are the tools you’ll need:
- Small Screwdriver: A small screwdriver is essential for removing the screws that secure the bottom case of your MacBook Pro. Make sure you have a screwdriver that fits the screws properly to avoid damaging them.
- Antistatic Wrist Strap (optional but recommended): An antistatic wrist strap can help protect your MacBook Pro’s internal components from static electricity. This tool is optional but highly recommended to prevent any potential damage caused by static discharge.
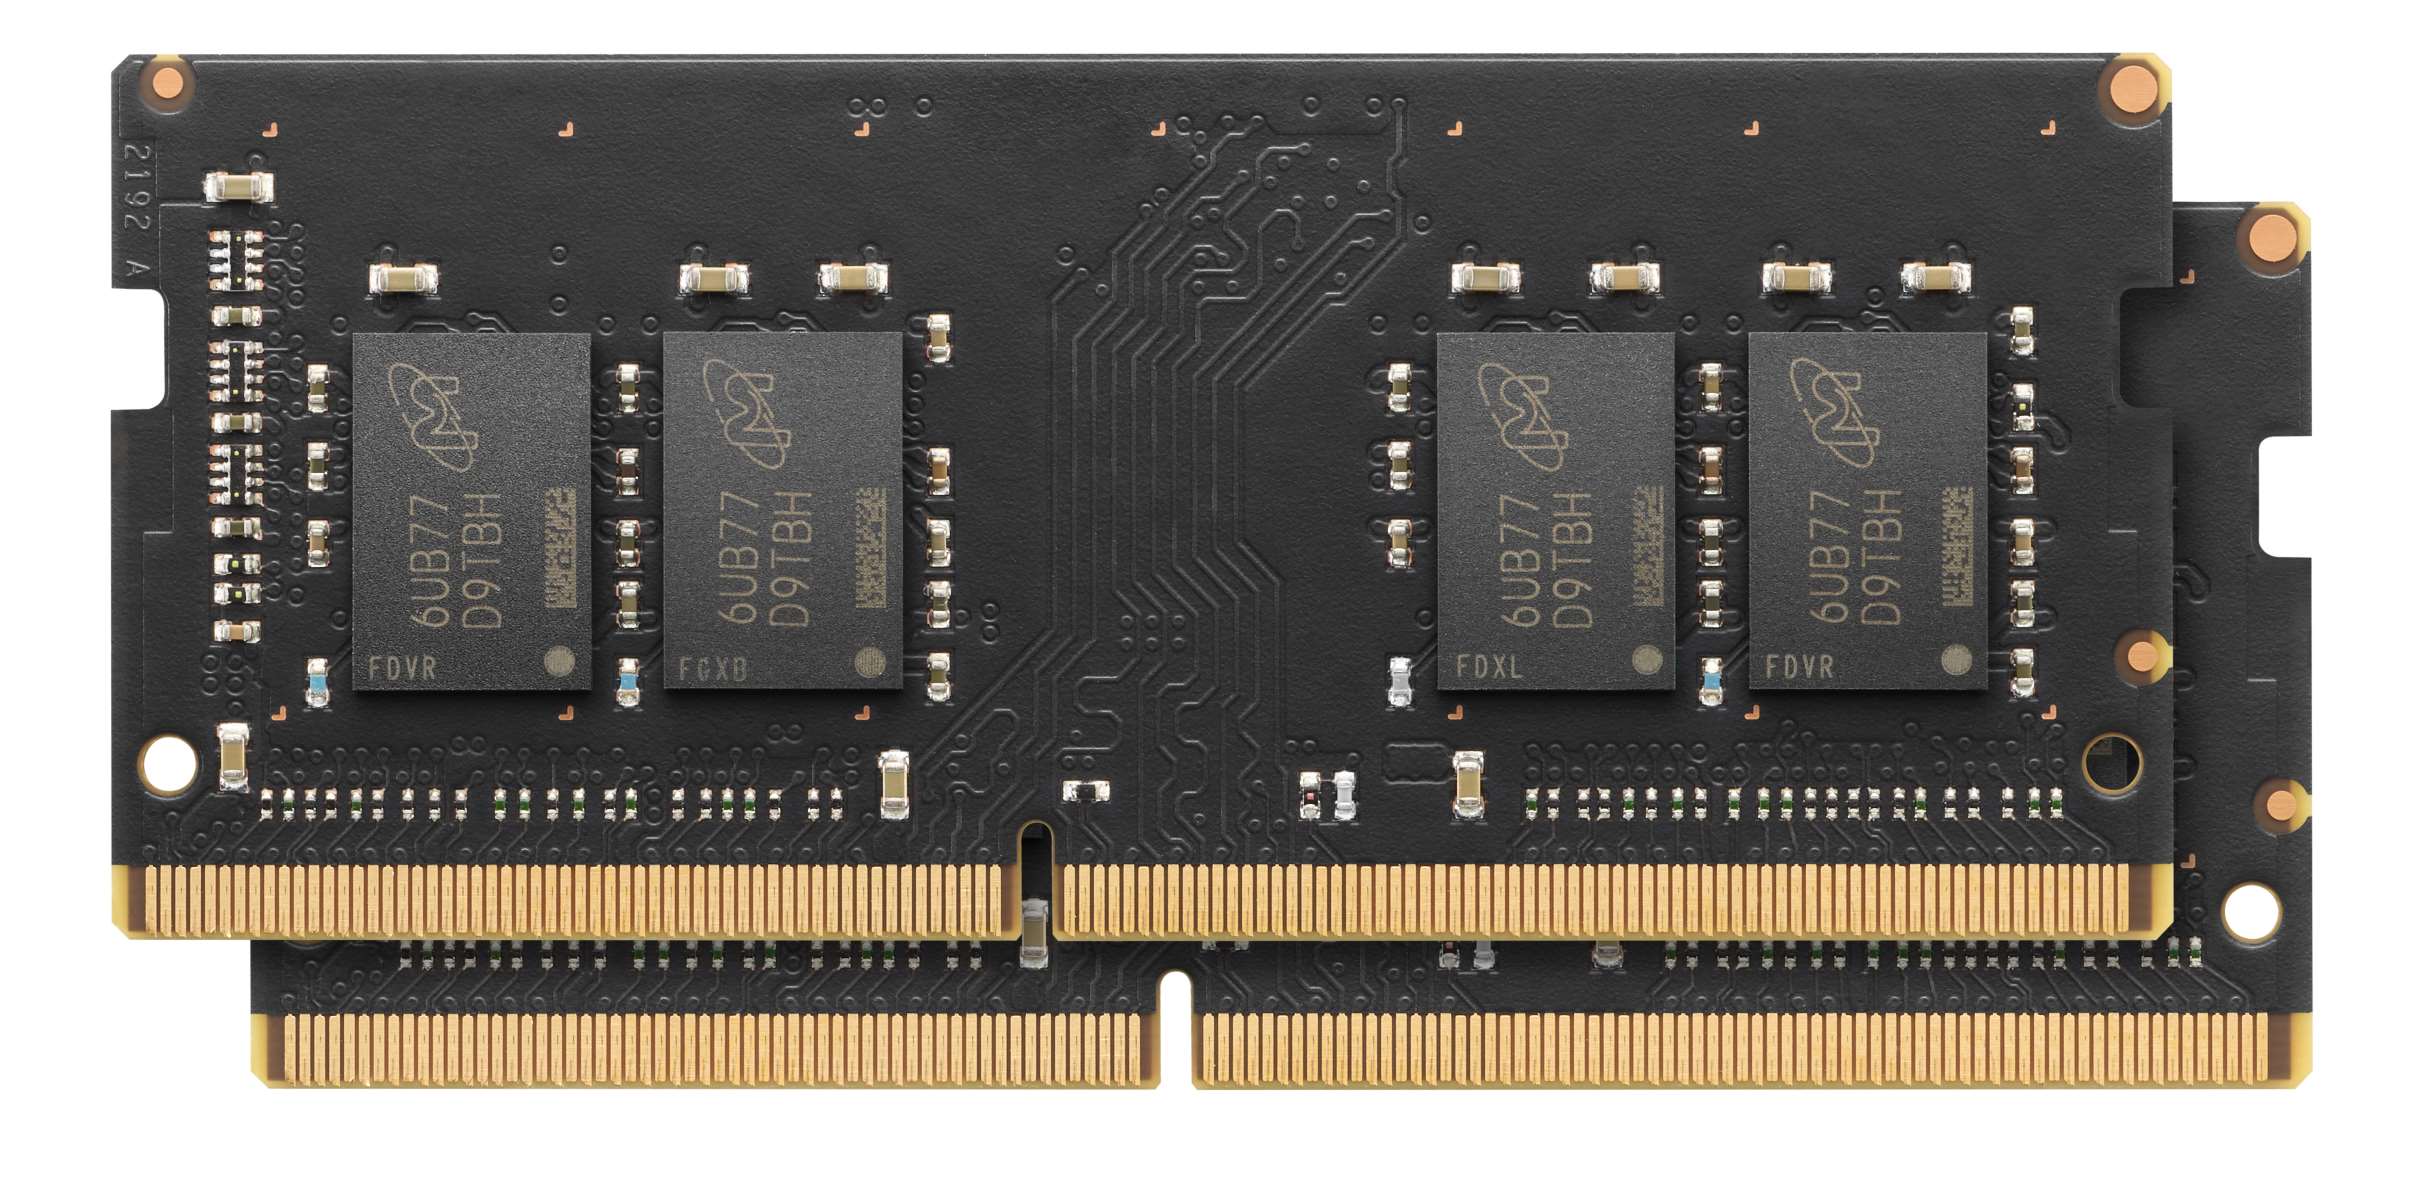
- New RAM Module: You’ll need a new RAM module that is compatible with your MacBook Pro model. Make sure to research and purchase a RAM module that fits your specific MacBook Pro model and meets the required specifications.
Before you begin the RAM upgrade process, ensure that you have these tools readily available. It’s important to use the correct tools to avoid damaging any components during the upgrade.
Additionally, ensure that you are working in a well-lit, clean, and static-free environment. This will minimize the risk of accidental damage or static discharge that could affect the performance and longevity of your MacBook Pro.
Once you have gathered the necessary tools, you’re ready to proceed with the RAM upgrade. In the next step, we’ll highlight the importance of backing up your data before making any modifications to your MacBook Pro.
Backup Your Data
Prior to performing any hardware modification, such as upgrading the RAM in your MacBook Pro, it is crucial to back up your data. Backing up your data ensures that your important files and documents are safe and protected in case of any unforeseen issues during the RAM upgrade process.
There are several methods you can use to back up your data on a MacBook Pro:
- Time Machine: Apple’s built-in backup solution, Time Machine, allows you to easily create automatic backups of your Mac. Connect an external hard drive or use a network drive for Time Machine backups, and ensure that you have enough available storage to accommodate your data.
- iCloud: iCloud provides cloud storage that automatically syncs your files across your devices. You can select which files and data you want to back up to iCloud, including photos, documents, and more. Make sure your iCloud storage has enough space for your data.
- External Hard Drive: Manually copying your important files to an external hard drive is another reliable backup option. Simply connect the external hard drive to your MacBook Pro, create a folder for your files, and copy and paste the data you want to back up.
- Cloud Storage Services: Utilize cloud storage services, such as Google Drive, Dropbox, or Microsoft OneDrive, to store and back up your important files. These services offer varying levels of free and paid storage options.
Choose the backup method that works best for you based on your storage needs and preferences. Ensure that you have enough available space on the chosen backup destination to accommodate all the data you want to back up.
Remember to back up not only your personal files but also any system settings or configurations that are important to you. This will help ensure a seamless transition in case you need to restore your MacBook Pro after the RAM upgrade.
Once you have successfully backed up your data and have a secure copy of your important files, you can proceed with the RAM upgrade process confidently, knowing that your data is protected. In the next step, we’ll shut down your MacBook Pro in preparation for the RAM upgrade.
Shut Down Your MacBook Pro
Before you begin the process of upgrading the RAM in your MacBook Pro, it is essential to properly shut down your device. Shutting down your MacBook Pro ensures that all processes are halted, minimizing the risk of damage or data loss during the RAM upgrade process. Follow these steps to shut down your MacBook Pro:
- Save your work: Prior to shutting down your MacBook Pro, save any open files or unsaved work in the applications you’re using. This will prevent any data loss or unsaved changes when the device powers off.
- Close all applications: Go through each open application on your MacBook Pro and close them one by one. Ensure that no applications are running in the background before proceeding with the shutdown.
- Disconnect external devices: If you have any external devices connected to your MacBook Pro, such as storage drives or peripherals, safely eject and disconnect them from your computer.
- Click on the Apple menu: In the upper-left corner of the screen, click on the Apple menu icon. A drop-down menu will appear.
- Select “Shut Down”: From the drop-down menu, select the “Shut Down” option. A confirmation dialog box will appear.
- Confirm the shutdown: In the confirmation dialog box, click on the “Shut Down” button to initiate the shutdown process. Your MacBook Pro will now begin shutting down.
- Wait for the shutdown to complete: Allow your MacBook Pro an ample amount of time to fully shut down. The screen will go blank, and you may hear the fans stop spinning, indicating that the shutdown process is complete.
Once your MacBook Pro has completely shut down, you are ready to proceed with the RAM upgrade. It is important to wait for the shutdown process to be fully completed before moving on to the next step to avoid any potential interruptions or data corruption. In the next section, we will learn how to remove the bottom case of your MacBook Pro for accessing the RAM slots.
Remove the Bottom Case
In order to access the RAM slots in your MacBook Pro, you’ll need to remove the bottom case. Follow these steps to safely remove the bottom case:
- Ensure your MacBook Pro is shut down: Before proceeding, confirm that your MacBook Pro is completely shut down to avoid any potential damage or data loss.
- Place your MacBook Pro on a soft surface: Find a clean, static-free workspace and place your MacBook Pro on a soft surface such as a microfiber cloth or a soft foam pad. This will protect both your device and the surface from scratches.
- Locate the screws: Flip your MacBook Pro over and locate the screws holding the bottom case in place. The number and placement of screws vary depending on your MacBook Pro model, so ensure you have the right tools (such as a small screwdriver) to remove them.
- Remove the screws: Use your small screwdriver to carefully remove the screws that secure the bottom case. Place the screws in a safe location, such as a small container or a magnetic mat, to prevent them from getting lost during the RAM upgrade process.
- Lift off the bottom case: Gently lift the bottom case from the edge where the screw holes are located. Apply even pressure to gradually separate the bottom case from the MacBook Pro. Be cautious not to force or pry the case, as this can cause damage. Slowly lift off the bottom case and set it aside.
With the bottom case removed, you’ll have access to the internal components of your MacBook Pro, including the RAM slots. Take care to handle the bottom case and screws in a secure and organized manner, as they will need to be reattached later. In the next step, we will guide you through locating and removing the existing RAM module from your MacBook Pro.
Locate and Remove the Existing RAM Module
Now that you have successfully removed the bottom case of your MacBook Pro, it’s time to locate and remove the existing RAM module. Follow these steps to safely locate and remove the RAM module:
- Take precautions: Before handling any internal components, ground yourself by touching a grounded metal surface or wear an antistatic wrist strap to discharge any static electricity that could potentially damage the delicate electronic components.
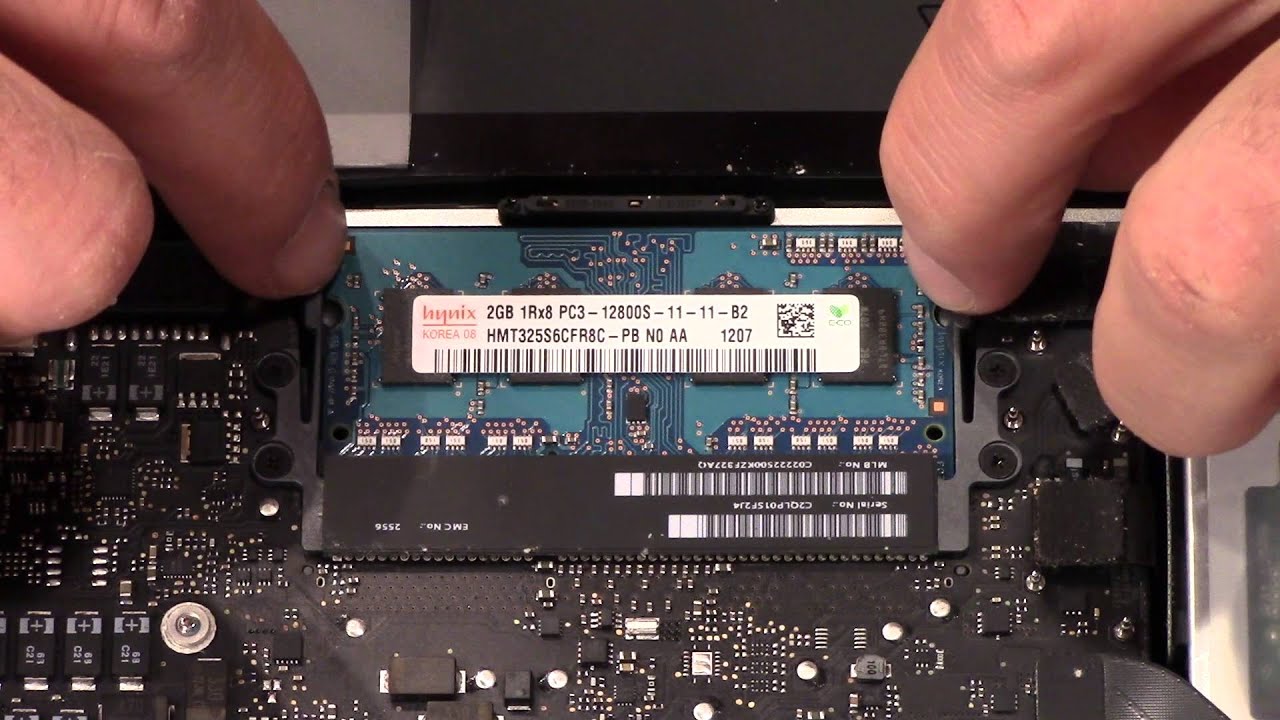
- Identify the RAM modules: Inside your MacBook Pro, you will find one or more RAM modules installed. These modules are typically rectangular in shape and have one or two retaining clips on each side to secure them in place.
- Spread the retaining clips: Gently spread the retaining clips on each side of the existing RAM module. These clips will release the module and allow you to remove it from the slot. Be careful not to apply excessive force or damage the retaining clips.
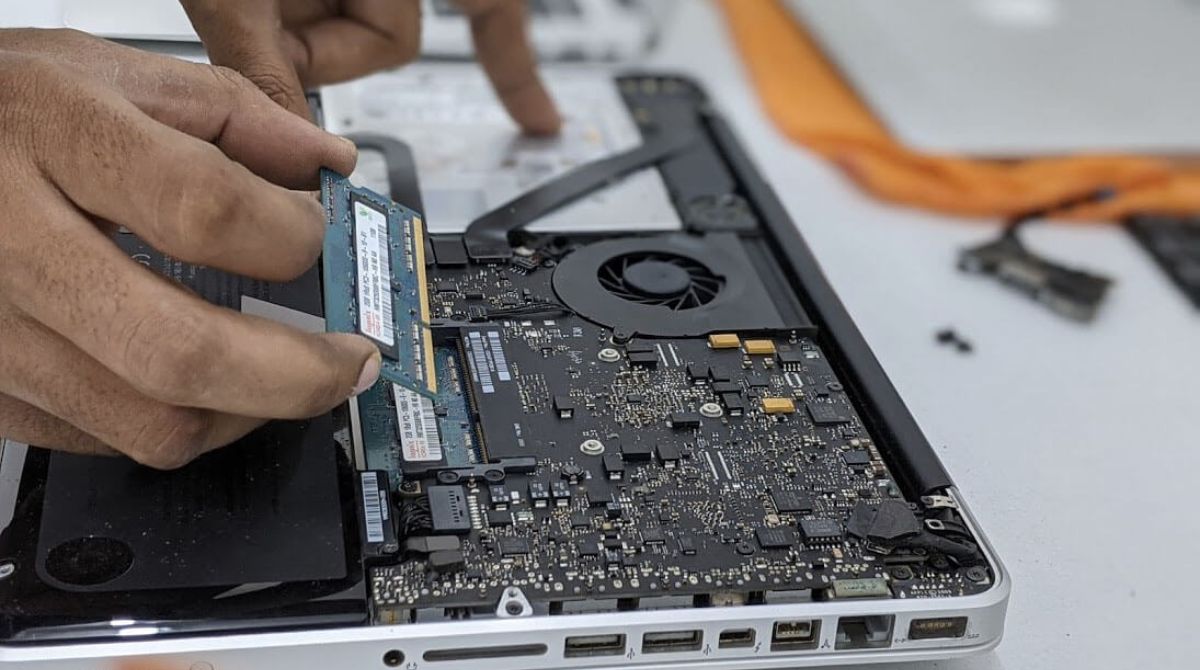
- Remove the RAM module: Once the retaining clips are spread apart, carefully lift the RAM module out of its slot. Hold the module by its edges and avoid touching the gold connectors or any other sensitive components.
- Set aside the removed RAM module: Place the removed RAM module in an anti-static bag or on an antistatic surface to protect it from damage. You may consider keeping it as a backup or selling it if it’s still in good condition.
By following these steps, you have successfully located and removed the existing RAM module from your MacBook Pro. Remember to handle the RAM module with care and avoid touching its sensitive components. In the next section, we will guide you through the process of installing the new RAM module in your MacBook Pro.
Install the New RAM Module
With the existing RAM module removed, it’s time to install the new RAM module into your MacBook Pro. Follow these steps to safely install the new RAM module:
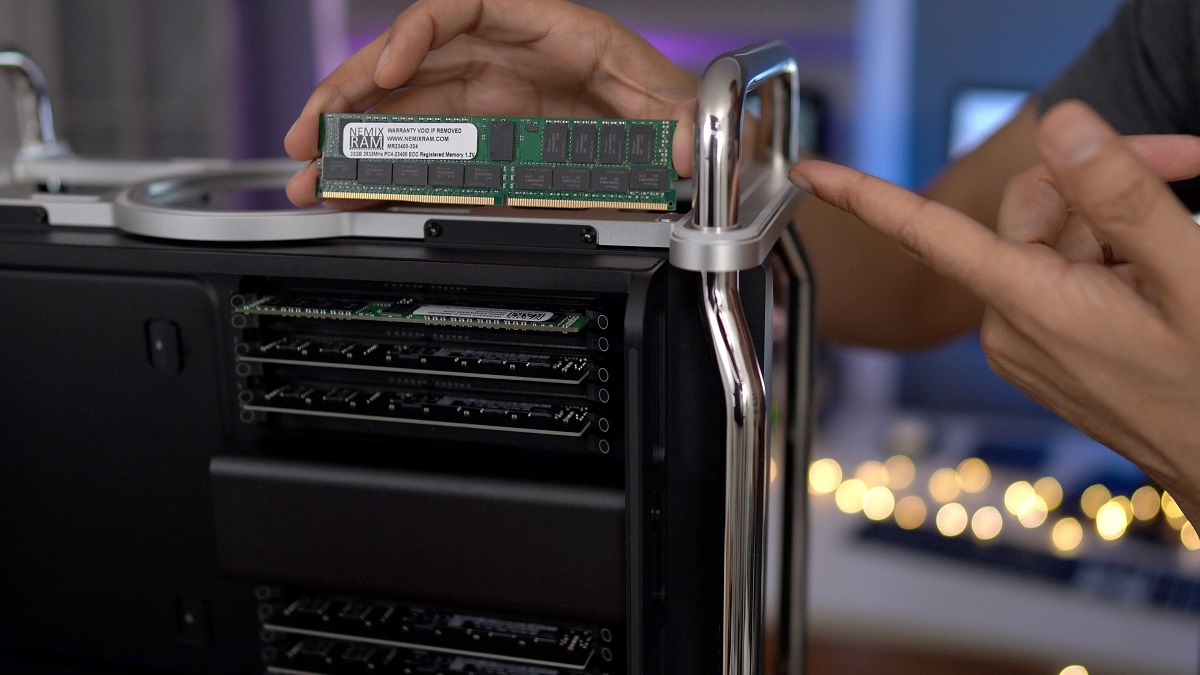
- Take the new RAM module out of its packaging: Remove the new RAM module from its packaging, ensuring you handle it by its edges while avoiding touching the gold connectors or any other sensitive components.
- Align the RAM module with the slot: Take the new RAM module and align it with the slot from which you removed the previous RAM module. Make sure the notch on the module matches the notch on the slot, as this ensures proper alignment.
- Insert the RAM module at a 45-degree angle: Gently insert the RAM module into the slot at a 45-degree angle. Apply even pressure, guiding the module down into the slot until it is fully seated and the gold connectors are no longer visible.
- Secure the RAM module in place: Once the RAM module is fully inserted, gently press down on the module until the retaining clips on both sides snap back into place. You should hear a click or feel a slight resistance, indicating that the module is securely fastened.
- Double-check the installation: Give the new RAM module a gentle wiggle and ensure that it is firmly seated in the slot with the retaining clips holding it securely. A properly installed RAM module should be flush and level within the slot.
By following these steps, you have successfully installed the new RAM module into your MacBook Pro. Ensure that the module is securely seated in the slot to avoid any issues during usage. In the next section, we will guide you on replacing the bottom case of your MacBook Pro.
Replace the Bottom Case
Now that you have successfully installed the new RAM module in your MacBook Pro, it’s time to replace the bottom case. Follow these steps to securely reattach the bottom case:
- Align the bottom case: Take the bottom case and align it with the edges of your MacBook Pro. Ensure that the screw holes on the bottom case align with the corresponding holes on your MacBook Pro.
- Lower the bottom case onto the MacBook Pro: Carefully lower the bottom case onto your MacBook Pro, ensuring that it fits snugly and evenly. Apply slight pressure and make sure it is aligned properly with all edges and corners.
- Tighten the screws: With the bottom case properly aligned, use your screwdriver to tighten the screws that secure the bottom case. Start with one corner screw and then gradually tighten the remaining screws in a diagonal pattern to ensure even pressure distribution.
- Avoid over-tightening: Take care not to over-tighten the screws, as this can damage the screw threads or the bottom case. Tighten them until they are secure but not excessively tight.
With these steps, you have successfully replaced the bottom case of your MacBook Pro. The bottom case should now be securely fastened, providing protection and stability to your MacBook Pro. In the final section, we will guide you on powering on your MacBook Pro and testing the functionality of the new RAM module.
Power On Your MacBook Pro and Test the New RAM
After successfully replacing the bottom case, it’s time to power on your MacBook Pro and test the functionality of the new RAM module. Follow these steps to complete the RAM upgrade process:
- Ensure the bottom case is securely fastened: Double-check that all screws on the bottom case are tightened properly but not overly tight. This ensures that the bottom case is securely attached to your MacBook Pro.
- Connect the power adapter: Plug in the power adapter to ensure your MacBook Pro has sufficient power during the testing process. This helps avoid potential interruptions due to low battery levels.
- Press the power button: Press the power button located on your MacBook Pro’s keyboard to turn on the device. The power button is typically marked with the power symbol (circle with a vertical line).
- Observe the startup: Watch the screen as your MacBook Pro starts up. You may see the Apple logo and a progress bar indicating that the system is booting up. This process may take a few moments.
- Check the system information: Once your MacBook Pro has booted up, click on the Apple menu in the upper-left corner of the screen and select “About This Mac.” In the window that appears, verify that the newly installed RAM module is recognized and correctly displayed.
- Test the new RAM’s performance: Lastly, test the performance of your MacBook Pro with the upgraded RAM. Open multiple applications or engage in resource-intensive tasks to assess the improved multitasking capabilities and overall performance. Notice any differences in speed, responsiveness, and smoothness.
If your MacBook Pro successfully recognizes the new RAM module and functions smoothly without any issues, congratulations! You have successfully upgraded the RAM in your MacBook Pro and enhanced its performance. Enjoy the improved multitasking and efficiency that comes with the upgraded RAM.
However, if you experience any issues or your MacBook Pro does not recognize the new RAM module, double-check the installation and compatibility. Revisit the previous steps to ensure that the RAM is properly seated and aligned. If problems persist, consider seeking assistance from a certified technician or Apple support.
With that, you’ve reached the end of the RAM upgrade process. You can now enjoy the enhanced performance and capabilities of your upgraded MacBook Pro. Happy computing!
Conclusion
Congratulations on successfully upgrading the RAM in your MacBook Pro! By following the step-by-step instructions in this guide, you have enhanced the performance and multitasking capabilities of your device.
Upgrading the RAM in your MacBook Pro provides several benefits, including improved performance, enhanced multitasking, increased system responsiveness, and optimized performance for resource-intensive applications. It is a cost-effective way to boost your MacBook Pro’s capabilities and extend its lifespan.
Before starting the RAM upgrade process, it’s crucial to check the compatibility and requirements of your MacBook Pro. Know your MacBook Pro model, its maximum RAM capacity, and the recommended RAM specifications.
Throughout the process, ensure that you handle the components with care, take precautions against static electricity, and follow proper installation techniques. Always remember to back up your data prior to any hardware modification to avoid data loss or damage.
Once you have successfully installed the new RAM module and reattached the bottom case, power on your MacBook Pro and test the functionality of the upgraded RAM. Check the system information to confirm that the new RAM module is recognized, and evaluate the performance by running multiple applications or engaging in resource-intensive tasks.
If everything is working smoothly, you can now enjoy the improved performance and efficiency of your MacBook Pro. If any issues arise, double-check the installation and compatibility or seek assistance from a certified technician.
Thank you for following this comprehensive guide on how to upgrade the RAM in your MacBook Pro. With the upgraded RAM, your MacBook Pro is now better equipped to handle demanding tasks and provide you with a seamless computing experience. Happy computing!