Introduction
Upgrading your MacBook Pro to a solid-state drive (SSD) can significantly enhance the performance and overall experience of your device. With faster boot times, quicker application launches, and improved data transfer speeds, this upgrade is a worthwhile investment for any MacBook Pro owner.
In this article, we will explore the benefits of upgrading to an SSD and guide you through the process of upgrading your MacBook Pro. Whether you have an older MacBook Pro or a newer model, this step-by-step guide will help you navigate the process and unleash the full potential of your device.
By transitioning from a traditional hard drive to an SSD, you’ll notice a remarkable boost in your MacBook Pro’s speed and responsiveness. With the increasing demand for faster and more efficient computing, an SSD upgrade is a practical solution to keep up with these demands.
Not only does an SSD improve the overall performance, but it also enhances the durability of your MacBook Pro. Unlike traditional hard drives, SSDs have no moving parts, making them more resistant to shock and vibration. This means improved reliability and reduced chances of data loss.
Furthermore, an SSD upgrade allows for better power efficiency. SSDs consume significantly less power than traditional hard drives, which translates to longer battery life for your MacBook Pro. This is particularly beneficial for users who rely on their MacBook Pro for productivity on the go.
Before we dive into the upgrade process, it’s important to understand the compatibility of SSDs with your MacBook Pro model. While most modern MacBook Pro models are compatible with SSD upgrades, it’s always recommended to check the documentation or consult with a professional if you are unsure.
Now that you understand the benefits and compatibility, let’s move on to the preparations required before upgrading your MacBook Pro to an SSD. These preparations will ensure a smooth transition and safeguard your data throughout the process.
Benefits of Upgrading to an SSD
Upgrading your MacBook Pro to a solid-state drive (SSD) offers a wide range of benefits that can greatly enhance your overall computing experience. Let’s take a closer look at the advantages of making this upgrade:
- Increased Speed: One of the primary benefits of upgrading to an SSD is the significant increase in speed. Unlike traditional hard drives, SSDs have no moving parts, allowing them to access and retrieve data at lightning-fast speeds. This means faster boot times, quicker application launches, and seamless multitasking.
- Improved Performance: With an SSD, your MacBook Pro will operate more efficiently and handle resource-intensive tasks with ease. Whether you’re editing videos, designing graphics, or running complex software, an SSD ensures that your system runs smoothly without any lag or slowdown.
- Enhanced Durability: Unlike traditional hard drives, SSDs are not susceptible to mechanical failures or damage caused by shock or vibration. The absence of moving parts makes SSDs more resistant to physical damage, ensuring that your data remains protected even in rugged environments.
- Better Battery Life: SSDs consume significantly less power than traditional hard drives, resulting in improved battery life for your MacBook Pro. This means you can enjoy longer usage times on a single charge, making it ideal for users who rely on their laptops for productivity on the go.
- No Noise: Traditional hard drives have spinning disks and moving parts, which can generate noise and vibrations. SSDs, on the other hand, are completely silent as they have no moving components. This means a quieter and more peaceful computing experience.
- Compact and Lightweight: SSDs are smaller and lighter than traditional hard drives, allowing for more portable and lightweight MacBook Pro configurations. This makes it a great option for users who prioritize mobility and travel frequently with their devices.
In summary, upgrading your MacBook Pro to an SSD offers a multitude of benefits, including increased speed, improved performance, enhanced durability, longer battery life, noise reduction, and a more portable form factor. These advantages significantly enhance your overall computing experience and ensure that your MacBook Pro performs at its best for years to come.
Understanding SSDs and Compatibility
In order to successfully upgrade your MacBook Pro to a solid-state drive (SSD), it’s important to have a good understanding of what an SSD is and its compatibility with your device.
An SSD is a storage device that uses flash memory to store data, unlike traditional hard drives that use spinning disks. This difference in technology provides several advantages, such as faster access times, improved reliability, and energy efficiency.
When it comes to compatibility, most modern MacBook Pro models are compatible with SSD upgrades. However, it’s always recommended to check the specifications and documentation of your specific MacBook Pro model before purchasing an SSD.
One factor to consider is the form factor of the SSD. MacBook Pros typically use either the M.2 form factor or the PCIe form factor. Make sure to choose an SSD that matches the form factor of your MacBook Pro to ensure proper installation.
Another consideration is the interface. MacBook Pros usually have either the SATA (Serial ATA) or the NVMe (Non-Volatile Memory Express) interface for the storage drive. It’s important to match the interface of the SSD with the interface of your MacBook Pro to ensure compatibility.
Additionally, it’s worth noting the capacity and speed of the SSD. Consider your storage needs and choose an SSD with sufficient capacity to accommodate your files, programs, and operating system. SSDs also come in different speed variations, so you may opt for a faster SSD if you require high-performance capabilities.
If you’re unsure about the compatibility or installation process, it’s always a good idea to consult with a professional or refer to the manufacturer’s documentation. They can provide you with the necessary guidance and ensure that you choose the right SSD for your MacBook Pro.
Understanding the basics of SSDs and their compatibility with your MacBook Pro is crucial before embarking on the upgrade journey. By selecting the right SSD and ensuring compatibility, you can maximize the benefits of the upgrade and experience the improved performance and efficiency that an SSD offers.
Preparations before Upgrading
Before you begin the process of upgrading your MacBook Pro to a solid-state drive (SSD), it’s essential to make a few preparations to ensure a smooth transition and safeguard your data. Here are the key steps you should take:
1. Backup Your Data: Before any major hardware change, it’s crucial to back up your important files, documents, and settings. This allows you to restore your data in case of any unforeseen issues during or after the upgrade process. You can use Time Machine to create a complete backup or manually copy your files to an external storage device.
2. Update Your Operating System: It’s recommended to update your MacBook Pro’s operating system to the latest version before proceeding with the upgrade. This ensures that your system is optimized for the new SSD and minimizes compatibility issues that may arise.
3. Gather the Necessary Tools and Materials: To successfully install the SSD, you’ll need a few tools and materials. These typically include a screwdriver (specific to your MacBook Pro model), an anti-static wristband (to protect against static electricity), and of course, the SSD itself. Refer to the manufacturer’s instructions or consult with a professional to ensure you have all the required tools and materials.
4. Create a Bootable Installer: To install the operating system on your new SSD, you’ll need a bootable installer. This can be created using a USB drive and the macOS installer application, which can be downloaded from the Mac App Store. Follow the instructions provided by Apple to create a bootable installer.
5. Familiarize Yourself with the Upgrade Process: It’s a good idea to familiarize yourself with the upgrade process by reviewing the manufacturer’s instructions or watching tutorial videos. This will give you a clear understanding of the steps involved and help you avoid any potential pitfalls during the installation process.
6. Arrange a Clean and Static-Free Workspace: Ensure that you have a clean and static-free workspace to work on your MacBook Pro. Dust and static electricity can potentially damage your device or components, so it’s important to minimize these risks by working in a controlled environment.
By following these preparations, you can set yourself up for a successful upgrade and reduce the chances of encountering any difficulties throughout the process. Taking the time to backup your data, update your operating system, gather the necessary tools, and familiarize yourself with the upgrade process will help ensure a smooth and hassle-free transition to the new SSD.
Backing Up Your Data
Before embarking on the process of upgrading your MacBook Pro to a solid-state drive (SSD), it is absolutely crucial to back up your data. This ensures that you have a copy of all your important files and settings in case of any unforeseen issues during or after the upgrade. Here’s what you need to do:
1. Time Machine: The most convenient way to back up your data is by using Time Machine, a built-in backup solution provided by macOS. Connect an external hard drive to your MacBook Pro and set it up as the designated Time Machine backup disk. Once configured, Time Machine will automatically back up your entire system, including documents, apps, settings, and even the operating system itself.
2. Manual Backup: If you prefer more control over the backup process or do not have an external hard drive for Time Machine, you can manually back up your important files. Simply copy the desired files and folders to an external storage device such as a USB flash drive or an external hard drive. Take care to include documents, photos, videos, music, and any other content you deem important.
3. Cloud Storage Services: Another option for backing up your data is to utilize cloud storage services such as iCloud, Google Drive, Dropbox, or OneDrive. These services allow you to store your files securely in the cloud, accessible from any device with an internet connection. Simply upload your important files to the cloud storage service of your choice and ensure they are synced and up to date.
4. Verify the Backup: Regardless of the method you choose, it’s essential to verify the integrity of your backup. Ensure that your backup files can be accessed and opened correctly to avoid any surprises or data loss after the upgrade. Double-check that all the essential files and settings are included in the backup.
Backing up your data is an essential precautionary step before upgrading to an SSD. It provides you with peace of mind knowing that your valuable files and settings are safely stored and easily recoverable. Whether you opt for Time Machine, manual backups, or cloud storage services, the most important thing is to have a reliable backup solution in place before proceeding with the upgrade.
Tools and Materials You’ll Need
Before upgrading your MacBook Pro to a solid-state drive (SSD), it’s important to gather the necessary tools and materials to ensure a smooth and successful installation. Here’s a list of the key items you’ll need:
- Screwdriver: The specific type of screwdriver required will depend on your MacBook Pro model. Most MacBook Pros require a Phillips #00 or Torx T5 screwdriver for removing the screws that secure the bottom panel and the hard drive.
- Anti-static Wristband: An anti-static wristband is recommended to protect your MacBook Pro and the SSD from any potential damage caused by static electricity. This helps to prevent any static discharge that could potentially harm electronic components.
- SSD: Of course, you’ll need the SSD itself. Ensure that you choose an SSD that is compatible with your MacBook Pro model in terms of form factor and interface. Take into consideration the capacity and speed of the SSD as well, based on your storage needs and performance preferences.
- External Enclosure (optional): If you want to transfer your data from the old hard drive to the new SSD, an external enclosure can be handy. This allows you to connect the old hard drive externally to your MacBook Pro and easily migrate the data onto the new SSD.
- Microfiber Cloth: A microfiber cloth is useful for wiping down your MacBook Pro and ensuring a clean workspace before and during the upgrade process. Cleaning the surface and components of your MacBook Pro helps to prevent any dirt or debris from interfering with the installation.
It’s important to note that the specific tools and materials required may vary depending on your MacBook Pro model and the manufacturer’s instructions for the SSD. It’s always recommended to refer to the documentation provided by the SSD manufacturer or consult with a professional if you have any doubts.
Prior to beginning the upgrade process, ensure that you have all the necessary tools and materials readily available. This will help you work efficiently and minimize the chances of any additional complications or delays during the installation.
Step-by-Step Guide to Upgrading Your MacBook Pro to SSD
Upgrading your MacBook Pro to a solid-state drive (SSD) can greatly enhance its performance and overall user experience. Follow these step-by-step instructions to successfully upgrade your MacBook Pro:
- Prepare Your Workspace: Start by powering off your MacBook Pro and disconnecting any peripherals. Place your MacBook Pro on a clean and static-free surface to avoid any potential damage or static discharge.
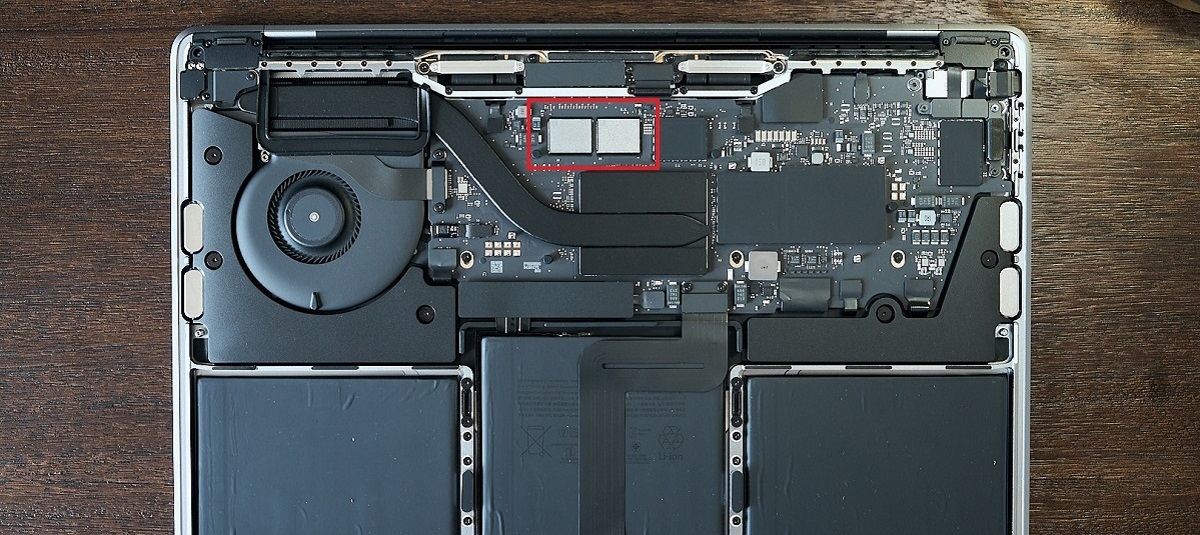
- Remove the Bottom Panel: Use the appropriate screwdriver to remove the screws securing the bottom panel of your MacBook Pro. Carefully lift off the panel to expose the internal components.
- Locate and Disconnect the Old Hard Drive: Identify the old hard drive, usually located on the right side of the MacBook Pro. Gently disconnect the SATA or PCIe connector, carefully removing any tape or adhesive if necessary.
- Install the SSD: Take out the new SSD from its packaging and align it with the connector slot. Connect the SSD to the appropriate interface (SATA or PCIe) and ensure a secure connection. If required, use the provided screws or adhesive to fasten the SSD in place.
- Replace the Bottom Panel: Once the SSD is securely installed, place the bottom panel back onto your MacBook Pro and tighten the screws to secure it in place.
- Create a Bootable Installer: Connect a USB flash drive containing the bootable installer to your MacBook Pro. Power on your MacBook Pro while holding down the Option key to access the boot menu. Select the USB drive as the startup disk and follow the on-screen instructions to boot from the installer.
- Install the Operating System: Once booted from the USB drive, select the option to install the operating system. Follow the prompts to select the destination drive (your new SSD) and complete the installation process.
- Restore Your Data (Optional): If you previously created a backup using an external enclosure, you can now use it to connect your old hard drive to your MacBook Pro. Use the migration tools provided by the operating system to transfer your files and settings from the old hard drive to your new SSD.
- Verify and Test: After the installation and data transfer, ensure that your MacBook Pro is functioning properly. Check that the SSD is recognized and that your files and settings are intact.
Please note that the specific steps may vary depending on your MacBook Pro model and the manufacturer’s instructions for the SSD. Always refer to the documentation provided by the SSD manufacturer or consult with a professional if you have any doubts or encounter any issues during the upgrade process.
By following these step-by-step instructions, you can successfully upgrade your MacBook Pro to an SSD and enjoy improved performance, faster boot times, and a more responsive computing experience.
Removing the Old Hard Drive
Before installing a new solid-state drive (SSD) in your MacBook Pro, you’ll need to remove the old hard drive. Follow these steps to safely remove the old hard drive:
- Preparation: Power off your MacBook Pro and disconnect any connected peripherals. Place your MacBook Pro on a clean and static-free surface to prevent any potential damage.
- Remove the Bottom Panel: Use the appropriate screwdriver to remove the screws securing the bottom panel of your MacBook Pro. Set aside the screws in a safe place and carefully remove the panel to expose the internal components.
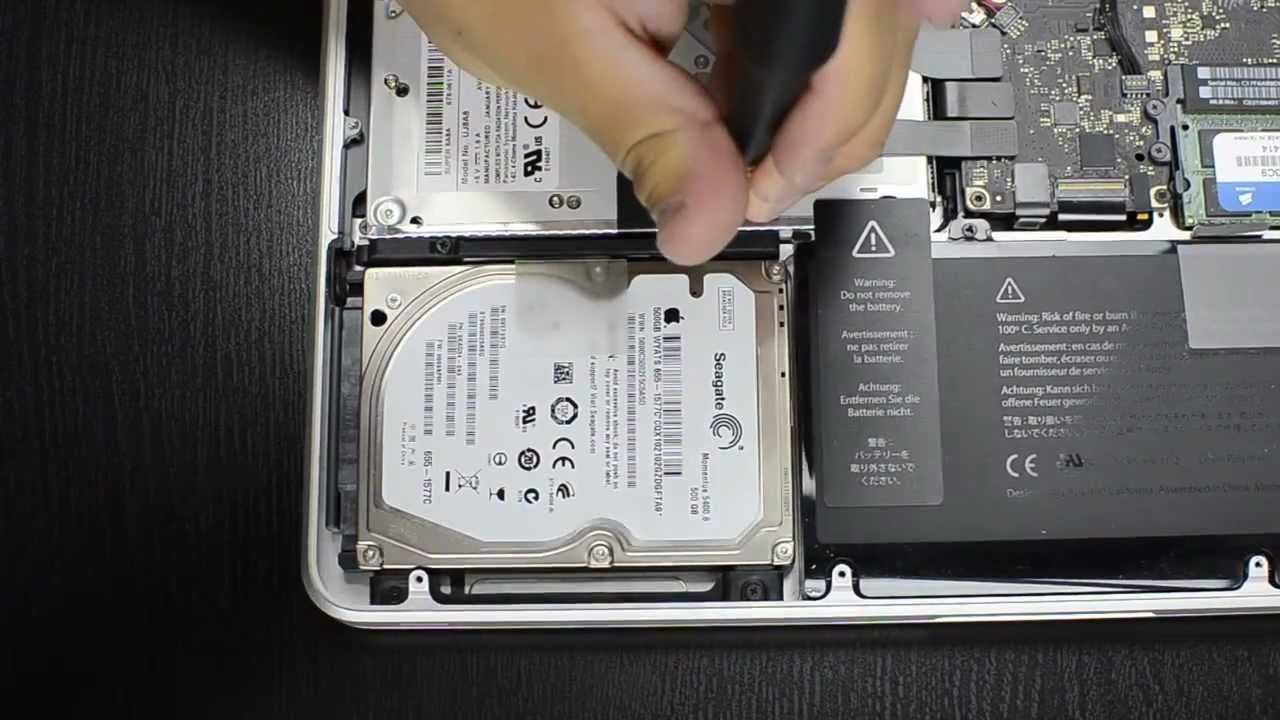
- Locate the Old Hard Drive: Identify the location of the old hard drive, usually on the right side of the MacBook Pro. It may be covered by a bracket or held in place by screws.
- Disconnect Cables and Adhesive: Gently disconnect the SATA or PCIe connector attached to the old hard drive. If there are any adhesive strips securing the drive, carefully peel them off while applying gentle pressure.
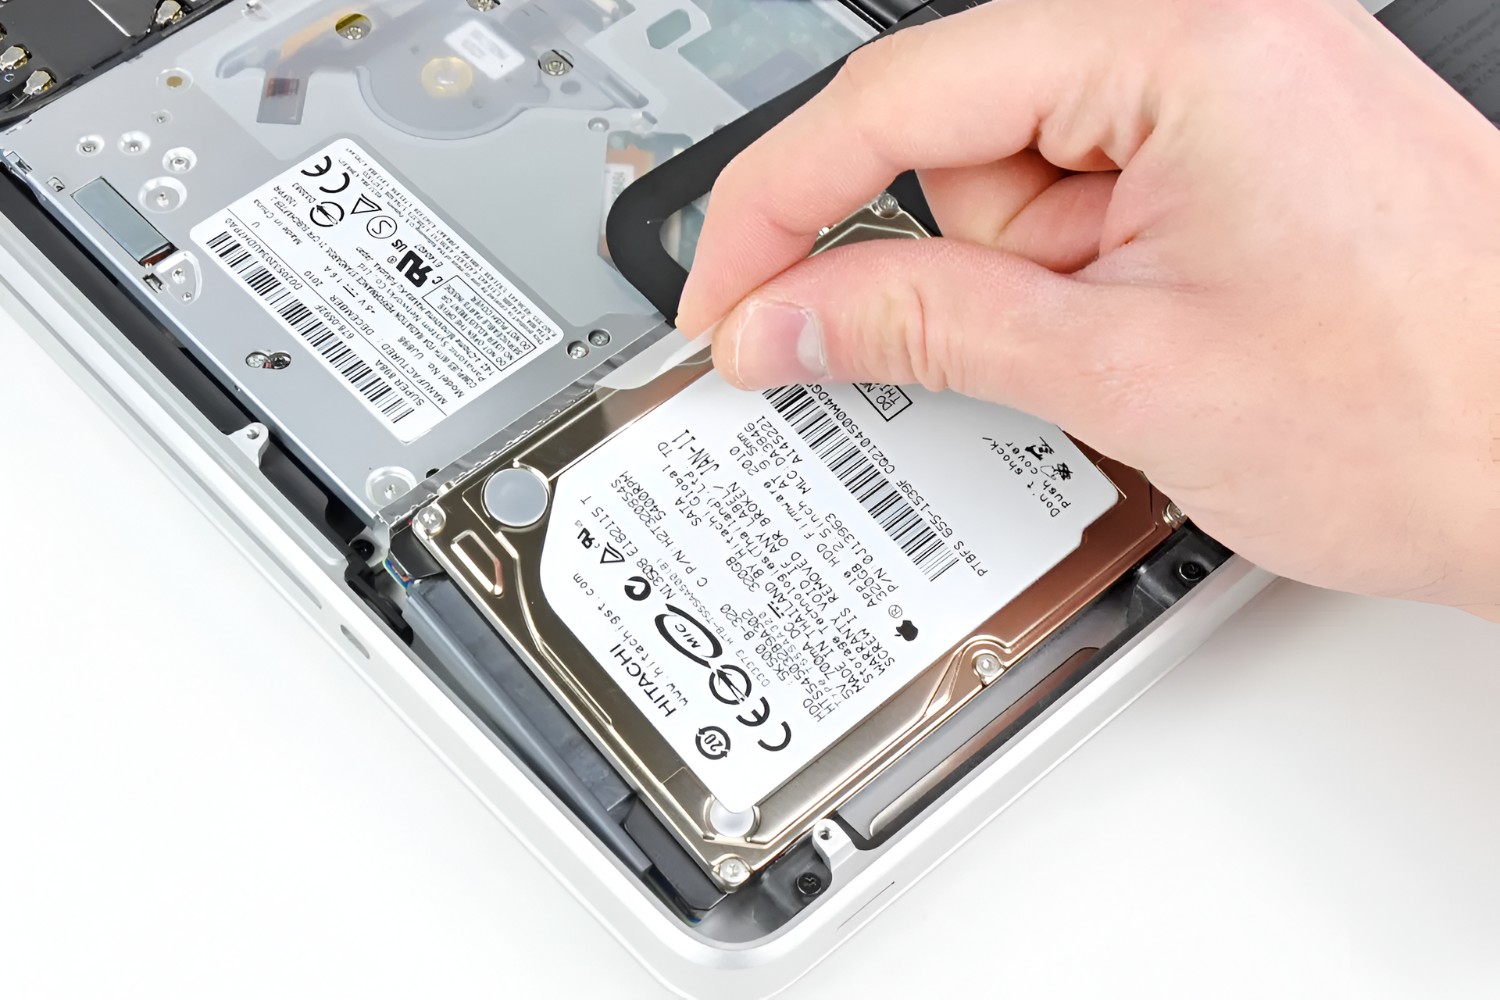
- Remove the Old Hard Drive: Once all the cables and adhesive are detached, carefully slide the old hard drive out of its slot. Take care not to exert unnecessary force or damage any other components in the process.
- Set Aside the Old Hard Drive: Place the removed hard drive in a safe and secure location. If you plan on reusing the old hard drive or extracting data from it, make sure to handle it with care and protect it from physical damage or static discharge.
It’s important to note that the removal process may vary slightly depending on your MacBook Pro model. Always refer to the manufacturer’s instructions or consult with a professional if you have any doubts or encounter any difficulties during the process.
Now that you have successfully removed the old hard drive from your MacBook Pro, you can proceed with installing the new SSD and enjoy the improved performance and efficiency it brings.
Installing the New SSD
Now that you’ve removed the old hard drive from your MacBook Pro, it’s time to install the new solid-state drive (SSD). Follow these steps to safely and securely install the new SSD:
- Prepare the SSD: Take the new SSD out of its packaging and familiarize yourself with its form factor and connectors. Check for any installation instructions or additional components provided by the manufacturer.
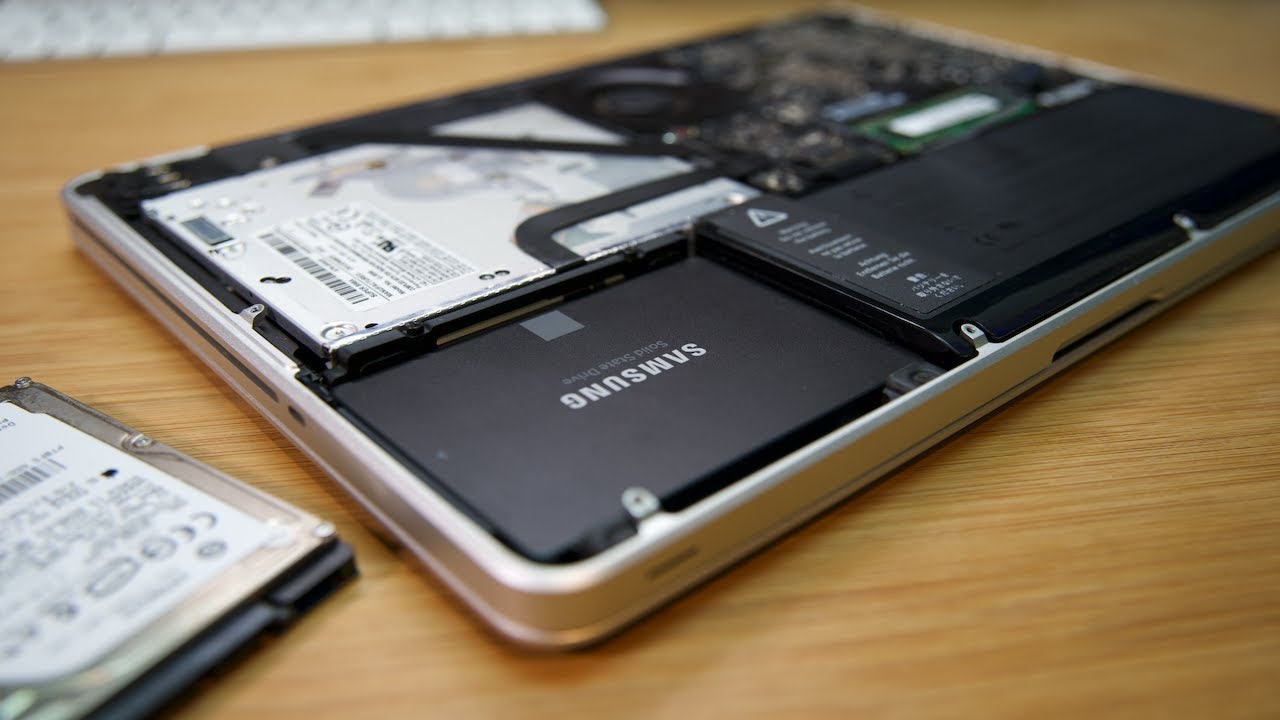
- Locate the SSD Slot: Identify the slot where the new SSD will be installed in your MacBook Pro. It’s usually located in the same area where the old hard drive was housed.
- Align the SSD: Carefully align the connector on the SSD with the corresponding slot in your MacBook Pro. Ensure that the connectors are correctly positioned before gently pushing the SSD into the slot.
- Secure the SSD in Place: Depending on your MacBook Pro model, there may be screws or adhesive strips to secure the SSD in place. If screws are provided, carefully insert and tighten them to ensure a secure fit. If adhesive strips are used, follow the manufacturer’s instructions to attach them to the SSD and secure it to the MacBook Pro’s frame.
- Double-Check the Connection: Once the SSD is securely installed, double-check the connection to ensure it is fully seated and properly aligned. It should be snug and not loose. Be cautious not to apply excessive force that could damage the SSD or other components.
It’s important to note that the installation process may vary slightly depending on your MacBook Pro model and the specific instructions provided by the SSD manufacturer. Always refer to the documentation or consult with a professional if you have any doubts or encounter any difficulties during the installation.
By following these steps, you can successfully install the new SSD in your MacBook Pro. The new SSD will provide improved performance, faster data transfer speeds, and enhanced overall efficiency. In the next step, we will move on to configuring the new SSD and preparing it for use.
Configuring Your New SSD
After successfully installing the new solid-state drive (SSD) in your MacBook Pro, it’s time to configure it and prepare it for use. Follow these steps to configure your new SSD:
- Power On Your MacBook Pro: Connect your MacBook Pro to a power source and press the power button to turn it on. Wait until the MacBook Pro completes the boot process and reaches the macOS setup screen.
- Select Language and Region: Choose your preferred language and region settings when prompted. This will ensure that your MacBook Pro’s operating system is set up correctly.
- Connect to Wi-Fi: If your MacBook Pro was previously connected to a Wi-Fi network, it should automatically try to reconnect. If not, select your Wi-Fi network from the available options and enter the necessary credentials to establish a connection.
- Agree to the Terms and Conditions: Read and accept the terms and conditions presented during the setup process. This is a standard procedure required to use macOS and continue with the configuration of your new SSD.
- Create or Sign in to Your Apple ID: If you already have an Apple ID, sign in with your credentials. If you don’t have one, you can create an Apple ID during this step. An Apple ID is useful for accessing iCloud, the App Store, and other Apple services.
- Choose Data Migration Options (Optional): If you backed up your data using an external enclosure or other backup methods, you can choose to migrate your data from the old hard drive to the new SSD. Follow the on-screen prompts and select the option to transfer data from a backup source.
- Set Up Touch ID and Apple Pay (if applicable): If your MacBook Pro has Touch ID capability, you can set it up during this step. This allows you to securely authenticate with your fingerprint and use features like Apple Pay.
- Set Up Siri (if desired): If you want to use Siri on your MacBook Pro, you can enable it during the setup process. Siri is a voice-activated assistant that can help you with various tasks and provide information.
- Complete the Setup Process: Follow the remaining on-screen instructions to complete the setup of your MacBook Pro with the new SSD. This may include choosing privacy settings, setting up a password, and customizing your preferences.
Once the setup process is complete, your MacBook Pro is now configured and ready to use with the new SSD. Enjoy the improved performance, faster data access, and enhanced efficiency that the SSD provides.
If you encounter any difficulties during the configuration process or need further assistance, refer to the macOS documentation or seek professional help to ensure a seamless setup.
Restoring Your Data
After configuring your new solid-state drive (SSD) in your MacBook Pro, it’s time to restore your data from your backup. Follow these steps to successfully restore your data:
- Connect Your Backup Source: If you used an external enclosure or other backup method, connect your backup source (such as the old hard drive) to your MacBook Pro. Ensure that it is securely connected.
- Power On Your MacBook Pro: Turn on your MacBook Pro and wait until it reaches the macOS setup screen. Follow the initial setup prompts until you reach the “Apps & Data” screen.
- Select Restore from Time Machine Backup: Choose the option to restore your data from a Time Machine backup. If you used a different backup method, select the appropriate option, such as “Restore from External Storage” or “Transfer from Another Mac”.
- Choose the Backup Source: Select the backup source that contains your saved data. This may be your Time Machine backup disk, the external enclosure, or another backup source you used during the backup process.
- Select the Data to Restore: Choose the specific data you want to restore to your MacBook Pro. This includes files, applications, and settings. You can restore everything or select specific items based on your preferences.
- Start the Restore Process: Begin the restore process and wait for your MacBook Pro to transfer the selected data from the backup source to the new SSD. The duration may vary depending on the size of your data and the speed of your backup source.
- Follow Post-Restore Setup: Once the restore process is complete, your MacBook Pro will restart. Follow any remaining on-screen prompts to complete the setup, such as signing in to your Apple ID, setting up iCloud, and customizing your preferences.
- Verify the Restored Data: After completing the setup, ensure that your data has been correctly restored to your MacBook Pro. Open applications, access documents, and check settings to ensure everything is as it was prior to the upgrade.
If you encounter any issues during the restoration process or if any data is missing, consult the documentation for your specific backup method or seek professional assistance. It’s essential to verify that all important files and settings have been successfully restored before continuing to use your upgraded MacBook Pro.
By following these steps, you can restore your data from a backup source and resume using your MacBook Pro with all your files, applications, and settings intact on the new SSD.
Troubleshooting Tips
While upgrading your MacBook Pro to a solid-state drive (SSD) is generally a straightforward process, there may be occasions when unexpected issues arise. Here are some troubleshooting tips to help you overcome common problems that you might encounter during the upgrade:
- Problem: SSD not detected by the MacBook Pro.
Solution: Ensure that the SSD is properly connected and securely seated in the SSD slot. Try disconnecting and reconnecting the SSD, making sure the connections are aligned correctly. If the problem persists, consult the documentation for your specific MacBook Pro model or contact the manufacturer’s support for further assistance. - Problem: Slow performance or freezing after SSD installation.
Solution: Ensure that the SSD firmware is up to date by checking the manufacturer’s website for any available updates. Also, verify that the operating system on your MacBook Pro is updated to the latest version. If the issue continues, consider reformatting the SSD and reinstalling the operating system to ensure a clean installation. - Problem: Incompatible SSD or improper installation.
Solution: Double-check the compatibility of the SSD with your MacBook Pro model. Verify that you have followed the installation instructions correctly, including aligning connectors, securing screws or adhesive strips, and ensuring a proper fit. If unsure, consult the manufacturer’s documentation or seek professional assistance. - Problem: Data not restored from the backup.
Solution: Check that your backup source is connected and accessible. Ensure that you have selected the correct backup source and chosen the appropriate data to restore. If using Time Machine, make sure your backup disk has the necessary space and that the backup was completed successfully. If the issue persists, consult the backup method’s documentation or seek help from Apple support or a professional technician. - Problem: Random system crashes or instability after SSD upgrade.
Solution: Check that all connections are secure and that the SSD is properly seated in the slot. Verify that the SSD is compatible with your MacBook Pro model and that you are using the latest firmware and operating system updates. If the issue persists, seek assistance from the SSD manufacturer or consult a professional technician for diagnostics and further troubleshooting.
If you encounter any other issues during or after the SSD upgrade process, always refer to the manufacturer’s documentation, online forums, or professional assistance for guidance. Remember to exercise caution and consult professionals if you are unsure or uncomfortable troubleshooting on your own.
By applying these troubleshooting tips, you can overcome common problems that may arise during the upgrade process and ensure a successful transition to an SSD-powered MacBook Pro.
Conclusion
Upgrading your MacBook Pro to a solid-state drive (SSD) is a valuable investment that can significantly enhance the speed, performance, and overall user experience of your device. By following the step-by-step guide provided, you can successfully upgrade your MacBook Pro to an SSD and enjoy the benefits it brings.
Throughout the article, we discussed the benefits of upgrading to an SSD, including increased speed, improved performance, enhanced durability, extended battery life, and quiet operation. We also explored the importance of understanding SSDs and compatibility with your MacBook Pro, as well as the preparations required before beginning the upgrade process.
We provided detailed instructions on backing up your data and gathering the necessary tools and materials. We then walked you through the step-by-step process of removing the old hard drive, installing the new SSD, configuring it, and restoring your data from a backup source.
In addition, we covered troubleshooting tips to help you overcome common issues that may arise during the upgrade process, ensuring a smooth and successful transition to the new SSD.
By upgrading to an SSD, you can unlock the full potential of your MacBook Pro, enjoying faster boot times, quicker application launches, improved multitasking capabilities, and enhanced durability. The performance boost and improved efficiency provided by the SSD will make your MacBook Pro feel like a brand new machine.
Remember to always refer to the manufacturer’s documentation, online forums, or seek professional assistance if you encounter difficulties or uncertainties during the upgrade process. It’s important to approach the upgrade with caution and ensure compatibility and proper installation.
With the knowledge and instructions provided in this article, you are now equipped with the necessary information to successfully upgrade your MacBook Pro to an SSD. Enjoy the enhanced performance and improved computing experience that the SSD brings to your MacBook Pro.