Introduction
Welcome to the world of MacBook Pro, the beloved laptop series that has become a staple of creativity and productivity. Whether you are a student, a professional, or a casual user, one of the key factors that contribute to the exceptional performance of MacBook Pro is the solid-state drive (SSD) it employs.
An SSD is a revolutionary form of storage that has drastically transformed the computing landscape, offering faster speeds, improved durability, and enhanced power efficiency. In this article, we will explore the importance of SSDs in the context of MacBook Pro, highlighting their advantages, functionality, and compatibility options.
As traditional hard disk drives (HDDs) gradually lose their relevance, SSDs have emerged as the go-to solution for storage needs, delivering superior performance and outstanding reliability. Understanding the benefits and intricacies of SSDs can help you make informed decisions when it comes to upgrading your MacBook Pro or troubleshooting any storage-related issues.
So, whether you’re a technology enthusiast, a MacBook Pro owner, or simply curious about the inner workings of modern laptops, join us on this journey as we delve into the fascinating world of SSDs on MacBook Pro.
What is an SSD?
An SSD, or solid-state drive, is a type of storage device that has revolutionized the way data is stored and accessed in modern computers, including the MacBook Pro. Unlike traditional hard disk drives (HDDs) that use a spinning magnetic platter, an SSD utilizes flash memory technology to store and retrieve data quickly and efficiently.
Flash memory is a non-volatile memory that retains data even when power is removed, making it highly reliable and ideal for use in portable devices like laptops. With no moving parts, SSDs offer a range of advantages over HDDs, including faster data transfer speeds, improved durability, lower power consumption, and increased shock resistance.
One of the key elements that sets SSDs apart from HDDs is their access time. While HDDs require time to physically move the read/write head to the correct location on the spinning disk, SSDs can access data almost instantaneously. This significantly reduces the boot time of the MacBook Pro and improves overall system performance.
Furthermore, SSDs have no mechanical limitations, allowing them to access multiple data locations simultaneously. This allows for faster multitasking and smoother operation, making SSD-equipped MacBook Pros highly efficient for tasks such as video editing, graphic design, and data analysis.
In terms of physical design, SSDs are typically smaller and lighter than HDDs. This compact form factor not only contributes to the sleek and portable design of MacBook Pros but also makes them more resistant to physical damage caused by drops or shocks. The absence of moving parts also means that SSDs produce less heat and operate silently, enhancing the overall user experience.
Overall, SSDs offer a significant performance boost and enhanced user experience compared to traditional HDDs. With faster access times, improved durability, and increased energy efficiency, SSDs have become an essential component in modern MacBook Pro laptops, ensuring that you can accomplish your tasks quickly and smoothly.
The Advantages of Using an SSD on a MacBook Pro
Upgrading to an SSD on your MacBook Pro can bring a multitude of advantages that enhance both performance and user experience. Let’s explore some of the key benefits of using an SSD:
- Speed and Performance: SSDs offer significantly faster data transfer speeds compared to traditional HDDs. This means that applications launch quickly, files open instantly, and overall system responsiveness is greatly improved. With an SSD, you can experience a snappy and smooth computing experience, enabling you to work efficiently and effortlessly.
- Improved Battery Life: SSDs are more power-efficient than HDDs. Since SSDs do not have any moving parts, they require less energy to operate, resulting in extended battery life on your MacBook Pro. This is particularly beneficial for users who need to work on the go or rely heavily on their laptops throughout the day.
- Durability and Reliability: The absence of mechanical components in SSDs makes them more resistant to shock, vibration, and other physical impacts. Unlike HDDs, which can be susceptible to damage if dropped or exposed to excessive movement, SSDs can withstand such mishaps, ensuring that your valuable data remains safe and secure.
- No Noise: SSDs operate silently, as they do not have any spinning disks or moving parts. This not only reduces background noise but also contributes to a more tranquil and distraction-free working environment, allowing you to focus on your tasks without any annoying fan noise or disk whirrs.
- Compact and Lightweight: SSDs are physically smaller and lighter than HDDs, making them an excellent fit for the sleek and portable design of MacBook Pros. The compact form factor not only contributes to the overall aesthetics of the laptop but also adds to its portability. With an SSD-equipped MacBook Pro, you can enjoy a lightweight and easy-to-carry device without compromising on storage capacity.
By harnessing the power of an SSD, your MacBook Pro can deliver exceptional performance, extended battery life, improved durability, and a silent computing experience. Whether you’re a student, professional, or creative enthusiast, upgrading to an SSD can significantly enhance your productivity and make every interaction with your MacBook Pro a delightful experience.
How Does an SSD Work in a MacBook Pro?
To understand how an SSD works in a MacBook Pro, let’s delve into its inner workings:
At the core of an SSD is the concept of flash memory, which is a type of non-volatile storage that retains data even when power is removed. The flash memory in an SSD is organized into cells, which are further divided into pages and blocks. Each cell represents a binary state, either storing a 1 or a 0.
When data is written to an SSD, it is stored in the form of electrical charges within the flash memory cells. To write data, the SSD uses an electrical charge to change the state of a cell. To erase data, the charge is removed, restoring the cell to its original state.
The key component that facilitates data transfer in an SSD is the controller. The controller acts as the brain of the SSD, managing read and write operations, optimizing performance, and handling error correction. It also contains firmware that controls various functionalities of the SSD, such as wear leveling, garbage collection, and encryption.
When you access data on an SSD in your MacBook Pro, the controller locates the data by referencing the logical address associated with it. It then retrieves the data from the appropriate flash memory cells and sends it to the computer’s memory for processing. This process is considerably faster than the mechanical movements required by HDDs.
Another important aspect of SSD operation is wear leveling. As data is written and erased in an SSD, certain cells can wear out over time. Wear leveling ensures that all cells are used evenly, mitigating the wear and tear on specific areas of the SSD and prolonging its lifespan.
Furthermore, SSDs employ various technologies to improve performance. One such technology is the use of cache memory, which acts as a buffer and stores frequently accessed data for faster retrieval. Trim, another technology, helps maintain optimal performance by marking deleted data as available for overwriting, reducing write amplification and extending the life of the drive.
In summary, an SSD in a MacBook Pro utilizes flash memory and a sophisticated controller to store and retrieve data quickly and efficiently. By eliminating the mechanical components found in traditional HDDs, SSDs deliver faster access times, increased durability, and improved reliability, making them an essential component in modern MacBook Pro laptops.
Types of SSDs Compatible with MacBook Pro
There are a few different types of SSDs that are compatible with MacBook Pro laptops. Let’s explore the options:
- SATA SSDs: SATA (Serial ATA) SSDs are the most common type and are compatible with most MacBook Pro models. They use the SATA interface, which is the same interface used by traditional hard disk drives (HDDs). SATA SSDs are available in various form factors, including the standard 2.5-inch size and the M.2 form factor. These SSDs offer a significant performance boost over HDDs but may not reach the maximum potential of newer MacBook Pro models.
- PCIe SSDs: PCIe (Peripheral Component Interconnect Express) SSDs are a newer and faster type of SSD that utilize the PCIe interface. These SSDs connect directly to the motherboard’s PCIe slots, offering faster data transfer speeds compared to SATA SSDs. PCIe SSDs are available in different generations, including PCIe 3.0 and PCIe 4.0, with the latter offering even higher speeds. MacBook Pro models from 2013 onwards are compatible with PCIe SSDs, with some later models having multiple PCIe slots for expansion options.
- NVMe SSDs: NVMe (Non-Volatile Memory Express) SSDs are a subset of PCIe SSDs and provide even faster performance. NVMe SSDs utilize the NVMe protocol, which is specifically designed to optimize the performance of flash storage. These SSDs offer extremely fast read and write speeds, making them ideal for demanding tasks such as video editing and data analysis. NVMe SSDs are compatible with newer MacBook Pro models released from 2015 onwards.
- Apple-Specific SSDs: Apple has also introduced its proprietary SSDs specifically designed for MacBook Pro models. These SSDs are customized to work seamlessly with Apple’s hardware and software, offering optimized performance and compatibility. Apple-specific SSDs are typically available as upgrades or replacements through Apple’s authorized service providers. However, they may have limited options compared to third-party SSDs.
When considering an SSD upgrade or replacement for your MacBook Pro, it’s important to ensure compatibility with your specific model. Checking the MacBook Pro’s specifications or consulting Apple’s official documentation can help determine the type of SSD your MacBook Pro supports.
Ultimately, the type of SSD you choose depends on your specific needs and budget. SATA SSDs provide a significant improvement over HDDs, while PCIe and NVMe SSDs offer even faster speeds for power users and professionals. Consider your storage requirements, performance demands, and budget constraints to select the SSD that best suits your MacBook Pro.
How to Tell if Your MacBook Pro Has an SSD
If you’re unsure whether your MacBook Pro is equipped with an SSD or a traditional hard disk drive (HDD), there are a few simple ways to determine the type of storage your laptop has:
- About This Mac: Start by clicking on the Apple menu in the top-left corner of your screen and selecting “About This Mac.” In the Overview tab, you should see a summary of your MacBook Pro’s specifications. Look for the “Storage” section, which will indicate whether you have an SSD or HDD.
- System Information: Another way to check the storage type is by accessing the System Information of your MacBook Pro. Go to the Apple menu, select “About This Mac,” and then click on the “System Report” button. In the System Information window that opens, navigate to the “Hardware” section and click on “Storage.” Here, you will find detailed information about the storage media, including the interface and model.
- Physical Appearance: In some cases, you may be able to visually identify whether your MacBook Pro has an SSD. SSDs are typically smaller and more compact compared to traditional HDDs. If your MacBook Pro is slim and lightweight, it is likely to have an SSD. On the other hand, if your laptop has a thicker and bulkier design, it might be equipped with an HDD.
- Performance Characteristics: One of the telltale signs of having an SSD is the speed and responsiveness of your MacBook Pro. SSDs offer faster boot times and quicker app launches compared to HDDs. If your MacBook Pro exhibits these characteristics, it is likely to be equipped with an SSD.
It’s important to note that some MacBook Pro models may have both an SSD and an HDD. In such cases, the SSD is typically used for the operating system and frequently accessed files, while the HDD provides additional storage capacity for less critical data.
If you’re still uncertain about the type of storage in your MacBook Pro, consider consulting Apple’s official documentation or contacting Apple support for further assistance. Identifying the type of storage your MacBook Pro has can be helpful for troubleshooting, upgrading, or optimizing your laptop’s performance and storage capabilities.
Upgrading to an SSD on a MacBook Pro
Upgrading your MacBook Pro with an SSD can bring significant performance improvements and enhance your overall computing experience. Here’s a guide on how to upgrade to an SSD:
- Identify your MacBook Pro model: Determine the exact model of your MacBook Pro to ensure compatibility with the SSD you plan to install. Check the model identifier by going to the Apple menu and selecting “About This Mac.” Note down the model information.
- Choose the right SSD: Select an SSD that is compatible with your MacBook Pro model. Consider factors such as storage capacity, performance, brand reputation, and budget. You can choose from reputable brands like Samsung, Crucial, Kingston, and Western Digital. Research and read customer reviews to make an informed decision.
- Back up your data: Before performing any hardware upgrades, it is crucial to back up all your data. Create a complete backup using Time Machine or a cloud-based storage service to ensure that your files are safe and easily restorable.
- Gather necessary tools: Depending on your MacBook Pro model, you may need specific tools to open the laptop and install the SSD. Commonly needed tools include screwdrivers (typically Philips or Torx), spudgers, and tweezers. Ensure you have the necessary tools on hand before proceeding with the upgrade.
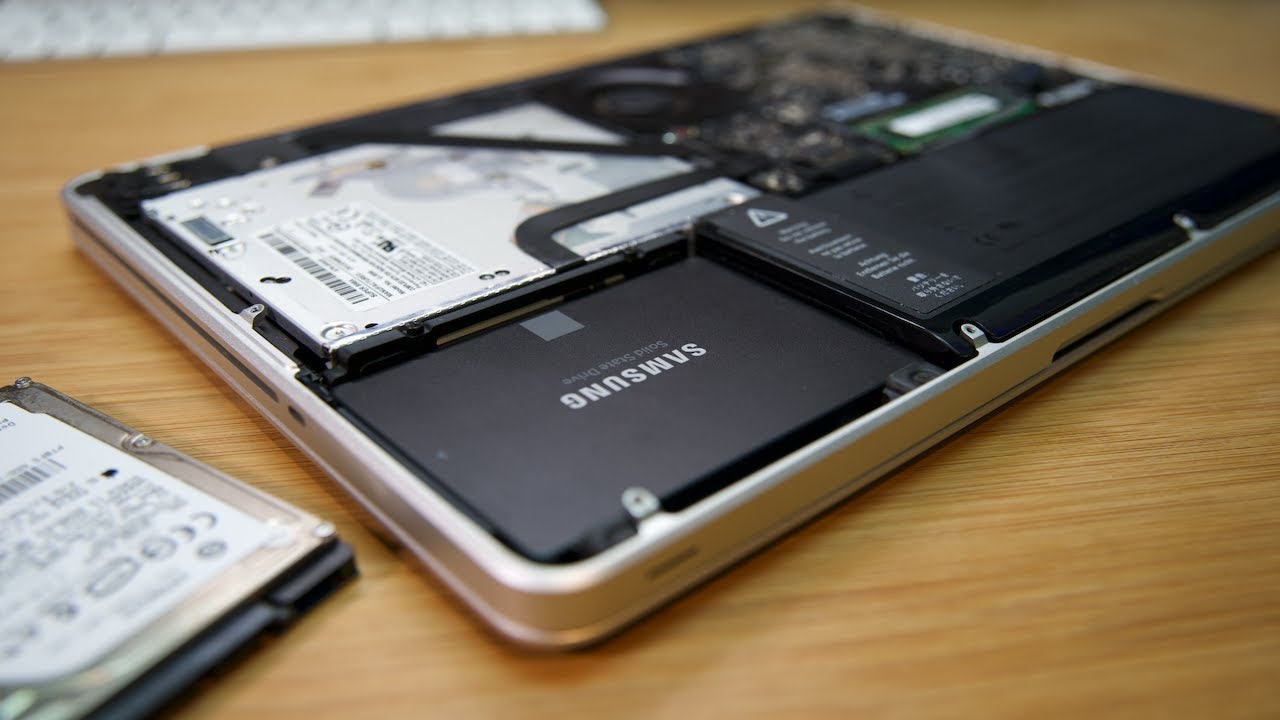
- Install the SSD: Follow the manufacturer’s instructions or consult online guides to open your MacBook Pro and install the SSD. Typically, this involves removing the bottom case, disconnecting the battery, unscrewing the existing storage drive, and replacing it with the new SSD. Ensure that all connections are secure and properly aligned.
- Reassemble your MacBook Pro: Once the SSD is installed, reassemble your MacBook Pro by putting the bottom case back on and securing all the screws. Take care to not overtighten the screws, as this may damage the threads or strip them.
- Restore your data: Power on your MacBook Pro and initialize the newly installed SSD. You can use the macOS Recovery mode by turning on your laptop and holding down Command + R until you see the Apple logo. Then, restore your data from the backup you created earlier.
- Verify the SSD: After restoring your data, double-check that the newly installed SSD is working correctly. Go to the Apple menu, select “About This Mac,” and click on “Storage” to ensure that the SSD is recognized and functioning as expected.
- Dispose of the old storage drive: Safely dispose of the old storage drive by securely wiping the data or physically destroying it to protect your personal information.
Upgrading to an SSD on your MacBook Pro can breathe new life into your laptop, providing faster boot times, improved application launch speeds, and a more responsive computing experience. It’s a worthwhile investment that can significantly enhance productivity and enjoyment while using your MacBook Pro.
Which SSD to Choose for Your MacBook Pro?
When selecting an SSD for your MacBook Pro, there are several factors to consider to ensure compatibility and optimal performance. Here are some key points to keep in mind:
- Compatibility: Ensure that the SSD you choose is compatible with your specific MacBook Pro model. Check the manufacturer’s specifications and compatibility lists to find a compatible SSD. It’s important to consider factors such as form factor (2.5-inch, M.2, PCIe), interface (SATA, PCIe), and connector type.
- Capacity: Determine the storage capacity you need based on your usage requirements. Consider the types of files you regularly work with and the amount of storage space they require. It’s generally recommended to choose an SSD with more storage capacity than you currently need to allow for future expansion.
- Performance: Look for an SSD that offers fast read and write speeds to ensure a snappy and responsive MacBook Pro experience. Consider the SSD’s sequential read and write speeds, random read and write speeds, and input/output operations per second (IOPS). Higher performance specifications result in better overall system performance.
- Reliability and Endurance: Check the SSD’s reliability features and endurance ratings. Look for SSDs with features such as built-in error correction, wear leveling, and power-loss protection. Additionally, check the total bytes written (TBW) or drive writes per day (DWPD) ratings, which indicate the expected lifespan and endurance of the SSD.
- Brand and Reputation: Stick to reputable brands when choosing an SSD for your MacBook Pro. Companies such as Samsung, Crucial, Kingston, Western Digital, and SanDisk have a solid track record of producing reliable and high-performance SSDs. Read customer reviews and check professional recommendations to gauge the reputation of the brand.
- Price: Consider your budget when selecting an SSD. SSD prices have become more affordable in recent years, but higher capacities or faster speeds may come at a higher price point. Determine your budget and find the right balance between price and performance to suit your needs.
It’s also worth noting that Apple offers their own specific SSDs for MacBook Pro models. While they can provide seamless integration and compatibility, they may be more expensive and have limited options compared to third-party SSDs.
Ultimately, the choice of SSD for your MacBook Pro depends on your specific requirements and preferences. Take the time to research and compare different brands, specifications, and reviews to find the SSD that best meets your needs in terms of compatibility, capacity, performance, reliability, and budget.
The Steps to Install an SSD in a MacBook Pro
Upgrading the storage in your MacBook Pro by installing an SSD is a relatively straightforward process. Here are the general steps to follow:
- Prepare: Gather the necessary tools for the installation, including the new SSD, a compatible screwdriver (typically Philips or Torx), and an anti-static wrist strap or mat to protect against electrostatic discharge.
- Back up your data: Before proceeding with any hardware changes, ensure that you have a current backup of your data. Use Time Machine or a cloud-based backup solution to create a complete backup of your MacBook Pro.
- Power off and disconnect: Shut down your MacBook Pro and unplug the power cord. To be safe, hold the power button for about 10 seconds to discharge any residual power. Ground yourself by wearing an anti-static wrist strap or by touching a grounded metal surface.
- Remove the bottom case: Use the appropriate screwdriver to remove the screws on the bottom case of the MacBook Pro. Keep the screws in a safe place for reassembly later. Carefully remove the bottom case to expose the internal components.
- Disconnect the battery: Locate the battery connector on the motherboard and gently lift the connector using a spudger or plastic tool. This will disconnect the battery and prevent any accidental power supply during the installation process.
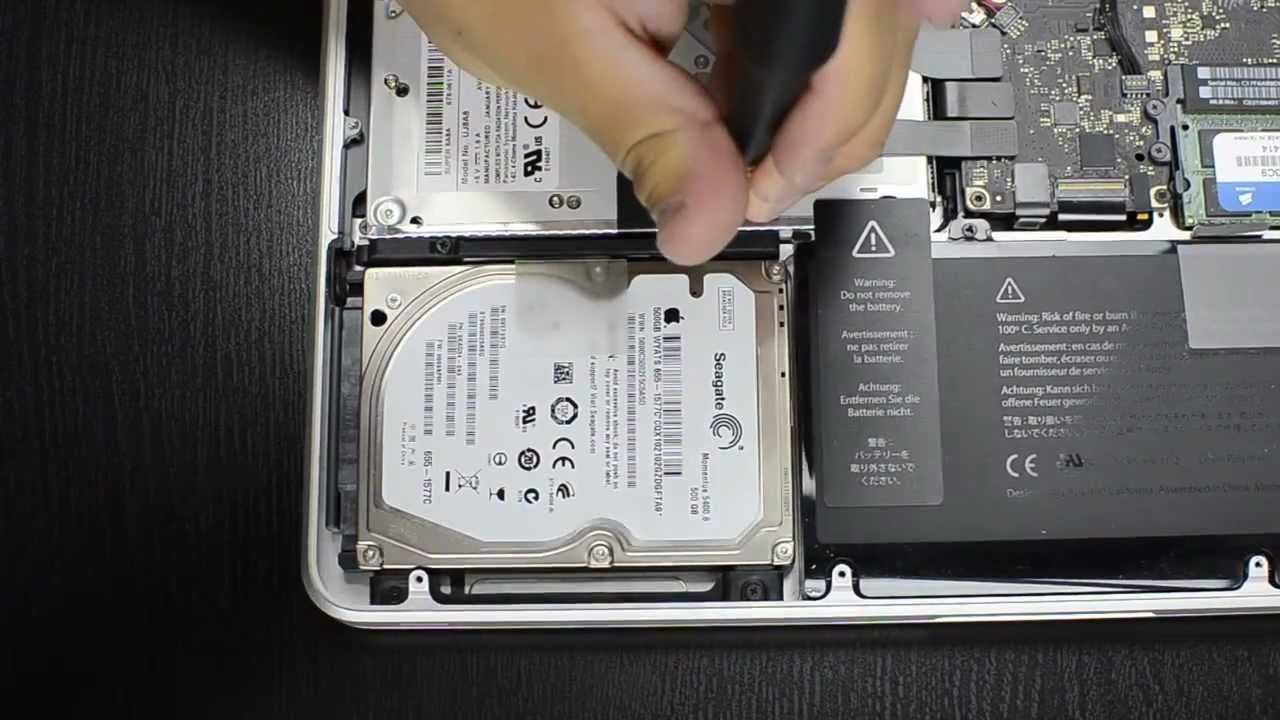
- Remove the existing storage: Locate the existing storage drive (often an HDD or an older SSD) inside your MacBook Pro. It is typically secured with screws or brackets. Remove the screws or brackets and carefully disconnect any cables or connectors from the drive.
- Install the new SSD: Take the new SSD and carefully align it in the storage slot. Secure it using the appropriate screws or brackets. Ensure that all connections are properly aligned and fully seated.
- Reassemble your MacBook Pro: Begin reassembling your MacBook Pro by reconnecting any cables or connectors that were disconnected earlier. Place the bottom case back on and secure it using the screws that were removed earlier.
- Power on and initialize the SSD: Power on your MacBook Pro and hold down the Command + R keys until you see the Apple logo. This will boot your MacBook Pro into macOS Recovery mode. From here, use Disk Utility to format and initialize the new SSD.
- Restore data: Once the SSD is initialized, you can restore your data from the backup you created earlier. Use Time Machine or another backup utility to copy your files, applications, and settings back to your MacBook Pro.
- Verify the installation: After the data is restored, verify that the new SSD is functioning correctly. Check the system information to ensure that the correct SSD is recognized and operating at the expected capacity and performance.
Note that the exact steps may vary slightly depending on your specific MacBook Pro model. It is always advisable to consult your MacBook Pro’s documentation or refer to online resources for detailed instructions specific to your model.
By following these steps carefully, you can successfully install an SSD into your MacBook Pro, enjoying faster speeds, improved performance, and enhanced storage capabilities.
How to Transfer Data from HDD to SSD on MacBook Pro
When upgrading to a new SSD on your MacBook Pro, it’s essential to transfer your existing data from the old hard disk drive (HDD) to the new SSD. Follow these steps to ensure a smooth and successful data transfer:
- Connect the SSD: If your MacBook Pro has a removable bottom case, power off your laptop and install the new SSD according to the manufacturer’s instructions. If your MacBook Pro has a soldered-in SSD, you’ll need an external USB enclosure or adapter to connect the new SSD externally.
- Boot up from the macOS Recovery mode: Power on your MacBook Pro and hold down the Command + R keys until you see the Apple logo. This will boot your MacBook Pro into macOS Recovery mode.
- Launch Disk Utility: In the macOS Recovery mode, select “Disk Utility” from the Utilities menu.
- Select the HDD and SSD: In Disk Utility, you should see both the old HDD and the new SSD listed. Select the HDD from the left sidebar.
- Choose “Restore”: Click on the “Restore” button in the Disk Utility toolbar.
- Select the HDD as the source and the SSD as the destination: In the restore dialog box, ensure that the “Source” is set to the HDD and the “Destination” is set to the SSD.
- Start the restore process: Click on the “Restore” button to begin the data transfer process. This will copy all the contents from the HDD to the SSD.
- Wait for the process to complete: The data transfer process may take some time, depending on the size of your data. Be patient and let the process finish uninterrupted.
- Eject and disconnect the SSD: Once the restore process is complete, eject the SSD from Disk Utility and safely disconnect it from your MacBook Pro.
- Swap the HDD with the SSD: If you installed the SSD internally, power off your MacBook Pro and replace the HDD with the SSD. If you connected the SSD externally, disconnect the HDD and connect the SSD internally.
- Power on and verify: Power on your MacBook Pro. It should now boot up from the new SSD. Go to “About This Mac” from the Apple menu to ensure that the SSD is recognized and working correctly.
- Reformat the old HDD: After verifying that everything is working fine with the SSD, you can reformat the old HDD to use it as an external storage device or repurpose it.
By following these steps, you can successfully transfer your data from the old HDD to the new SSD on your MacBook Pro. This ensures that all your files, applications, and settings are seamlessly transferred, allowing you to enjoy the improved performance and storage capacity of your new SSD.
Frequently Asked Questions about SSDs on MacBook Pro
Here are answers to some commonly asked questions about SSDs on MacBook Pro:
- Q: Can I upgrade my MacBook Pro to an SSD?
A: Yes, most MacBook Pro models can be upgraded to an SSD. However, the process and compatibility may vary depending on the specific model. It’s recommended to check the official documentation or consult with an authorized service provider to determine the upgrade options for your MacBook Pro. - Q: How do I know if my MacBook Pro supports NVMe SSD?
A: NVMe SSDs are supported on MacBook Pro models released from 2015 onwards. To verify compatibility, check your MacBook Pro’s specifications or consult the official documentation to see if NVMe SSDs are listed as supported storage options. - Q: Do I need an adapter to install an SSD in my MacBook Pro?
A: It depends on the specific model of your MacBook Pro. Some MacBook Pro models have removable storage bays, while others have soldered-in SSDs. If your MacBook Pro has a soldered-in SSD, you may need an external USB enclosure or adapter to connect the new SSD externally. - Q: What size SSD should I get for my MacBook Pro?
A: The size of the SSD you should get depends on your storage needs and budget. SSDs are available in various capacities, ranging from 128GB to several terabytes. Consider your storage requirements, such as the amount of data you regularly work with and the size of files you use, to determine the appropriate size for your SSD. - Q: Can I use an external SSD with my MacBook Pro?
A: Yes, you can use an external SSD with your MacBook Pro. External SSDs can provide additional storage capacity and flexibility. You can connect an external SSD via USB or Thunderbolt ports and use it for data storage or even as a bootable drive, depending on your needs. - Q: Can I transfer data from my old MacBook Pro HDD to a new SSD?
A: Yes, it is possible to transfer data from your old MacBook Pro HDD to a new SSD. You can use methods like Time Machine backups or disk cloning software to transfer your data. Alternatively, you can manually copy your files and folders from the old HDD to the new SSD. - Q: Do SSDs on MacBook Pros require special maintenance?
A: SSDs on MacBook Pros require minimal maintenance. Unlike traditional HDDs, SSDs have no moving parts, so there is no need to defragment the drive. It’s important to keep your MacBook Pro’s operating system and firmware up to date to ensure optimal performance and security. - Q: Can I use the old HDD after upgrading to an SSD on my MacBook Pro?
A: Yes, you can repurpose the old HDD after upgrading to an SSD. You can use it as an external storage device by putting it into an external enclosure or use it as a backup drive. However, it’s recommended to securely wipe the drive or format it before repurposing to protect your personal data.
These FAQs address some common concerns and queries regarding SSDs on MacBook Pro. If you have further questions or specific requirements, it’s advisable to consult Apple’s official documentation or seek assistance from an authorized service provider.
Conclusion
SSDs have revolutionized the computing experience on MacBook Pro, offering faster speeds, improved durability, and enhanced power efficiency. Upgrading to an SSD can greatly enhance the performance and user experience of your MacBook Pro, allowing for quick boot times, faster application launches, and smoother multitasking.
When choosing an SSD, consider factors such as compatibility, capacity, performance, reliability, and budget. Ensure that the SSD you select is compatible with your specific MacBook Pro model and meets your storage requirements.
Installing an SSD in your MacBook Pro is a relatively straightforward process, but it requires careful handling and attention to detail. Following the recommended steps, including backing up your data, acquiring the necessary tools, and correctly installing and initializing the SSD, will help ensure a successful upgrade.
Transferring data from the old HDD to the new SSD is crucial to preserve your files, applications, and settings. Utilize macOS Recovery’s Disk Utility or backup tools like Time Machine to facilitate a smooth and seamless data transfer.
By upgrading your MacBook Pro with an SSD, you can benefit from improved performance, extended battery life, enhanced durability, and a whisper-quiet operation. Whether you’re a student, professional, or creative enthusiast, the upgrade to an SSD can significantly enhance your productivity and make every interaction with your MacBook Pro a delightful experience.
Remember to always refer to official documentation, consult professional resources, or seek assistance from authorized service providers when upgrading or troubleshooting your MacBook Pro. With the power of an SSD, unleash the full potential of your MacBook Pro and enjoy a faster, more efficient, and enjoyable computing experience.