Introduction
Welcome to this guide on how to speed up your MacBook Pro! If you’ve noticed that your MacBook Pro is running slower than usual, don’t worry. There are several steps you can take to optimize its performance and get it running smoothly again.
As time goes on, your MacBook Pro can accumulate junk files, unused applications, and other clutter that can bog down its performance. Fortunately, with a little bit of maintenance and some tweaks to your settings, you can significantly improve its speed and responsiveness.
In this article, we will explore various methods to help you speed up your MacBook Pro. From cleaning up your hard drive to upgrading your storage drive, we will cover a range of strategies that will have your MacBook Pro running like new.
It’s important to note that while these tips are generally safe and effective for most MacBook Pro users, it’s always a good idea to backup your data before making any major changes. Ready to boost your MacBook Pro’s performance? Let’s get started!
Clean up your hard drive
One of the first steps to speeding up your MacBook Pro is to clean up your hard drive. Over time, your hard drive can become cluttered with unnecessary files, which can slow down your system. Here are some ways to clean up your hard drive:
- Delete unused files: Take a look at your files and folders and delete anything that you no longer need. This can include old documents, downloads, and unused applications. Be sure to empty your Trash afterwards to free up even more space.
- Manage your files: Organize your files into folders and remove any duplicates. This will not only help free up space but also make it easier to find and access your files.
- Use a disk cleanup tool: There are several third-party applications available that can help you clean up your hard drive. These tools can scan your system for unnecessary files, temporary files, and caches, allowing you to remove them with a few clicks.
By regularly cleaning up your hard drive, you can free up valuable space and improve your MacBook Pro’s performance. It’s recommended to perform these clean-up tasks at least once a month to ensure optimal performance.
Remove unnecessary startup programs
Having too many programs launching at startup can significantly slow down your MacBook Pro’s boot time. Many applications set themselves to start automatically when you turn on your computer, which can consume valuable system resources. Here’s how to remove unnecessary startup programs:
- Review login items: Open the System Preferences and go to the Users & Groups section. Select your username, click on the Login Items tab, and review the list of programs that launch at startup. Remove any applications that you don’t need to start automatically.
- Disable launch agents: Launch agents are background processes that start when you log in to your user account. Some applications install these launch agents without your knowledge. To manage launch agents, open the Terminal application and enter the following command:
sudo launchctl list. This will display a list of all launch agents. Identify any unnecessary ones and disable them using thesudo launchctl remove [label]command. - Use a third-party tool: There are also third-party applications available that can help you manage startup programs more efficiently. These tools allow you to easily enable or disable programs from starting up with your MacBook Pro.
By removing unnecessary startup programs, you can reduce the amount of resources consumed during startup, leading to faster boot times and improved overall performance. Be cautious when disabling programs, ensuring you don’t disable any critical processes for your system to function properly.
Update your operating system
Keeping your operating system up to date is crucial for optimal performance on your MacBook Pro. Software updates not only bring new features but also include important bug fixes and performance enhancements. Here’s how to update your operating system:
- Check for updates: Apple regularly releases updates for macOS, so it’s essential to check for updates regularly. Go to the Apple menu and click on “System Preferences.” Then, click on “Software Update” to check for any available updates.
- Install updates: If there are updates available, click on “Update Now” to initiate the installation process. Make sure you have a stable internet connection as larger updates may take some time to download and install.
- Enable automatic updates: To ensure that your MacBook Pro stays up to date automatically, go to “System Preferences,” click on “Software Update,” and check the box for “Automatically keep my Mac up to date.” With this option enabled, your system will download and install updates in the background without requiring manual intervention.
Updating your operating system not only improves performance but also enhances security by patching any vulnerabilities. It’s important to note that some older MacBook Pro models may not be eligible for the latest macOS updates, so be sure to check the system requirements before attempting to update.
By keeping your operating system updated, you can ensure that your MacBook Pro is running the latest software with all the performance improvements and bug fixes provided by Apple.
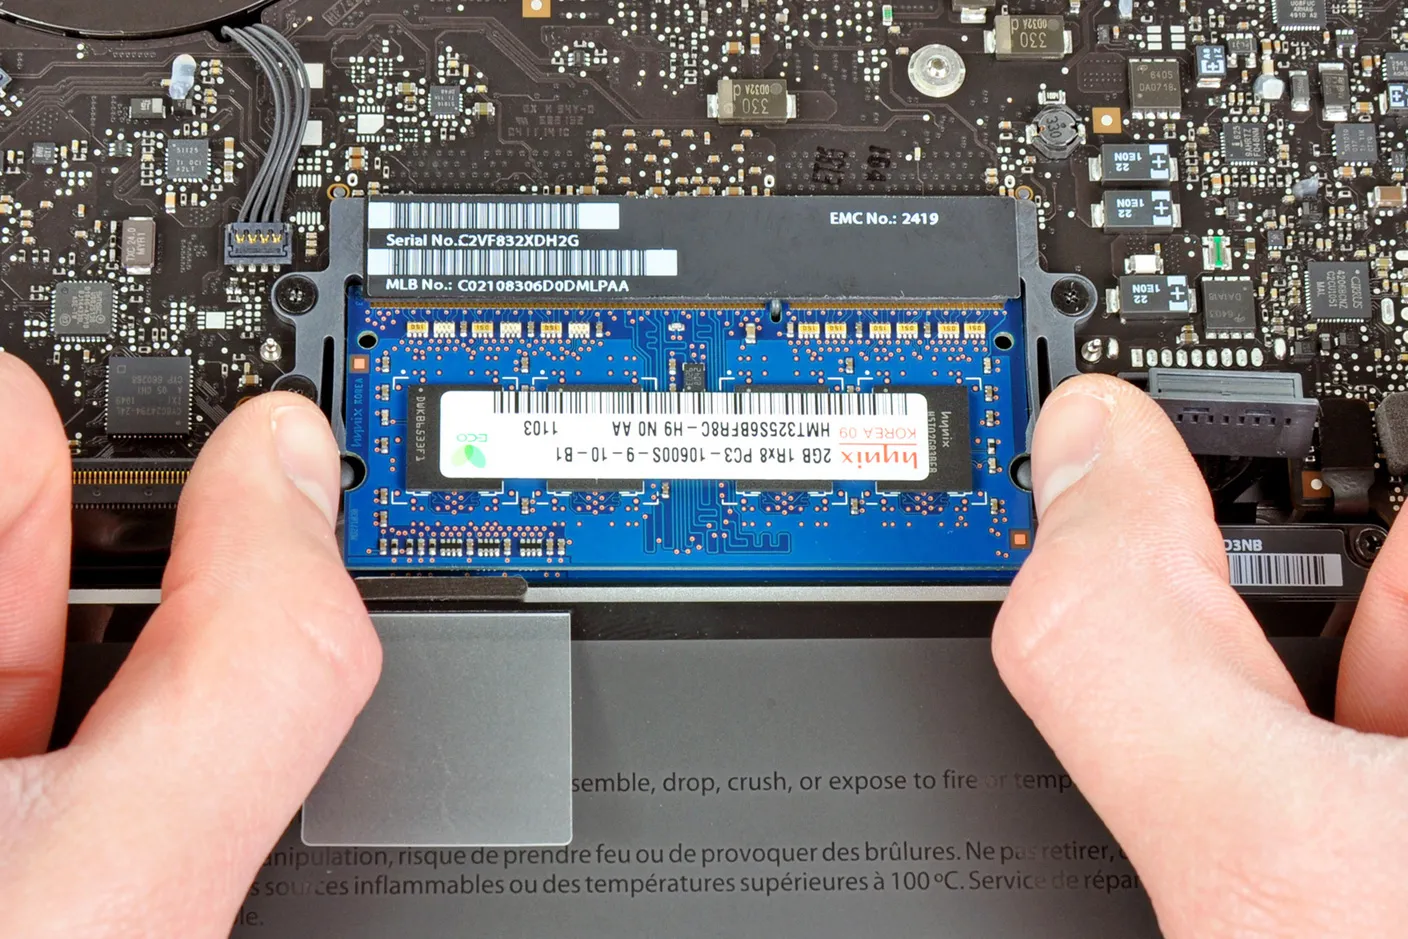
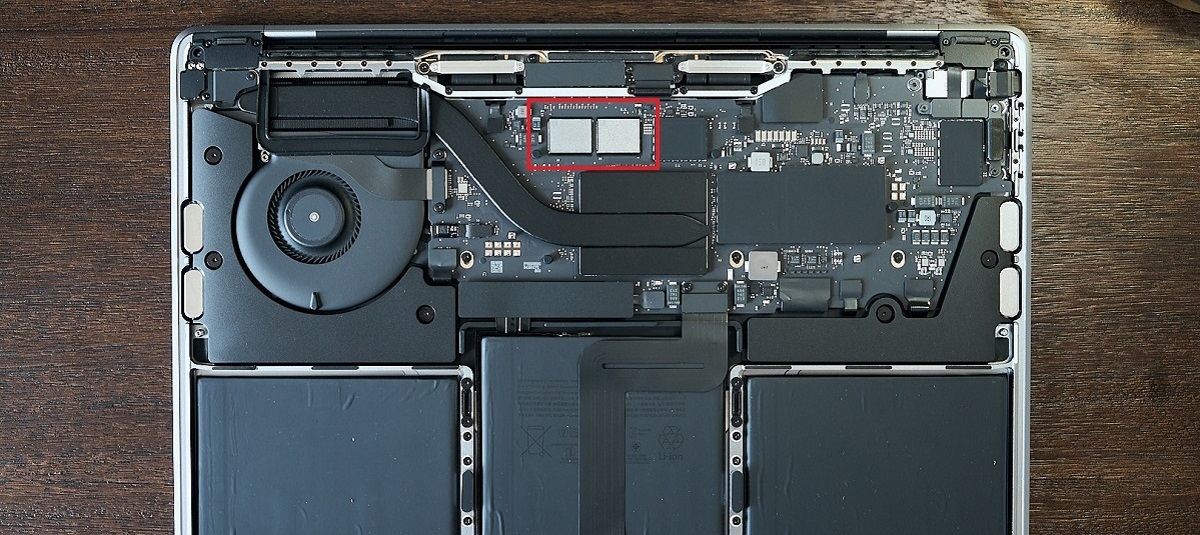
Increase your RAM
If your MacBook Pro is running slow and frequently experiencing performance issues, upgrading your RAM (Random Access Memory) can significantly improve its speed and responsiveness. RAM is responsible for temporarily storing data that your computer needs to access quickly. Here’s how to increase your RAM:
- Determine your current RAM: To find out how much RAM your MacBook Pro currently has, click on the Apple menu, select “About This Mac,” and navigate to the “Memory” tab. Note the installed memory capacity.
- Check compatibility: Before upgrading your RAM, ensure you are purchasing the correct type and compatible RAM modules for your specific MacBook Pro model. Consult Apple’s official documentation or a trusted resource to determine the compatible RAM specifications.
- Purchase and install new RAM: Once you have determined the compatible RAM modules, purchase them from a reliable source. To install the new RAM, shut down your MacBook Pro, disconnect all peripherals, remove the battery (if removable), and locate the RAM slots. Carefully remove the old RAM modules and insert the new ones in the correct orientation. Ensure they are securely seated in the slots.
- Power up your MacBook Pro: After installing the new RAM, reassemble your MacBook Pro, reconnect any peripherals, and power it on. Your MacBook Pro should recognize the upgraded RAM automatically, and you will notice a significant improvement in performance.
Increasing your RAM allows your MacBook Pro to handle more tasks simultaneously and access data more quickly. It can help prevent slowdowns and improve overall system performance. However, keep in mind that upgrading the RAM in some MacBook Pro models may require professional assistance or void the warranty, so be sure to research and proceed with caution.
Note that increasing your RAM may not be feasible or necessary for all users. Evaluate your specific needs and usage patterns to determine if upgrading the RAM is the right solution for you.
Clear browser cache and history
If you primarily use your MacBook Pro for browsing the internet, clearing your browser’s cache and history can help improve performance and speed up your browsing experience. As you browse the web, your browser stores temporary files and data that can accumulate over time and slow down the loading of web pages. Here’s how to clear the cache and history in popular web browsers:
- Safari: Open Safari and click on “History” in the menu bar. From the drop-down menu, select “Clear History.” Choose the desired time range, such as “the past hour” or “all history,” and click “Clear History.”
- Google Chrome: In Chrome, click on the three-dot menu icon in the top-right corner and go to “More tools” and then “Clear browsing data.” Select the desired time range and check the options for “Cached images and files” and “Browsing history.” Click “Clear data” to clear the cache and history.
- Mozilla Firefox: Open Firefox and click on the hamburger menu icon in the top-right corner. Go to “Options,” then “Privacy & Security.” Under the “Cookies and Site Data” section, click on “Clear Data.” Check the options for “Cached Web Content” and “Browsing & Download History” and click “Clear.”
By clearing your browser’s cache and history, you are essentially deleting temporary files and data, allowing your browser to start fresh. This can improve browsing speed and prevent potential conflicts with outdated or corrupted cache files.
Regularly clearing your cache and history can also enhance your online privacy and security by removing any traces of your browsing activities. However, keep in mind that clearing your history will remove your browsing history, so be sure to consider any important information or saved passwords that you might need.
Remember, different browsers may have slightly different steps to clear cache and history, but the general idea is the same. Consult the specific documentation for your preferred browser if you encounter any difficulties.
Disable visual effects
MacBook Pro comes with various visual effects and animations that enhance the user interface experience. While these visual effects can be visually appealing, they can also consume system resources, which can slow down your MacBook Pro’s performance. Disabling unnecessary visual effects can help improve speed and responsiveness. Here’s how to disable visual effects on your MacBook Pro:
- Open System Preferences: Click on the Apple menu in the top-left corner of your screen and select “System Preferences.”
- Go to Accessibility: In the System Preferences window, click on “Accessibility.”
- Select Display: Once you’re in the Accessibility settings, select “Display” from the sidebar.
- Enable “Reduce motion”: Check the box next to “Reduce motion” to reduce the animated effects in the user interface.
- Enable “Increase contrast”: To further disable certain visual effects, you can also check the box next to “Increase contrast.”
- Adjust transparency: Additionally, you can reduce transparency effects by going to “System Preferences,” then “Accessibility,” and selecting “Display.” From there, check the box next to “Reduce transparency.”
Disabling visual effects can free up system resources and result in smoother performance, particularly on older MacBook Pro models or those with lower specifications. However, keep in mind that disabling certain visual effects may affect the overall aesthetics of your user interface. You can experiment with different settings to strike a balance between visual appeal and performance.
It’s worth noting that disabling visual effects may not have a significant impact on newer MacBook Pro models with more powerful hardware. If you have a newer model and don’t experience any performance issues, you may not need to disable visual effects.
By reducing unnecessary visual effects, you can streamline your MacBook Pro’s performance and enjoy a snappier user experience.
Run regular maintenance tasks
Performing regular maintenance tasks on your MacBook Pro is crucial for ensuring optimal performance and preventing issues that can slow down your system. By taking a proactive approach to maintenance, you can keep your MacBook Pro running smoothly and minimize performance-related problems. Here are some essential maintenance tasks you should perform regularly:
- Update your apps: Just like your operating system, it’s important to keep your applications up to date. Updates often include bug fixes and performance improvements that can enhance your MacBook Pro’s performance. Check for updates regularly in the App Store or the respective applications’ websites.
- Scan for malware: Running regular malware scans can help detect and remove any malicious software that can negatively impact your MacBook Pro’s performance. Use reputable antivirus software and keep it up to date.
- Verify disk permissions: Disk permissions can sometimes become corrupted, leading to performance issues. To verify and repair disk permissions, open the Disk Utility application, select your startup disk, and click on “First Aid.” Then, click on “Verify Disk Permissions” and “Repair Disk Permissions” if any issues are detected.
- Check for available disk space: Insufficient disk space can slow down your MacBook Pro. Regularly check your available disk space and make sure you have enough free space for your system to operate efficiently. Consider removing any large or unused files to free up space.
- Restart your MacBook Pro: Restarting your MacBook Pro can help clear temporary files, refresh system resources, and resolve minor software glitches that may be impacting performance. Perform a restart at least once a week, or more frequently if you notice any issues.
- Reset PRAM/NVRAM and SMC: Resetting the PRAM/NVRAM (Parameter Random Access Memory/Non-Volatile Random Access Memory) and SMC (System Management Controller) can help resolve certain hardware-related issues that can affect performance. Consult Apple’s official documentation or their support website for instructions on how to perform these resets for your specific MacBook Pro model.
Running regular maintenance tasks helps keep your MacBook Pro in optimal condition. By staying proactive and incorporating these tasks into your routine, you can prevent performance issues and ensure a smooth computing experience.
Remember, different maintenance tasks may require different frequencies, so adapt your maintenance schedule based on your usage and specific needs. Always refer to official documentation or consult with Apple’s support if you are unsure about any maintenance task.
Quit unused applications
If you often have multiple applications open on your MacBook Pro, it’s essential to quit unused applications to free up system resources and improve overall performance. Having too many applications running simultaneously can drain your MacBook Pro’s resources and slow down its speed. Here’s why and how you should quit unused applications:
When you launch an application, it consumes system memory (RAM) and CPU resources, even if it’s running in the background. If you have several resource-intensive applications open simultaneously, it can lead to sluggish performance. By quitting unused applications, you can reclaim those system resources and allocate them to the applications you are actively using.
To quit unused applications on your MacBook Pro:
- Switch to the application: Click on the application’s window to bring it to the forefront.
- Use the application menu: In the top-left corner of your screen, click on the application’s name and select “Quit [Application Name].” Alternatively, you can press Command + Q on your keyboard to quit the active application quickly.
- Use the Dock: Open the Dock at the bottom of your screen and locate the application’s icon. Right-click on the icon and select “Quit” from the context menu. Some applications may require you to press and hold the Option key while right-clicking to reveal the “Quit” option.
- Use the Force Quit menu: If an application becomes unresponsive and doesn’t quit using the methods above, you can force quit it. Press Option + Command + Escape on your keyboard to open the Force Quit Applications window. Select the unresponsive application and click “Force Quit.”
By quitting unused applications, you not only free up system resources but also reduce clutter and simplify your workflow. It’s a good habit to periodically assess which applications you actually need open and close the ones that are not in use.
Remember, some applications may run background processes even after you quit the main application window. In such cases, it may be necessary to check the application’s preferences or settings to ensure it’s completely closed and not consuming any system resources.
By regularly quitting unused applications, you can maximize the performance of your MacBook Pro and ensure a smooth and efficient computing experience.
Close unnecessary browser tabs and extensions
If you’re a frequent internet user, it’s easy to accumulate a large number of open tabs in your web browser. Additionally, having too many browser extensions installed can also impact your MacBook Pro’s performance. Closing unnecessary tabs and disabling unnecessary extensions can help improve your browsing speed and overall system performance. Here’s how to manage tabs and extensions effectively:
Close unnecessary tabs: Each open tab in your web browser consumes system resources, including memory (RAM) and processing power. It’s common to have multiple tabs open simultaneously, but keeping too many tabs open can slow down your MacBook Pro. Consider closing tabs that you no longer need or are not actively using. If you want to save a webpage for later access, consider adding it to bookmarks for easy retrieval.
Disable unnecessary extensions: Browser extensions can enhance your browsing experience, but having too many installed can impact performance. Each extension runs processes in the background, consuming system resources. Review your installed extensions and determine which ones are essential. Disable or uninstall any extensions that you don’t frequently use or no longer need. This can help reduce the memory footprint and improve browser performance.
In addition to managing tabs and extensions, consider utilizing features like bookmarking, tab grouping, or using a session manager extension to save and organize your browsing sessions effectively. These features can help declutter your browser window, improve navigation, and enhance overall browsing speed.
Regularly closing unnecessary tabs and disabling unused extensions will not only improve your MacBook Pro’s performance but also enhance your browsing experience. It’s a good practice to periodically evaluate your open tabs and extensions to ensure you’re only using what you truly need.
Remember, closing tabs and disabling extensions may significantly impact your browsing workflow if you frequently rely on certain pages or functionalities. Evaluate your browsing habits and customize the number of tabs and extensions to strike a balance between performance and convenience.
By actively managing your browser tabs and extensions, you can optimize your MacBook Pro’s performance and enjoy a smoother and more efficient browsing experience.
Manage your desktop clutter
Your MacBook Pro’s desktop can quickly become cluttered with files, folders, and shortcuts, which can affect both visual appeal and performance. Managing your desktop clutter not only improves organization but also helps optimize your MacBook Pro’s performance. Here are some tips to effectively manage your desktop clutter:
- Organize files and folders: Take some time to declutter and organize the files and folders on your desktop. Group related files into folders and name them appropriately. This not only makes it easier to locate specific files but also reduces visual clutter.
- Create a filing system: Establish a filing system that works for you. Consider categorizing files by project, type, or date. Be consistent with your file naming conventions to help you easily identify and retrieve files in the future. Aim to keep only the necessary files and folders on your desktop.
- Utilize the Dock and Finder: Instead of cluttering your desktop with shortcut icons, utilize the Dock and Finder to access your frequently used applications and files. Pin your most-used applications to the Dock for quick access and utilize the Finder to navigate through your files and folders.
- Use desktop organization tools: There are various third-party desktop organization tools available that help you automatically arrange and clean up your desktop. These tools can sort files, group them into stacks, and keep your desktop tidy. Explore options such as Hazel, Fences, or Desktop Groups to find a tool that suits your needs.
- Regularly remove unnecessary files: Periodically go through your desktop and delete any unnecessary files or duplicates. Unused files can take up valuable storage space and potentially slow down your MacBook Pro. Be mindful of moving important files to appropriate folders before deleting them.
By effectively managing your desktop clutter, you not only improve the visual aesthetics but also enhance your MacBook Pro’s performance. Having a clutter-free desktop allows your system resources to focus on tasks at hand rather than managing the visual elements on your screen.
Remember to regularly maintain your organized desktop and avoid quickly accumulating files and shortcuts again. Develop the habit of managing files efficiently and periodically reevaluate your desktop to ensure it remains clutter-free.
By implementing these practices, you can create a clean and organized desktop environment that promotes productivity and keeps your MacBook Pro running smoothly.
Reset System Management Controller (SMC)
The System Management Controller, or SMC, is responsible for managing various hardware functions on your MacBook Pro. Resetting the SMC can help resolve certain hardware-related issues and potentially improve performance. Here’s how to reset the SMC on your MacBook Pro:
- Shut down your MacBook Pro: Click on the Apple menu in the top-left corner of your screen and select “Shut Down.”
- Disconnect the power adapter: Unplug the power adapter from your MacBook Pro.
- Reset the SMC: Different MacBook Pro models have different methods for resetting the SMC. Follow the appropriate steps below for your model:
- MacBook Pro with non-removable battery: Press and hold the Shift, Control, and Option keys on the left side of the keyboard, then press and hold the power button simultaneously. Hold these keys and the power button for 10 seconds, then release them all. Finally, press the power button again to turn on your MacBook Pro.
- MacBook Pro with removable battery: Power off your MacBook Pro. Disconnect the power adapter and remove the battery. Press and hold the power button for 5 seconds, then release it. Reinsert the battery, connect the power adapter, and turn on your MacBook Pro.
- MacBook Pro with Apple Silicon (M1) chip: Shut down your MacBook Pro. Press and hold the power button for 10 seconds, then release it. Wait for a few seconds, then press the power button again to start your MacBook Pro.
- Power on your MacBook Pro: Once you have successfully reset the SMC, power on your MacBook Pro and check if any performance issues have been resolved.
Resetting the SMC can help resolve various hardware-related issues, such as battery problems, performance slowdowns, and fan malfunctions. It is generally safe to reset the SMC as it does not delete any data or settings on your MacBook Pro.
However, keep in mind that resetting the SMC should be done sparingly and only when necessary. It’s not a routine maintenance task, and excessive reset attempts may not provide any additional benefits. If you’re facing persistent performance issues, it’s advisable to consult Apple Support or visit an authorized service center for further assistance.
By resetting the SMC, you can potentially resolve hardware-related performance issues and restore your MacBook Pro to optimal functioning.
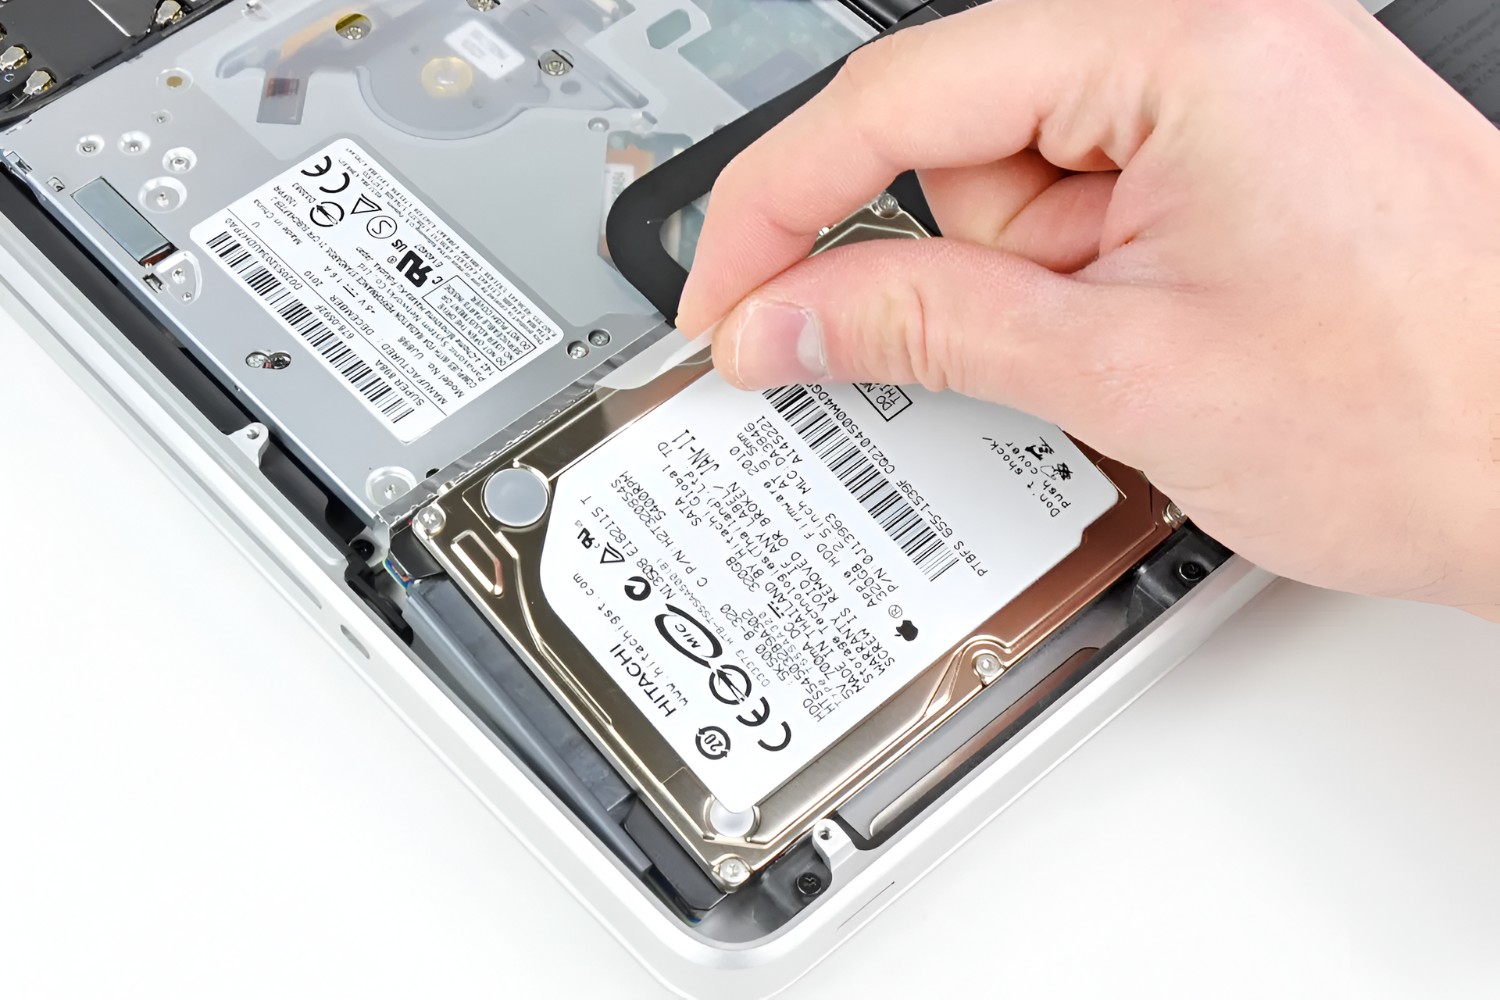
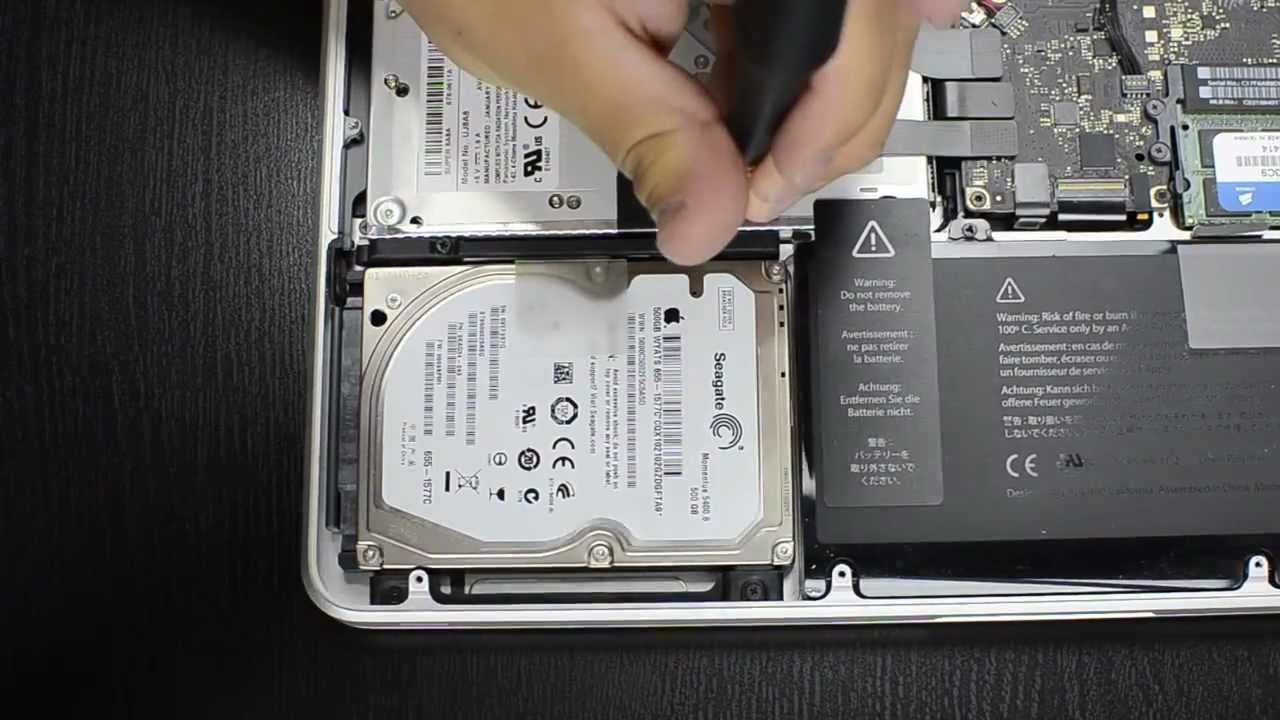
Upgrade your storage drive to SSD
If you’re looking to significantly boost the performance of your MacBook Pro, consider upgrading your storage drive to a Solid State Drive (SSD). Traditional Hard Disk Drives (HDDs) can be a bottleneck for your system’s speed due to their mechanical nature, whereas SSDs offer faster data access and improved overall performance. Here’s why and how you should upgrade to an SSD:
Why upgrade to an SSD?
SSDs use flash memory, which allows for faster read and write speeds compared to the spinning disks of HDDs. This results in quicker boot times, faster application launch, and improved file transfer rates. With an SSD, you can experience significantly improved overall system responsiveness, reduced loading times, and a smoother computing experience.
How to upgrade to an SSD:
- Backup your data: Before proceeding with any storage drive upgrade, it’s crucial to backup all your important data to an external source to prevent any data loss.
- Choose the right SSD: Research and select an SSD that is compatible with your MacBook Pro model. Consider factors such as storage capacity, read/write speeds, and price.
- Prepare for the upgrade: Gather the necessary tools, such as screwdrivers, and follow an online tutorial or consult the official documentation specific to your MacBook Pro model to learn how to access and replace the storage drive.
- Install the new SSD: Once you have access to the internal components of your MacBook Pro, carefully remove the existing storage drive and replace it with the new SSD. Follow the instructions provided with your SSD and ensure a secure connection.
- Restore data and macOS: After installing the new SSD, initialize and format it using Disk Utility. Then, restore your backed-up data or perform a fresh installation of macOS onto the new drive.
Upgrading to an SSD can be a game-changer for your MacBook Pro’s performance. However, if you’re not comfortable performing the upgrade yourself, consider seeking professional assistance from an authorized service provider.
Keep in mind that upgrading to an SSD may void your MacBook Pro’s warranty, so carefully weigh the benefits against any potential warranty concerns.
By upgrading your storage drive to an SSD, you can breathe new life into your MacBook Pro and experience a significant improvement in speed and overall performance.
Conclusion
In conclusion, there are various steps you can take to speed up your MacBook Pro and improve its overall performance. By implementing these strategies, you can optimize your MacBook Pro’s speed, responsiveness, and efficiency.
Start by cleaning up your hard drive to remove unnecessary files and free up valuable space. Removing unnecessary startup programs can also help streamline your MacBook Pro’s boot time and free up system resources. Updating your operating system ensures you have the latest bug fixes, security patches, and performance enhancements.
If you’re experiencing frequent slowdowns, consider increasing your RAM to provide your MacBook Pro with more memory for efficient multitasking. Clearing browser cache and history can enhance browsing speed and efficiency, while disabling visual effects can reduce system resource consumption.
Running regular maintenance tasks, such as updating apps, scanning for malware, and ensuring adequate disk space, helps keep your MacBook Pro running smoothly. Quitting unused applications and closing unnecessary browser tabs and extensions can further optimize performance.
Managing desktop clutter and resetting the System Management Controller (SMC) can address hardware-related performance issues. Lastly, upgrading your storage drive to an SSD can significantly enhance your MacBook Pro’s speed and overall performance.
Remember, every MacBook Pro is unique, and the strategies that work best for one might not be as effective for another. It’s important to assess your specific needs and tailor these methods accordingly.
By implementing these tips and techniques, you can enjoy a faster, more efficient MacBook Pro and maximize your productivity. Take the time to regularly maintain and optimize your MacBook Pro to ensure optimal performance for years to come.