Why set a graphics card as default?
Setting a graphics card as the default option on your system can have numerous benefits, especially if you engage in activities that require high-quality graphics or demanding visual applications. Here are a few reasons why you might consider setting a graphics card as default:
- Enhanced Performance: By setting your graphics card as the default option, you can ensure that all graphics-intensive tasks are handled by the dedicated hardware. This can result in smoother gameplay, faster rendering of videos, and improved overall performance.
- Optimized Visual Experience: Graphics cards are designed to deliver superior visual quality. When set as the default option, they can provide sharper and more vibrant images, higher frame rates, and more detailed graphics, enhancing your overall viewing experience.
- Support for Advanced Features: Many graphics cards offer support for advanced features, such as ray tracing, virtual reality, and 3D rendering. By setting your graphics card as the default, you can take advantage of these features and enjoy their benefits in supported applications or games.
- Compatibility with Modern Software: Some software applications and games, especially those with demanding graphics requirements, may not function properly when using an integrated graphics processor. By setting your graphics card as the default, you can ensure compatibility and avoid any potential compatibility issues.
- Better Multitasking: With a dedicated graphics card as the default option, the burden of handling graphics-intensive tasks is taken off the processor. This allows the CPU to focus on other tasks, leading to improved multitasking capabilities and overall system responsiveness.
Overall, setting a graphics card as the default option can significantly enhance your system’s performance and visual capabilities. Whether you are a gamer, a video editor, or simply someone who appreciates high-quality graphics, configuring your system to prioritize the dedicated graphics card is a worthwhile endeavor.
Checking your system
Before setting a graphics card as the default option on your system, it’s important to check if your computer has a dedicated graphics card installed. Here are a few steps you can follow to verify your system’s configuration:
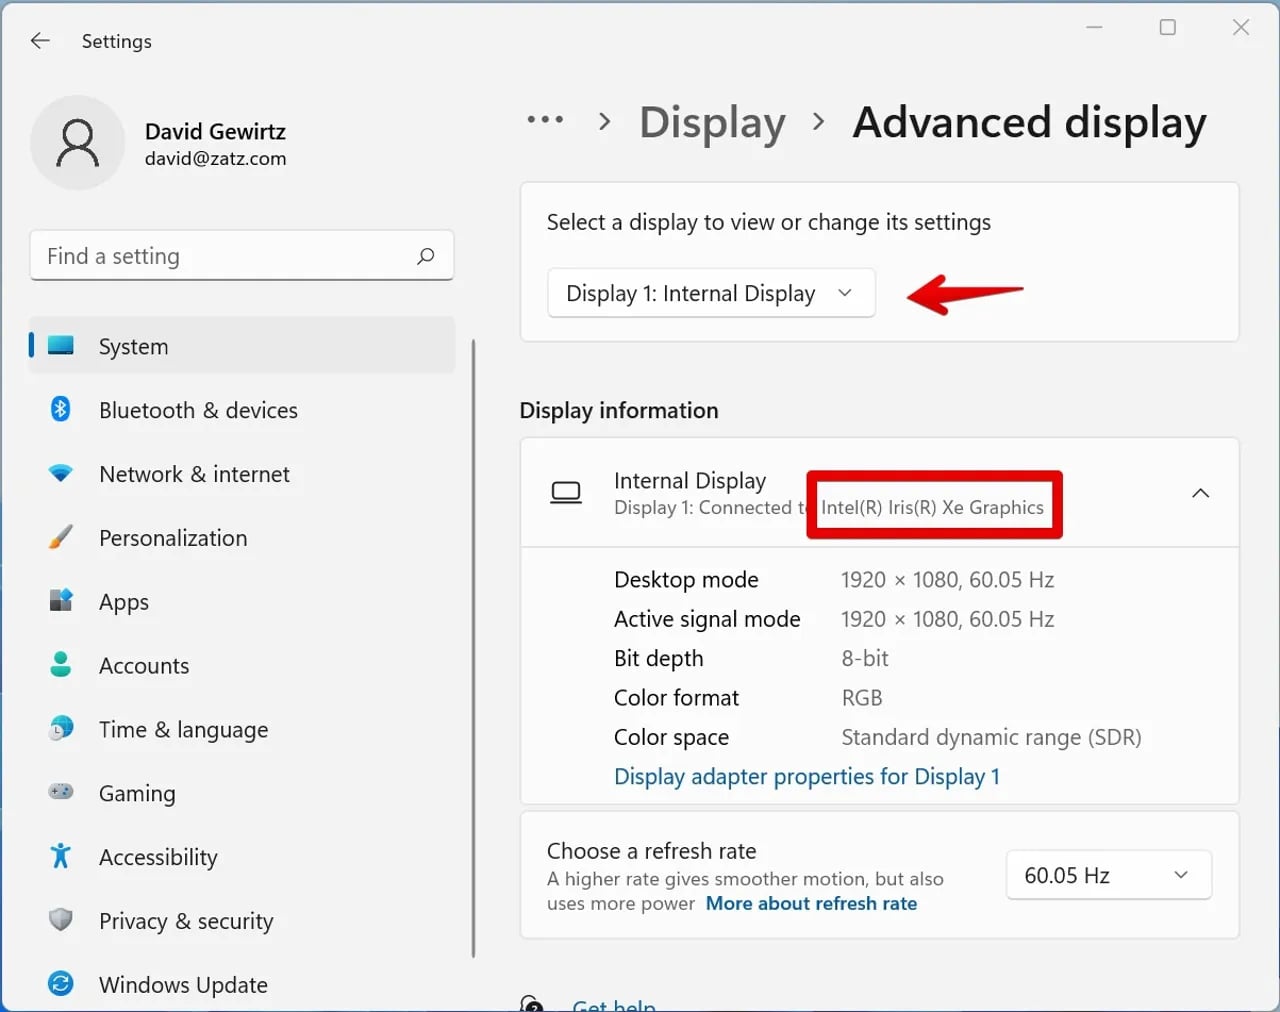
- System Specifications: Start by checking your computer’s specifications. Open the “System Information” application on Windows or the “About This Mac” section on macOS to get an overview of your system’s hardware components. Look for the presence of a dedicated graphics card in the display or graphics section.
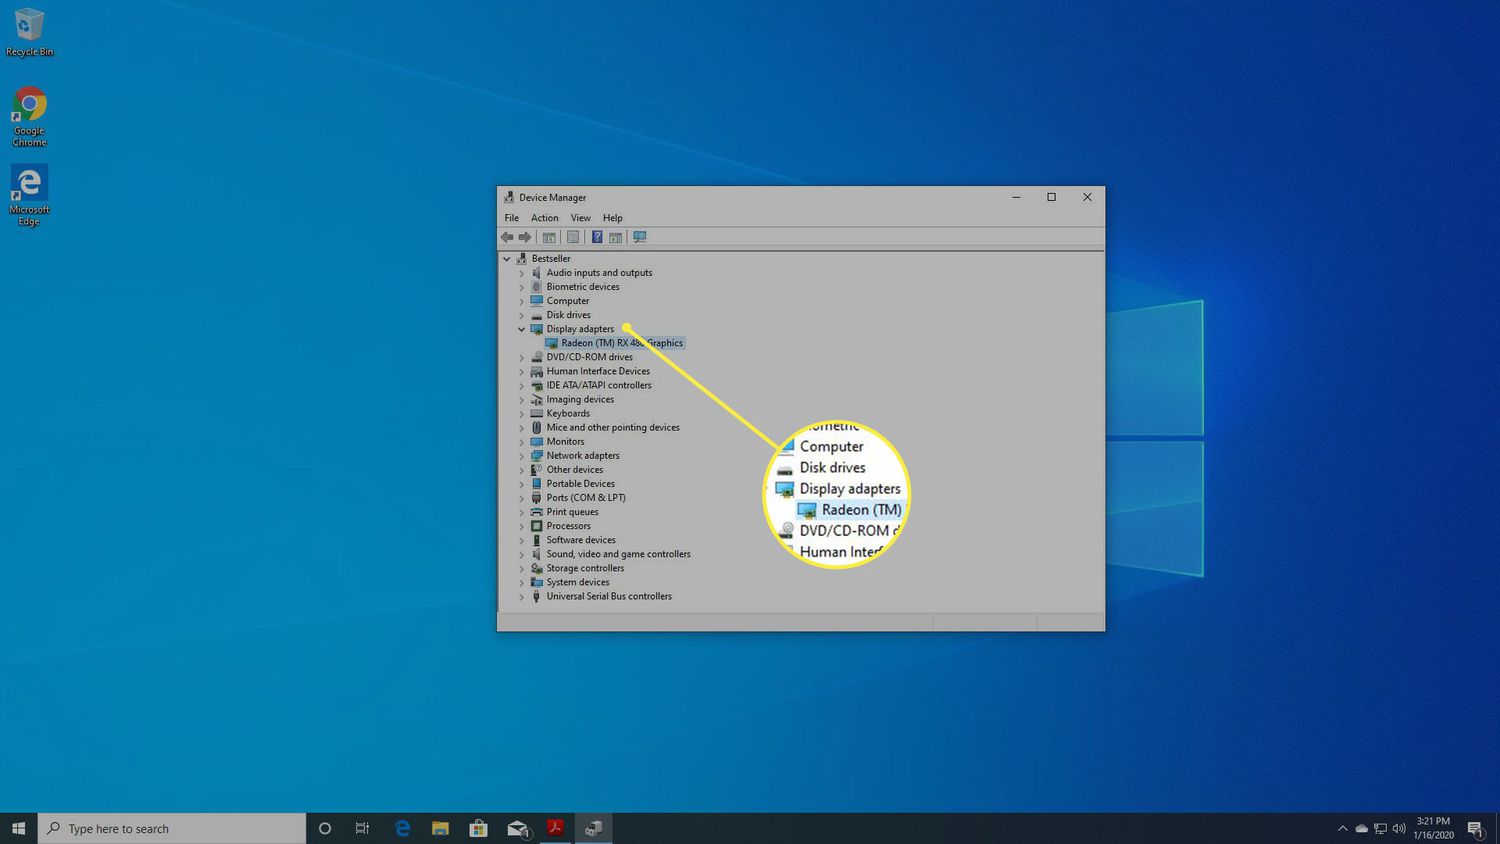
- Device Manager: On Windows, you can also use the Device Manager utility to check for the presence of a graphics card. Press the Windows key + X and select “Device Manager” from the menu. Expand the “Display Adapters” category to see if a dedicated graphics card is listed.
- GPU Monitoring Software: Another option is to use GPU monitoring software, such as GPU-Z or Speccy, to identify the graphics card installed in your system. These tools provide detailed information about your graphics hardware and can confirm if you have a dedicated card.
- Physical Inspection: If you are comfortable opening your computer case, you can physically inspect the motherboard to determine if a dedicated graphics card is present. Look for an expansion slot, typically PCIe, where the graphics card would be inserted. Additionally, check for any video output ports on the card itself.
By following these steps, you can ensure that you have a dedicated graphics card installed in your system before proceeding with setting it as the default option. It’s important to note that some computers only have an integrated graphics processor, which means you won’t be able to set a dedicated graphics card as the default. In such cases, optimizing the settings for the integrated graphics may be the best option.
Updating drivers
Before setting a graphics card as the default option and to ensure optimal performance, it is crucial to have the latest drivers installed. Graphics card drivers act as a bridge between the hardware and software, enabling smooth communication and compatibility with your operating system. Here’s how you can update your graphics card drivers:
- Identify Your Graphics Card: Determine the make and model of your graphics card. You can refer to the manufacturer’s website, consult the documentation that came with your computer, or use diagnostic software like GPU-Z to obtain this information.
- Visit the Manufacturer’s Website: Once you have identified the graphics card, visit the manufacturer’s official website. Look for the support or drivers section, where you can find the latest driver updates for your specific card model.
- Download the Latest Drivers: Locate the appropriate driver for your operating system and download the file. It’s essential to choose the correct driver version, compatible with your graphics card and operating system to avoid any potential compatibility issues.
- Install the Drivers: After downloading the driver, run the installation file, and follow the on-screen instructions. Typically, you will need to agree to the license agreement, select an installation location, and complete the installation process by clicking “Install” or a similar button.
- Restart Your Computer: Once the installation is completed, it is recommended to restart your computer to ensure that the driver updates are fully applied. This will also help eliminate any potential issues or conflicts that may arise due to the driver update.
Updating your graphics card drivers ensures that you have the latest performance optimizations, bug fixes, and compatibility improvements. It can also resolve issues related to graphics rendering, application crashes, or display anomalies. Make sure to periodically check for driver updates to keep your graphics card running smoothly and to take full advantage of its capabilities.
Configuring graphics card settings
Once you have updated your graphics card drivers, you can proceed with configuring the settings to optimize the performance and functionality of your card. Most graphics card manufacturers provide software utilities that allow you to customize various settings. Here’s how you can configure your graphics card settings:
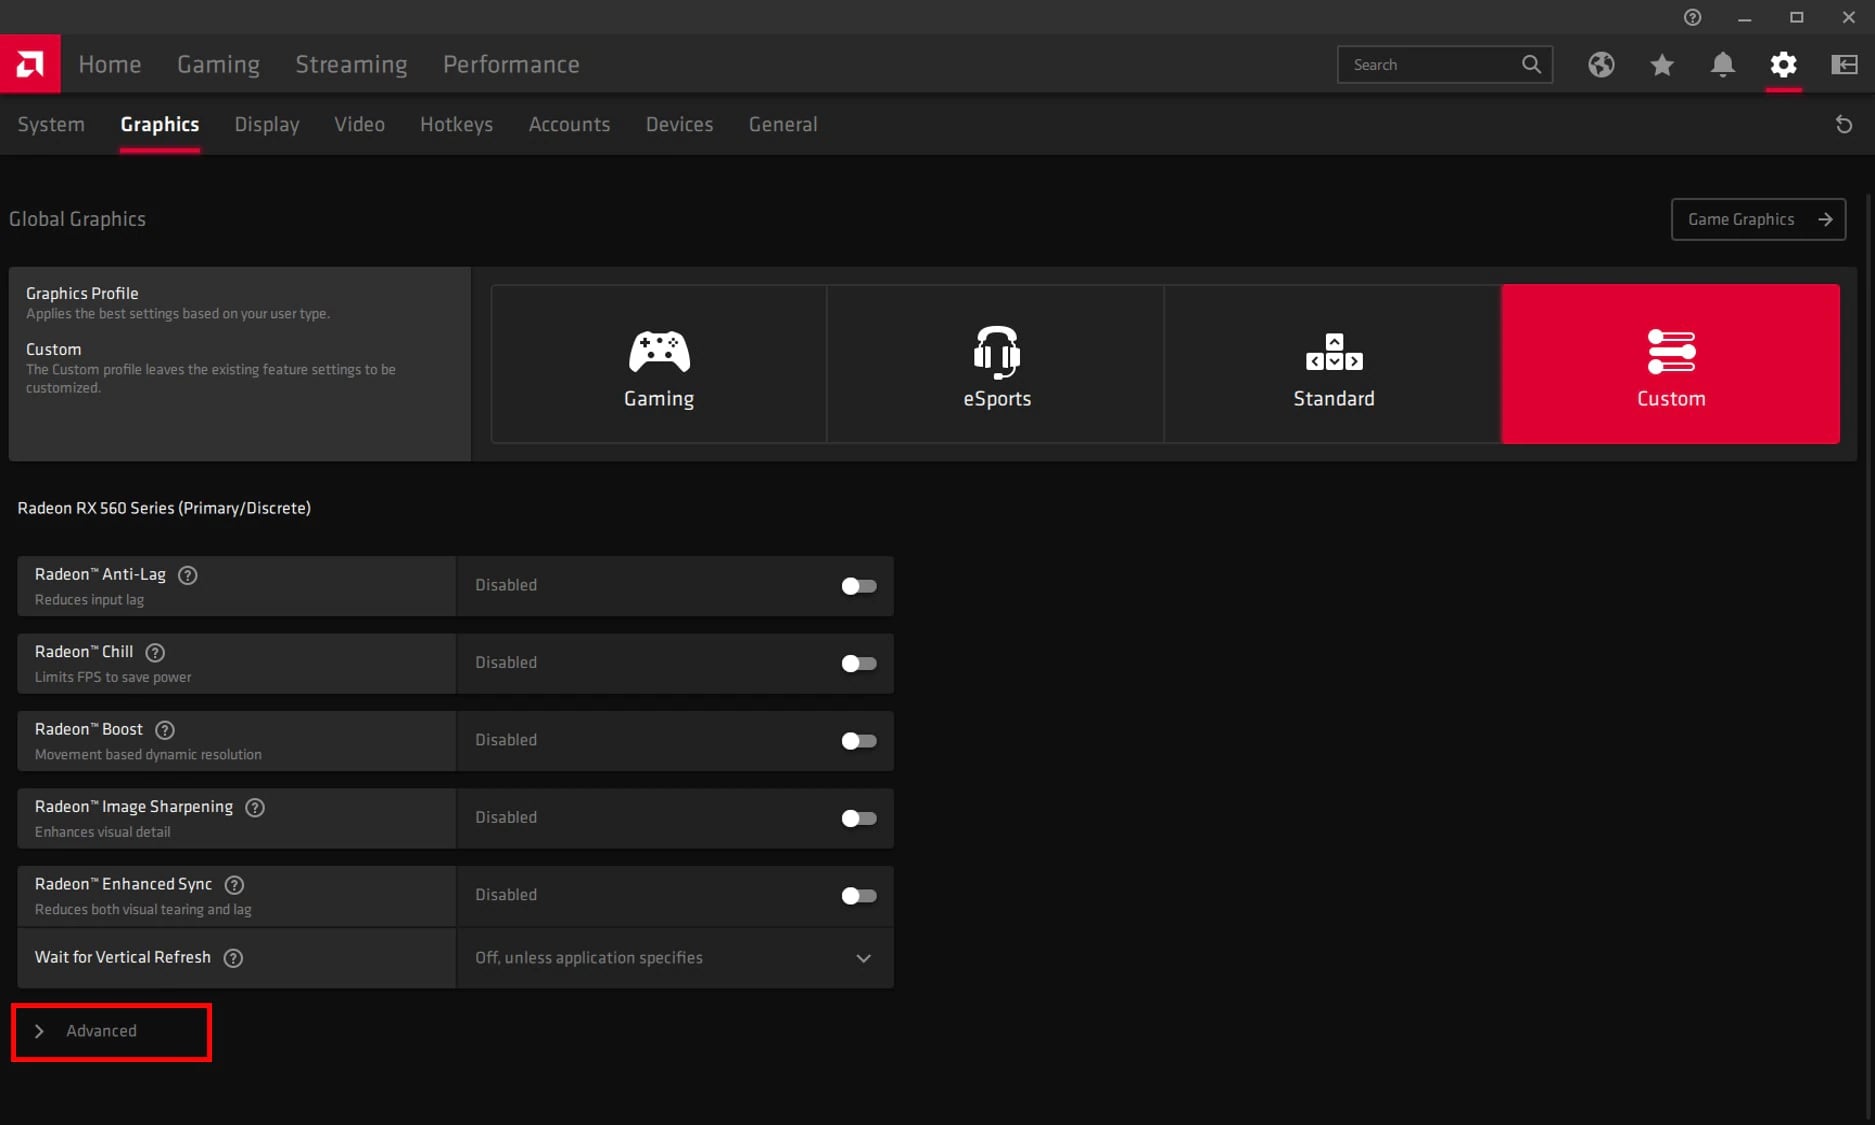
- Accessing Graphics Card Control Panel: Depending on your graphics card brand, you can access the control panel or configuration utility through the Start menu, system tray, or by right-clicking on the desktop and selecting an option like “Graphics Options” or “Graphics Control Panel.
- Performance Settings: Within the control panel, you will typically find options to adjust the performance settings of your graphics card. This includes options like power management, overclocking, or fan speed control. Customize these settings based on your requirements, keeping in mind the limitations and capabilities of your specific graphics card model.
- Image Quality and Anti-Aliasing: Graphics control panels often offer options to enhance image quality and reduce jagged edges or aliasing. You can adjust settings such as anti-aliasing, anisotropic filtering, texture quality, or shader settings to strike a balance between performance and visual quality.
- Multiple Monitor Setup: If you have multiple monitors connected to your system, the graphics control panel allows you to configure their arrangement, resolution, and other display settings. This can enhance productivity and enable immersive gaming or multimedia experiences across multiple screens.
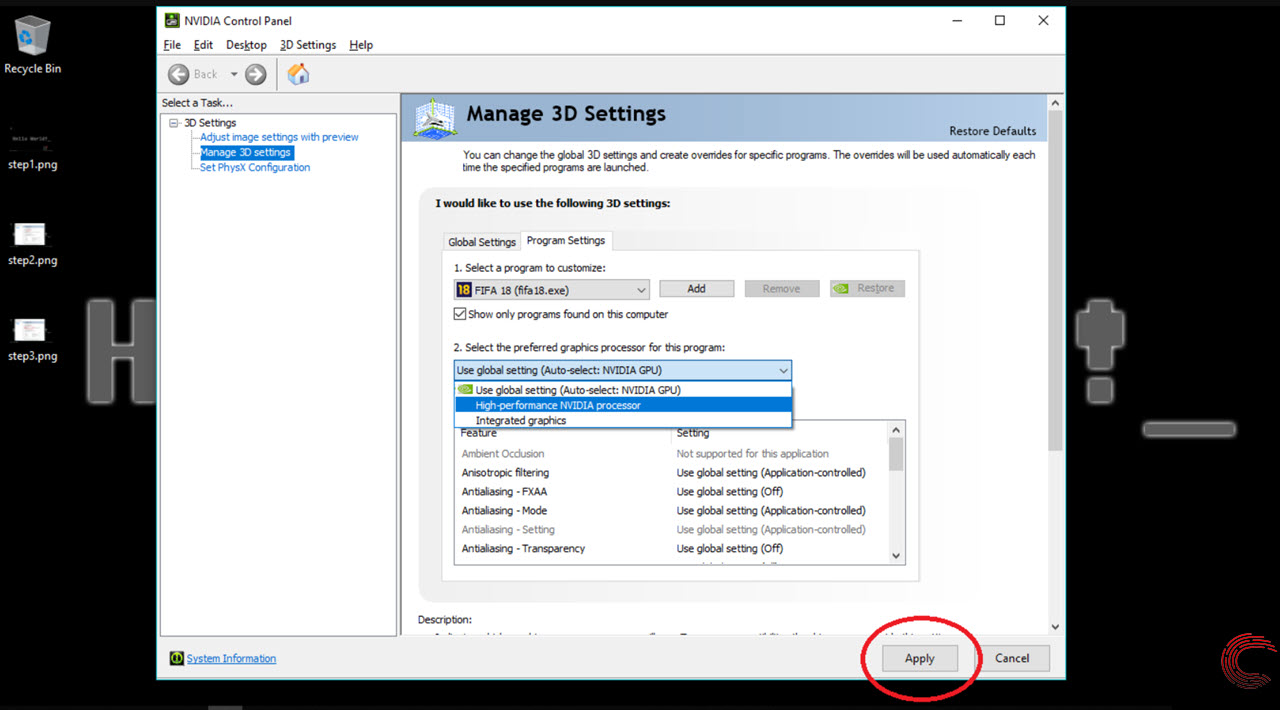
- Application-Specific Settings: Graphics control panels also provide the ability to set specific options and optimizations for individual applications. You can customize settings such as vertical synchronization (VSync), triple buffering, or maximum frame rate to match the requirements of different games or software applications.
It is important to note that the specific options and layout of the control panel may vary depending on your graphics card brand and model. Familiarize yourself with the control panel, explore the available options, and experiment with different settings to find the optimal configuration that suits your needs.
Setting graphics card as default
Once you have updated the drivers and configured the graphics card settings, you can now proceed with setting the graphics card as the default option on your system. Here’s how you can do it:
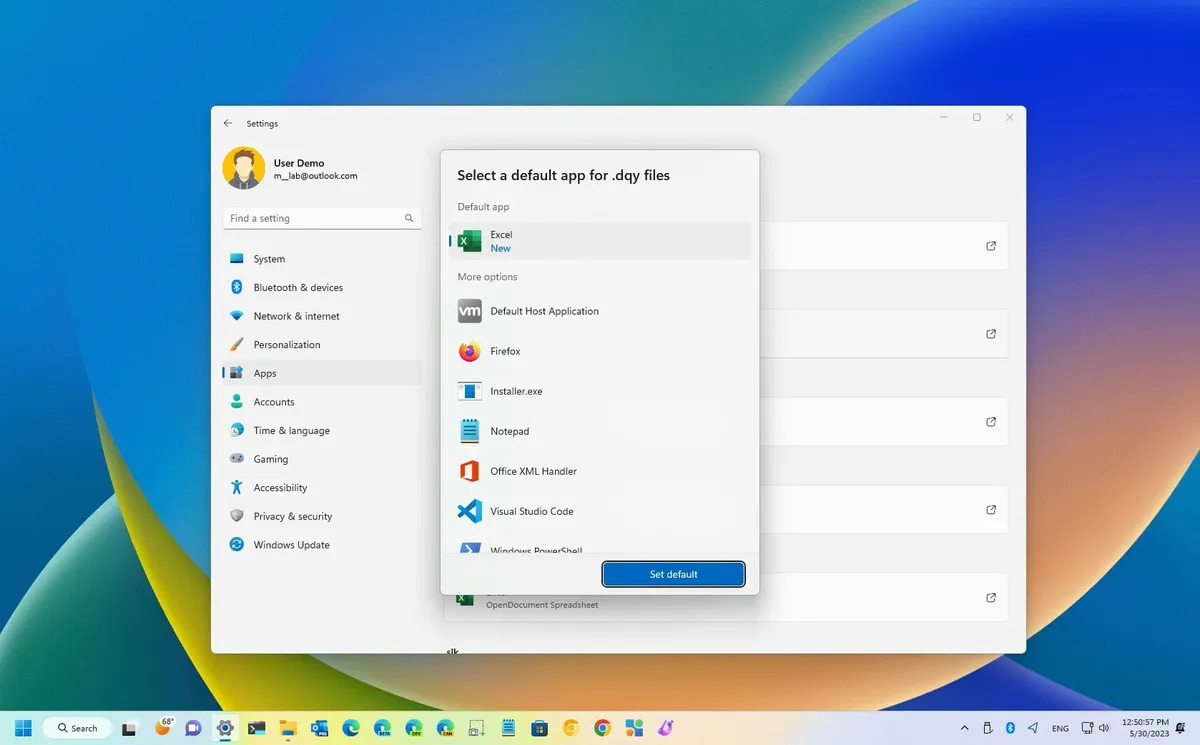
- Accessing Display Settings: Right-click on an empty area of your desktop and select “Display settings” or “Graphics options” from the context menu. Alternatively, you can access the display settings through the control panel or system settings, depending on your operating system.
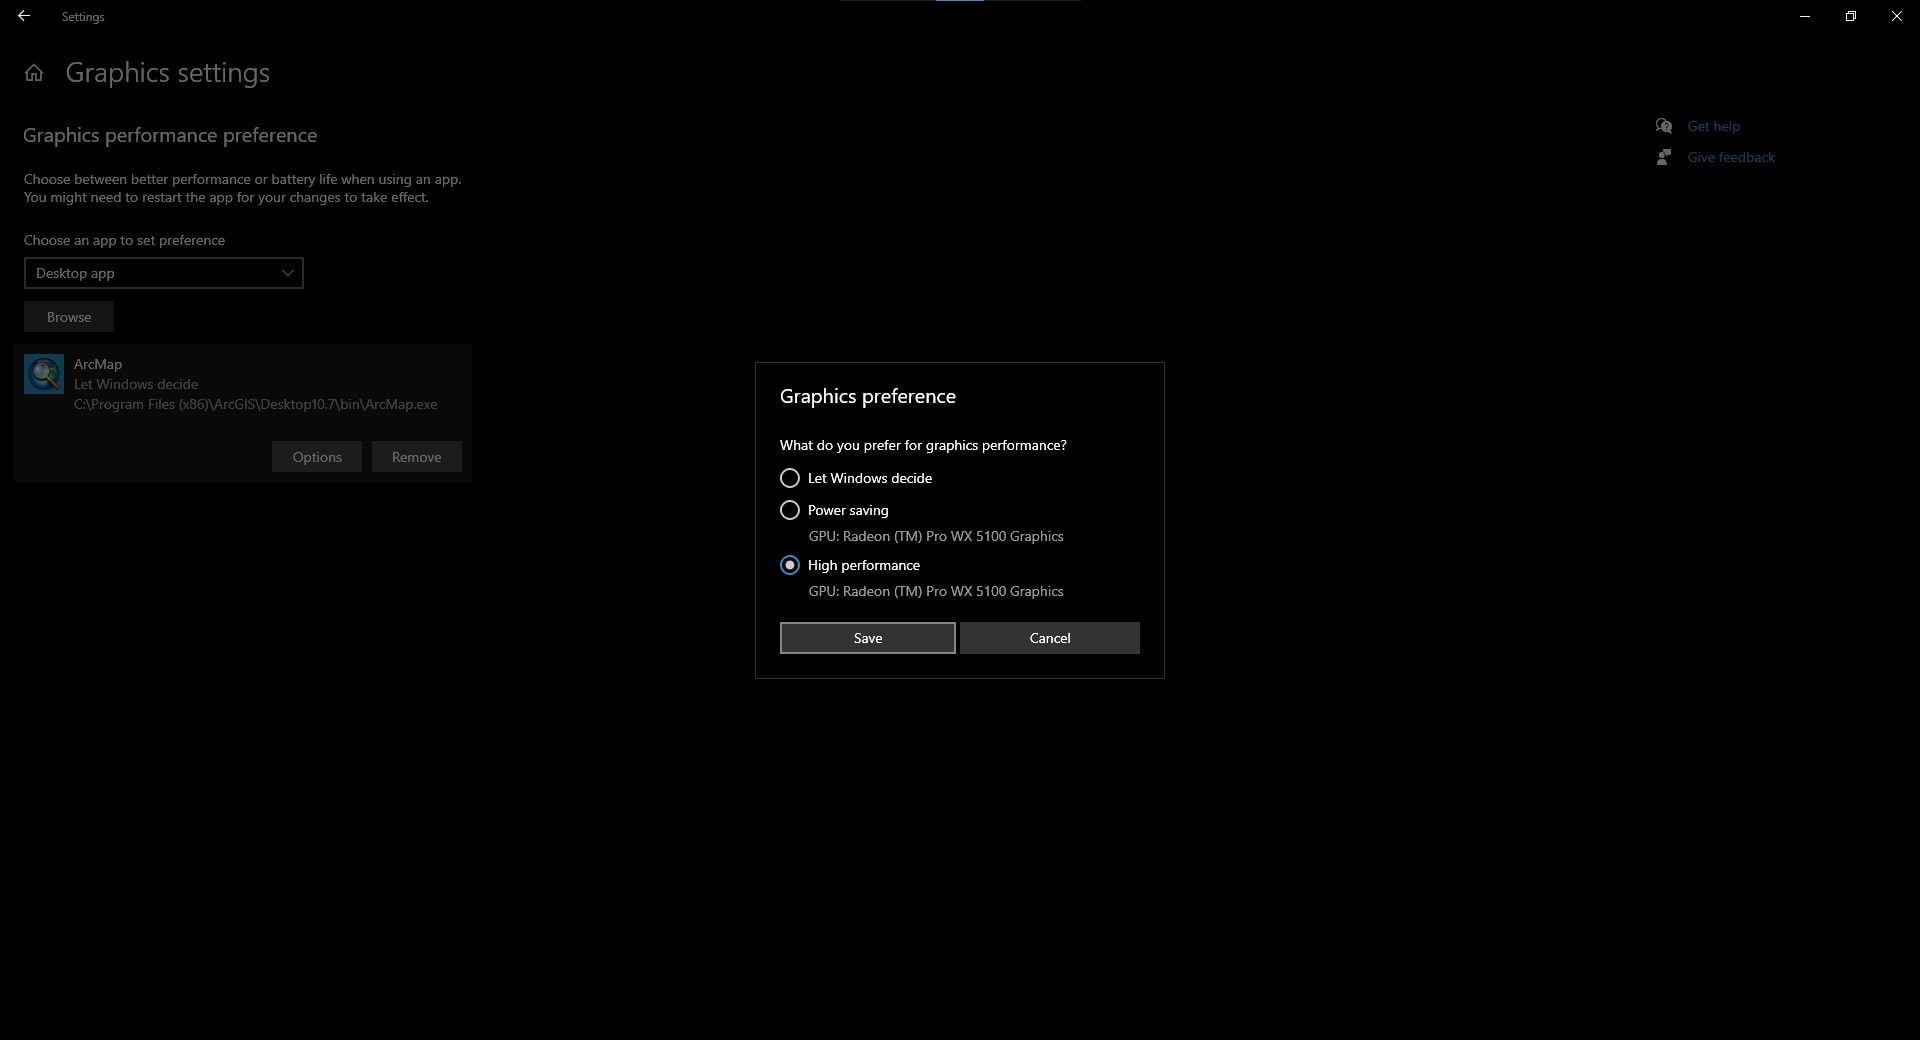
- Selecting Graphics Card: In the display settings, navigate to the “Graphics settings” or “Graphics adapter” section. Look for an option to choose the default graphics card or prioritization settings. Click on it to access the available options.
- Choosing Default Graphics Card: Within the graphics settings, you should see a list of available graphics cards. Select the dedicated graphics card from the list as the primary or default option. Save the changes, and the system will now prioritize the selected graphics card for rendering graphics-intensive tasks.
- Restart Your Computer: It is recommended to restart your computer after making changes to the default graphics card settings. This will ensure that the changes are applied correctly and take effect when the system boots up.
Setting the graphics card as the default option ensures that your system utilizes the dedicated hardware for handling demanding graphics tasks. This can lead to improved performance, smoother gameplay, and enhanced visual quality in applications and games that require high-level graphics processing.
If you don’t find an option to set the default graphics card in the display settings or graphics options, it could indicate that your system doesn’t support this feature. In such cases, the graphics card will automatically be used whenever it is required, and you won’t need to manually set it as the default.
Verifying the changes
After setting the graphics card as the default option, it’s important to verify that the changes have taken effect and that the system is utilizing the dedicated graphics card for graphics-intensive tasks. Here are a few ways to verify the changes:
- Task Manager: Open the Task Manager on Windows by pressing Ctrl+Shift+Esc and navigate to the “Performance” tab. In the GPU section, you should see the name of the graphics card that is currently being used for graphics processing. Ensure that it is the dedicated graphics card and not the integrated one.
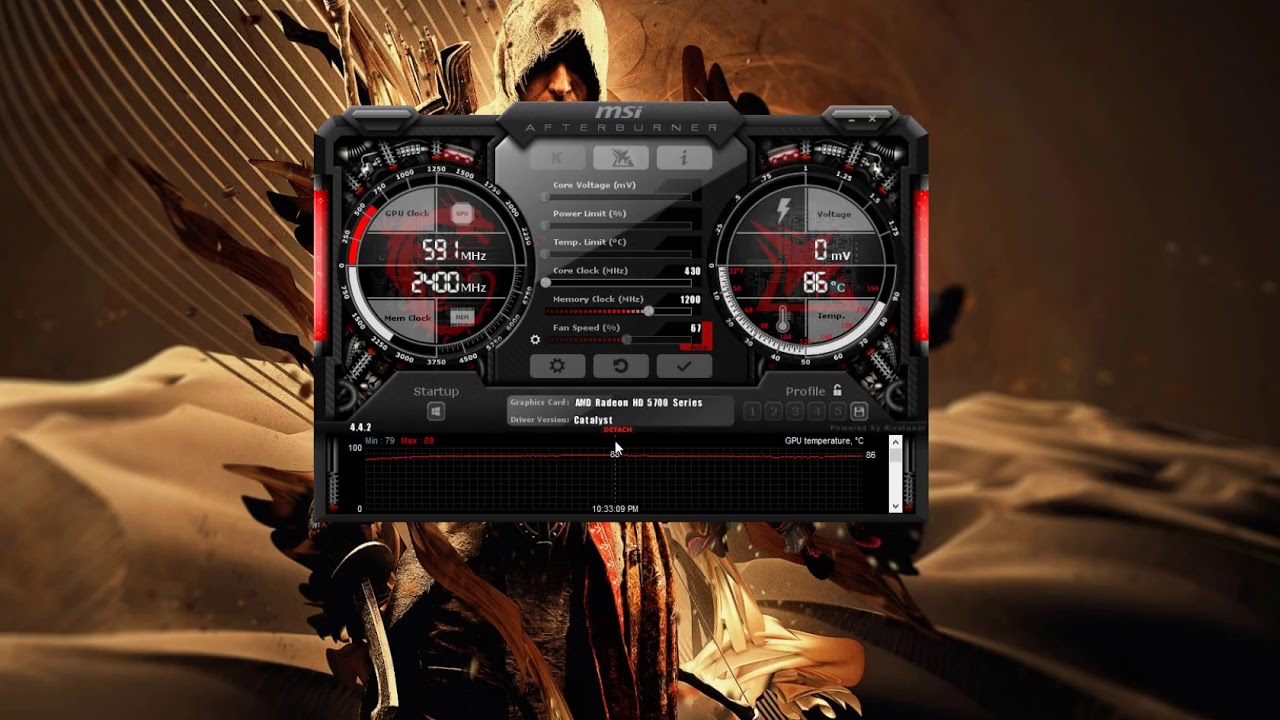
- GPU Monitoring Software: Install GPU monitoring software, such as MSI Afterburner or GPU-Z, to monitor the usage and performance of your graphics card. These tools provide real-time information about the GPU load, temperature, and clock speed. Confirm that the dedicated graphics card is active and being utilized during graphics-intensive tasks.
- Benchmarking Tools: Run graphics benchmarks or stress tests, such as 3DMark or Unigine Heaven, to evaluate the performance of your graphics card. Compare the results with previous tests to ensure that the dedicated card is delivering the expected performance and improvement after setting it as the default.
- Visual Quality: Finally, visually inspect applications, games, or multimedia content that require significant graphics processing. Pay attention to the smoothness, detail, and overall quality of the visuals. If you notice improved graphics performance, reduced lag, and enhanced visual effects, it indicates that the system is utilizing the dedicated graphics card as intended.
Verifying the changes ensures that your system is using the dedicated graphics card to its full potential. If you encounter any issues or discrepancies, double-check the driver installation, graphics card settings, and default selection. It’s also worth consulting the technical documentation or support resources provided by your graphics card manufacturer for further assistance.
Troubleshooting common issues
While setting a graphics card as the default option can bring significant benefits, you may encounter certain issues that require troubleshooting. Here are some common problems that you might encounter and possible solutions:
- Driver Compatibility: Ensure that you have the latest drivers installed, compatible with both your graphics card and operating system. Visit the manufacturer’s website to download and install the correct drivers.
- Driver Crashes: If you experience frequent driver crashes or system instability, try uninstalling the existing drivers completely and then reinstalling them. Use a driver cleaner tool to remove any remnants of previous driver installations.
- Conflicts with Integrated Graphics: Sometimes, integrated graphics processors can conflict with the dedicated graphics card. In the BIOS or UEFI settings, disable the integrated graphics option to prevent any conflicts and ensure that the system solely relies on the dedicated graphics card.
- Power Supply Limitations: Verify that your power supply can deliver enough power to support the dedicated graphics card. Insufficient power supply can cause system crashes or performance issues. Consider upgrading to a higher wattage power supply if needed.
- Overheating: Check the temperature of your graphics card during operation. Excessive heat can lead to performance throttling, system instability, or even damage to the GPU. Ensure that the graphics card is properly cooled with adequate airflow, clean any dust buildup, and consider using tools to monitor and control the fan speed.
- Compatibility with Applications: Some older applications or games may not be optimized to work with the latest graphics cards. In such cases, you might experience compatibility issues or visual glitches. Check for patches or updates for the problematic software and consider running it under compatibility mode if available.
If you encounter persistent issues or are unsure about the troubleshooting steps, it is advisable to seek assistance from the graphics card manufacturer’s support service or consult online forums and communities dedicated to graphics card troubleshooting. They can provide specific guidance based on your hardware and software configuration.
Conclusion
Setting a graphics card as the default option on your system can greatly enhance performance, visual quality, and compatibility with graphics-intensive tasks. By following the steps outlined in this guide, you can ensure that your system is utilizing the dedicated graphics card to its full potential.
Start by checking your system specifications to verify the presence of a dedicated graphics card. Update the drivers to ensure compatibility and access the latest performance optimizations. Configure the graphics card settings through the control panel, customizing options such as performance, image quality, and multi-monitor setups. Then, set the graphics card as the default option in the display settings to prioritize its use for graphics-intensive tasks.
After making these changes, it is important to verify that the system is utilizing the dedicated graphics card. Monitor GPU usage, check performance in benchmarking tools, and visually inspect the quality of graphics-intensive applications or games. If any issues arise, troubleshoot common problems, such as driver compatibility, conflicts with integrated graphics, or power supply limitations.
Remember to regularly check for driver updates and periodically optimize your graphics card settings for the best performance and visual experience. Be sure to consult the documentation and support resources provided by your graphics card manufacturer for specific guidance and assistance.
By setting a graphics card as the default and ensuring its proper utilization, you can unlock the full potential of your system’s graphics capabilities and enjoy smoother gameplay, improved visual quality, and enhanced performance in graphics-intensive applications.