Introduction
Graphics cards play a vital role in delivering an exceptional visual experience while using your computer, especially for tasks that require intense graphics processing, such as gaming or video editing. The default graphics card on your system determines the quality of the graphics rendered and can significantly impact performance.
If your computer has an Nvidia graphics card installed, you may want to consider making it the default graphics card. By doing so, you can ensure that all applications and games utilize the power of the Nvidia card, resulting in improved performance and better visual quality. In this article, we will walk you through the process of making Nvidia the default graphics card on your Windows machine.
Before proceeding, it is important to note that this tutorial specifically focuses on Windows operating systems. The steps and instructions may vary slightly depending on your system configuration and the version of Windows you are using.
Now, let’s begin by checking the current default graphics card on your system to determine whether Nvidia is already set as the default or if changes need to be made.
Checking the current default graphics card
Before making any changes, it is essential to identify the current default graphics card on your system. This will help us determine whether Nvidia is already set as the default or if you need to make adjustments.
Follow these steps to check the current default graphics card:
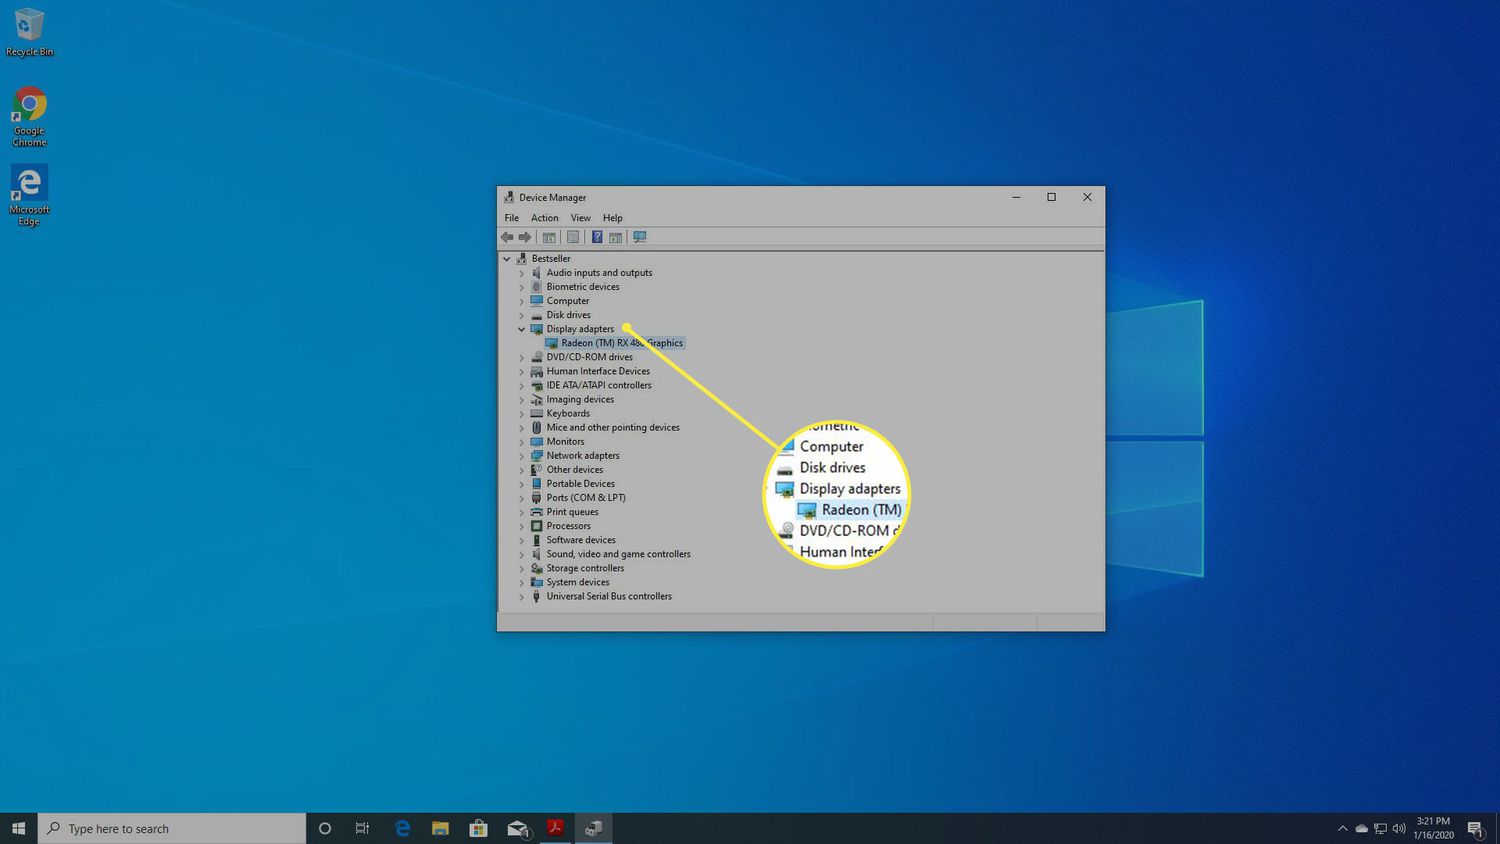
- Right-click on the Windows Start menu and select “Device Manager” from the context menu. Alternatively, you can press the Windows key + R, type “devmgmt.msc,” and hit Enter to open the Device Manager.
- In the Device Manager window, expand the “Display adapters” category by clicking the arrow next to it. This will display the graphics cards installed on your system.
- The default graphics card is usually indicated by a checkmark or the word “Default” next to it. Look for the entry that specifies your current default graphics card. If you have an Nvidia graphics card installed, it should be listed here.
If you see Nvidia listed as the default graphics card, you can skip the following steps and proceed to verify the driver installation. However, if another graphics card is currently set as the default, you will need to continue with the next section to make Nvidia the default graphics card on your system.
If you are unsure about which graphics card is the default or if you have multiple graphics cards installed, you can consult your computer’s manual or contact the manufacturer for assistance.
Once you have identified the current default graphics card on your system, you are ready to proceed with the necessary steps to make Nvidia the default graphics card.
Checking if Nvidia graphics card is installed
Before making Nvidia the default graphics card, it is crucial to ensure that you have an Nvidia graphics card installed on your system. Here’s how you can verify the presence of an Nvidia graphics card:
- Open the Device Manager by right-clicking on the Windows Start menu and selecting “Device Manager” from the context menu. You can also press the Windows key + R, type “devmgmt.msc,” and hit Enter to open the Device Manager.
- In the Device Manager window, expand the “Display adapters” category by clicking the arrow next to it. You should see a list of graphics cards installed on your system.
- Look for the Nvidia graphics card entry. It may be labeled as “Nvidia GeForce,” “Nvidia Quadro,” or “Nvidia NVS,” followed by the model number. If you have an Nvidia graphics card installed, it should be listed here.
- If you cannot find an Nvidia graphics card listed, it means that you either do not have an Nvidia graphics card installed or it is not detected by your system. In this case, you may need to check your hardware connections, update your drivers, or consult the manufacturer for further assistance.
Keep in mind that the absence of an Nvidia graphics card does not necessarily mean that you cannot proceed with making Nvidia the default graphics card. You may still be able to install an Nvidia graphics card in your system if desired.
Once you have confirmed the presence of an Nvidia graphics card on your system, you can proceed to the next section, which covers the process of installing the latest Nvidia graphics driver.
Installing the latest Nvidia graphics driver
In order to maximize the performance and compatibility of your Nvidia graphics card, it is essential to have the latest Nvidia graphics driver installed on your system. Here is a step-by-step guide on how to install the latest Nvidia graphics driver:
- Visit the Nvidia Driver Download page on the official Nvidia website. You can access this page by navigating to https://www.nvidia.com/Download/index.aspx.
- On the Nvidia Driver Download page, the website will automatically detect your graphics card and operating system. However, if it does not, you can manually select your product series, product, and operating system from the dropdown menus.
- Once you have selected the correct options, click on the “Search” button to proceed.
- A list of available driver versions will be displayed. It is recommended to download and install the latest stable version of the driver. To do so, click on the “Download” button next to the driver version.
- Before starting the driver installation, it is wise to close any open applications running on your system.
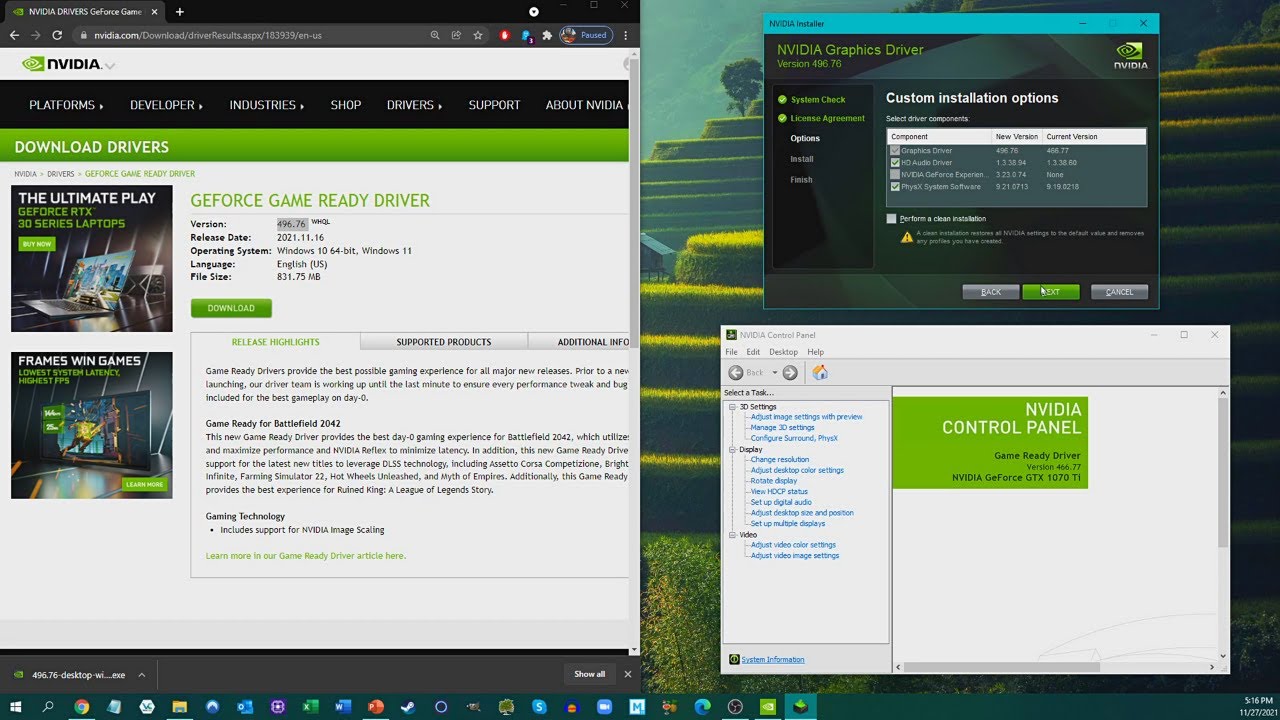
- Once the driver is downloaded, locate the file and double-click on it to start the installation process.
- Follow the on-screen prompts to complete the installation of the Nvidia graphics driver. During the installation, you will have the option to customize the installation settings according to your preferences. If you are unsure, it is generally safe to proceed with the default settings.
- After the installation is complete, restart your system to apply the changes and ensure that the new driver is properly activated.
Note that during the installation process, you may be prompted to uninstall the previous version of the Nvidia graphics driver. It is recommended to uninstall the previous driver to avoid any conflicts or compatibility issues.
Once you have successfully installed the latest Nvidia graphics driver, you can proceed to the next section which outlines the process of setting Nvidia as the default graphics card in the Nvidia Control Panel.
Setting Nvidia as the default graphics card in the Nvidia Control Panel
After installing the latest Nvidia graphics driver, the next step is to configure the Nvidia Control Panel to set Nvidia as the default graphics card on your system. Here’s how you can do it:
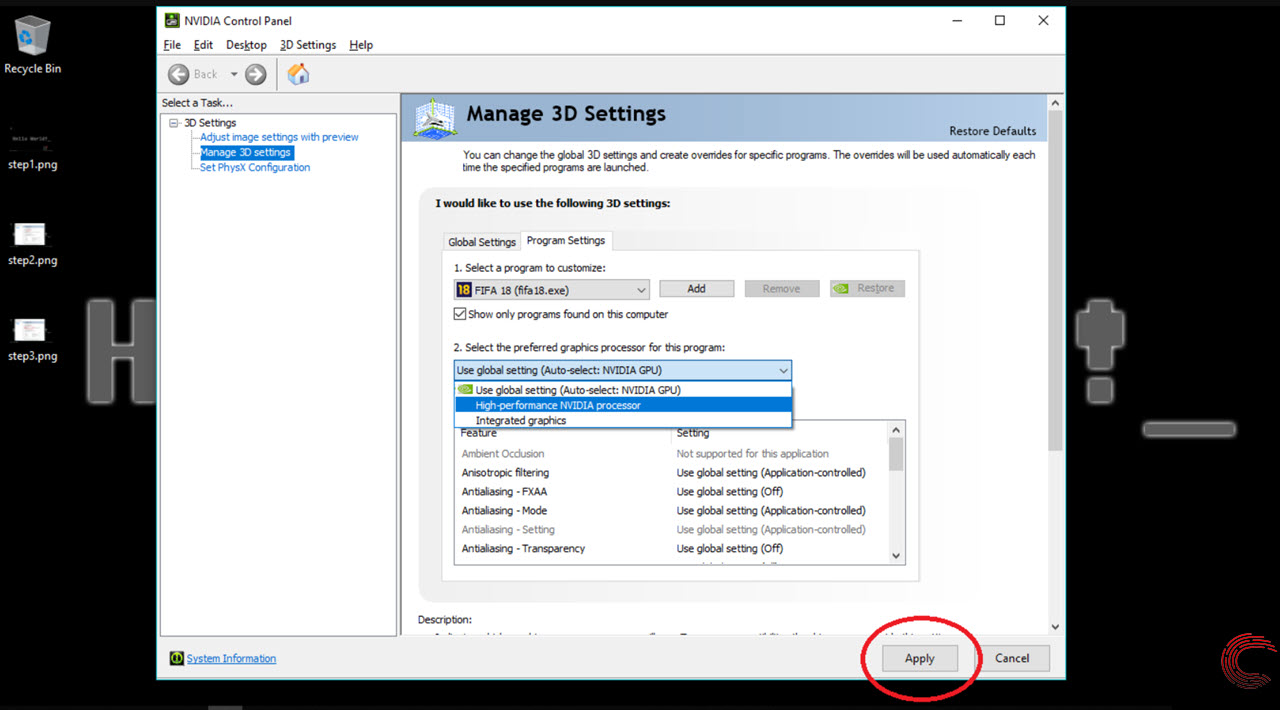
- Right-click on your computer’s desktop and select “Nvidia Control Panel” from the context menu. If you don’t see this option, you may need to update your Nvidia graphics driver or reinstall the Nvidia Control Panel.
- In the Nvidia Control Panel, navigate to the “3D Settings” category in the left pane.
- Under “3D Settings,” click on the “Manage 3D settings” option.
- In the “Manage 3D Settings” window, go to the “Global Settings” tab.
- In the “Preferred graphics processor” dropdown menu, select “High-performance Nvidia processor” to set Nvidia as the default graphics card.
- Click on the “Apply” button to save the changes.
By setting Nvidia as the preferred graphics processor in the Nvidia Control Panel, you ensure that your system utilizes the full power of your Nvidia graphics card for all applications and games. This will result in improved performance and better graphics quality.
Now that you have successfully set Nvidia as the default graphics card in the Nvidia Control Panel, it is important to verify the changes and, if required, restart your system for the changes to take effect.
In the next section, we will cover how to verify the changes and troubleshoot any common issues that may arise during the process.
Verifying the changes and restarting the system if necessary
After setting Nvidia as the default graphics card in the Nvidia Control Panel, it is crucial to verify that the changes have been applied successfully. Additionally, in some cases, a system restart may be necessary to ensure that the changes take full effect. Here’s what you need to do:
- Open a graphics-intensive application or game on your computer, such as a high-definition video or a demanding game.
- While the application or game is running, observe the graphics performance and visual quality. If Nvidia is successfully set as the default graphics card, you should experience improved performance and enhanced graphics.
- If you notice any issues or inconsistencies, double-check the Nvidia Control Panel settings to ensure that the preferred graphics processor is set to “High-performance Nvidia processor.”
- If the issue persists, consider restarting your system. Sometimes, a system restart is required for the changes to take full effect.
- After restarting your system, repeat the verification process by launching a graphics-intensive application or game and assessing the graphics performance and quality.
If, even after verifying the settings and restarting your system, you still encounter performance or compatibility issues, you may need to explore additional troubleshooting steps or consider seeking assistance from Nvidia support or your system manufacturer.
In the next section, we will provide some common troubleshooting tips to help you address typical issues that may arise during the process of setting Nvidia as the default graphics card.
Troubleshooting common issues
While setting Nvidia as the default graphics card should be a straightforward process, there might be some common issues that could arise. Here are a few troubleshooting tips to help you address these issues:
1. Ensure you have the latest Nvidia graphics driver: If you encounter any problems after setting Nvidia as the default graphics card, make sure you have installed the latest Nvidia graphics driver. Visit the Nvidia website and download the latest driver for your specific graphics card model and operating system. Install the driver and restart your system.
2. Check for conflicts with other software: Sometimes, conflicts with other software or applications can interfere with the proper functioning of Nvidia as the default graphics card. Disable or uninstall any conflicting software, such as third-party graphics optimization tools or other graphics drivers, and then restart your system to see if the issue is resolved.
3. Adjust Nvidia Control Panel settings: In the Nvidia Control Panel, you have various settings that can affect the performance and compatibility of your graphics card. Experiment with different settings, such as power management mode or texture filtering options, to see if it improves your graphics performance or resolves any specific issues you may encounter.
4. Reset Nvidia Control Panel settings: If you have made extensive changes to the Nvidia Control Panel settings and are experiencing issues, you can reset the settings to their default values. Open the Nvidia Control Panel, go to the “Manage 3D settings” tab, click on the “Restore” button, and then restart your system.
5. Update your operating system: Ensure that your operating system is up to date with the latest updates and patches. Sometimes, outdated operating system components can cause compatibility issues with Nvidia graphics cards. Check for updates in your operating system’s settings or manually download and install the latest updates from the official website.
6. Seek assistance from Nvidia support: If you have tried all the troubleshooting steps and are still experiencing issues, it is recommended to reach out to Nvidia’s customer support. They can provide specific guidance and help resolve any intricate problems related to using Nvidia as the default graphics card.
Remember, each system configuration is unique, and the solutions that work for one person may not work for another. If you encounter any difficulties, it’s always a good idea to seek help from official support channels or consult with technical experts to ensure you can enjoy the full benefits of using Nvidia as the default graphics card on your system.
Conclusion
Setting Nvidia as the default graphics card on your Windows system can significantly improve the performance and visual quality of your computer, especially for graphics-intensive tasks such as gaming and video editing. In this article, we have provided a step-by-step guide on how to make Nvidia the default graphics card on your system.
We started by checking the current default graphics card on your system and verifying the presence of an Nvidia graphics card. Then, we walked you through the process of installing the latest Nvidia graphics driver, which is essential for maximizing performance and compatibility. Next, we explained how to set Nvidia as the default graphics card in the Nvidia Control Panel.
After making the necessary changes, we emphasized the importance of verifying the changes and, if needed, restarting the system to ensure that they take full effect. Additionally, we provided common troubleshooting tips to help you address any issues you may encounter during the process.
Remember that the steps and instructions outlined in this guide may vary slightly depending on your system configuration and the version of Windows you are using. It is always recommended to consult your computer’s manual, the Nvidia website, or seek assistance from official support channels if you have any specific concerns or encounter difficulties.
By setting Nvidia as the default graphics card, you can unlock the full potential of your Nvidia graphics card and enjoy improved graphics performance and quality. Whether you’re a gamer, a content creator, or simply someone who values a smooth and visually appealing computing experience, making Nvidia the default graphics card is a worthwhile endeavor.
With this knowledge in hand, you are now equipped to take control of your graphics settings and optimize your system for a more immersive and enjoyable computing experience.