Introduction
Welcome to our guide on how to change the default graphics card in Windows 10. Graphics cards play a crucial role in the performance and visual experience of your computer, especially when it comes to demanding tasks like gaming, rendering, and video editing. Windows 10 automatically assigns a default graphics card to handle these tasks, but sometimes you may want to change it to a different one to optimize your system’s performance.
In this article, we will provide you with a step-by-step guide to help you change the default graphics card in Windows 10. We will discuss various methods, including using Device Manager, updating graphics driver software, modifying BIOS settings, and installing a new graphics card. We will also address common issues that you may encounter during the process and provide troubleshooting tips to help you overcome them.
Before we delve into the different methods of changing the default graphics card, it is important to understand the basics. We will explain what the default graphics card is, how to check your current graphics card, and why you may need to change it. This knowledge will equip you with a better understanding of the process and ensure a smooth transition to your desired graphics card.
Whether you’re a casual computer user wanting to improve your gaming experience or a professional looking to optimize your workstation, this guide will walk you through the necessary steps to change the default graphics card in Windows 10. So, let’s get started and unleash the full potential of your graphics hardware!
Understanding Default Graphics Card in Windows 10
Before diving into the process of changing the default graphics card in Windows 10, it’s essential to have a clear understanding of what the default graphics card actually is and how it functions within the operating system.
The default graphics card, also known as the primary display adapter, is the graphics processing unit (GPU) that handles all the visual output on your computer. Windows 10 automatically assigns a default graphics card during the installation process based on the hardware detected. This default card is responsible for rendering images, videos, games, and any other graphics-intensive tasks.
The default graphics card is selected based on various factors, including compatibility with the system’s hardware, driver availability, and performance capabilities. Windows 10 relies on the default graphics card to ensure optimal performance and stability for all graphical applications running on your computer.
It’s important to note that a computer may have multiple graphics cards installed, especially in modern gaming rigs or workstations. These additional graphics cards are often used in conjunction with the default graphics card to improve performance or enable multi-monitor setups. However, the default graphics card is the primary GPU that Windows 10 recognizes and utilizes by default.
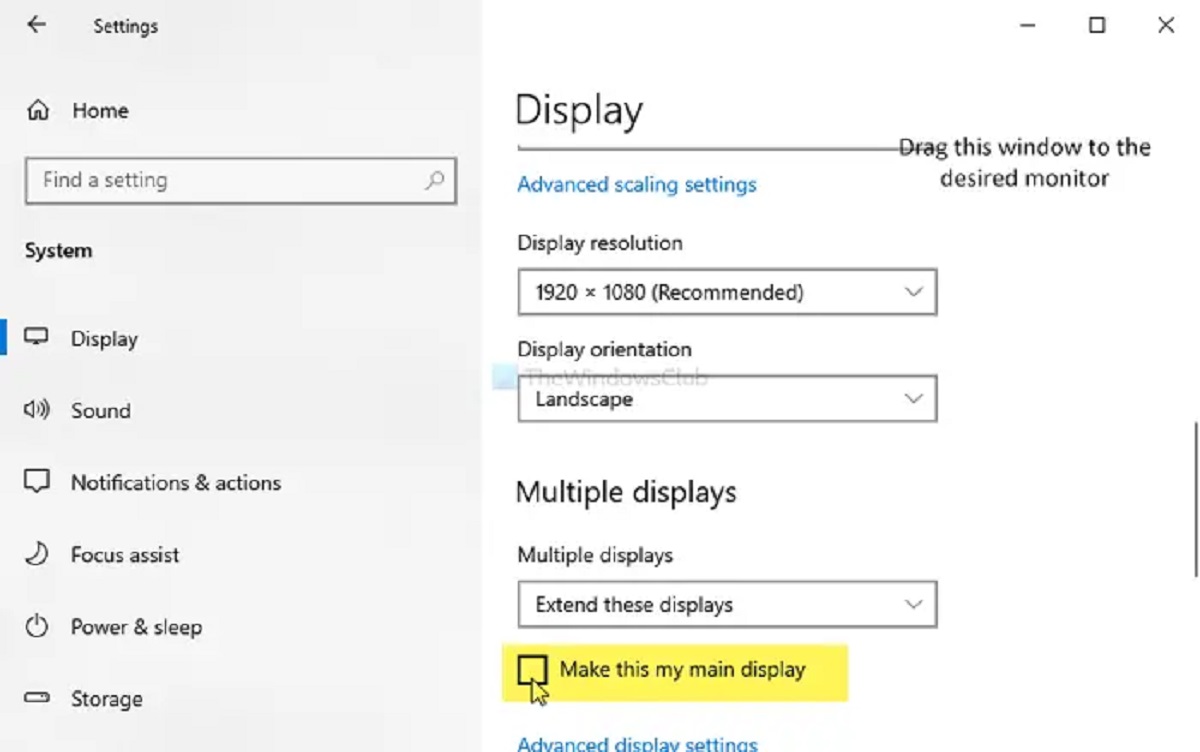
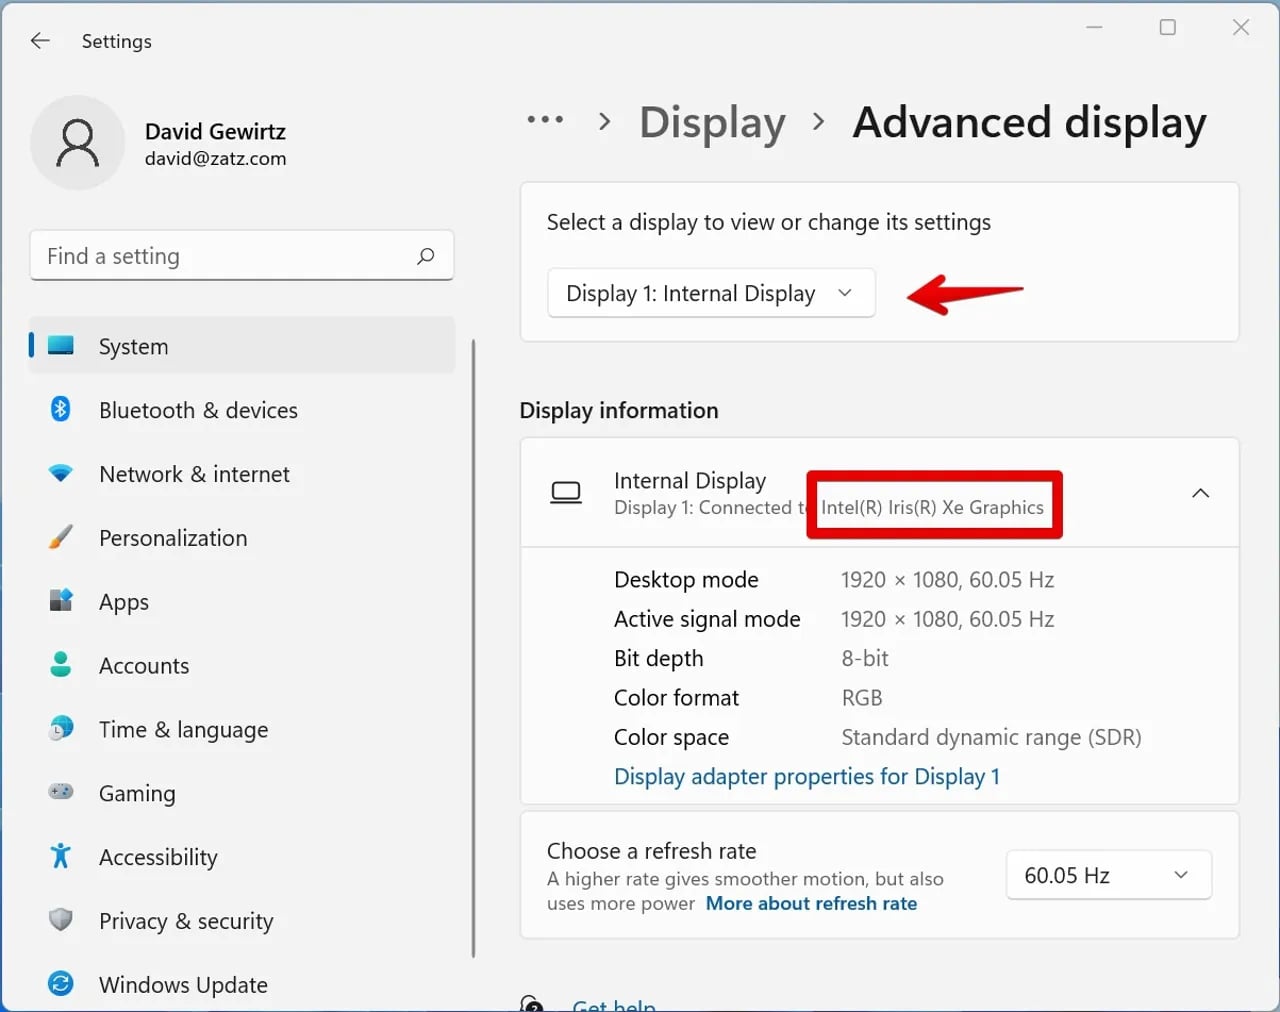
To determine which graphics card is currently set as the default in Windows 10, you can access the Display Settings. Here, you will find information about the currently active display and the graphics card driving it.
Understanding the default graphics card in Windows 10 is crucial because it helps you identify the specific GPU that your system relies on for graphics rendering. This knowledge is particularly important when you want to change the default graphics card to optimize performance, upgrade to a more capable GPU, or troubleshoot any graphics-related issues.
Now that we have a clear understanding of the default graphics card in Windows 10, let’s move on to the next section and learn how to check which graphics card is currently set as the default on your system.
Checking Your Current Graphics Card
Before you can proceed with changing the default graphics card in Windows 10, it’s important to know which graphics card is currently being used by your system. By checking your current graphics card, you can ensure that you have accurate information and make the necessary changes accordingly.
There are several methods that you can use to check your current graphics card in Windows 10:
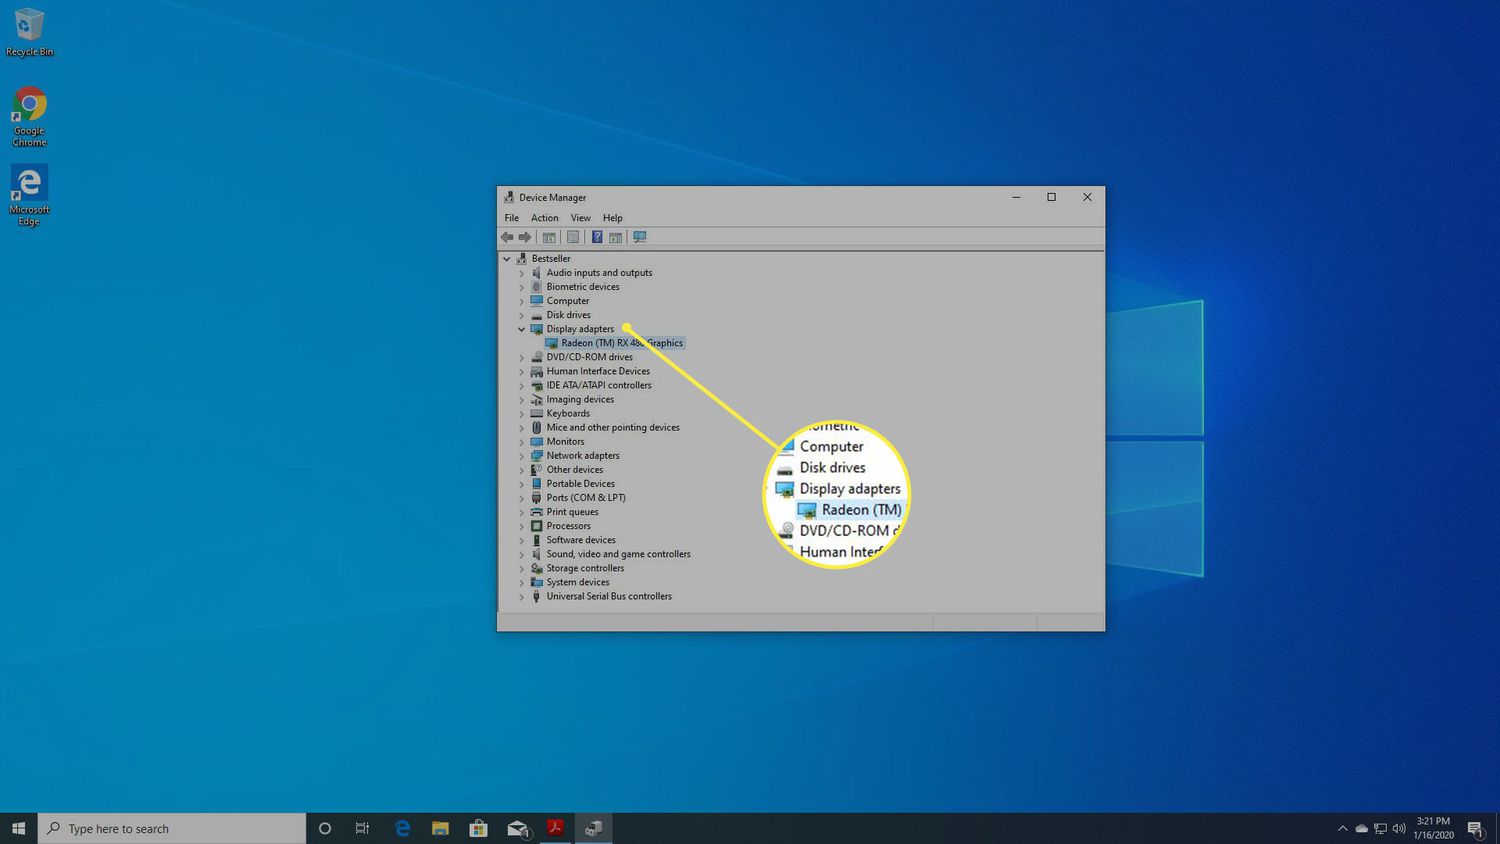
- Device Manager: The Device Manager is a built-in Windows utility that allows you to view and manage the hardware devices connected to your computer. To access it, right-click on the Start button and select “Device Manager” from the context menu. In the Device Manager window, expand the “Display adapters” category, and you will see the name of your current graphics card listed.
- System Information: The System Information tool provides detailed information about your computer’s hardware and software configuration. To access it, press the Windows key + R to open the Run dialog box, type “msinfo32” and hit Enter. In the System Information window, expand the “Components” category and click on “Display.” On the right-hand side, you will find the name of your current graphics card under the “Adapter Description” section.
- Third-party System Information Tools: There are various third-party system information tools available that provide detailed information about your computer’s hardware, including the graphics card. Some popular options include CPU-Z, GPU-Z, and Speccy. These tools offer more advanced features and can provide additional information, such as GPU temperature, clock speed, and driver version.
By utilizing one of these methods, you can easily determine the name and model of your current graphics card. This information is essential when it comes to changing the default graphics card, as you’ll need to ensure compatibility with your system and select the appropriate replacement, if necessary.
Once you have identified your current graphics card, you’re ready to move on to the next section, where we will discuss the reasons why you may need to change the default graphics card in Windows 10.
Identifying the Need for Changing Default Graphics Card
While the default graphics card that Windows 10 assigns during installation is typically suitable for most users, there are situations where you may find the need to change it. Understanding these scenarios can help you evaluate whether changing the default graphics card is necessary for your specific needs.
Here are some common reasons why you might consider changing the default graphics card in Windows 10:
- Performance Enhancement: If you are a gamer or regularly use graphics-intensive applications, you may want to upgrade to a more powerful graphics card to improve performance and experience smoother gameplay or faster rendering times. Changing the default graphics card to a higher-end model with better specifications can result in significant performance gains.
- Driver Compatibility: In some cases, the default graphics card driver installed by Windows 10 may not be the latest or optimal driver for your specific graphics card model. Changing the default graphics card allows you to install the most up-to-date driver from the manufacturer’s website, ensuring optimal compatibility and performance.
- Multiple Graphics Cards: If you have multiple graphics cards installed in your system, it may be beneficial to change the default graphics card to utilize a different GPU for specific tasks. For example, you might want to designate a more power-efficient graphics card for everyday use and reserve a high-performance card for gaming or other demanding applications.
- Graphics-Related Issues: In some cases, you may encounter graphics-related issues such as screen flickering, artifacts, or poor image quality. Changing the default graphics card can help troubleshoot and resolve these issues by utilizing a different GPU or updating the driver.
Identifying the specific need for changing the default graphics card will help you determine whether it’s worth the effort and expense. It’s important to consider factors such as your intended usage, budget, and the performance capability of alternative graphics cards before making any changes.
Now that you’ve identified the need for changing the default graphics card, it’s time to delve into the step-by-step guide on how to make the switch. In the following section, we will discuss various methods that you can use to change the default graphics card in Windows 10.
Step-by-Step Guide to Changing Default Graphics Card
Changing the default graphics card in Windows 10 involves a series of steps that vary depending on the method you choose. In this section, we will provide you with a comprehensive step-by-step guide that covers various methods to help you make the switch.
Method 1: Using Device Manager
- Open the Device Manager by right-clicking on the Start button and selecting “Device Manager” from the context menu.
- Expand the “Display adapters” category.
- Right-click on the current default graphics card and select “Disable” to turn it off.
- Right-click on the desired graphics card that you want to set as the default and select “Enable” to activate it.
Method 2: Updating Graphics Driver Software
- Visit the manufacturer’s website for your new graphics card and download the latest driver software.
- Run the downloaded driver package and follow the on-screen instructions to update the graphics driver.
- Restart your computer after the driver installation is complete.
Method 3: Modifying BIOS Settings
- Restart your computer and access the BIOS settings by pressing the designated key during the boot process (usually displayed on the startup screen).
- Navigate to the “Advanced” or “Integrated Peripherals” section of the BIOS.
- Locate the option to change the default graphics card or Primary Display Adapter.
- Select the desired graphics card from the available options.
- Save the changes and exit the BIOS.
Method 4: Installing a New Graphics Card
- Power off your computer and disconnect the power supply.
- Open your computer case and locate an available PCI Express slot.
- Insert the new graphics card firmly into the slot.
- Connect the necessary power cables from the power supply to the graphics card.
- Close the computer case and reconnect the power supply.
- Power on your computer and install the necessary driver software for the new graphics card.
It’s important to note that not all methods may be available or suitable for your specific system configuration. Choose the method that best suits your needs and follow the provided steps carefully to avoid any issues.
Now that you have a step-by-step guide to changing the default graphics card in Windows 10, you can proceed with confidence and optimize your system’s graphics performance according to your preferences. However, before diving into the process, it’s always a good idea to back up your important data and create a system restore point to ensure a safe and smooth transition.
Method 1: Using Device Manager
One of the easiest and quickest ways to change the default graphics card in Windows 10 is by using the Device Manager. The Device Manager is a built-in Windows utility that allows you to manage and control hardware devices connected to your computer. Follow these steps to change the default graphics card using Device Manager:
- Open the Device Manager by right-clicking on the Start button and selecting “Device Manager” from the context menu.
- Expand the “Display adapters” category to view the list of installed graphics cards.
- Right-click on the current default graphics card and select “Disable” from the drop-down menu. This action will disable the current default card.
- To set a new graphics card as the default, right-click on the desired graphics card from the list and select “Enable.”
By following these steps, you can disable the current default graphics card and enable the desired graphics card as the new default. Once you enable the new graphics card, the Windows operating system will start utilizing it for all graphical tasks.
It’s important to note that some systems may require a system restart for the changes to take effect. Make sure to save any unsaved work and restart your computer when prompted.
Changing the default graphics card using Device Manager is a straightforward and convenient method. However, keep in mind that this method may not be available for certain integrated graphics configurations or laptops with switchable graphics cards. In such cases, you may need to explore alternative methods or consult your system’s documentation for specific instructions.
Now that you are familiar with the first method of changing the default graphics card via Device Manager, you can proceed to the next section, where we will discuss another method: updating the graphics driver software.
Method 2: Updating Graphics Driver Software
Another method to change the default graphics card in Windows 10 involves updating the graphics driver software. This method is beneficial when you have installed a new graphics card and want to ensure that you are using the most up-to-date driver for optimal performance. Follow these steps to update the graphics driver software:
- Visit the manufacturer’s website for your new graphics card. Navigate to the “Support” or “Downloads” section.
- Search for the latest driver software for your specific graphics card model and operating system. Download the driver package to your computer.
- Once the download is complete, run the driver package and follow the on-screen instructions to proceed with the installation. It’s recommended to close any other programs before installing the driver.
- During the installation process, you may be prompted to choose between a clean installation (removing the existing driver) or a custom installation (updating the current driver). Select the appropriate option based on your preference.
- After the driver installation is complete, restart your computer to apply the changes. Some driver installations may prompt you to restart immediately, while others may require a manual restart.
By updating the graphics driver software, you ensure that your system is utilizing the most recent driver version provided by the manufacturer. This not only improves compatibility but also offers potential performance enhancements and bug fixes.
It’s worth mentioning that in some cases, Windows Update may also provide driver updates for your graphics card. However, it is recommended to visit the manufacturer’s website directly to ensure you have the latest and most compatible driver for your specific card model.
Updating the graphics driver software is a crucial step when installing a new graphics card and helps ensure that your computer is using the correct and optimal driver. Now that you have learned about this method, you can proceed to the next section where we will discuss another approach: modifying BIOS settings.
Method 3: Modifying BIOS Settings
Modifying BIOS settings is another method that can be used to change the default graphics card in Windows 10. This method is particularly useful when you have multiple graphics cards installed in your system and want to specify which one should be used as the default. Here’s how you can modify BIOS settings to change the default graphics card:
- Restart your computer and access the BIOS settings by pressing the designated key during the boot process. The specific key varies depending on the motherboard manufacturer, but it is usually displayed on the startup screen.
- Navigate to the “Advanced” or “Integrated Peripherals” section in the BIOS settings. The location of this section may vary slightly based on your BIOS version and motherboard model.
- Look for an option related to the default graphics card or Primary Display Adapter. The exact name of the option can differ, but it may include terms like “Primary Display,” “VGA Priority,” or “Graphics Adapter Priority.”
- Select the desired graphics card from the available options. This may be a specific PCIe slot or a specific graphics card model, depending on your BIOS options.
- Save the changes and exit the BIOS settings. You can usually do this by pressing a function key like F10 or by selecting the “Save and Exit” option.
By modifying the BIOS settings, you are specifying which graphics card should be used as the default during the system startup. This can be helpful when you have multiple graphics cards installed and want to designate a specific one as the primary display adapter.
It’s important to note that not all BIOS versions and motherboard models have the option to modify the default graphics card. In some cases, your BIOS may automatically detect and assign the default graphics card based on the PCIe slot hierarchy or other factors. Make sure to consult your system’s documentation or the manufacturer’s website for specific instructions related to changing the default graphics card in BIOS.
Now that you have learned about modifying BIOS settings to change the default graphics card, you can proceed to the next section, where we will discuss another method: installing a new graphics card.
Method 4: Installing a New Graphics Card
If you want to change the default graphics card in Windows 10 by physically replacing the existing one with a new one, you can do so by installing a new graphics card. This method is ideal when you want to upgrade to a more powerful GPU or replace a faulty graphics card. Follow these steps to install a new graphics card:
- Power off your computer and disconnect the power supply to prevent any electrical mishaps.
- Open your computer case by removing the screws or latches on the side panel.
- Locate an available PCI Express (PCIe) slot on your motherboard. This slot is typically longer than other expansion slots and is specifically designed for graphics cards.
- Gently align the gold contacts on the bottom of the graphics card with the PCIe slot on the motherboard.
- Insert the graphics card firmly into the slot, applying even pressure until it clicks into place. Ensure that the metal bracket at the rear of the card aligns with the rear I/O panel of your computer case.
- Connect the necessary power cables from the power supply to the graphics card. Some high-performance graphics cards require additional power connectors, such as 6-pin or 8-pin connectors.
- Close the computer case and secure it with the screws or latches to ensure proper installation and safety.
- Reconnect the power supply cables and any other peripheral devices that you had disconnected earlier.
- Power on your computer and install the necessary driver software for the new graphics card by following the prompts provided by the manufacturer.
After successfully installing the new graphics card and installing the appropriate driver software, Windows 10 will detect and recognize the new card as the default graphics card. This means that all graphics-intensive tasks will be handled by the newly installed GPU.
It’s worth noting that when installing a new graphics card, you may need to uninstall the driver software for the previous card before installing the driver for the new one. This can be done using the Device Manager or by using a driver removal tool provided by the graphics card manufacturer.
Please refer to the documentation and installation guide provided by the graphics card manufacturer for specific instructions and precautions related to your particular model. Now that you have learned about installing a new graphics card as a method to change the default graphics card, you can proceed to the next section where we will discuss troubleshooting common issues that may arise during this process.
Troubleshooting Common Issues
While changing the default graphics card in Windows 10 is generally a smooth process, there may be some common issues that you could encounter along the way. Here are a few troubleshooting tips for resolving these issues:
Issue 1: Driver Incompatibility
If you experience driver incompatibility after changing the default graphics card, ensure that you have installed the latest driver specific to your new graphics card model. Visit the manufacturer’s website and download the correct driver to ensure compatibility and optimal performance.
Issue 2: Invalid Display Output
If you encounter an issue where your monitor displays no signal or an invalid output after changing the default graphics card, ensure that the monitor is connected to the correct port on the new graphics card. Additionally, check the cable connections and make sure they are secure.
Issue 3: System Instability or Crashes
If your system experiences instability or crashes after changing the default graphics card, it may be due to inadequate power supply. Verify that your power supply can handle the power requirements of the new graphics card. In some cases, upgrading to a higher wattage power supply may be necessary.
Issue 4: Incorrect BIOS Settings
If you encounter issues with BIOS settings after changing the default graphics card, such as the system not recognizing the new card, ensure that you have selected the correct primary graphics card option in the BIOS. Review your motherboard manual or consult the manufacturer’s website for detailed instructions specific to your hardware.
Issue 5: Overheating or Fan Issues
If you notice excessive heat or abnormal fan noise after changing the default graphics card, check that the graphics card is properly seated in its slot and that the fans on the card are spinning freely. Clean any dust or debris from the card and ensure that airflow within the case is adequate.
If you encounter any other issues during the process of changing the default graphics card, it’s recommended to consult the documentation provided by the graphics card manufacturer or seek assistance from technical support channels.
By following these troubleshooting tips, you can address common issues that may arise during the process of changing the default graphics card. Now that you are equipped with these troubleshooting techniques, you can confidently proceed with changing the default graphics card in Windows 10.
Conclusion
Changing the default graphics card in Windows 10 can greatly enhance your computer’s performance and visual capabilities. Whether you’re looking to upgrade to a more powerful graphics card or troubleshoot graphics-related issues, the step-by-step methods discussed in this guide can help you make the desired changes.
We began by understanding the concept of the default graphics card and how it functions within the Windows 10 operating system. We then explored various methods for changing the default graphics card, including using Device Manager, updating graphics driver software, modifying BIOS settings, and installing a new graphics card. Each method offers different benefits and is suitable for specific scenarios.
It’s important to note that while changing the default graphics card can provide significant performance improvements, it’s essential to ensure compatibility with your system and follow the manufacturer’s instructions carefully. Additionally, remember to back up your data and create a system restore point before making any changes to minimize the risk of data loss or system instability.
If you encounter any issues during the process, troubleshooting common problems such as driver incompatibility, display output issues, or system instability can help you overcome these challenges. Refer to the manufacturer’s documentation or seek assistance from technical support channels if needed.
By following the steps outlined in this guide and considering your specific needs, you can successfully change the default graphics card in Windows 10 and optimize your computer’s performance for gaming, design work, or any graphics-intensive tasks.
Now it’s time for you to apply the knowledge from this guide and take control of your computer’s graphics capabilities. Enjoy improved visuals, enhanced performance, and a more satisfying computing experience!