Introduction
When it comes to capturing moments, whether it’s an important document, an interesting webpage, or a memorable image, taking a screenshot is a convenient way to preserve and share information. If you are a proud owner of a Surface Pro device, you’ll be pleased to know that there are various methods available to take screenshots using the keyboard.
In this article, we will explore the different ways you can easily capture screenshots on your Surface Pro using the keyboard shortcuts. Whether you’re running the latest version of Windows or using an older model, there’s a method suitable for your device. So, let’s dive into the different techniques and discover how to screenshot on a Surface Pro with just a few keyboard presses!
Note: The methods provided in this article are specifically for capturing screenshots using the keyboard on a Surface Pro device. If you prefer using the touch screen or a stylus, there are alternative methods available as well.
Before we proceed to the step-by-step instructions, it’s important to note that the specific keyboard layout and functionalities may vary slightly depending on the model and version of your Surface Pro. However, the major key combinations mentioned in this article should work across most Surface Pro devices.
Now that we’ve set the stage, let’s explore the various methods you can use to take screenshots on your Surface Pro with just a few keyboard shortcuts.
How to Take a Screenshot on Surface Pro with Keyboard
Taking a screenshot on your Surface Pro using the keyboard is a quick and efficient way to capture what’s currently displayed on your screen. Here are four simple methods to help you get the perfect screenshot:
Method 1: Windows Key + PrtScn
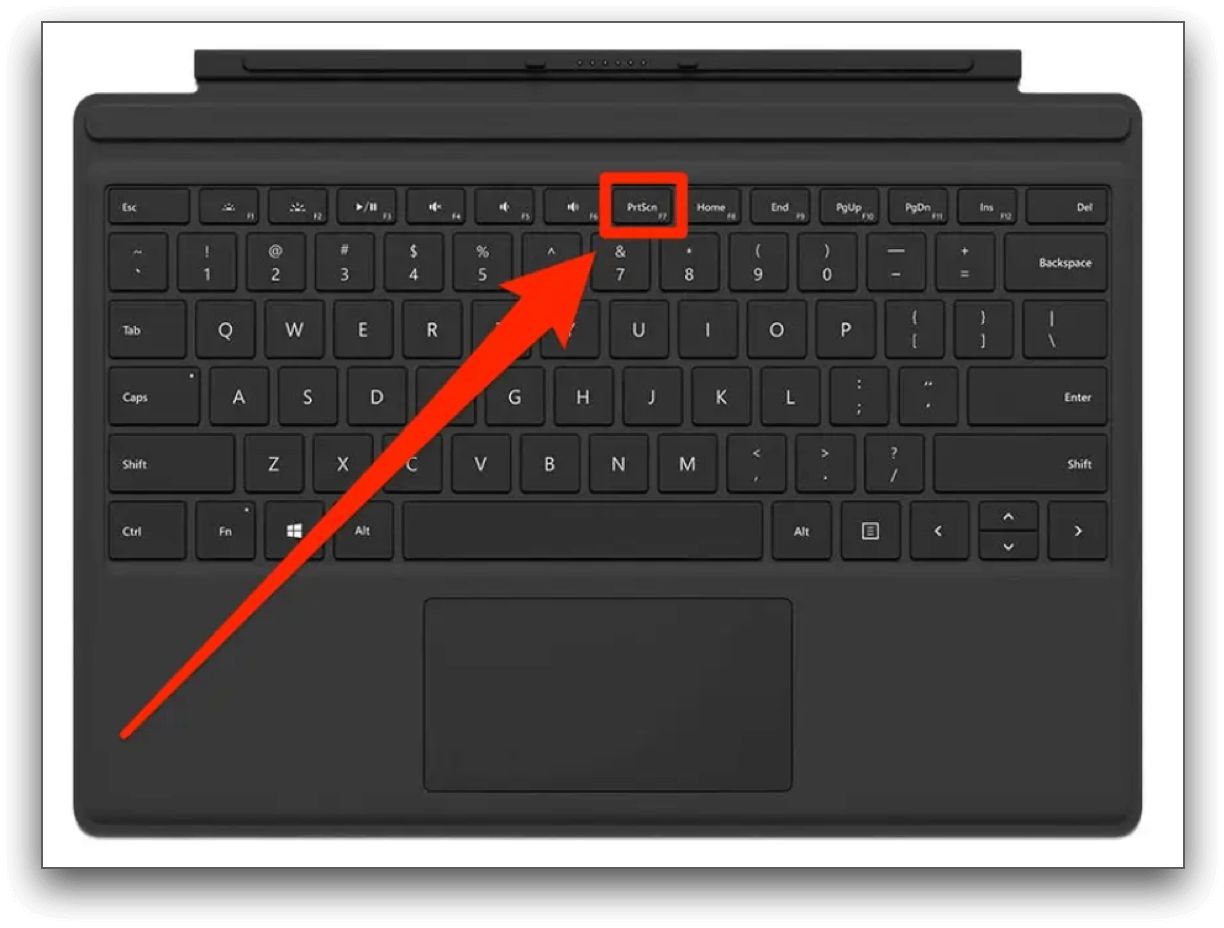
To capture the entire screen, press the Windows key and the PrtScn (Print Screen) key simultaneously. This will instantly save the screenshot in the default Pictures folder with a filename labeled “Screenshot”. You can easily locate the captured image by opening the Pictures folder and accessing the Screenshots subfolder.
Method 2: Alt + PrtScn
If you only want to capture the active window or application, press the Alt key and the PrtScn (Print Screen) key at the same time. This will save a screenshot of the active window to the clipboard. To access the screenshot, open any image editing application or a word processing program and paste the screenshot using the Ctrl + V keyboard shortcut. From there, you can save the image to a desired location.
Method 3: Fn + Spacebar
If you’re using a Surface Pro Type Cover, you can use the Fn (Function) key in combination with the Spacebar to capture a screenshot. Simply press the Fn key and the Spacebar simultaneously to capture the entire screen. The screenshot will be saved in the Screenshots subfolder of the default Pictures folder.
Method 4: Fn + Alt + Spacebar
For users with an older version of Surface Pro or a different keyboard layout, the Fn (Function) key in combination with Alt and the Spacebar can be used to capture the active window or application. Press all three keys at the same time to capture the screenshot.
With these four methods at your disposal, you have the flexibility to capture the entire screen or specific windows or applications with ease. Choose the method that suits your preference and start capturing those noteworthy moments on your Surface Pro!
Method 1: Windows Key + PrtScn
One of the simplest and most commonly used keyboard shortcuts to capture a screenshot on a Surface Pro is by pressing the Windows key and the PrtScn (Print Screen) key simultaneously. This method allows you to capture the entire screen and save it as an image file.
Here’s how you can use this method:
- Make sure the content you want to capture is displayed on your screen.
- Locate the Windows key on your Surface Pro keyboard. It’s usually located towards the left side, between the Ctrl and Alt keys.
- Press and hold the Windows key and simultaneously press the PrtScn key.
- You might notice a quick dimming of your screen, indicating that a screenshot has been successfully taken.
- Open the default Pictures folder on your Surface Pro. You can do this by clicking on the File Explorer icon in the taskbar, navigating to the Pictures folder, and then opening the Screenshots subfolder.
- In the Screenshots subfolder, you will find the captured screenshot labeled with a filename like “Screenshot (1)” or “Screenshot (2)”.
That’s it! Your screenshot is now saved and ready to be accessed or shared. The captured image is automatically saved in the PNG format, ensuring high-quality and lossless compression.
Keep in mind that when you use this method, the screenshot is saved to the default Pictures folder on your Surface Pro. However, if you prefer to save it to a different location or modify the file format, you can simply open the screenshot in an image editing application and make the necessary changes.
This method is perfect for capturing the entire screen, whether it’s a webpage, a document, or even your desktop setup. It’s quick, straightforward, and provides a high-quality image that you can use for various purposes.
Method 2: Alt + PrtScn
If you want to capture a specific window or application on your Surface Pro, using the Alt key in combination with the PrtScn (Print Screen) key is the perfect method. This keyboard shortcut allows you to capture the active window or application and save it to the clipboard for further use.
Here’s how you can use this method:
- Ensure that the window or application you want to capture is active and displayed on your screen.
- Locate the Alt key on your Surface Pro keyboard. It’s usually found towards the bottom left, next to the spacebar.
- Press and hold the Alt key.
- While still holding the Alt key, press the PrtScn key.
- The screen may dim momentarily, indicating that the screenshot of the active window has been successfully captured.
- Open any image editing application or a word processing program. Examples include Microsoft Paint, Adobe Photoshop, or Microsoft Word.
- Once inside the program, paste the screenshot by using the Ctrl + V keyboard shortcut. This will insert the screenshot from the clipboard into the document or editing area.
You can now use the image editing application or word processing program to save the screenshot as an image file or make any necessary modifications. This method allows for more flexibility in terms of editing and adjusting the captured screenshot before saving it.
It’s important to note that when using this method, the screenshot is not automatically saved as a file. Instead, it’s copied to the clipboard, allowing you to paste and use it in various applications. If you wish to save the screenshot as an image file, make sure to paste it into an image editing application or a word processing program and save it from there.
The Alt + PrtScn method is perfect when you want to capture a specific window or application without including the entire screen contents. Whether you’re capturing a dialog box, a specific part of a webpage, or an open program, this method provides a convenient way to gather the information you need.
Method 3: Fn + Spacebar
If you own a Surface Pro device with a Type Cover keyboard, you can utilize the Fn (Function) key in combination with the Spacebar to capture a screenshot. This method allows you to quickly capture the entire screen without having to use any additional key combinations.
Here’s how you can use this method:
- Ensure that the content you want to capture is displayed on your screen.
- Locate the Fn key on your Surface Pro Type Cover keyboard. It’s usually located near the lower-left corner of the keyboard.
- Press and hold the Fn key.
- While still holding the Fn key, press the Spacebar key.
- You might notice a brief dimming of your screen, indicating that the screenshot has been successfully captured.
- Access the default Pictures folder on your Surface Pro by clicking on the File Explorer icon in the taskbar, navigating to the Pictures folder, and then opening the Screenshots subfolder.
- In the Screenshots subfolder, you will find the captured screenshot labeled with a filename, such as “Screenshot (1)” or “Screenshot (2)”.
And that’s it! Your screenshot is now saved and ready to be accessed or shared. Using the Fn + Spacebar method ensures that you can quickly capture the entire screen with just a simple key combination.
It’s worth mentioning that the captured screenshot is automatically saved as a PNG image file in the default Pictures folder. If you prefer to save it in a different location or modify the file format, you can simply open the screenshot in an image editing application and make the necessary changes.
This method is particularly useful for Surface Pro users who have a Type Cover keyboard connected to their device. It eliminates the need for complex key combinations, providing a straightforward way to capture screenshots effortlessly.
Method 4: Fn + Alt + Spacebar
For users with older versions of Surface Pro or different keyboard layouts, the Fn (Function) key can be combined with the Alt key and the Spacebar to capture a screenshot. This method allows you to capture the active window or application on your Surface Pro.
Here’s how you can use this method:
- Make sure the window or application you want to capture is active and displayed on your screen.
- Locate the Fn key on your Surface Pro keyboard. It’s usually located towards the lower-left corner of the keyboard.
- Press and hold the Fn key.
- While still holding the Fn key, press the Alt key and the Spacebar simultaneously.
- The screen may briefly dim, indicating that the screenshot of the active window has been successfully captured.
- To access the screenshot, open any image editing application or word processing program.
- Paste the screenshot by using the Ctrl + V keyboard shortcut. This will insert the screenshot from the clipboard into the document or editing area.
Once you’ve pasted the screenshot, you can save it as an image file or perform any necessary edits or modifications using the image editing application or word processing program.
It’s important to note that when using this method, the screenshot is not automatically saved as a file. Instead, it’s copied to the clipboard, allowing you to paste and use it in various applications. To save the screenshot as an image file, paste it into an image editing application or word processing program, and save it from there.
Using the Fn + Alt + Spacebar method gives you the flexibility to capture the active window or application on your Surface Pro. Whether you need to capture a specific program, a dialog box, or a portion of a webpage, this method provides a convenient way to capture precise screenshots with a few key presses.
Tips for Taking Screenshots on Surface Pro
Now that you know the various methods to capture screenshots on your Surface Pro using the keyboard, here are some helpful tips to enhance your screenshot-taking experience:
- Use the Snipping Tool: If you need more control over the specific area or shape of the screenshot, consider using the built-in Snipping Tool in Windows. This tool allows you to capture custom shapes, annotate the captured image, and easily save or share the screenshot. Simply search for “Snipping Tool” in the Start menu to access it.
- Utilize the Windows Game Bar: For gamers or those who want to capture screenshots while playing games or using specific apps, the Windows Game Bar can be a valuable tool. You can activate it by pressing the Windows key + G, and it provides options to capture screenshots, record video, and even broadcast your gameplay.
- Customize the Screenshots Folder: If you frequently capture screenshots and want a more convenient way to access them, you can change the default location of the Screenshots folder. Simply right-click on the Pictures folder, go to Properties, and select a new location for the Screenshots folder.
- Experiment with Different Keyboard Combinations: While we’ve covered the main keyboard combinations in this article, don’t be afraid to explore other key combinations on your Surface Pro keyboard. There may be additional shortcuts or features available that can enhance your screenshot-taking capabilities.
- Edit and Enhance Screenshots: After capturing a screenshot, you can further enhance it by using image editing software. Whether you want to crop, resize, annotate, or add effects to your screenshots, a reliable image editing application can help you achieve the desired results.
- Consider Third-Party Screenshot Tools: If you find yourself frequently taking screenshots and require more advanced features, you may want to explore third-party screenshot tools. These tools offer additional functionalities such as scrolling capture, timed screenshots, and cloud storage for easy sharing and access to your screenshots.
- Organize and Delete Screenshots: To keep your Screenshots folder clean and organized, periodically review and delete any unnecessary or outdated screenshots. This will help you quickly find the screenshots you need and prevent your storage from being cluttered.
By following these tips, you can optimize your screenshot-taking workflow on your Surface Pro and have a seamless experience capturing, organizing, and editing your screenshots.
Conclusion
Capturing screenshots on your Surface Pro using the keyboard is a convenient and efficient way to preserve and share information. Whether you need to capture the entire screen or specific windows or applications, the methods we’ve discussed in this article provide the flexibility to do so.
We started by introducing the different methods and keyboard shortcuts available to take screenshots on your Surface Pro. From the widely used Windows Key + PrtScn shortcut to the Alt + PrtScn, Fn + Spacebar, and Fn + Alt + Spacebar combinations, each method offers a unique way to capture screenshots with ease.
We also provided practical tips to enhance your screenshot-taking experience. Using the Snipping Tool, employing the Windows Game Bar, customizing the Screenshots folder, and exploring different keyboard combinations are just a few ways to enhance your screenshot workflow on your Surface Pro.
Remember, with the captured screenshots, you have the ability to edit, annotate, and share them as needed. Whether you use built-in tools like the Snipping Tool or turn to third-party applications, you can further enhance the captured screenshots to meet your specific requirements.
We hope this article has equipped you with the knowledge and skills to effortlessly take screenshots on your Surface Pro using the keyboard. Now you can easily capture and save important information, memorable moments, or anything else you find noteworthy with just a few keyboard presses!