Introduction
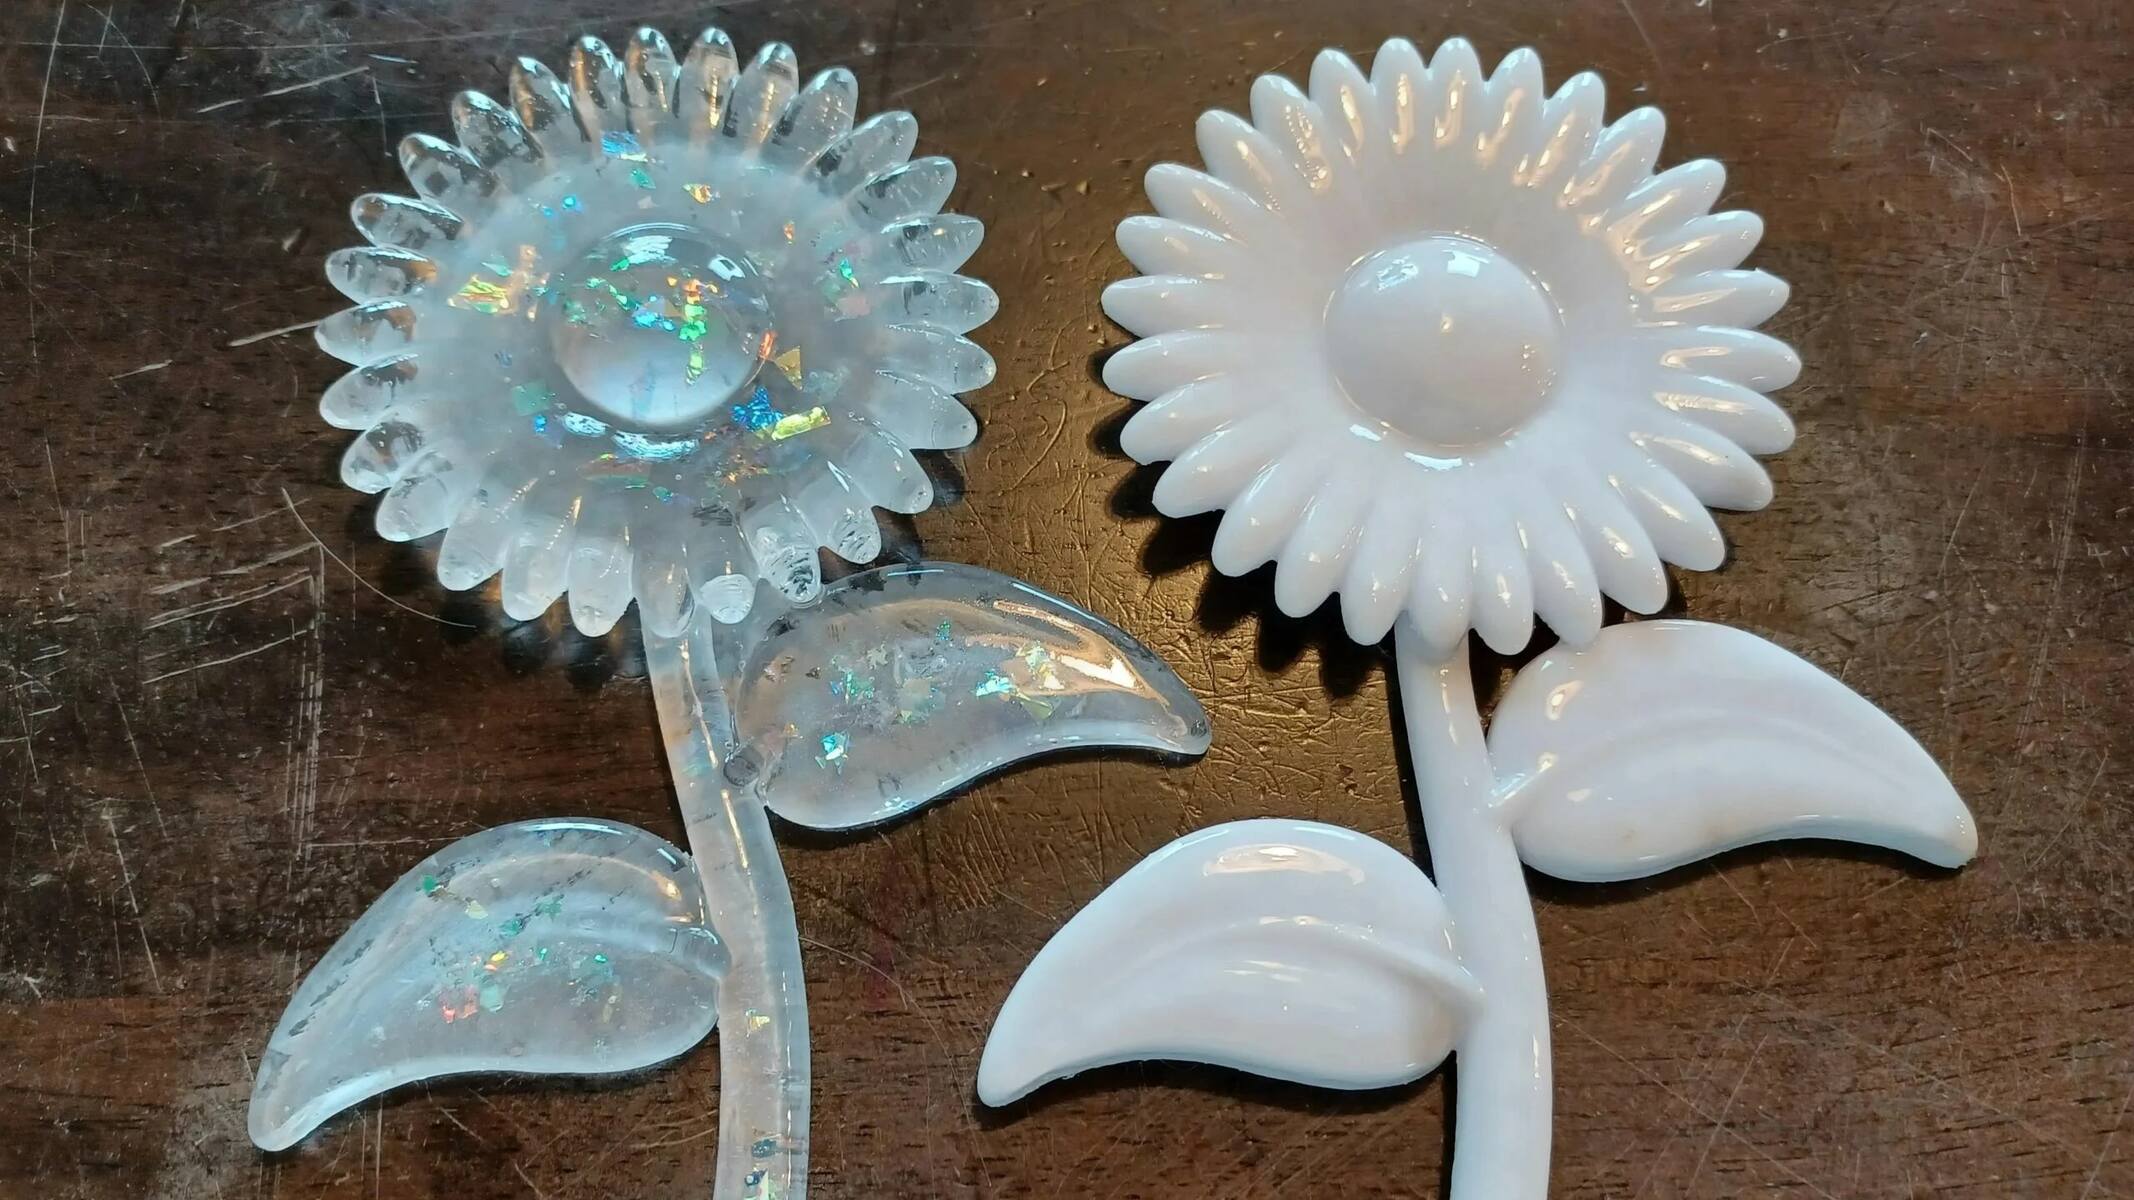
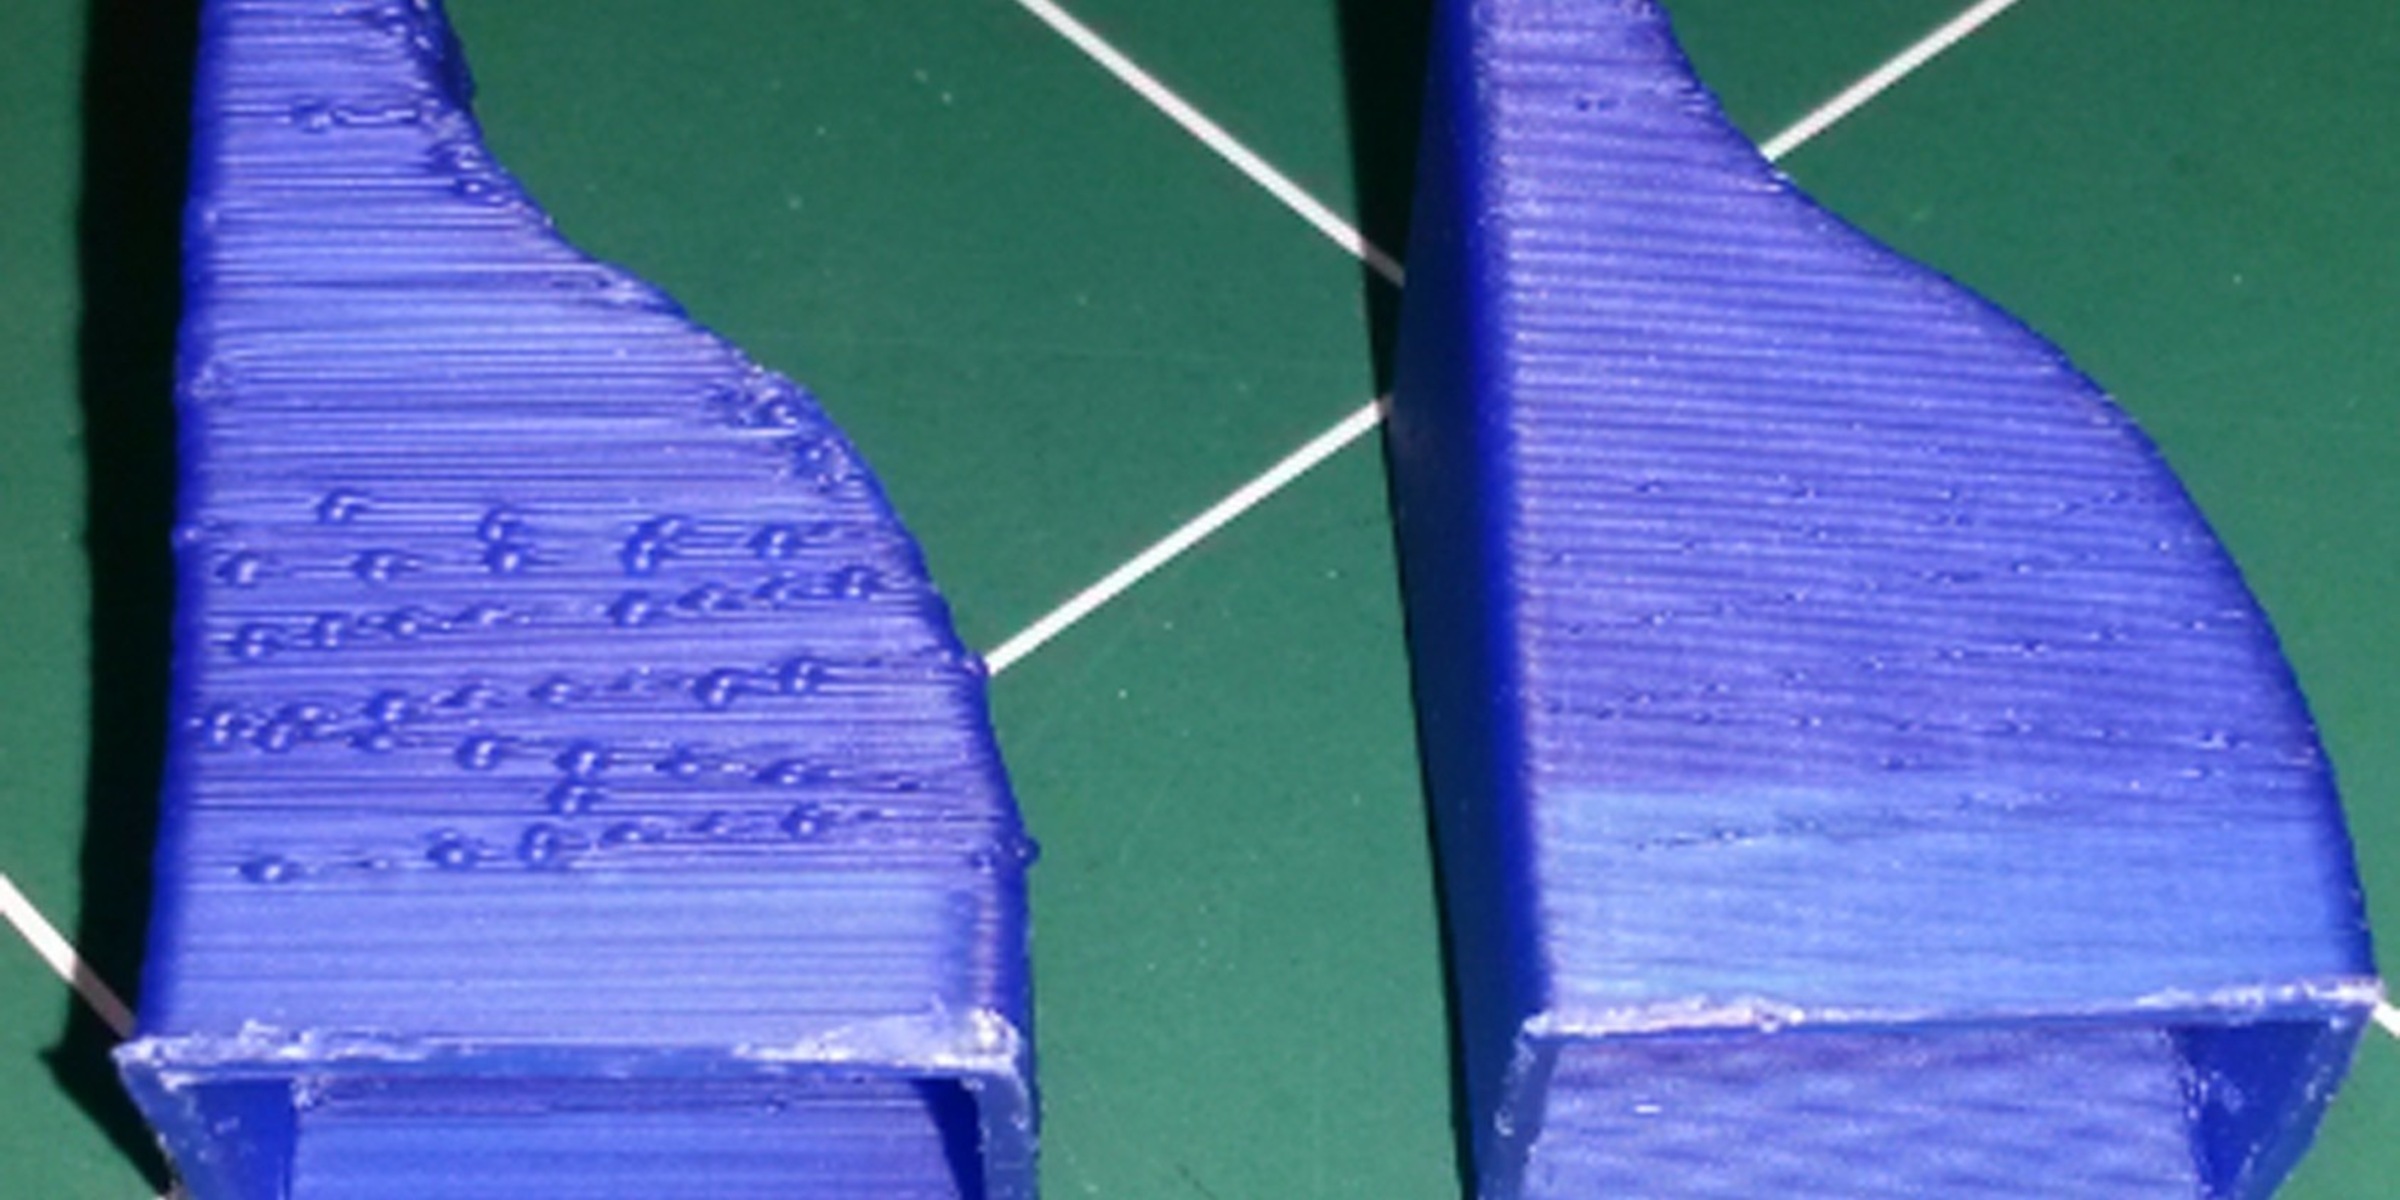
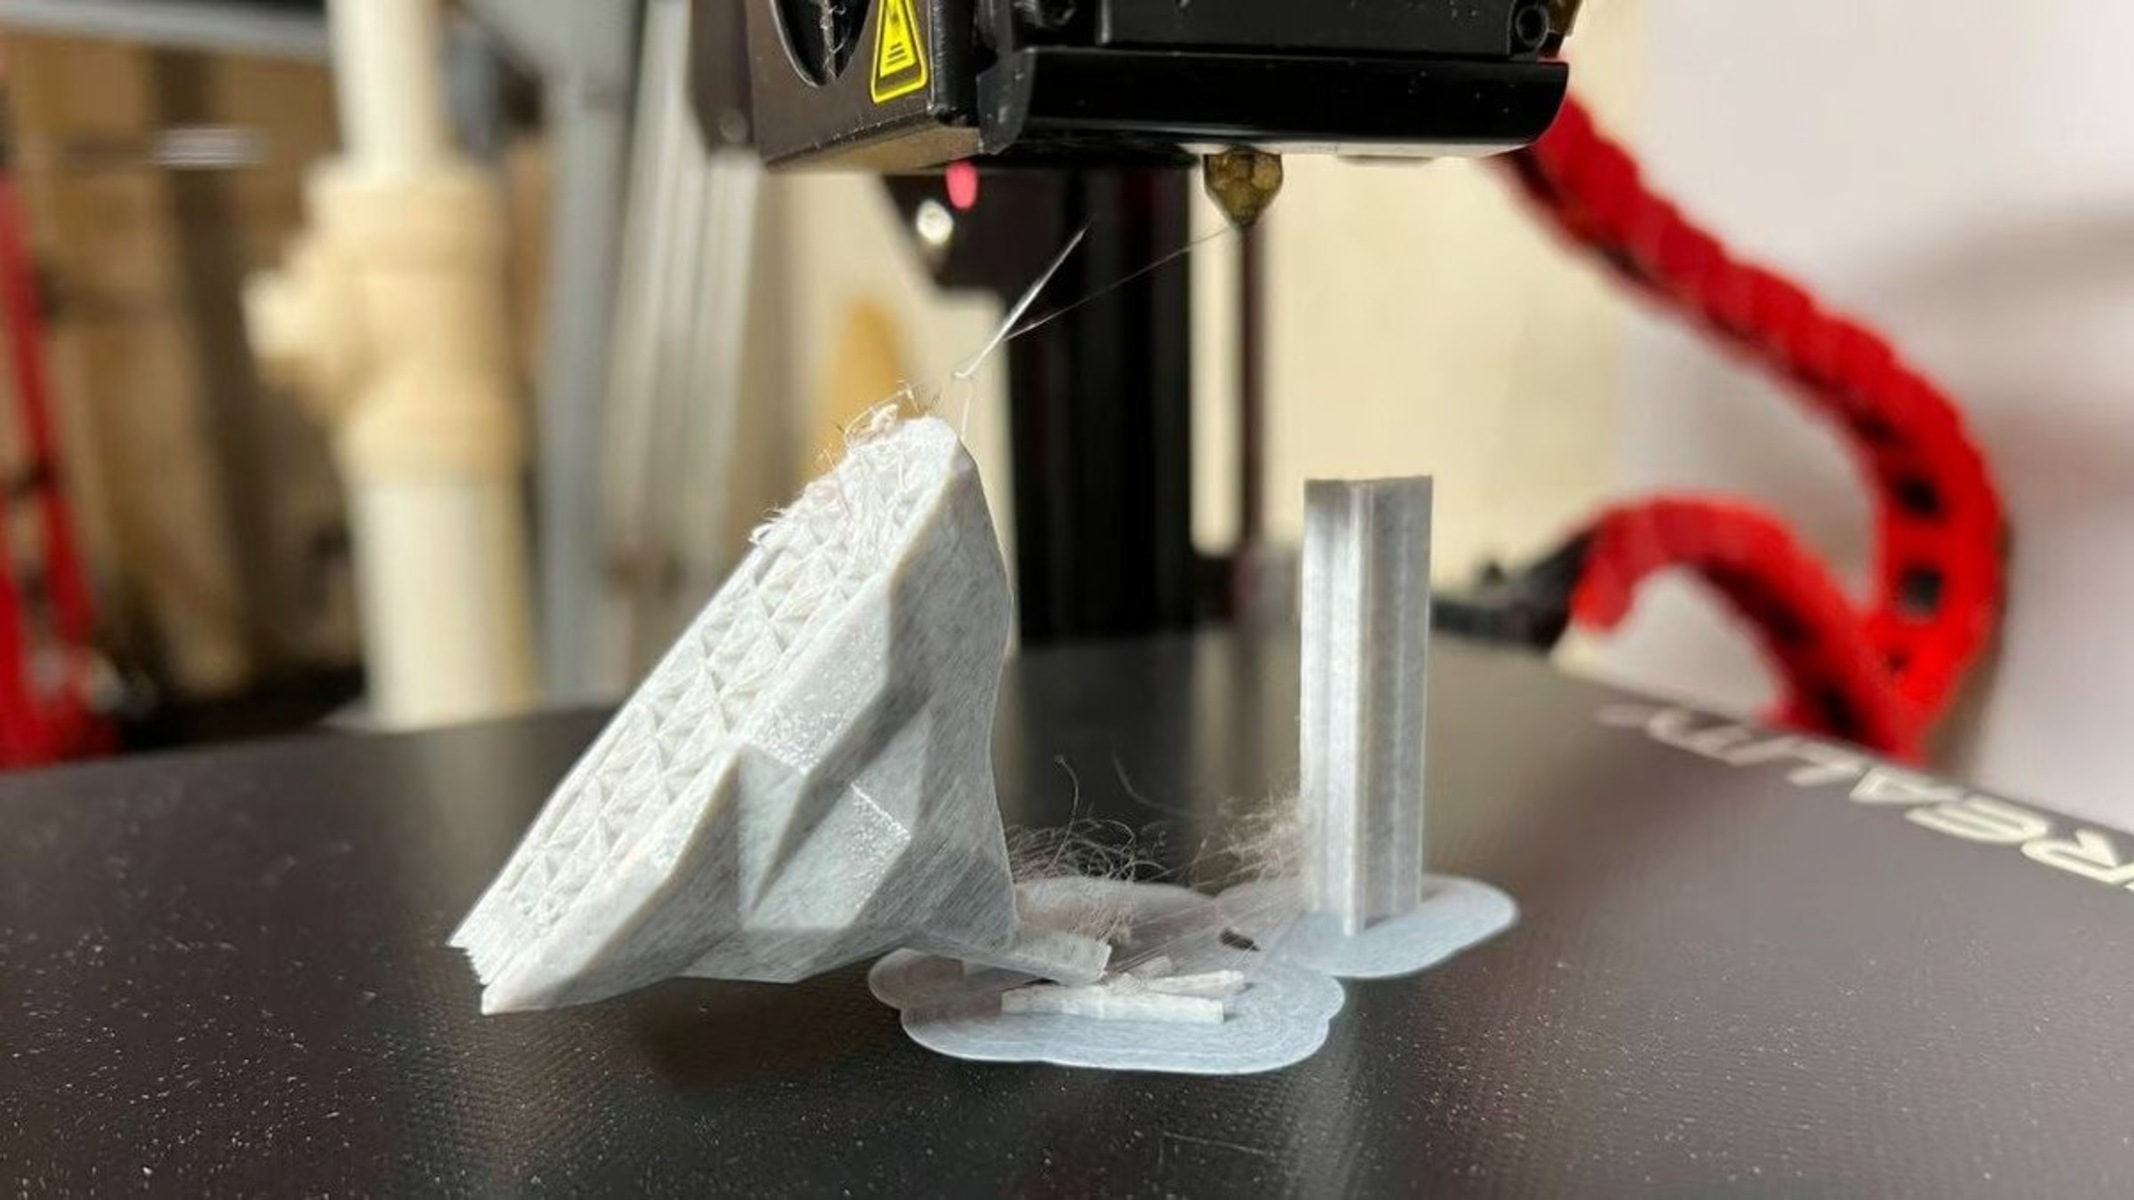
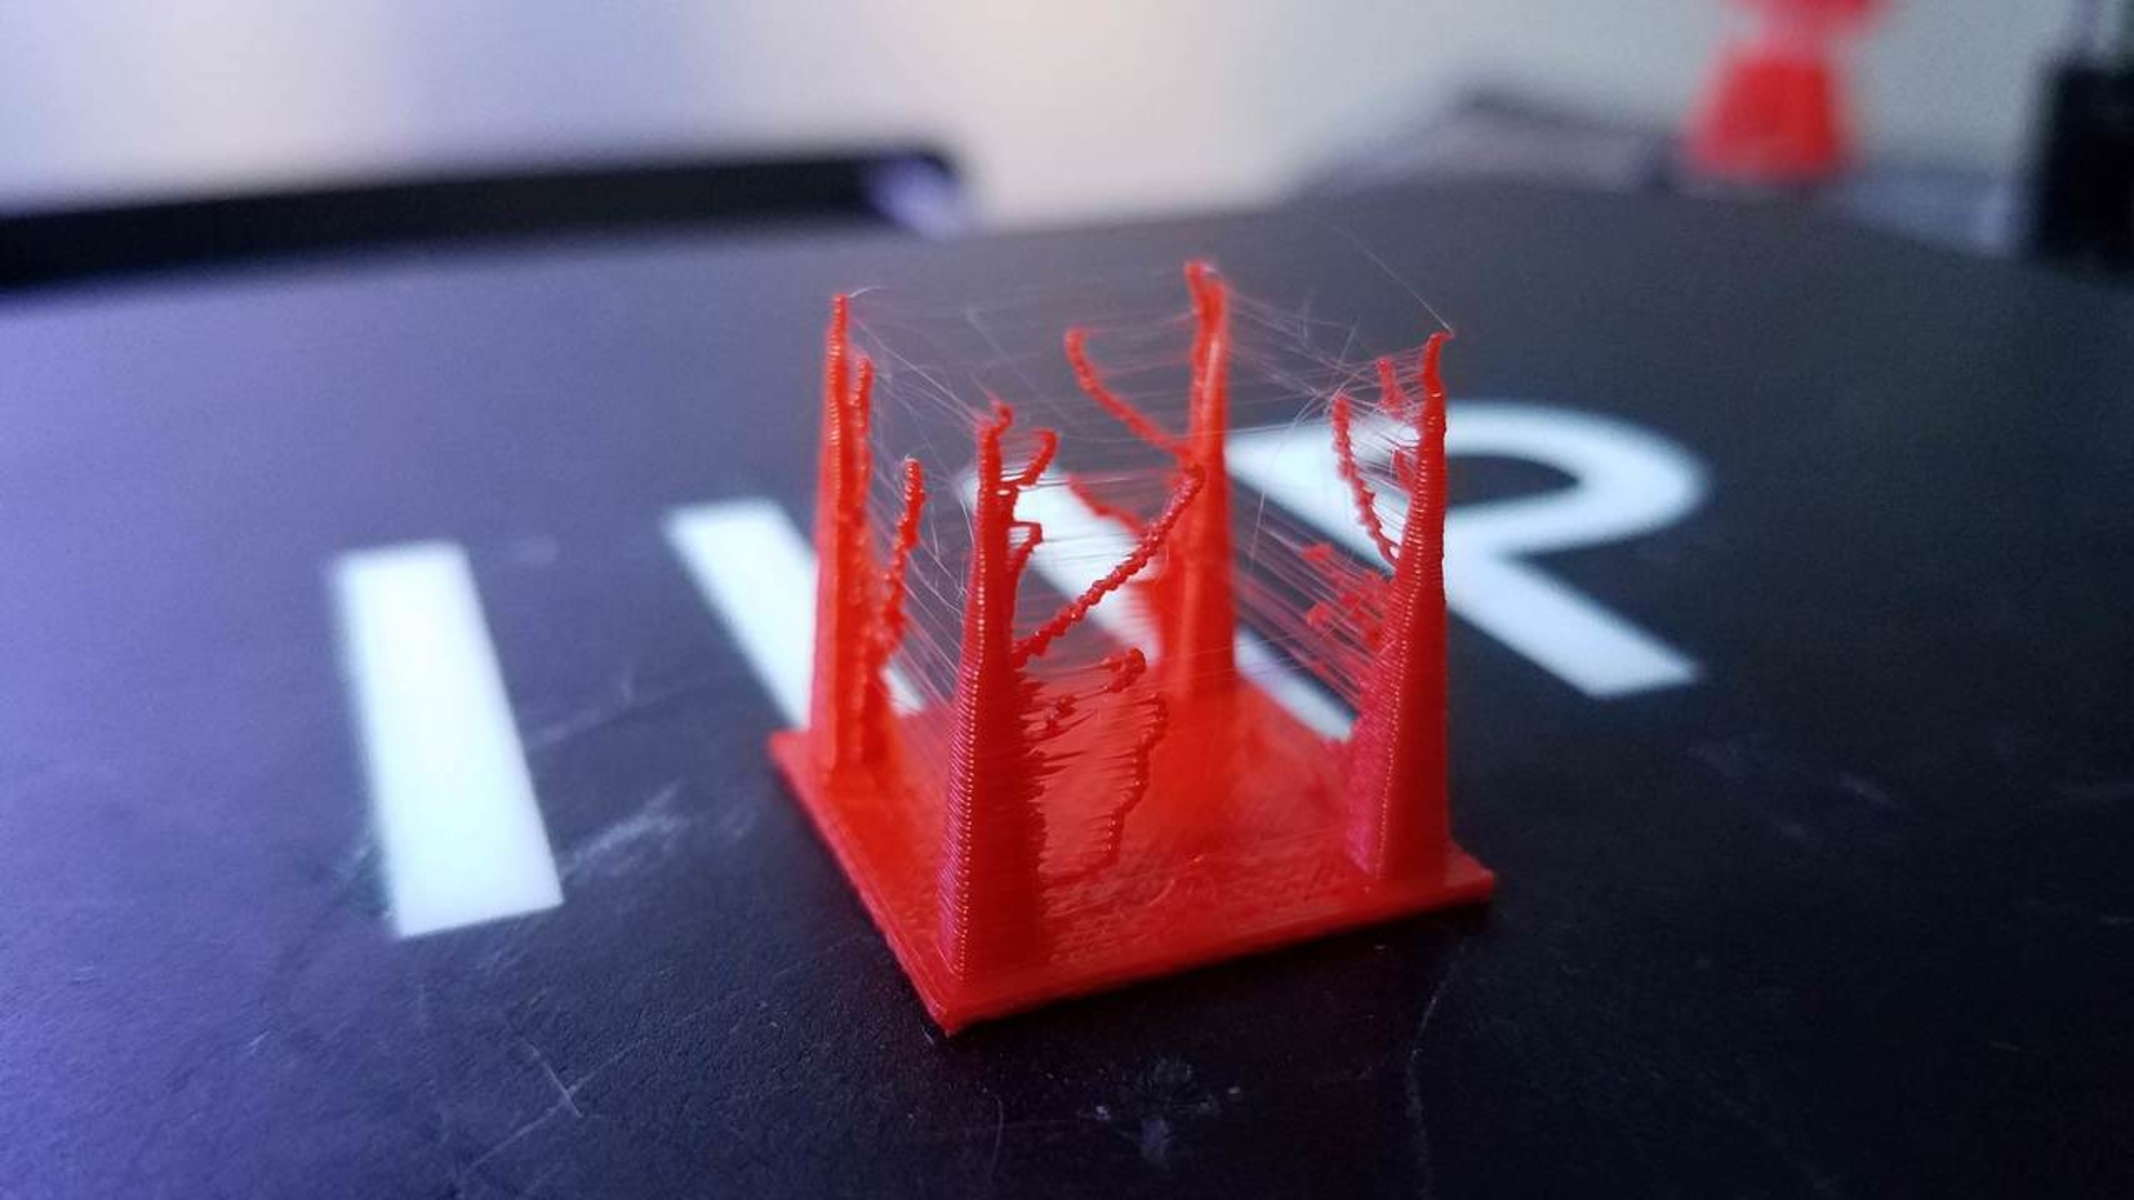
In the world of 3D printing, achieving high-quality prints is the ultimate goal. However, one common issue that can hinder the perfection of a 3D print is stringing. Stringing refers to the thin strands of filament that appear between the different parts of a print, causing a messy and unprofessional finish.
Stringing occurs when the nozzle of the 3D printer moves from one part of the print to another and leaves behind excess filament that hasn’t been properly retracted. These unwanted strings can be a frustrating sight for anyone involved in 3D printing, but fortunately, there are ways to minimize and even eliminate stringing altogether.
In this article, we will delve into the causes of stringing and provide some effective tips on how to reduce it. By implementing these techniques, you will be able to achieve cleaner and more precise 3D prints, saving both time and filament in the process.
What is stringing in 3D printing?
Stringing, also known as oozing or filament dribbling, refers to the occurrence of thin strands of filament that appear between different parts of a 3D print. These unwanted strings can make the final print look messy and unprofessional. Stringing is caused by the extruder nozzle continuing to extrude filament when it shouldn’t, resulting in these extra strands.
Stringing is most commonly observed when the printer’s hot end moves from one area of the print to another, leaving behind residual filament. This can happen due to several factors, including improper retraction settings and excessive printing temperatures. These issues can lead to a buildup of pressure in the nozzle, causing filament to ooze out when it’s not supposed to.
Stringing not only affects the aesthetics of a print but can also cause functional problems. For example, if the stringing occurs between two separate parts of a print, it can create a physical connection between them, making it difficult to separate or clean up the final product.
Stringing is a common problem faced by 3D printing enthusiasts, but the good news is that there are ways to mitigate it. By understanding the causes of stringing and implementing the right techniques, users can minimize or even eliminate stringing altogether, resulting in cleaner and more professional-looking prints.
Causes of stringing
Stringing in 3D printing can have multiple causes, and understanding these causes is crucial in effectively addressing the issue. Here are some common factors that contribute to stringing:
1. Improper retraction settings: Retraction is the process of pulling the filament back into the nozzle to prevent oozing. If the retraction settings are not optimized, the filament may not be retracted enough, leading to stringing.
2. High printing temperature: Printing at temperatures higher than what is necessary can make the filament more fluid and prone to oozing. This can result in excessive stringing.
3. Slow travel speed: When the printer moves from one area of the print to another, known as the travel movement, a slow travel speed can cause the filament to continue oozing and result in stringing.
4. Low-quality filament: Inferior quality filaments can have impurities and inconsistencies in their composition, leading to higher chances of stringing during printing.
5. Poor filament drying: Moisture present in the filament can cause it to become more fluid and prone to stringing. Improper storage or exposure to humidity can result in moist filament.
6. Inadequate cooling: Insufficient cooling can cause the filament to not solidify quickly enough, resulting in stringing as the nozzle moves to the next part of the print.
7. Print settings: Each type of filament has different optimal print settings. If the settings are not properly adjusted for the specific filament being used, it can contribute to stringing.
By identifying and addressing these causes, users can effectively reduce stringing and achieve cleaner, more professional 3D prints.
Tips to reduce stringing
Stringing can be a frustrating issue in 3D printing, but there are several effective tips you can follow to minimize or eliminate it entirely. Here are some useful strategies to reduce stringing:
1. Adjust retraction settings: Optimize the retraction settings in your slicing software. Increase the retraction distance and speed to ensure that the filament is properly pulled back into the nozzle when necessary. Experiment with different settings to find the sweet spot that reduces stringing.
2. Lower the printing temperature: Experiment with lowering the printing temperature within the recommended range for your filament. Decreasing the temperature can help reduce filament ooze and subsequent stringing. However, be cautious not to lower the temperature too much, as it may negatively impact print quality.
3. Increase travel speed: Increasing the travel speed can minimize the time the nozzle spends moving between different parts of the print, reducing the chances of stringing. However, be careful not to increase the speed too much, as it may affect the overall print quality.
4. Use filament drying techniques: If you suspect that moisture in the filament is causing stringing, consider drying the filament before printing. You can use a dedicated filament dryer or place the filament in a low-temperature oven to remove moisture and improve print quality.
5. Check for filament quality: Ensure you are using high-quality filament that is free from impurities and inconsistencies. Poor quality filaments are more likely to cause stringing. Invest in reputable brands or sources for your filament to minimize issues.
6. Add a filament cooling fan: If your 3D printer does not have a filament cooling fan, consider adding one. Proper cooling can help the filament solidify quickly, reducing the chances of stringing during travel movements.
7. Optimize print settings for each filament type: Different filaments require different print settings to achieve optimal results. Take the time to fine-tune the print settings for each filament type you use. This includes adjusting the retraction settings, temperature, and cooling settings specifically for that filament.
By implementing these tips, you can significantly reduce or even eliminate stringing in your 3D prints. Remember that it may take some trial and error to find the perfect settings for your specific printer and filament combination. Experimentation and patience are key to achieving the best results.
Adjust retraction settings
Retraction settings play a crucial role in minimizing stringing in 3D printing. Retraction refers to the process of pulling the filament back into the nozzle when the extruder is traveling between different parts of the print. By adjusting the retraction settings, you can effectively reduce stringing. Here are some key factors to consider:
Retraction distance: Increasing the retraction distance ensures that the filament is pulled back far enough to prevent oozing and stringing. However, be cautious not to set the retraction distance too high, as it can result in other printing issues like filament grinding or under-extrusion.
Retraction speed: Higher retraction speeds can help in quickly pulling the filament back into the nozzle. Increasing the retraction speed can reduce the time the filament spends oozing and minimize the chances of stringing. However, it’s important to find the right balance, as excessively high retraction speeds can lead to filament issues like clogs.
Coasting: Coasting is a technique where the extruder stops extruding a short distance before reaching the end of a printed segment. This allows the pressure in the nozzle to relieve, reducing the chances of stringing. Enabling the coasting feature in your slicing software can help minimize stringing in certain cases.
Minimum travel distance: Some slicing software allows you to set a minimum travel distance. This parameter ensures that the retraction is only performed for longer travel movements, reducing unnecessary retractions for small movements that may not cause stringing.
It’s important to note that the optimal retraction settings may vary depending on your specific printer, filament, and print settings. Therefore, it may require some trial and error to find the ideal retraction settings for minimizing stringing in your prints. Make incremental adjustments to the retraction distance and speed, and test the results until you achieve the desired outcome.
By adjusting the retraction settings carefully, you can significantly reduce stringing and achieve cleaner and more professional 3D prints.
Lower the printing temperature
One effective strategy to minimize stringing in 3D printing is to lower the printing temperature. The temperature at which the filament is melted and extruded plays a significant role in controlling the viscosity and flow of the material. Here’s how lowering the printing temperature can help reduce stringing:
Reduced filament viscosity: Lowering the printing temperature decreases the viscosity of the filament, making it less fluid. This reduced flowability can help prevent excessive oozing and stringing during print movements.
Increased filament control: When the printing temperature is lowered, the filament becomes less prone to dribbling and oozing from the nozzle. This increased control over the filament flow reduces the chances of stringing between different parts of the print.
However, it’s important to note that lowering the printing temperature too much can negatively impact print quality and result in issues like under-extrusion. Therefore, it’s crucial to find the right balance. Here are a few tips to optimize the printing temperature:
Refer to filament manufacturer’s recommendations: Different filaments have specific printing temperature ranges recommended by the manufacturer. Start by using the recommended temperature and gradually decrease it to find the lowest temperature that still ensures good adhesion and optimal print quality.
Perform temperature calibration tests: Conduct temperature calibration tests to determine the ideal printing temperature for your specific filament. These tests involve printing a small temperature tower and visually inspecting the result to choose the temperature that produces the least stringing.
Consider layer height and print speed: Lowering the printing temperature might require adjustments in other print settings. For example, thinner layer heights tend to require lower temperatures, and reducing the print speed can also help minimize stringing.
Keep in mind that different filaments have different temperature requirements, so be sure to adjust the printing temperature accordingly for each specific filament you use. By finding the optimal printing temperature and making necessary adjustments, you can effectively reduce stringing and improve the overall quality of your 3D prints.
Increase travel speed
When it comes to reducing stringing in 3D printing, adjusting the travel speed can be an effective technique. Travel speed refers to the speed at which the extruder nozzle moves between different parts of the print, without extruding any filament. Here’s how increasing the travel speed can help minimize stringing:
Reduced filament exposure time: Increasing the travel speed reduces the time the hot nozzle spends moving across open spaces. This decreased exposure time limits the opportunity for filament oozing and stringing to occur.
Promotes cleaner retractions: Faster travel movements encourage cleaner retractions by creating a more pronounced pressure difference that helps pull the filament back into the nozzle. This reduces the likelihood of filament dribbling and stringing during travel.
However, it’s important to find the right balance when increasing the travel speed. Setting the speed too high can lead to issues such as overshooting the target locations, causing inaccuracies in the print or even dislodging previously printed layers.
Here are a few tips to optimize the travel speed:
Gradually increase the travel speed: Start by incrementally increasing the travel speed until you notice a reduction in stringing. Keep testing and find the optimal speed for your specific printer and filament combination.
Consider other factors: Adjusting the travel speed might require other print settings adjustments. For example, reducing the travel acceleration can help prevent printer vibrations that could lead to stringing.
Balance speed with quality: Remember that increasing the travel speed too much can sacrifice print quality. Find the right balance between speed and the desired print quality to achieve the best results.
Each printer and filament combination may have different optimal travel speeds. It’s essential to experiment and find the settings that work best for your specific setup. By increasing the travel speed strategically, you can significantly minimize stringing and achieve cleaner and more precise 3D prints.
Use filament drying techniques
Moisture in the filament can contribute to stringing during 3D printing. When filament absorbs moisture, it becomes more prone to oozing and stringing as the water vaporizes at high temperatures. However, by implementing proper filament drying techniques, you can minimize the moisture content and reduce stringing. Here are some effective methods:
Filament Dryer: Investing in a filament dryer is one of the most efficient ways to remove moisture from filament. These devices are specifically designed to create a controlled environment with low humidity, effectively drying out the filament before it reaches your 3D printer.
Dehumidifier: If you live in a particularly humid environment, using a dehumidifier can help reduce the overall humidity in your printing area. Lowering the humidity levels can prevent filament from absorbing moisture during storage and while in use.
Oven drying: If a filament dryer is not available, you can use your oven to dry the filament. Preheat your oven to a low temperature (around 50-60°C) and place the filament in the oven for a few hours. However, be cautious not to exceed the recommended temperature for your filament, as it can lead to melting or deformation.
Silica gel packs: Placing silica gel packs or desiccant packets in your filament storage area can help absorb excess moisture from the air. Make sure to replace the packs regularly to maintain their effectiveness.
Vacuum-sealing: Vacuum-sealing the filament when not in use can help prevent moisture absorption. Use vacuum-sealed bags or airtight containers to keep the filament dry until you are ready to use it.
By employing these filament drying techniques, you can significantly reduce the moisture content in your filament and minimize stringing during printing. Remember to check the manufacturer’s recommendations for drying temperature and time to ensure the best results without damaging the filament.
Check for filament quality
One of the factors that can contribute to stringing in 3D printing is the quality of the filament used. Inferior quality filaments may contain impurities or inconsistencies in their composition, making them more prone to stringing. By ensuring you are using high-quality filament, you can minimize the chances of stringing and achieve better print results. Here are some steps to check for filament quality:
Source from a reputable manufacturer: Purchase filament from reputable manufacturers or trusted suppliers. Established brands often have strict quality control measures in place, ensuring a more consistent and reliable product.
Inspect the filament: Before printing, visually inspect the filament for any visible defects such as bumps, scratches, or discoloration. These imperfections can negatively impact print quality and increase the chances of stringing.
Check for diameter consistency: Measure the diameter of the filament at several different points using a caliper. High-quality filaments have consistent diameters throughout, which promotes smooth extrusion and reduces the risk of stringing.
Look for certifications: Some filaments may carry certifications such as RoHS or FDA compliance. These certifications ensure that the filament is free from harmful substances and safe for use in various applications.
Read customer reviews: Customer reviews and feedback can provide valuable insights into the quality and performance of specific filament brands. Take note of any recurring issues related to stringing or print quality.
By taking the time to select and use high-quality filament, you can minimize the occurrence of stringing in your 3D prints. Remember to store the filament properly in a dry and controlled environment to maintain its quality over time.
Add a filament cooling fan
In 3D printing, proper cooling of the filament is crucial for achieving clean and accurate prints. Adding a filament cooling fan to your 3D printer can significantly reduce stringing by improving the solidification of the filament as it is extruded. Here’s how a filament cooling fan can help:
Rapid cooling: A filament cooling fan blows a stream of cool air directly onto the freshly extruded filament. This rapid cooling process promotes faster solidification, reducing the chances of stringing and ensuring that the printed layers retain their shape and position.
Improved bridging performance: When printing over open areas or gaps, proper cooling with a fan helps in creating clean and well-formed bridges. By quickly cooling the filament, the fan prevents excessive sagging and stringing between the bridged segments.
When adding a filament cooling fan to your 3D printer, consider the following:
Positioning: Position the cooling fan in a way that ensures it blows air directly onto the printed object or the extruded filament. The exact positioning may vary depending on your printer model, so refer to the manufacturer’s guidelines or consult online communities for recommendations.
Tuning the fan speed: Adjust the fan speed based on the specific filament being used and the printing conditions. Too high of a fan speed may cause inadequate layer adhesion, while too low of a fan speed may not provide sufficient cooling to eliminate stringing.
Layer-specific cooling: Some slicing software allows for layer-specific fan control, enabling you to adjust the fan speed for specific layers. This can be particularly useful for optimizing cooling for structures with varying geometries or overhangs.
Adding a filament cooling fan to your 3D printer can be a valuable upgrade that helps minimize stringing and improves print quality. Experiment with fan positioning and speed settings to find the optimal configuration for your specific printer and filament combination.
Optimize print settings for each filament type
Each filament type has its own unique properties and requires specific print settings to achieve optimal results. By optimizing the print settings for each filament type you use, you can minimize stringing and improve overall print quality. Here’s how:
Refer to manufacturer recommendations: Filament manufacturers often provide recommended print settings for their specific products. These guidelines typically include information on nozzle temperature, print speed, cooling, and retraction settings. Following these recommendations can help reduce stringing and ensure the best results.
Experiment with temperatures: Different filaments have different optimal printing temperatures. Adjusting the nozzle temperature within the recommended temperature range can have a significant impact on stringing. Lower temperatures may be suitable for some filaments, while others may require higher temperatures for proper flow and adhesion.
Tune retraction settings: The retraction settings can vary for different filament types. Experiment with retraction distance, retraction speed, and other parameters to find the optimal settings that prevent filament oozing and stringing for each specific filament.
Adjust print speed: Print speed plays a crucial role in minimizing stringing. Some filaments require slower print speeds to ensure proper layer adhesion and cooling, while others can tolerate faster speeds. Experiment with different print speeds to find the right balance for each filament type.
Optimize cooling: Proper cooling can help in reducing stringing, especially for filaments that are prone to oozing. Adjust the fan speed and cooling settings to ensure sufficient cooling between layers and during travel movements. Different filaments may require different cooling profiles, so adjust accordingly.
Keep notes and track settings: It’s important to keep track of the optimized settings for each filament type you use. Maintain a record of successful print settings and any adjustments made to minimize stringing. This way, you can easily refer back to the settings that produced the best results for future prints.
Remember that optimizing print settings for each filament type may involve some trial and error. Be patient, make incremental adjustments, and keep a close eye on the print quality and stringing issues. With persistence and careful tuning, you can achieve clean and string-free prints for each filament type you work with.
Conclusion
Stringing can be frustrating when it comes to 3D printing, but it is a common issue that can be overcome with the right strategies. By implementing the tips discussed in this article, you can minimize stringing and achieve cleaner and more professional 3D prints.
We explored various factors that contribute to stringing, such as improper retraction settings, high printing temperatures, slow travel speeds, low-quality filaments, inadequate cooling, and suboptimal print settings. By understanding the causes, we can effectively address them and reduce stringing.
Adjusting retraction settings, lowering printing temperatures, increasing travel speeds, using filament drying techniques, checking filament quality, adding a filament cooling fan, and optimizing print settings for each filament type are all effective techniques to minimize stringing.
Remember that experimenting and fine-tuning may be necessary to find the optimal settings for your specific printer and filament combinations. Keep track of the adjustments made and the outcomes to establish a set of optimal print settings for different filaments.
By implementing these strategies, you can significantly reduce stringing and achieve cleaner, more precise 3D prints. Embrace the process of learning and experimentation to unlock the true potential of your 3D printer and enjoy successful and string-free prints.