Introduction
3D printing has revolutionized the way we create and prototype objects. From intricate figurines to functional prototypes, this technology has opened up a world of possibilities. However, like any manufacturing process, 3D printing is not without its challenges. One common issue that many users encounter is stringing.
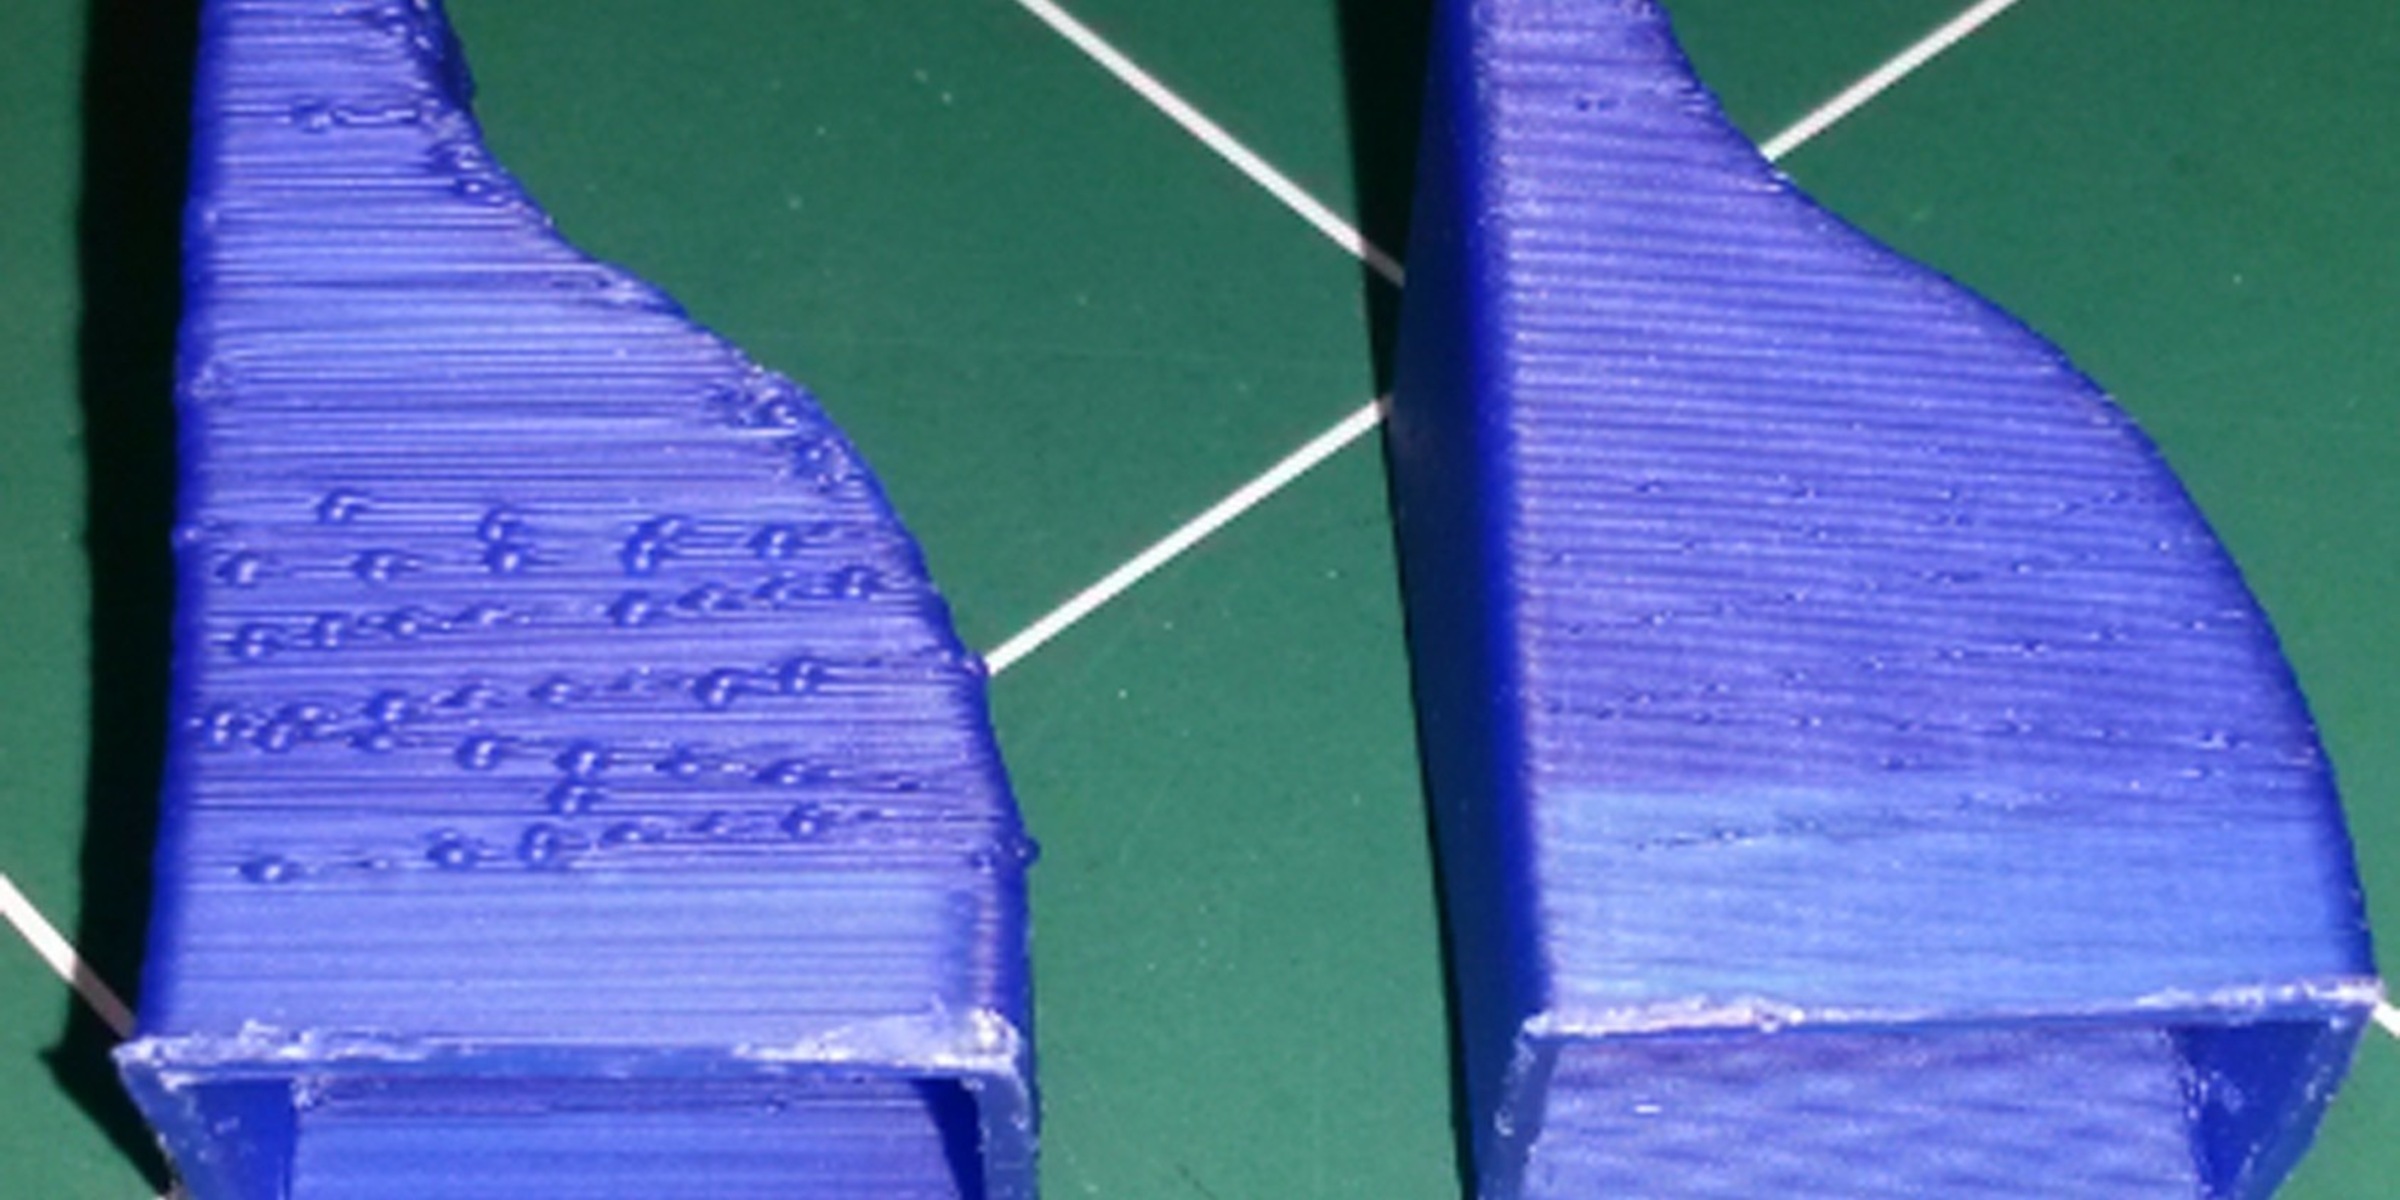
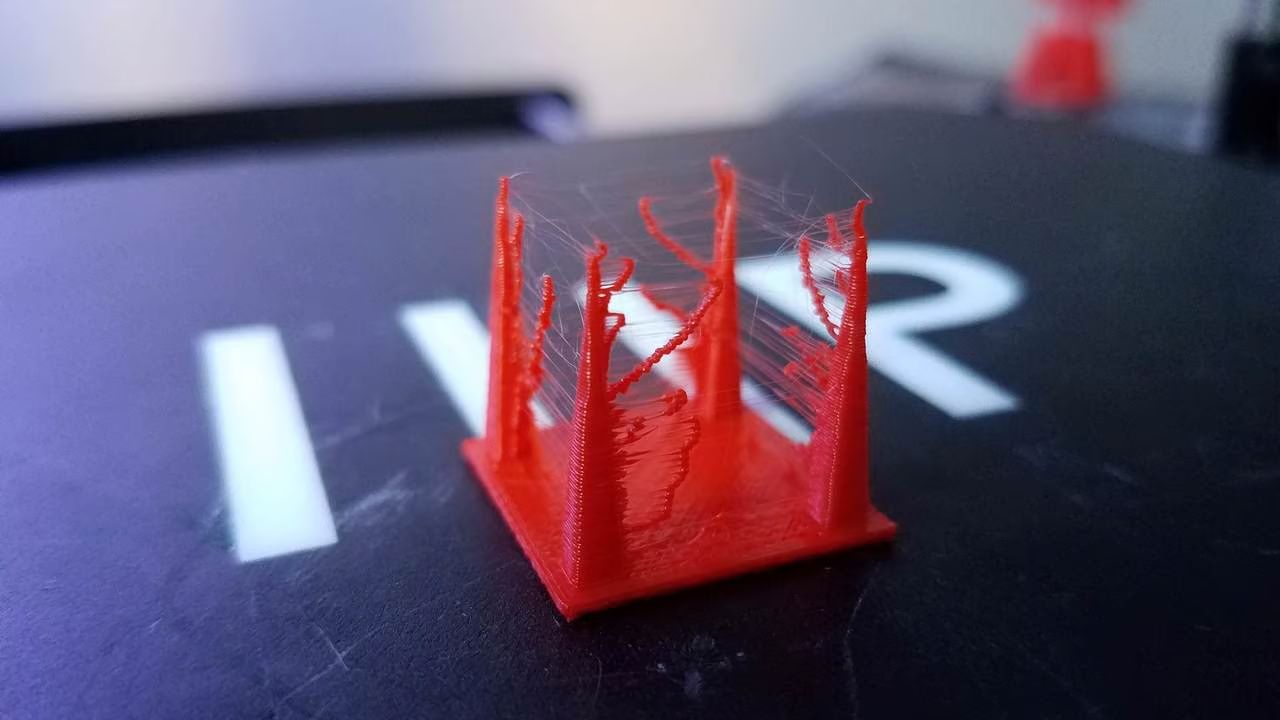
Stringing refers to the thin strands of filament that appear between non-connected parts of a 3D print. It happens when the printer deposits excess filament during travel moves, resulting in unwanted strings of material. These strings not only compromise the overall aesthetic of the print but can also affect its structural integrity.
Understanding the causes of stringing and learning how to fix it can greatly improve the quality of your 3D prints. In this article, we will explore the different factors that contribute to stringing and provide effective solutions to help you overcome this issue.
Note: Before attempting any troubleshooting techniques mentioned in this article, ensure that your 3D printer is properly calibrated and in good working condition.
Understanding Stringing
Stringing in 3D printing occurs when the printer leaves thin strands of filament between different parts of the print. These strings are formed when the printer’s extruder continues to extrude filament during travel moves, leading to unwanted filament deposits. While some stringing may be inevitable due to the nature of the printing process, excessive stringing can significantly affect the quality of the print.
The severity of stringing can vary depending on various factors, including the type of filament, printer settings, and the specific model being printed. In some cases, the strings may be barely visible, while in others, they can cause significant aesthetic imperfections and even affect the functionality of the print.
Stringing can be particularly problematic when printing complex geometries, small details, or prints with multiple separate parts. These strings can get entangled, affect the overall finish of the print, and require post-processing to remove them successfully.
One important thing to keep in mind is that stringing is different from oozing. Oozing refers to the extrusion of filament from the nozzle when it is idle. While both issues are related to filament flow, oozing primarily occurs at rest, whereas stringing happens during movement between different parts of the print.
Now that we have a better understanding of what stringing is, let’s explore some of the most common causes behind this issue and how to address them effectively.
Causes of Stringing
Stringing in 3D printing can be caused by several factors, and identifying the root cause is essential for implementing effective solutions. Here are some common causes of stringing:
- Temperature: High temperature can cause filament to become more fluid, making it prone to oozing and stringing. If the temperature is too high, the filament may continue to flow even during travel moves, leading to stringing.
- Retraction settings: Retraction is the process of pulling the filament back into the nozzle when the printer is not extruding. Inadequate or excessive retraction settings can result in filament being dragged along during travel moves, causing stringing.
- Printing speed: Printing too quickly can increase the chances of stringing as the filament has less time to cool and solidify before the nozzle moves to the next position. This can lead to filament drooping and creating stringy strands.
- Travel moves: The path the nozzle takes between different parts of the print can also contribute to stringing. If the travel moves are not optimized or the distance between the parts is too large, the filament may continue to extrude, resulting in stringing.
- Filament quality: The quality and composition of the filament can also affect stringing. Filaments with impurities or inconsistencies in their composition may be more prone to stringing issues.
It’s important to note that stringing can be influenced by a combination of these factors, and the optimal solution may vary depending on your specific printer and filament. By understanding the underlying causes, you can take the necessary steps to minimize or eliminate stringing from your 3D prints.
How to Fix Stringing Issues
Stringing is a common problem in 3D printing, but fortunately, there are several methods you can try to minimize or eliminate stringing from your prints. Here are some effective solutions:
- Adjusting Temperature Settings: Experiment with lowering the temperature of your printer’s extruder. Lower temperatures can help reduce the fluidity of the filament, preventing excessive oozing and stringing. However, be mindful that going too low can cause other issues like under-extrusion, so find the right balance for your specific filament.
- Tweaking Retraction Settings: Optimize your retraction settings to minimize stringing. Increase the retraction distance to pull more filament back into the nozzle during travel moves. Also, adjust the retraction speed to find the optimal speed that allows the filament to retract without causing jams or other issues.
- Using a Different Filament: If you consistently experience stringing, consider trying a different filament brand or type. Some filaments are more prone to stringing due to their composition or quality. Experiment with different filaments to find one that minimizes stringing for your specific printer settings.
- Cleaning the Nozzle: A clogged or dirty nozzle can contribute to stringing. Regularly clean your nozzle to ensure smooth extrusion and prevent filament buildup. There are various nozzle cleaning tools available, such as cleaning needles or nozzle cleaning kits, which can help remove any obstructions.
- Calibrating Printer Settings: Properly calibrating your printer can have a significant impact on reducing stringing. Check and adjust your printer’s steps per millimeter, flow rate, and other settings according to your filament and printer specifications.
- Upgrading Firmware or Slicer Software: Sometimes, stringing issues can be resolved by upgrading your printer’s firmware or using a different slicer software. Newer firmware versions often include improvements in retraction algorithms or other features that help minimize stringing. Additionally, different slicer software may provide more customization options that can better control stringing.
- Using a Filament Dryer: Moisture in the filament can lead to increased stringing. Using a filament dryer can help remove excess moisture and improve the print quality. Placing the filament in a dry environment or using a dedicated filament dryer can reduce stringing caused by moisture.
Remember, each printer and filament combination is unique, so it may take some experimentation to find the optimal settings and solutions for your specific setup. Try making one adjustment at a time and test the results to determine which method works best for minimizing stringing in your 3D prints.
Method 1: Adjusting Temperature Settings
One of the first methods to consider when addressing stringing issues in 3D printing is adjusting the temperature settings. Higher temperatures can cause the filament to become too fluid, leading to excessive oozing and stringing. Lowering the temperature can help mitigate these issues.
Start by reducing the temperature of your printer’s extruder by a few degrees. This will depend on the specific filament you are using, so consult the manufacturer’s recommendations as a starting point. Gradually lower the temperature and observe the results on your prints. You should aim for a balance where the filament is fluid enough to extrude smoothly but not so fluid that it continues to flow during travel moves.
It’s important to note that different filaments have varying temperature requirements. For example, PLA typically requires a lower temperature range compared to ABS or PETG. By adjusting the temperature settings based on the filament you are using, you can optimize the print quality and minimize stringing.
To fine-tune the temperature, consider printing a temperature tower test. This involves printing a tower with different temperature zones, allowing you to visually analyze the impact of temperature changes on stringing, layer adhesion, and overall print quality. By observing the results at different temperature intervals, you can identify the optimal temperature range for your specific filament.
Remember to make incremental changes to the temperature settings and test the results after each adjustment. Document your findings and keep track of the ideal temperature range for specific filaments, as this can vary across different brands and batches.
By adjusting the temperature settings, you can find the sweet spot where the filament flows smoothly during normal extrusion but minimizes stringing during travel moves, resulting in cleaner and more precise prints.
Method 2: Tweaking Retraction Settings
Retraction is an essential setting in 3D printing that helps address stringing issues. It involves pulling the filament back into the nozzle when the printer is not extruding, preventing the filament from oozing and causing unwanted strings during travel moves.
To minimize stringing, you can tweak the retraction settings of your printer. There are two primary parameters to consider: retraction distance and retraction speed.
Retraction Distance: This setting determines how far the filament is retracted back into the nozzle. Increasing the retraction distance can help minimize stringing as more filament is pulled back, reducing the chances of unwanted stringing during travel moves. However, it’s important to find the right balance, as excessive retraction distance can lead to other issues like under-extrusion or filament jams. Start by increasing the retraction distance in small increments (e.g., 0.2mm) and test the results with each adjustment until you find the optimal value.
Retraction Speed: The retraction speed dictates how quickly the filament is pulled back into the nozzle. A higher retraction speed can help retract the filament faster, reducing stringing. However, setting the retraction speed too high can cause issues like filament skipping or extruder motor strain. It’s recommended to start with a moderate retraction speed and gradually increase or decrease it based on the results obtained. Often, a retraction speed in the range of 40-60 mm/s works well for most printers.
Remember that the ideal retraction settings can vary depending on factors such as the type of printer, extruder setup, and filament used. It may require some experimentation to find the optimum values for your specific configuration.
When adjusting the retraction settings, it’s crucial to consider other factors such as print speed, print temperature, and layer height. These parameters can also impact the amount of stringing and should be fine-tuned accordingly.
Regularly test and inspect the prints to assess the impact of retraction adjustments. Look for improvements in stringing reduction without compromising the overall print quality and performance. Take note of the optimal retraction settings for different filaments, as each type may require specific adjustments.
By tweaking the retraction settings, you can effectively minimize stringing and achieve cleaner and more precise 3D prints.
Method 3: Using a Different Filament
When dealing with stringing issues in 3D printing, another effective method to consider is using a different filament. Not all filaments are created equal, and the composition and quality of the filament can have a significant impact on stringing.
If you consistently face stringing problems with a specific filament, it may be worth exploring alternative brands or types of filaments that are known to have better stringing resistance. Different filaments have distinct characteristics that can affect their behavior during the printing process.
For instance, some filaments, such as PLA (polylactic acid) or PETG (polyethylene terephthalate glycol), have lower tendencies for stringing compared to ABS (acrylonitrile butadiene styrene) or Nylon. By switching to a filament known for its reduced stringing properties, you can decrease the likelihood of unwanted strings between printed parts.
Furthermore, consider the filament diameter. Inconsistent filament diameter can lead to uneven extrusion and increased stringing. Ensure that your filament is of high quality, with a consistent and accurate diameter throughout the spool.
When trying out a different filament, start with a small test print to evaluate its performance. Look for signs of reduced stringing compared to your previous filament. Keep in mind that each filament may require adjustments to temperature, retraction settings, and print speed to achieve optimal results.
It’s also worth noting that the color of the filament can impact stringing to some extent. Some users have observed that darker-colored filaments tend to exhibit more stringing than lighter ones. While this may not be a determining factor, it’s something to be aware of when troubleshooting stringing issues.
Experimenting with different filaments can help you identify the ones that work best for your specific printer and desired print outcomes. Keep a record of the filaments you’ve tested and note their performance regarding stringing reduction. This way, you’ll have a reference for future prints.
By using a filament known for its reduced stringing properties, you can minimize this issue and achieve cleaner and more accurate 3D prints.
Method 4: Cleaning the Nozzle
A clogged or dirty nozzle can contribute to stringing issues in 3D printing. When the nozzle becomes partially blocked or has leftover filament residue, it can lead to inconsistent extrusion and stringing during printing. Regularly cleaning the nozzle can help maintain optimal performance and reduce the occurrence of stringing.
There are several methods you can use to clean the nozzle:
1. Manual cleaning: Heat up the nozzle to a temperature suitable for the filament you are using (refer to the filament manufacturer’s guidelines). Once heated, carefully remove any visible filament residue from the nozzle using tweezers or needle-nose pliers. Be cautious not to damage the nozzle or scratch its surface. Use a brass brush or nozzle cleaning tool to gently scrub away any stubborn debris inside the nozzle.
2. Cold pull (atomic pull): This method involves using a filament to clean the nozzle while it is cold. Start by heating the nozzle to the printing temperature of the filament you last used. Once heated, carefully remove the filament and allow the nozzle to cool down to about 90-100°C. Insert a cleaning filament or a piece of filament of similar composition, and then slowly pull it out. The cooled filament will help remove any residual debris or clogs as it is pulled through the nozzle.
3. Chemical cleaning: If manual cleaning alone doesn’t seem sufficient, you can try using specialized nozzle cleaning chemicals. These are often available in the form of cleaning filaments or nozzle cleaning solutions. Follow the instructions provided by the manufacturer to ensure safe and effective use of the cleaning chemicals.
Regularly maintaining and cleaning the nozzle can help ensure smooth filament flow, preventing clogs and reducing the occurrence of stringing. Make it a routine to inspect the nozzle before each print and clean it as needed.
Successful nozzle cleaning can greatly improve the overall print quality by reducing extrusion inconsistencies and preventing unwanted strings of filament. By incorporating nozzle cleaning into your 3D printing maintenance routine, you can minimize stringing issues and achieve cleaner and more precise prints.
Method 5: Calibrating Printer Settings
Calibrating your printer settings is a crucial step in minimizing stringing issues and optimizing the overall print quality. Proper calibration ensures that the printer is accurately translating the digital design into the physical object.
Here are some key areas to focus on when calibrating your printer:
1. Steps per millimeter (calibrating extruder): Ensuring that the extruder is calibrated correctly is essential for consistent filament flow. Incorrect steps per millimeter (E-steps) can result in over or under extrusion, leading to stringing. Follow a reliable guide or tutorial specific to your printer to adjust the E-steps accurately.
2. Flow rate (calibrating extrusion multiplier): Adjusting the flow rate allows you to fine-tune the amount of filament being extruded. An incorrect flow rate can lead to over extrusion, which can contribute to stringing. By calibrating the extrusion multiplier or flow rate through test prints or calibration cubes, you can optimize the amount of filament being extruded for precise and clean prints.
3. Print speed and acceleration: The speed at which your printer operates can affect stringing. Printing too quickly can result in filament drooping and increased stringing. Experiment with adjusting the print speed and acceleration settings to find the optimal balance that minimizes stringing while still maintaining print quality. It may also be beneficial to slow down the travel speed between different parts of the print to reduce the chances of stringing.
4. Retraction settings: As mentioned previously, adjusting the retraction settings can help minimize stringing. Fine-tune the retraction distance and speed to find the optimum values for your specific printer and filament combination. Keep in mind that these settings may need to be tweaked for different filaments, so document the optimal values for future reference.
5. Print bed leveling: Properly leveling the print bed ensures that the first layer adheres well and ensures consistent layer height throughout the print. Improper bed leveling can lead to uneven extrusion, causing stringing. Regularly check and adjust the bed leveling to maintain optimal print quality.
Regular calibration of these printer settings is essential for minimizing stringing and achieving high-quality prints. Keep records of your calibration adjustments and note the optimal settings for various filaments and print scenarios. This way, you can easily replicate successful prints and make informed adjustments when needed.
By consistently calibrating your printer settings, you can optimize filament flow, reduce stringing, and achieve cleaner and more accurate 3D prints.
Method 6: Upgrading Firmware or Slicer Software
Upgrading your printer’s firmware or using a different slicer software can be an effective method for addressing stringing issues in 3D printing. Firmware updates and slicer software improvements often introduce new features and algorithms that can help optimize the printing process and minimize stringing.
Here are a few key considerations for upgrading firmware or slicer software:
1. Firmware upgrades: Check if there are any firmware updates available for your 3D printer. Manufacturers often release firmware updates that include improvements in retraction algorithms, temperature control, and other functions that can help reduce stringing. Check the manufacturer’s website or forums for any firmware updates specific to your printer model. Follow the provided instructions to safely install the latest firmware version, ensuring compatibility and proper functionality.
2. Slicer software options: If you are experiencing persistent stringing issues, consider trying a different slicer software. Different slicers offer varied levels of customization and settings to control stringing. Experiment with different software options such as Cura, Slic3r, or PrusaSlicer to access advanced features and settings that can optimize the print quality. Additionally, ensure that you are using the latest version of the chosen slicer software, as updates often include bug fixes and enhancements.
3. Custom configurations: In some cases, firmware upgrades or slicer software changes may not fully address the stringing issue. In such instances, you may need to explore custom configurations. This involves manually adjusting the firmware or slicer settings to fine-tune the print parameters. Advanced users can dive into the firmware code or slicer configuration files to modify retraction settings, temperature profiles, and other relevant variables to mitigate stringing. However, exercise caution and refer to reliable sources or seek guidance from the 3D printing community when making custom configurations.
When upgrading firmware or slicer software, it’s essential to thoroughly test the changes and monitor the results. Look for improvements in stringing reduction and overall print quality. Refer to printing profiles and guidelines provided by the firmware or slicer software developers to ensure proper configuration. Remember to document any changes made and their impact on stringing to replicate successful prints and troubleshoot any potential issues in the future.
By upgrading firmware or trying different slicer software options, you can take advantage of the latest advancements in filament control and printing algorithms, leading to reduced stringing and improved print quality.
Method 7: Using a Filament Dryer
Moisture in filament can contribute to stringing issues in 3D printing. When filament absorbs moisture from the environment, it can become more prone to oozing and stringing during the printing process. Using a filament dryer is an effective method to remove excess moisture and minimize stringing.
A filament dryer is a device specifically designed to heat and dry filaments, ensuring that they are in optimal condition for printing. Here’s how you can effectively utilize a filament dryer:
1. Filament storage: Store your filament spools in airtight containers with desiccant packets or moisture absorbers. This helps prevent moisture absorption and maintains the filament’s dryness. Keep the filament spools sealed when not in use to minimize exposure to humidity.
2. Pre-drying: If you suspect that your filament has absorbed moisture, pre-drying it in a filament dryer is recommended before printing. Place the spool of filament in the filament dryer and set the appropriate temperature and drying time based on the filament type. This will gradually and evenly remove moisture from the filament, ensuring its optimal printing condition.
3. Continuous drying: For high humidity environments or if you frequently encounter stringing issues due to moisture, consider using a filament dryer that can be attached directly to the 3D printer. These dryers feature a filament feed mechanism that passes the filament through a heated chamber as it enters the printer. This continuous drying process helps maintain optimal filament moisture levels during printing, minimizing the chances of stringing.
Remember to follow the manufacturer’s instructions when using a filament dryer. Each filament type may require specific drying temperatures and times. Be cautious not to overheat the filament, as that can result in degradation or warping.
Using a filament dryer is particularly beneficial for hygroscopic materials like nylon or certain types of filaments that are more susceptible to moisture absorption. By ensuring that your filament is properly dried and free from excess moisture, you can significantly reduce stringing and achieve cleaner and smoother 3D prints.
Conclusion
Stringing is a common issue faced by 3D printing enthusiasts, but thankfully, there are several effective methods for minimizing or eliminating stringing in your prints. By understanding the causes of stringing and implementing the appropriate solutions, you can achieve cleaner and more precise 3D prints.
The methods discussed in this article offer a comprehensive approach to tackling stringing issues. Adjusting temperature settings and tweaking retraction settings allow for fine-tuning filament behavior, while using different filaments can offer improved stringing resistance. Additionally, regular cleaning of the nozzle and calibrating printer settings help ensure reliable and consistent extrusion. Upgrading firmware or slicer software provides access to enhanced features and settings specifically designed to mitigate stringing. Lastly, using a filament dryer is valuable for removing excess moisture that can contribute to stringing.
Remember, each 3D printer and filament combination is unique, so it may take some trial and error to find the optimal settings and methods that work best for your specific setup. Be patient, document your findings, and keep track of successful configurations for future reference.
By implementing these methods and diligently troubleshooting stringing issues, you can greatly enhance the quality and appearance of your 3D prints. Enjoy the process of refining your printing techniques and exploring the endless possibilities that 3D printing has to offer.