Introduction
Welcome to the world of ultrabooks, sleek and powerful devices that combine the portability of a tablet with the performance of a laptop. Whether you’re a tech enthusiast looking to upgrade your current ultrabook or a DIY enthusiast eager to explore the inner workings of these devices, opening an ultrabook can be a valuable skill to have. By knowing how to access the internal components, you can perform upgrades or replace faulty parts with ease.
In this article, we will guide you through the process of opening an ultrabook step by step. We will cover the tools and equipment you’ll need, how to remove the bottom cover, disconnect the battery, and safely access the internal components. Additionally, we’ll provide insights on upgrading or replacing components and guide you in reassembling the ultrabook without any hiccups.
Before we get started, it’s essential to note that opening an ultrabook may void the warranty, so proceed with caution. If your ultrabook is still under warranty, it’s advisable to contact the manufacturer or authorized service center for any repairs or upgrades. However, if you’re confident in your skills and want to take matters into your own hands, let’s dive right in!
Tools and Equipment Needed
Before you begin opening your ultrabook, you’ll need to gather a few essential tools and equipment. Here’s a list of items you’ll need to have on hand:
- Screwdrivers: Ultrabooks often use small and specialized screws, so make sure you have a set of precision screwdrivers that includes various sizes and types such as Phillips and Torx.
- Plastic pry tools: These non-metallic tools are essential for safely detaching the bottom cover of your ultrabook without scratching or damaging the surface.
- Anti-static wrist strap: This strap helps ground you and prevents static electricity from damaging sensitive components of your ultrabook during the opening process.
- Cleaning cloth: A soft microfiber cloth is useful to wipe away any dust or smudges that may accumulate during the process.
- Optional: If you’re planning to upgrade or replace specific components, such as the hard drive or RAM, you might need additional tools such as a spudger or a small pair of tweezers.
It’s essential to ensure that you have the correct tools for your specific ultrabook model. While most ultrabooks have similar designs, there may be slight variations in screw sizes or connector types.
If you’re not sure about the tools required for your ultrabook, consult the manufacturer’s documentation or visit their website for specific instructions. Additionally, there are online communities and forums dedicated to DIY tech enthusiasts who can provide guidance and insights on the tools needed for specific ultrabook models.
Once you have gathered all the necessary tools and equipment, you’re ready to move on to the next steps in opening your ultrabook.
Step 1: Power Down and Disconnect
Before opening your ultrabook, it’s crucial to power it down and disconnect it from any power sources. This step ensures your safety and prevents any potential damage to the internal components.
To begin, save any unsaved work and close all applications on your ultrabook. Shut down the operating system properly following the manufacturer’s instructions.
Next, unplug the power adapter from the ultrabook and remove any other external devices connected to it, such as USB drives or peripherals. It’s important to disconnect all power sources to avoid any risk of electric shock during the opening process.
If your ultrabook has a built-in battery, make sure it’s completely powered off. If the battery is removable, take it out as well. Removing the battery ensures that there’s no power supply to the device, reducing the risk of accidental damage or injury.
Remember to handle the battery with care and follow any specific instructions provided by the manufacturer for its removal. Some ultrabooks may require the use of a small latch or release mechanism to detach the battery.
Once you have successfully powered down your ultrabook and disconnected it from all power sources, you can proceed with confidence to the next step of removing the bottom cover.
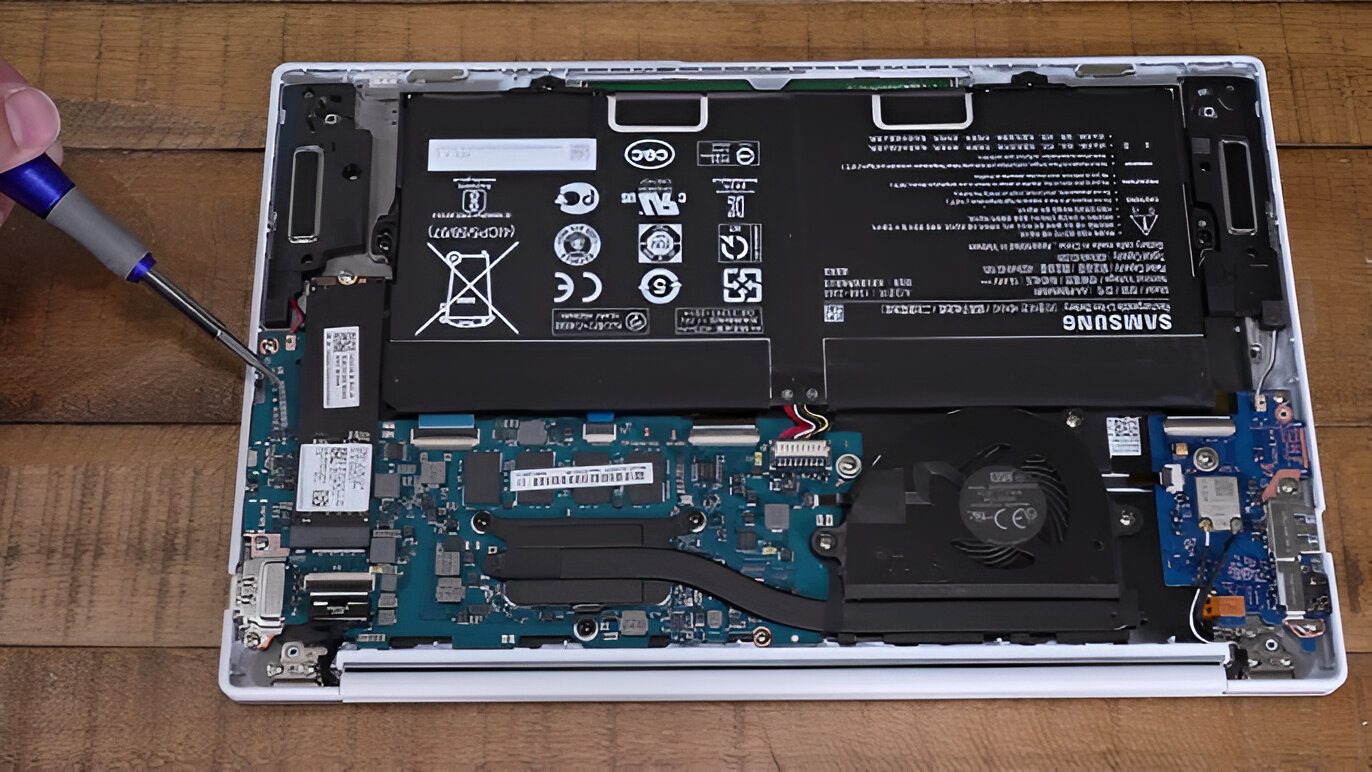
Step 2: Removing the Bottom Cover
Now that your ultrabook is powered down and disconnected, it’s time to remove the bottom cover to gain access to the internal components. Please note that the process may vary slightly depending on the specific ultrabook model, so it’s a good idea to refer to the manufacturer’s documentation for any specific instructions.
Start by placing your ultrabook on a flat and stable surface, ensuring that it’s secure and won’t slip or slide. Take your plastic pry tool and carefully insert it between the bottom cover and the main body of the ultrabook. Gently apply pressure and slowly work your way around the edges, popping the clips that hold the bottom cover in place.
Be cautious not to use excessive force or pry too aggressively, as this may cause damage to the clips or the plastic housing. Some ultrabooks might have screws holding the bottom cover in place, so make sure to remove those screws before attempting to pry it off.
As you work your way around, you should feel the clips releasing one by one. Take your time and be patient to avoid any accidental breakage or damage. Once all the clips are released, you can carefully lift off the bottom cover.
Set the bottom cover aside in a safe place, making sure it’s away from any static electricity or potential hazards. You now have an open glimpse into the internal components of your ultrabook, and you’re ready to move on to the next steps of the opening process.
It’s worth noting that some ultrabooks may have additional layers or covers beneath the bottom cover. If you encounter multiple layers, you might need to repeat the process of removing clips or screws to access the desired components. Always exercise caution and refer to the manufacturer’s documentation for specific instructions on your ultrabook model.
Step 3: Disconnecting the Battery
Before proceeding with any further steps involving the internal components of your ultrabook, it’s crucial to disconnect the battery. This step ensures your safety and prevents any accidental damage to the device.
If your ultrabook has a removable battery, you may have already removed it during the power down process in Step 1. However, if your ultrabook has a built-in battery, follow the steps below to disconnect it:
- Locate the battery connector on the motherboard of your ultrabook. This connector is usually a small white or black plastic piece with thin wires connected to it.
- Gently and carefully pull the connector away from its socket. It should detach easily, but be cautious not to pull too forcefully to avoid damaging the connector or the motherboard.
- Once the battery connector is disconnected, double-check that there is no power supply to the device by pressing the power button. If the ultrabook does not turn on, you have successfully disconnected the battery.
It’s important to note that some ultrabooks may have additional screws or clips securing the battery in place. If you encounter any, carefully remove them before attempting to disconnect the battery connector.
By disconnecting the battery, you minimize the risk of electrostatic discharge (ESD) and ensure that no power is flowing through the device while you work on it. This step is crucial for your safety and the overall success of the opening process.
With the battery disconnected, you’re now ready to proceed with accessing and working on the internal components of your ultrabook. However, always handle the disassembled ultrabook with care and avoid touching any sensitive components directly to prevent damage from static electricity or physical mishandling.
Step 4: Accessing the Internal Components
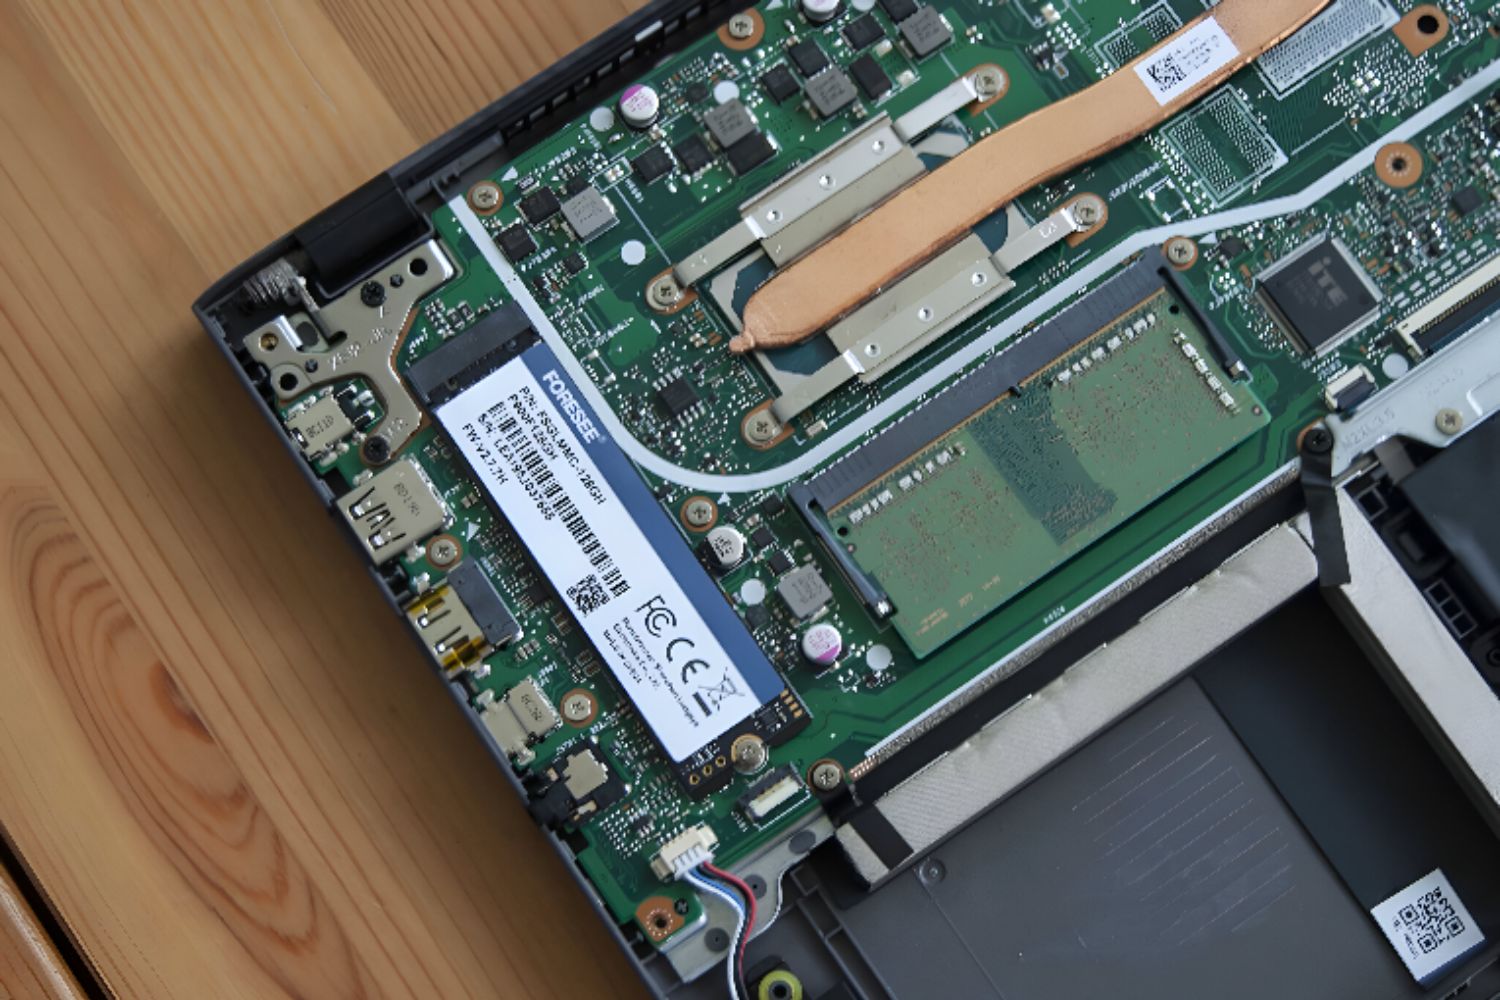
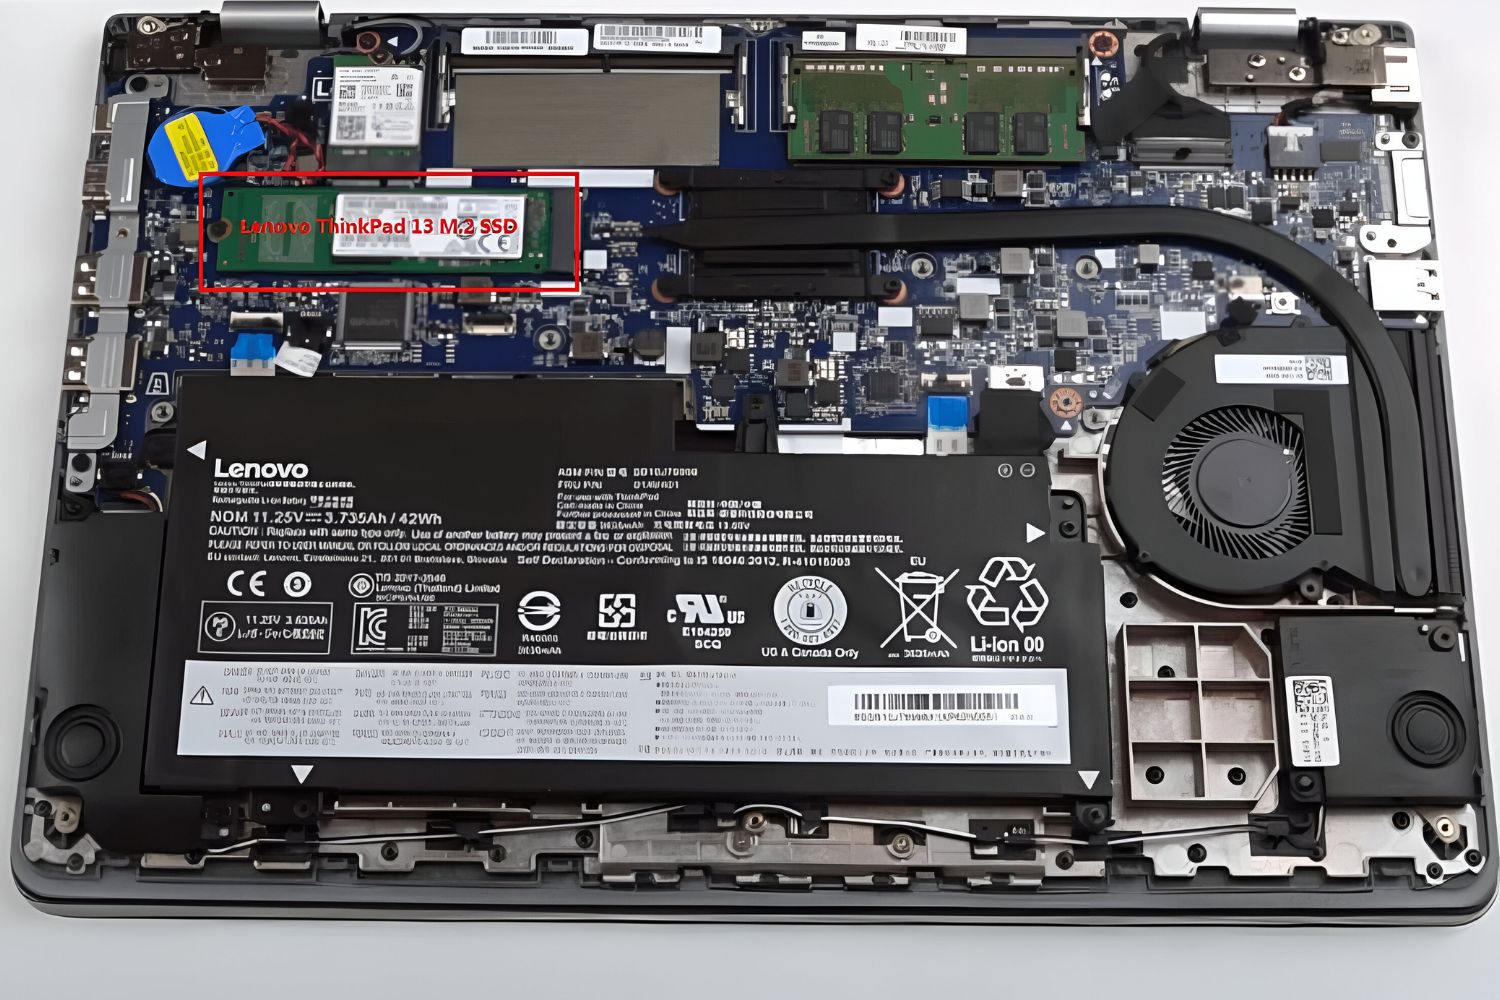
With the bottom cover removed and the battery disconnected, you have now gained access to the internal components of your ultrabook. This is where you can upgrade or replace various hardware components such as the hard drive, RAM, or Wi-Fi card. Let’s explore how to access these components:
Take a moment to familiarize yourself with the layout of the internal components. You should see the mainboard or motherboard, which is the main circuit board where various components are connected. The hard drive, RAM slots, and other hardware components will be visible, depending on the specific model of your ultrabook.
To access specific components, you may need to remove additional covers or panels. These covers are usually held in place with screws or clips. Carefully remove the necessary screws or unclip the panels to reveal the desired components.
When working with internal components, it’s crucial to exercise caution and follow proper antistatic precautions. If possible, use an antistatic mat or wear an antistatic wrist strap to prevent any static electricity from damaging the delicate components.
If you’re unsure about which components can be upgraded or replaced in your ultrabook, refer to the manufacturer’s documentation or website to see what options are available. Some ultrabooks may have certain components soldered directly onto the motherboard, limiting upgradability.
A common component that users often upgrade is the hard drive. If you’re looking to replace the hard drive with a larger capacity or upgrade to a solid-state drive (SSD) for improved speed and performance, carefully disconnect the cables connected to the current hard drive and remove it from its slot. Insert the new hard drive or SSD and reconnect the cables securely.
Remember to take note of the specific instructions for each component and the orientation of connectors when disconnecting or reconnecting them. This will ensure proper installation and avoid any potential issues.
Once you have completed the necessary upgrades or replacements, you’re ready to move on to the next step of reassembling your ultrabook with the newly installed components.
Step 5: Upgrading or Replacing Components
Now that you have accessed the internal components of your ultrabook, it’s time to consider upgrading or replacing specific hardware components to enhance its performance. Here are a few common components that users often upgrade:
- Hard Drive: Upgrading to a larger capacity hard drive or a faster solid-state drive (SSD) can significantly improve the storage and overall performance of your ultrabook. Follow the manufacturer’s instructions to remove the old hard drive and install the new one, ensuring a secure connection to the interface.
- RAM: Increasing the amount of random access memory (RAM) in your ultrabook can enhance multitasking capabilities and overall system responsiveness. Locate the RAM slots on the motherboard, carefully remove the existing RAM modules, and install the new ones according to the specific instructions, ensuring they are firmly seated.
- Battery: If you’re experiencing reduced battery life or your ultrabook won’t hold a charge, replacing the battery may be necessary. Consult the manufacturer’s documentation for the specific steps to remove the old battery and install the new one.
- Wireless Card: If you’re facing connectivity issues or want to upgrade to a newer wireless standard, replacing the wireless card can be the solution. Locate the wireless card on the motherboard, carefully disconnect the antennas and remove the existing card. Install the new card and reconnect the antennas securely.
- Other Components: Depending on your ultrabook model, you may have other components that can be upgraded, such as the graphics card or the cooling system. Research your specific model to determine what options are available and follow the manufacturer’s instructions to perform the upgrades.
When upgrading or replacing components, it’s essential to use compatible hardware that is recommended by the manufacturer. Follow the installation instructions carefully, ensuring proper connections and compatibility. Incorrect installation or using incompatible components can result in system instability or damage to your ultrabook.
Additionally, before making any changes to your ultrabook, consider backing up your important data to avoid any accidental loss during the upgrade process. This ensures that your files are safe and can be easily restored after the upgrade is complete.
Remember, if you’re uncertain about any step or lack technical expertise, it’s best to seek professional assistance or consult the manufacturer’s support team. They can provide guidance and ensure a successful upgrade or replacement process for your ultrabook.
Step 6: Reassembling the Ultrabook
After completing the necessary upgrades or replacements, it’s time to reassemble your ultrabook and put everything back together. Reassembly is a crucial step to ensure that all components are properly and securely installed. Here’s a guide on how to reassemble your ultrabook:
- Replace the Components: Start by carefully reinstalling any additional covers or panels that were removed during the access step. Follow the manufacturer’s instructions to ensure the correct alignment and secure attachment of these components.
- Connect the Battery: If you removed the battery, now is the time to reconnect it. Gently insert the battery connector back into its socket on the motherboard, making sure it is properly seated. The connector should attach easily without applying excessive force.
- Reattach the Bottom Cover: Align the bottom cover with the ultrabook’s main body and press it firmly in place. You will hear the clips snapping into position. Ensure that all edges are properly aligned and that there are no gaps or misalignments. If your ultrabook requires screws to secure the bottom cover, insert them carefully and tighten them using the correct screwdriver.
- Power Up the Ultrabook: With the reassembly complete, it’s time to power on your ultrabook. Connect it to a power source and press the power button to start the device. If everything has been reinstalled correctly, your ultrabook should boot up without any issues.
- Check Functionality: After powering up, test the functionality of your ultrabook and ensure that all upgraded or replaced components are functioning correctly. Verify that the new hard drive is recognized, the RAM is properly detected, and all wireless connections are working.
Throughout the reassembly process, be mindful of following proper antistatic precautions to avoid any static discharge that could damage sensitive components. Remember to handle all components with care and pay attention to proper alignment and positioning.
If, at any point, you encounter difficulties or your ultrabook does not function as expected after reassembly, it’s advisable to consult the manufacturer’s documentation or seek professional assistance. They can provide further troubleshooting steps or instructions specific to your ultrabook model.
Congratulations! You have successfully opened, upgraded, or replaced components in your ultrabook, and now it’s ready for use with its enhanced performance and functionality.
Conclusion
Opening an ultrabook and accessing its internal components can be a rewarding and valuable skill for tech enthusiasts and DIY enthusiasts alike. Whether you’re upgrading hardware components for better performance or troubleshooting and replacing faulty parts, knowing how to open an ultrabook gives you the freedom to customize and optimize your device to suit your needs.
Throughout this guide, we have covered the essential steps involved in opening an ultrabook, from powering down and disconnecting to removing the bottom cover, accessing internal components, and performing upgrades or replacements. We emphasized the importance of following manufacturer instructions, using the appropriate tools and techniques, and maintaining proper antistatic precautions.
Remember, opening an ultrabook may void the warranty, so it’s essential to understand the risks and proceed with caution. If you’re unsure about any step or lack the technical expertise, it’s best to seek professional assistance or consult the manufacturer’s support team.
By opening your ultrabook, you have the opportunity to unleash its potential and truly make it your own. Whether it’s upgrading the hard drive for more storage, increasing the RAM for better multitasking, or replacing a faulty component, you can breathe new life into your ultrabook and optimize its performance.
We hope this guide has provided you with the necessary knowledge and confidence to open your ultrabook and undertake the necessary upgrades or replacements. Remember to always prioritize your safety, take your time, and follow the manufacturer’s instructions diligently.
Happy opening and happy upgrading!