Introduction
Welcome to our comprehensive guide on how to upgrade memory on an Ultrabook! If you’re looking to boost the performance and speed of your Ultrabook, upgrading its memory is a great option. Whether you’re a professional who needs to run demanding software or a casual user who wants a smoother multitasking experience, increasing your Ultrabook’s memory can make a significant difference.
An Ultrabook is a lightweight and portable laptop that is designed to provide high performance in a sleek and compact form factor. These devices are known for their fast boot times and quick response, but even the most advanced Ultrabooks can benefit from a memory upgrade.
By increasing the memory capacity of your Ultrabook, you’ll have more space for running multiple applications simultaneously, storing larger files, and handling resource-intensive tasks. This can result in smoother multitasking, improved overall system performance, and a more efficient computing experience.
Before diving into the step-by-step process of upgrading your Ultrabook’s memory, it’s important to familiarize yourself with the basics. In the following sections, we’ll guide you through understanding memory on an Ultrabook, checking system compatibility, purchasing the right type of memory, and the tools you’ll need for the upgrade.
Upgrading your Ultrabook’s memory may seem intimidating, but with the right information and guidance, it can be a straightforward and rewarding process. So, let’s get started and unlock the full potential of your Ultrabook through a memory upgrade!
Understanding Memory on an Ultrabook
Before delving into the process of upgrading memory on an Ultrabook, it’s essential to have a basic understanding of how memory works in these devices. Memory, also known as RAM (Random Access Memory), plays a crucial role in the overall performance and responsiveness of your Ultrabook.
RAM is temporary storage that is used by your Ultrabook to hold data that is actively being processed or accessed by the CPU (Central Processing Unit). It allows your Ultrabook to quickly retrieve and modify data, resulting in faster and smoother application execution. In simpler terms, the more RAM your Ultrabook has, the more tasks it can handle simultaneously without slowing down.
The amount of RAM in an Ultrabook is typically specified in gigabytes (GB). Popular Ultrabooks usually come with 4GB or 8GB of RAM, but some high-end models can offer even greater capacity. While 4GB may be sufficient for basic tasks like web browsing and document editing, power users who engage in resource-intensive activities such as video editing or running virtual machines may benefit from upgrading to 8GB or more.
Another important aspect to consider is the speed of the memory modules. RAM speed is measured in megahertz (MHz) and determines how quickly data can be accessed and transferred. Higher RAM speeds generally result in improved system performance, especially in tasks that involve high data throughput, such as gaming or multimedia editing.
It’s important to note that not all Ultrabooks allow for memory upgrades. Some models have memory modules soldered onto the motherboard, making them non-upgradable. Before proceeding with a memory upgrade, check the specifications and documentation of your Ultrabook to ensure that it supports user-accessible memory slots.
In the next sections, we’ll explore how to check the compatibility of your Ultrabook, how to purchase the right type of memory modules, and the tools you’ll need for a successful memory upgrade. So, let’s move on and ensure that your Ultrabook is ready for a memory boost without compromising its functionality.
Checking System Compatibility
Before purchasing memory modules for your Ultrabook, it’s crucial to ensure their compatibility with your system. Here are some steps to follow to determine if the memory you’re considering is compatible:
1. Check your Ultrabook’s specifications: Start by checking the manufacturer’s website or the documentation that came with your Ultrabook. Look for information on RAM capacity, the number of available memory slots, and the supported memory types and speeds. This will give you a clear understanding of what your Ultrabook can handle.
2. Determine the current memory configuration: Find out how many memory modules are currently installed in your Ultrabook and the amount of memory they provide. This will help you decide if you need to add new modules or replace existing ones.
3. Identify the memory type and speed: Note down the specific memory type and speed supported by your Ultrabook. This information is important when selecting compatible memory modules. Common memory types include DDR3 and DDR4, while typical speed ratings range from 1600MHz to 3200MHz.
4. Check for limitations: Some Ultrabooks have limitations on the maximum amount of RAM they can handle or specific memory module capacities they support. Ensure that you’re aware of these limitations to make an informed decision about the upgrade.
5. Seek expert advice if needed: If you’re unsure about the compatibility or have specific requirements, consult the manufacturer’s support or an expert technician who can provide guidance tailored to your Ultrabook model.
By thoroughly checking the system compatibility, you can avoid purchasing incompatible memory modules and ensure a smooth and successful memory upgrade for your Ultrabook. Once you’ve determined the compatibility, it’s time to move on to the next step: purchasing the right type of memory modules.
Purchasing the Right Type of Memory
When it comes to purchasing memory for your Ultrabook, it’s crucial to choose the right type of memory modules to ensure compatibility and optimal performance. Here are a few factors to consider when selecting the memory for your upgrade:
1. Determine the memory capacity needed: Assess your usage requirements and decide how much additional memory you need. If you’re a casual user who mainly engages in light tasks like web browsing and document editing, adding another 4GB of memory may be sufficient. On the other hand, if you’re a power user who runs resource-intensive applications or multitasks heavily, consider upgrading to 8GB or more for improved performance.
2. Check the memory type and speed: Refer to your Ultrabook’s specifications to determine the supported memory type (e.g., DDR3, DDR4) and speed (e.g., 1600MHz, 3200MHz). Ensure that the memory modules you choose are compatible with your Ultrabook’s requirements to guarantee proper functionality.
3. Consider reputable brands: Opt for memory modules from reputable manufacturers known for their reliability and quality. Established brands often provide better warranty coverage and technical support, giving you peace of mind with your purchase.
4. Verify voltage compatibility: Some Ultrabooks have specific voltage requirements for memory modules. Ensure that the modules you choose adhere to these specifications to avoid any potential compatibility issues.
5. Budget considerations: While you shouldn’t compromise on quality, it’s important to consider your budget when purchasing memory modules. Compare prices from different retailers or online sources to find the best deals without compromising on compatibility or reliability.
6. Read reviews and ratings: Before making a final decision, read reviews and ratings from other users who have purchased and used the same memory modules. This can provide valuable insights and help you make an informed choice.
Taking these factors into account will help you select the right type of memory modules for your Ultrabook upgrade. Once you’ve made your purchase, it’s time to gather the necessary tools for the upgrade process, which we’ll discuss in the next section.
Tools Needed for the Upgrade
Before starting the memory upgrade process on your Ultrabook, it’s important to gather the necessary tools. Having the right tools on hand will ensure a smooth and efficient upgrading experience. Here are the tools you’ll need:
1. Screwdriver: You’ll need a small Phillips-head screwdriver to open the Ultrabook’s casing and remove the screws that secure the back panel. Look for a screwdriver with a handle that provides a comfortable grip and allows you to exert adequate force without slipping.
2. Anti-static wrist strap: An anti-static wrist strap is used to discharge static electricity from your body, helping to prevent any damage to sensitive electronic components during the upgrade process. It’s a crucial tool to ensure electrostatic discharge (ESD) protection. Make sure to connect the strap to a grounded metal object, such as the Ultrabook’s chassis, to dissipate static charges effectively.
3. Thermal compound (optional): If you are planning to remove the heatsink while upgrading the memory, you may need a thermal compound. This compound is used to improve heat transfer between the processor and its heatsink, ensuring proper cooling. If you choose to remove the heatsink, a small tube of thermal compound will be needed to apply a fresh layer before reassembling the Ultrabook.
4. Soft cloth or grounding mat: To protect your Ultrabook’s exterior from scratches or damage during the upgrade process, use a soft cloth or grounding mat to provide a clean and secure surface to work on.
5. User manual or online guide: Having the user manual for your Ultrabook or an online guide specific to your model can be helpful during the upgrade process. It can provide detailed instructions on accessing the memory slots and any specific steps or precautions to be aware of.
By collecting these tools beforehand, you’ll be prepared to perform the memory upgrade on your Ultrabook without any hiccups. Once you have the necessary tools, it’s time to move on to the next stage: preparing your Ultrabook for the memory upgrade process.
Preparing Your Ultrabook for the Upgrade
Before diving into the memory upgrade process, it’s important to properly prepare your Ultrabook to ensure a successful and hassle-free upgrade. Here are the steps to follow:
1. Back up your data: It’s always a good practice to back up your important files and data before making any hardware changes. This ensures that in case anything goes wrong during the upgrade process, your data will remain safe and intact. You can back up your data to an external hard drive, cloud storage, or any other reliable backup solution.
2. Shut down your Ultrabook: Before opening the Ultrabook’s casing, make sure to shut it down completely. This will prevent any potential damage to the internal components and ensure your safety during the upgrade process. Wait for a few minutes to allow the Ultrabook to cool down before proceeding.
3. Disconnect the power source: Unplug the power adapter from your Ultrabook and remove any external peripherals or cables connected to it. This will ensure that there’s no power running through the device during the memory upgrade process, preventing any potential electrical hazards.
4. Ground yourself: Before handling any internal components of the Ultrabook, it’s essential to discharge any static electricity from your body to avoid damaging sensitive electronic parts. Use an anti-static wrist strap and connect it to a grounded metal object or wear it throughout the upgrade process. This will help protect your Ultrabook from electrostatic discharge (ESD).
5. Choose a clean and well-lit workspace: Find a clean and well-lit area to work on your Ultrabook. Make sure the workspace is free from dust, clutter, and any potential hazards. A sturdy table or an anti-static mat can provide a secure surface to perform the upgrade.
By following these preparation steps, you’ll ensure that your Ultrabook is ready for the memory upgrade process. Once your Ultrabook is properly prepared, you can proceed to the next stage: opening the Ultrabook and accessing the memory slots.
Opening the Ultrabook
Opening your Ultrabook is the first step in accessing and upgrading the memory modules. However, it’s crucial to proceed with caution and follow the manufacturer’s instructions or an online guide specific to your Ultrabook model. Here are the general steps to open your Ultrabook:
1. Refer to the user manual or online guide: Familiarize yourself with the specific steps and precautions provided in the user manual or online guide for your Ultrabook. Different models may have slightly different approaches to opening the casing, so it’s important to follow the appropriate instructions.
2. Power off and disconnect all cables: Make sure your Ultrabook is powered off completely, and disconnect the power adapter and all other external cables connected to it. This will help ensure your safety and prevent any potential damage during the opening process.
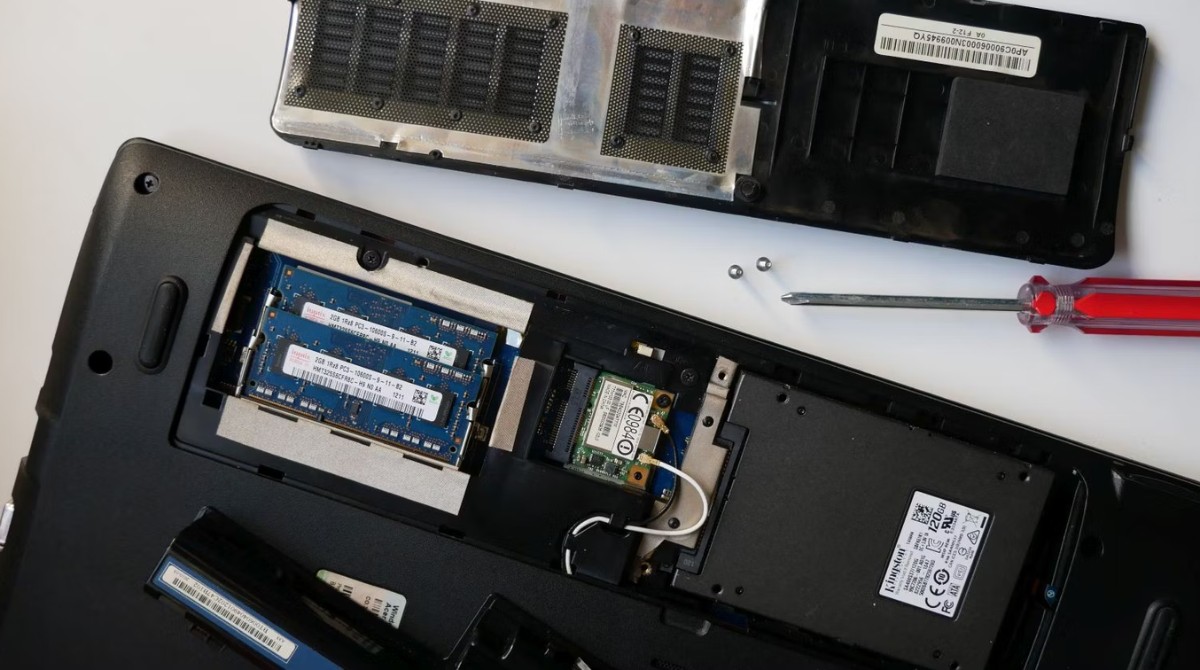
3. Remove the back panel: Typically, Ultrabooks have a removable back panel secured with a series of screws. Use a small Phillips-head screwdriver to remove these screws, keeping them aside in a safe place. Gently pry open the back panel using a plastic opening tool or your fingers, being careful not to apply excessive force or damage any internal components.
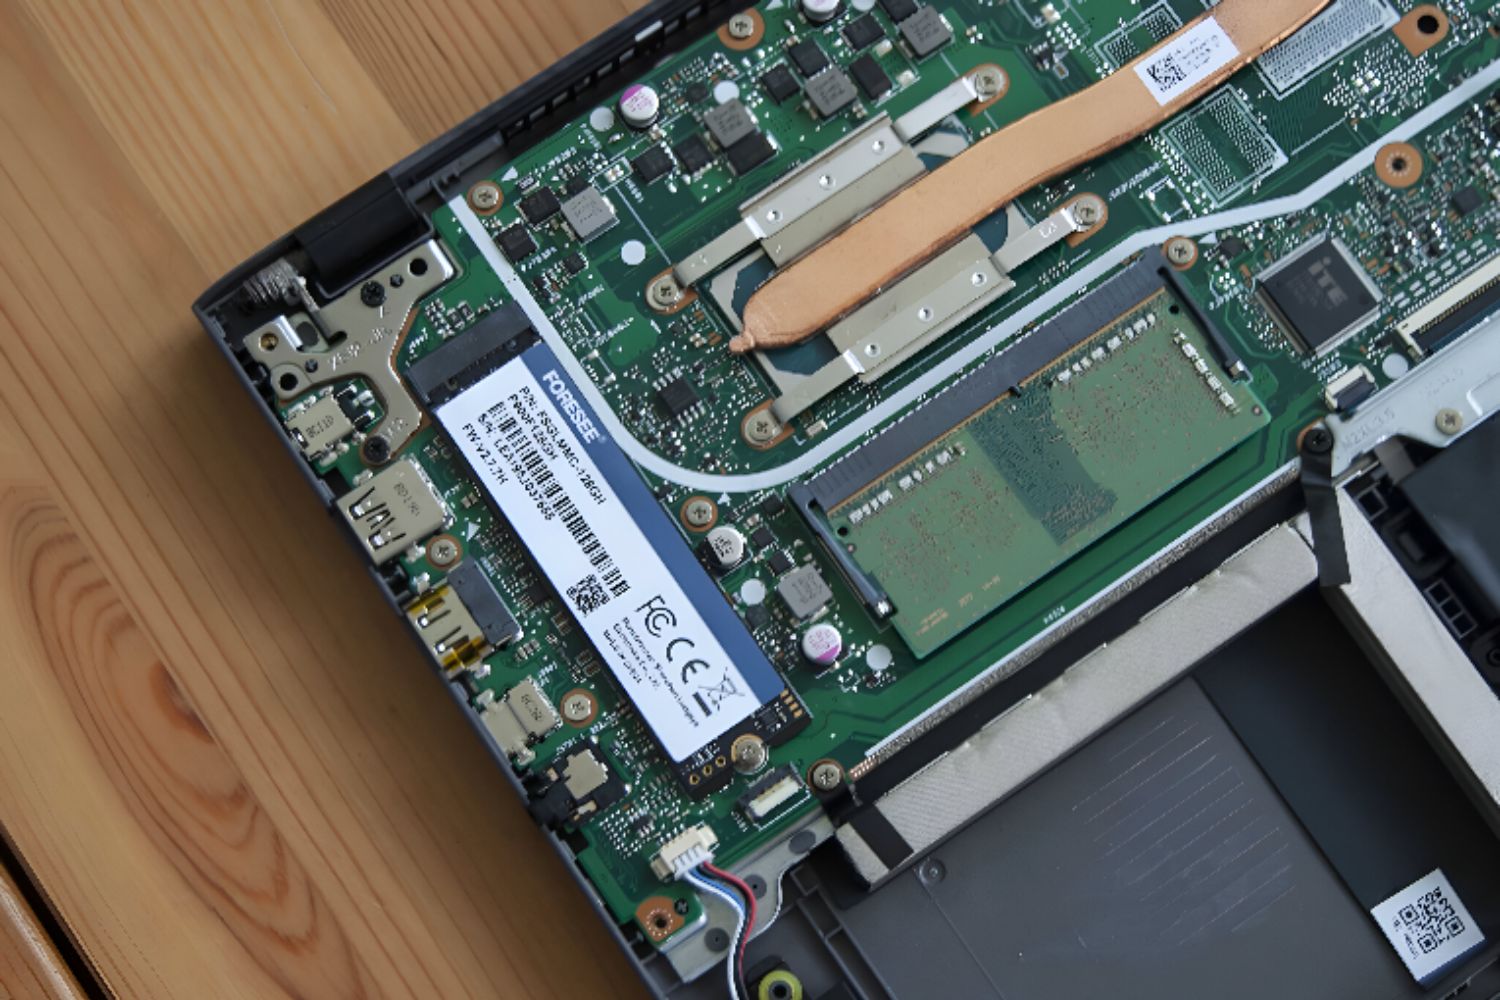
4. Identify the memory compartment: Once the back panel is removed, locate the memory compartment. It is usually positioned near the center or top of the Ultrabook’s interior. Take note of any clips, brackets, or additional screws that may be securing the memory modules.
5. Handle the components with care: When working inside your Ultrabook, be mindful of delicate components, cables, and connectors. Avoid touching any exposed circuitry, and handle the memory modules by their edges without applying excessive force.
6. Take necessary precautions: Some Ultrabooks may require you to remove additional components, such as the keyboard, to access the memory slots. If this is the case, follow the specific instructions provided in the user manual or online guide to safely remove these components.
By following these general steps and referring to the appropriate resources for your specific Ultrabook model, you can confidently open your Ultrabook without damaging any internal components. Once the Ultrabook is open, you can proceed to the next step: removing the old memory modules.
Removing the Old Memory Modules
After successfully opening your Ultrabook, the next step is to remove the old memory modules. Here’s a step-by-step guide on how to remove the old memory modules from your Ultrabook:
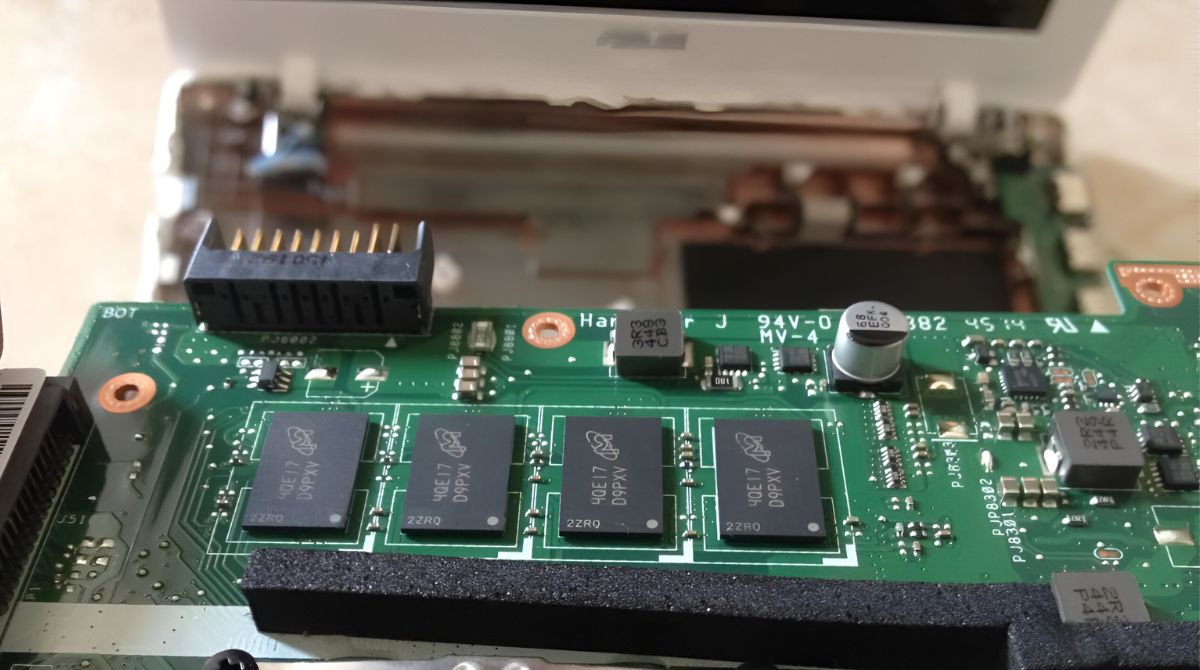
1. Identify the existing memory modules: Take a close look at the memory modules already installed in your Ultrabook. They will be small, rectangular circuit boards connected to the memory slots. Note their orientation and any securing mechanisms such as clips or brackets.
2. Release the securing mechanism: Depending on your Ultrabook model, there may be a securing mechanism, such as clips or brackets, holding the memory modules in place. Carefully release these mechanisms by gently pushing the clips aside or pushing the brackets away from the modules. This will loosen the modules and allow them to be removed.
3. Remove the old memory modules: Once the securing mechanism is released, grasp the edges of the memory modules firmly and pull them straight out of the memory slots. Use gentle and even pressure to avoid damaging the modules or the slots. If the modules appear stuck, double-check if any securing mechanisms are still engaged and release them accordingly.
4. Handle the memory modules with care: It’s important to handle the old memory modules with care. Avoid touching the gold pins or any exposed circuitry on the modules to prevent damage from static electricity or debris. Set them aside in a safe place or store them in an anti-static bag if you plan to keep them as backups.
5. Inspect the memory slots: With the old memory modules removed, take a moment to inspect the memory slots for any signs of dust, debris, or damage. Use a can of compressed air or a soft brush to gently clean the slots if necessary. This will ensure a clean and secure connection when inserting the new memory modules.
By following these steps and exercising caution while handling the old memory modules, you can successfully remove them from your Ultrabook. With the old modules out of the way, it’s time to move on to the exciting part: inserting the new memory modules for your upgrade!
Inserting the New Memory Modules
Now that you have removed the old memory modules from your Ultrabook, it’s time to insert the new ones. Follow these steps to ensure a proper and secure installation of the new memory modules:
1. Determine the correct orientation: Before inserting the new memory modules, ensure that you have them in the correct orientation. Check the notch or keying on the module and align it with the corresponding slot in the memory slot. This ensures that the module is inserted in the right direction.
2. Align the module with the memory slot: Gently position the new memory module above the memory slot at about a 45-degree angle. Make sure the gold pins on the module line up with the contacts in the memory slot.
3. Insert the module: With the module properly aligned, carefully press down on the module while maintaining an even pressure. The module will slide into the slot, and you should feel a gentle snap or click once it is fully inserted. Ensure that the module lies flat and is securely seated in the memory slot.
4. Repeat for additional modules: If you have multiple memory slots for additional modules, repeat the previous steps for each module, ensuring proper alignment and secure insertion. It’s important to keep track of the memory configuration and follow any guidelines or recommendations specific to your Ultrabook model.
5. Double-check and secure: Once all the new memory modules are inserted, double-check that they are all securely seated in their respective slots. Gently press down on each module to ensure it is fully inserted and flush with the memory slot.
6. Replace any securing mechanisms: If your Ultrabook has securing mechanisms such as clips or brackets, ensure that they are properly engaged to hold the memory modules in place. These mechanisms provide additional stability and help prevent accidental dislodging of the modules.
By following these steps and carefully inserting the new memory modules, you can ensure a proper and secure installation. With the modules in place, it’s time to move on to closing up your Ultrabook and preparing for the final step: testing the upgraded memory!
Closing the Ultrabook
After successfully inserting the new memory modules into your Ultrabook, it’s time to close it up. Here are the steps to follow to securely close your Ultrabook:
1. Align the back panel: Position the back panel of your Ultrabook back in place, aligning it carefully with the edges of the casing. Make sure that any openings for ports, vents, or connectors are properly aligned with their corresponding slots on the back panel.
2. Replace the screws: Using the screwdriver, reinsert and tighten all the screws that secure the back panel to the Ultrabook’s casing. Start with one corner and work your way around to ensure an even and secure fit. Avoid overtightening the screws, as this could damage the screw holes or strip the threads.
3. Test the tightness: Once all the screws are in place, gently press down on the back panel to ensure it is securely fastened. If you feel any movement or hear any creaking, double-check the screws to ensure they are tightened properly.
4. Reconnect the power source and peripherals: Plug in the power adapter to your Ultrabook, reconnect any external peripherals or cables that were disconnected, and ensure that everything is securely connected.
5. Power on your Ultrabook: Press the power button to turn on your Ultrabook and allow it to boot up. Wait for the operating system to load, and you’ll be ready to test the newly upgraded memory.
6. Check system information: Once your Ultrabook is powered on, navigate to the system settings or use diagnostic tools to verify that the new memory modules are recognized and functioning correctly. Ensure that the total memory capacity matches the expected upgrade and that the memory speed is correctly detected.
By following these steps, you can securely close your Ultrabook after upgrading the memory modules. Now, you’re ready for the final step: testing the upgraded memory to ensure optimal performance.
Testing the Upgraded Memory
After closing up your Ultrabook, it’s crucial to test the newly upgraded memory to ensure everything is functioning as expected. Here are the steps to follow to test the upgraded memory:
1. Perform a system reboot: Restart your Ultrabook to allow the operating system to recognize and configure the upgraded memory modules. During the reboot process, pay attention to any notifications or prompts that may appear regarding the memory upgrade.
2. Check system information: Once your Ultrabook has restarted, navigate to the system settings or use diagnostic tools to verify that the upgraded memory is being detected correctly. Look for information that confirms the total memory capacity and the correct memory speed.
3. Run memory diagnostics: To ensure optimal performance and identify any potential issues, you can run memory diagnostic tools. These tools are often available as built-in features in the operating system or can be downloaded separately. They test the functionality and reliability of the memory modules by performing comprehensive tests and identifying any errors or issues.
4. Monitor system performance: Keep an eye on your Ultrabook’s performance after the memory upgrade. Pay attention to system responsiveness, multitasking capabilities, and the smoothness of application execution. If you notice a significant improvement in these areas, it’s a good indication that the memory upgrade was successful.
5. Test memory-intensive tasks: Engage in activities that typically require a substantial amount of memory, such as running resource-intensive applications or multitasking with several memory-hungry programs. Monitor how your Ultrabook performs under these conditions to ensure that the upgraded memory is handling the tasks effectively.
6. Monitor system temperatures: Check the system temperatures of your Ultrabook during heavy usage. Higher memory capacities or increased memory speeds may generate more heat. Ensure that the cooling system of your Ultrabook is adequately handling the increased load and that the temperatures remain within safe limits to avoid any potential thermal issues.
By following these steps and monitoring the performance of your Ultrabook, you can effectively test the upgraded memory modules. If everything is functioning as expected and you experience a noticeable improvement in system performance, then congratulations – you have successfully upgraded the memory on your Ultrabook!
Final Thoughts
Upgrading the memory on your Ultrabook can significantly enhance its performance and provide a smoother computing experience. By increasing the memory capacity and improving the memory speed, you can handle more demanding tasks, run multiple applications simultaneously, and enjoy faster data access.
Throughout this guide, we’ve covered the essential steps for upgrading the memory on an Ultrabook. From understanding memory basics and checking system compatibility to selecting the right memory modules and performing the upgrade process, we aimed to provide you with the knowledge and guidance needed for a successful memory upgrade.
Remember to always refer to the user manual or an online guide specific to your Ultrabook model for detailed instructions and precautions. Take the time to gather the necessary tools, prepare your Ultrabook, and handle the components with care to ensure a smooth and problem-free upgrade process.
After inserting the new memory modules and closing up your Ultrabook, it’s vital to test the upgraded memory to confirm its proper functionality. Run memory diagnostics, monitor system performance, and engage in memory-intensive tasks to ensure that the upgrade has had the desired impact on your Ultrabook’s performance.
If you encounter any issues during the memory upgrade process or experience unexpected performance problems after the upgrade, consult the manufacturer’s support or seek assistance from a qualified technician. They can provide further guidance and troubleshooting to address any concerns or difficulties you may encounter.
By successfully upgrading the memory on your Ultrabook, you’ve taken a significant step towards optimizing its performance and expanding its capabilities. Enjoy the benefits of improved multitasking, faster data access, and a more responsive computing experience.
Remember, as technology continues to advance, maintaining an up-to-date understanding of your Ultrabook’s specifications and the latest memory options available can help you make informed decisions in the future, ensuring that your Ultrabook stays at the cutting edge of performance.
We hope this guide has been helpful in your journey to upgrade the memory on your Ultrabook. Good luck, and enjoy the enhanced performance and productivity that the upgraded memory brings!