Introduction
Upgrading the memory in your Dell Inspiron Ultrabook can significantly improve its performance, allowing you to run more programs simultaneously and handle resource-intensive tasks with ease. Whether you’re a gamer, a graphic designer, or simply a multitasker, increasing the amount of memory in your laptop can provide a noticeable boost in speed and responsiveness.
In this guide, we will walk you through the process of replacing the memory in your Dell Inspiron Ultrabook. With the right tools and a step-by-step approach, this task can be completed easily, even if you don’t have much technical experience. Before starting, make sure to check the specifications of your laptop to determine the type and maximum capacity of memory it can support.
Replacing the memory in your Dell Inspiron Ultrabook offers several benefits. Firstly, it allows you to take advantage of the full potential of your laptop’s processor and other hardware components. By upgrading your memory, you can eliminate system bottlenecks and enjoy smoother performance when multitasking, running demanding applications, or editing large files.
Additionally, increasing your memory capacity can enhance your overall computing experience. With more memory, you’ll be able to open and switch between multiple programs effortlessly, without experiencing significant slowdowns. This is especially beneficial for professionals who rely on resource-intensive software, such as video editors, photographers, and 3D designers.
Furthermore, a memory upgrade can extend the lifespan of your Dell Inspiron Ultrabook. As software becomes more demanding over time, having additional memory can ensure that your laptop remains capable of handling future updates and advancements. By investing in a memory upgrade now, you can delay the need for a new laptop and save money in the long run.
In the following steps, we will guide you through the process of preparing for the replacement, opening the memory compartment, removing the old memory module, installing the new module, and closing the compartment. Before you begin, make sure to power off your laptop and remove the battery to ensure your safety and prevent potential damage to the device.
Step 1: Prepare for the Replacement
Before you start replacing the memory in your Dell Inspiron Ultrabook, it’s important to make some preparations to ensure a smooth and successful upgrade process. Here are the essential steps to follow:
- Gather the necessary tools: To replace the memory module, you’ll need a small Phillips screwdriver and an anti-static wrist strap. The anti-static wrist strap is crucial for preventing static electricity from damaging the sensitive internal components of your laptop.
- Research the memory specifications: Identify the specific type and capacity of memory that your Dell Inspiron Ultrabook supports. Check the laptop’s user manual or visit the manufacturer’s website for the official specifications. This information will help you choose the appropriate replacement memory module.
- Purchase the new memory module: Once you know the correct specifications, you can purchase the new memory module from a reliable retailer. Make sure to buy from a reputable source to ensure the quality and compatibility of the product.
- Backup your data: While replacing the memory should not interfere with your files, it’s always a good idea to back up your important data before performing any hardware changes. Use a cloud storage service, an external hard drive, or any other backup solution of your choice.
- Choose a suitable workspace: Find a clean and well-lit workspace with a flat surface to work on. Make sure there’s enough space to comfortably maneuver your laptop and lay out the tools you’ll be using. Avoid static-prone environments, such as carpeted areas, as static electricity can damage computer components.
- Power off and disconnect: Shut down your Dell Inspiron Ultrabook properly and disconnect any external power source, such as the charging cable. This precaution will help protect both you and your device during the memory replacement process.
By following these preparatory steps, you’ll ensure that you have all the necessary tools and information at hand, minimizing the chances of running into unexpected issues during the memory replacement process. Once you have completed these preparations, you’re ready to move on to the next step: shutting down your Dell Inspiron Ultrabook and removing the battery.
Step 2: Shut Down the Dell Inspiron Ultrabook and Remove the Battery
Before you can begin replacing the memory in your Dell Inspiron Ultrabook, it’s important to shut down the laptop properly and take precautionary measures. Here’s how to proceed:
- Save your work and close all applications: Ensure that you save any open documents or projects and close all running applications. This step prevents data loss and ensures a clean shutdown.
- Shut down the laptop: Click on the “Start” button in the lower-left corner of the screen, select the power icon, and choose “Shut down” from the menu options. Allow the laptop to complete the shutdown process before proceeding.
- Disconnect the power source: Unplug the charging cable from the laptop to ensure that it’s not connected to any power source during the memory replacement process. This step is essential to prevent electrical shocks or damage.
- Flip the laptop over: Carefully turn your Dell Inspiron Ultrabook upside down, so the bottom panel is facing up. Ensure that you place it on a soft and clean surface to avoid scratching the laptop or damaging any components.
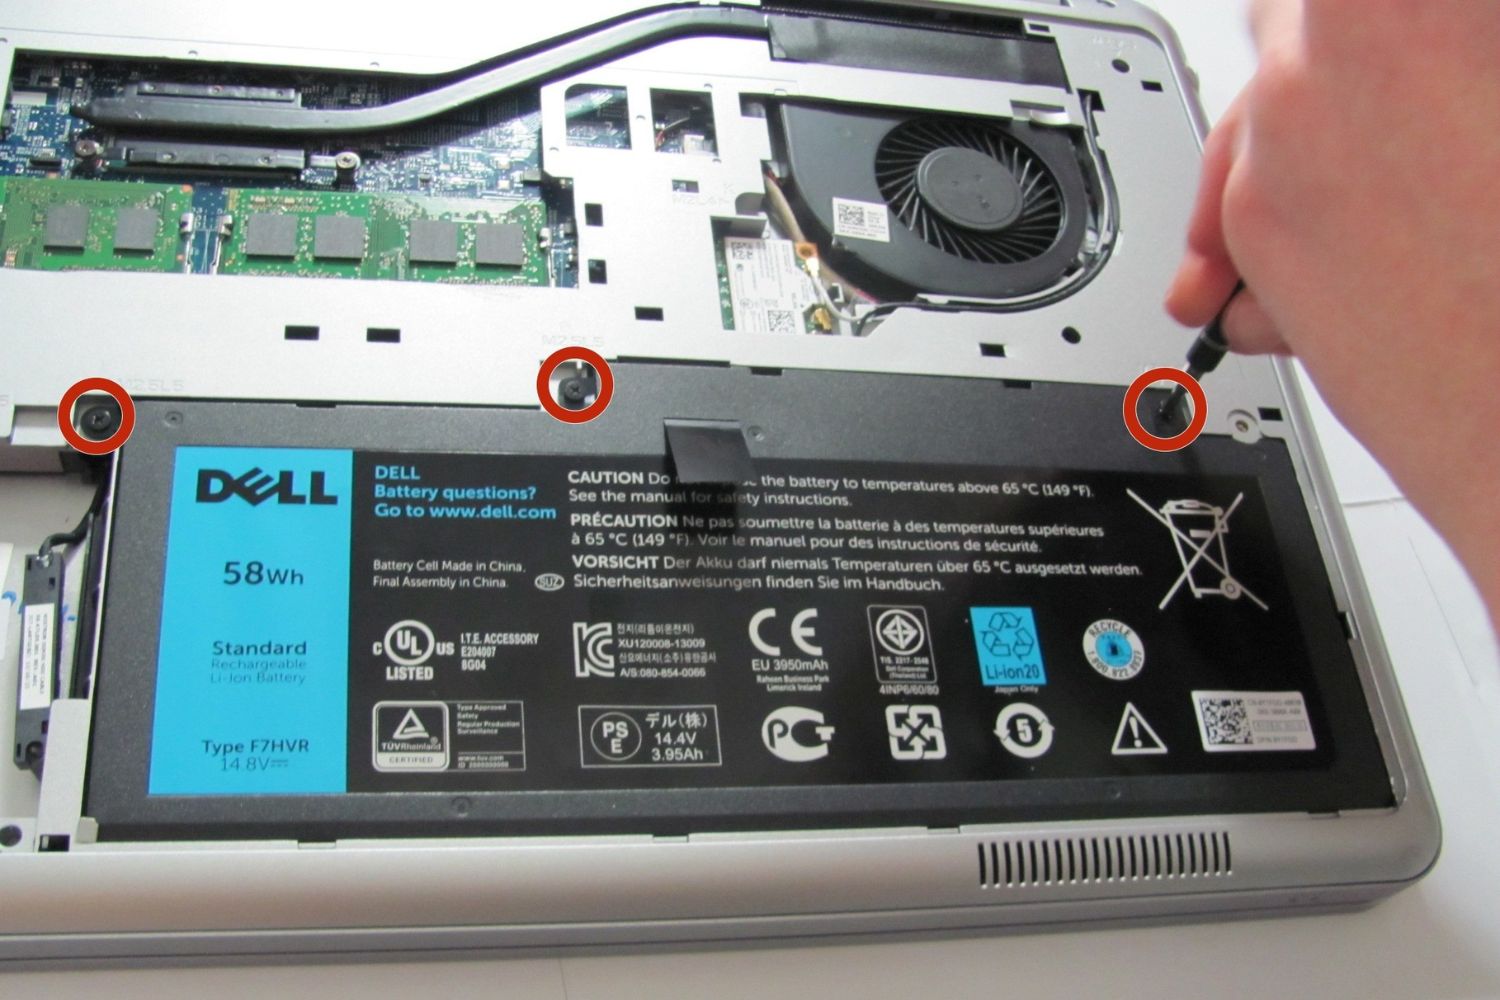
- Locate the battery release latch: Look for a small sliding latch or switch near the bottom of the laptop’s battery. This latch is designed to secure and release the battery from its compartment.
- Slide or press the battery release latch: Slide or press the battery release latch in the direction indicated by the arrow or unlock symbol. This will disengage the latch, allowing you to remove the battery.
- Remove the battery: Once the latch is disengaged, gently lift the battery from the compartment. Start by lifting one end of the battery and then lift the other end until the battery is entirely free. Take care not to apply excessive force or twist the battery, as this can cause damage.
By following these steps, you have successfully shut down your Dell Inspiron Ultrabook and removed the battery. It’s important to remember that removing the battery serves as an additional safety precaution, as it disconnects the laptop from any power source and reduces the risk of electrical damage. Now that you have completed this step, you are ready to move on to the next phase: locating the memory compartment.
Step 3: Locate the Memory Compartment
To proceed with replacing the memory in your Dell Inspiron Ultrabook, the next step is to locate the memory compartment. Follow these instructions to find the memory compartment:
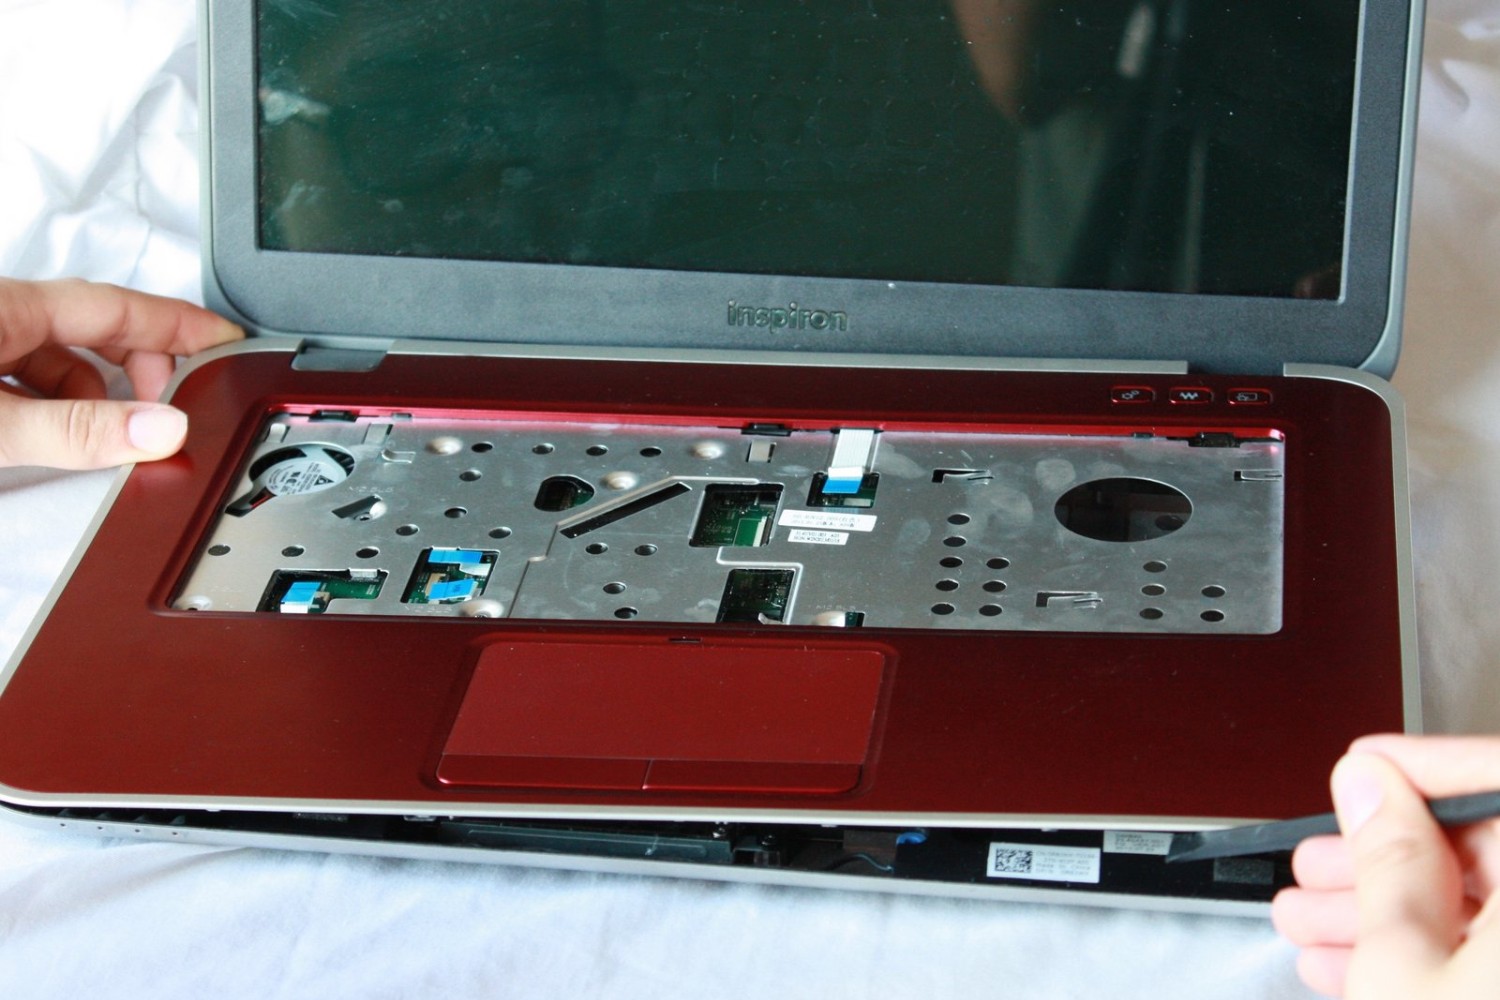
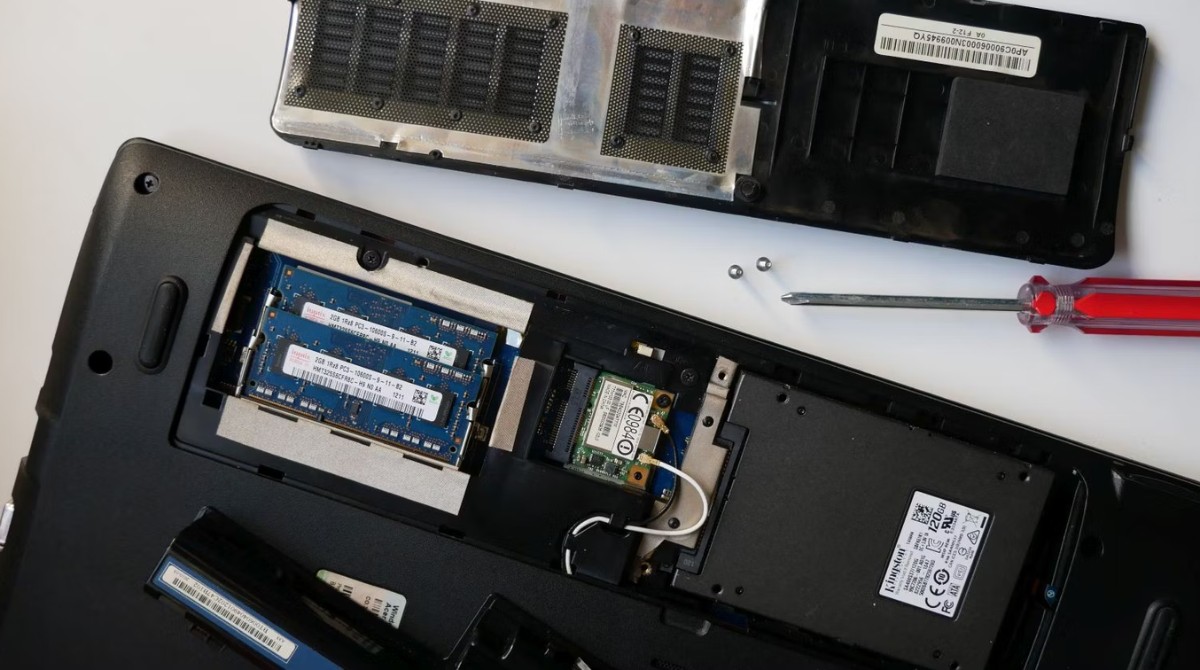
- Examine the bottom panel of your laptop: With the battery removed, take a closer look at the bottom panel of your Dell Inspiron Ultrabook. Look for any access panels or compartments that appear to be secured with screws or labeled with memory-related symbols.
- Refer to the user manual or support documentation: If you’re unsure about the exact location of the memory compartment, consult the user manual or visit the Dell support website for detailed instructions specific to your laptop model. The user manual may provide diagrams or descriptions that can help you identify the memory compartment.
- Identify the memory compartment: Look for a rectangular or square-shaped panel that is slightly smaller than the overall size of the bottom panel. It’s often located towards one side or corner of the laptop.
- Inspect the compartment cover: The memory compartment is usually covered with a removable lid secured by one or more screws. Look for small labels or markings indicating its purpose, such as “memory,” “RAM,” or a similar term.
- Prepare the screwdriver: If the memory compartment is secured with screws, note the type and size of the screws. Use a suitable screwdriver to remove them. Ensure that the screwdriver is in good condition and fits securely into the screw heads to avoid stripping or damaging them.
- Remove the compartment cover: Carefully unscrew the screws securing the compartment cover and set them aside in a safe place. Gently lift the cover to expose the memory slots and modules inside.
By following these steps, you should now have successfully located the memory compartment in your Dell Inspiron Ultrabook. Take your time to familiarize yourself with the compartment and its cover before proceeding to the next step. It’s essential to handle the cover and screws with care to avoid any damage. Once you’ve removed the compartment cover, you’re ready to move on to the next step: removing the old memory module.
Step 4: Remove the Old Memory Module
Now that you have located the memory compartment in your Dell Inspiron Ultrabook, it’s time to remove the old memory module. Follow these steps carefully:
- Observe the memory slots: Once you have opened the memory compartment, you will see one or more memory slots. These slots hold the memory modules in place. Take note of the number of slots available and whether any of them are currently occupied.
- Release the clips: Look for small metal or plastic clips that hold the memory module in place. These clips are located on both sides of the module. Gently push them outward to release the module from the slot.
- Remove the old memory module: Once the clips are released, the old memory module will pop up at an angle. Hold it by the edges and carefully pull it out of the slot. Avoid touching the gold contacts on the bottom of the module to prevent any damage from static electricity or oils on your fingers.
- Set aside the old memory module: Place the old memory module on an anti-static surface or in a protective antistatic bag. This will prevent any electrostatic discharge and keep it safe until you’re ready to dispose of it or repurpose it.
- Inspect the memory slot: Before proceeding to install the new memory module, take a moment to inspect the memory slot for any dust or debris. Use a can of compressed air or a soft brush to gently clean the slot if necessary. Ensuring that the slot is clean will promote proper contact between the new memory module and the laptop.
Following these steps carefully will allow you to remove the old memory module from your Dell Inspiron Ultrabook without any issues. Remember to handle the module with care and avoid touching its gold contacts. Once you have removed the old module and inspected the memory slot, you’re now ready to proceed to the next step: installing the new memory module.
Step 5: Install the New Memory Module
With the old memory module removed, it’s time to install the new memory module in your Dell Inspiron Ultrabook. Follow these steps carefully to ensure a successful installation:
- Line up the new memory module: Take the new memory module out of its packaging, being careful to avoid touching the gold contacts. Orient the module correctly by aligning the notch on the module’s connector with the corresponding slot in the memory slot.
- Insert the module at an angle: Hold the new memory module by its edges and insert it into the memory slot at a slight angle. Gently press down on the module until it is firmly seated in the slot. Ensure that the clips on both sides of the slot click into place and secure the module.
- Confirm proper installation: Once the module is inserted, double-check that it is fully seated and the clips are securely holding it in place. The module should be flush with the edges of the slot and not protruding or loose.
- Repeat if necessary: If your Dell Inspiron Ultrabook has multiple memory slots and you are installing additional modules, repeat the above steps for each additional module, aligning and inserting them one at a time.
- Replace the compartment cover: Once you have installed the new memory module(s), carefully reposition the memory compartment cover over the slots. Align the screw holes and use the previously removed screws to secure the cover back in place. Be careful not to overtighten the screws.
By following these steps, you have successfully installed the new memory module(s) in your Dell Inspiron Ultrabook. Make sure that all clips are securely holding the module(s) in place and that the module(s) are properly aligned and seated in the memory slot(s). Now that the new module(s) are installed, you’re ready to move on to the next step: closing the memory compartment and reinstalling the battery.
Step 6: Close the Memory Compartment and Reinstall the Battery
Now that you have successfully installed the new memory module(s) in your Dell Inspiron Ultrabook, it’s time to close the memory compartment and reinstall the battery. Follow these steps carefully:
- Align the memory compartment cover: Align the memory compartment cover with the bottom panel of your Dell Inspiron Ultrabook. Ensure that all edges line up correctly and that the screw holes are in their proper positions.
- Secure the compartment cover: Insert the screws that you previously removed through the screw holes in the memory compartment cover. Use a screwdriver to tighten them without overdoing it. Be cautious not to strip the screws or damage the threads.
- Reinstall the battery: Take the battery that you removed earlier and gently slide it back into its compartment. Ensure that it is aligned properly and fully inserted. Once the battery is in place, slide or press the latch back to its original position to secure the battery in the laptop.
- Flip the laptop back over: Carefully flip your Dell Inspiron Ultrabook back over so that the top panel is facing up. Place it on a flat and stable surface to prevent any accidental falls.
- Connect the power source: Plug in the charging cable or the external power source that you previously disconnected. Make sure the connection is secure and that the power source is providing electricity to the laptop.
Following these steps will allow you to close the memory compartment and reinstall the battery in your Dell Inspiron Ultrabook. Take your time to ensure that the compartment cover is aligned correctly and securely fastened with the screws. Similarly, make sure that the battery is inserted properly and the latch is engaged.
Now that the memory module(s) are installed, the memory compartment is closed, and the battery is reinstalled, you’re ready to move on to the final step: booting up your Dell Inspiron Ultrabook and confirming the memory upgrade.
Step 7: Boot Up and Confirm the Memory Upgrade
With the memory module(s) installed, the memory compartment closed, and the battery reinstalled, it’s time to boot up your Dell Inspiron Ultrabook and confirm the success of the memory upgrade. Follow these steps to complete the process:
- Ensure proper connections: Double-check that all cables and power sources are securely connected to your laptop. Confirm that the charging cable is plugged into a power outlet.
- Press the power button: Press the power button to turn on your Dell Inspiron Ultrabook. Wait for the laptop to boot up and load the operating system. The startup process may take a moment, so be patient.
- Check the memory utilization: Once your laptop has booted up and you’re logged into the system, check the memory utilization. On Windows, you can open Task Manager by pressing
Ctrl + Shift + Escand navigate to the “Performance” tab. On other operating systems, consult the relevant system monitoring tool to check the memory usage. - Verify the memory upgrade: In the memory utilization window, or system monitoring tool, you should see an increase in the total available memory. This indicates that the memory upgrade was successful and that your Dell Inspiron Ultrabook is now utilizing the new memory module(s).
- Run memory-intensive tasks: To further confirm the impact of the memory upgrade, consider running memory-intensive tasks or applications that you previously struggled with. Test the laptop’s performance and see if the upgraded memory enables smoother multitasking, faster program launches, or improved overall system responsiveness.
By following these steps, you can ensure that the memory upgrade in your Dell Inspiron Ultrabook was successful. Confirming the increased memory utilization and running memory-intensive tasks will validate the improved performance and responsiveness. Enjoy your upgraded laptop, now equipped with the additional memory capacity to handle your computing needs more efficiently!
Conclusion
Upgrading the memory in your Dell Inspiron Ultrabook can significantly enhance its performance and enable you to handle more demanding tasks with ease. By following the step-by-step instructions provided in this guide, you have successfully learned how to replace the memory module(s) in your laptop.
Throughout the process, we discussed the importance of preparing for the replacement, shutting down the laptop, locating the memory compartment, removing the old memory module, installing the new memory module, closing the memory compartment, and reinstalling the battery. Each step plays a vital role in ensuring a successful and smooth memory upgrade.
By upgrading your memory, you can take full advantage of your Dell Inspiron Ultrabook’s hardware capabilities and enjoy improved performance when running resource-intensive applications, multitasking, or working with large files. The added memory capacity allows for smoother operation, enhanced responsiveness, and a more efficient computing experience.
Remember to consult your laptop’s user manual or the manufacturer’s website for specific details regarding memory compatibility and maximum capacity. Additionally, always ensure that you follow safety precautions, such as disconnecting the power source and using an anti-static wrist strap, to protect both yourself and your device during the upgrade process.
Now that you have successfully completed the memory upgrade in your Dell Inspiron Ultrabook, take some time to explore the improved capabilities of your laptop. Run memory-intensive tasks and enjoy the benefits of smoother multitasking and improved overall performance.
Upgrading the memory is just one way to optimize your laptop’s performance. Consider exploring other hardware and software enhancements, such as upgrading the storage drive or keeping your operating system and drivers up to date, to further enhance your computing experience.
Enjoy your newly upgraded Dell Inspiron Ultrabook and the enhanced performance it brings!