Introduction
Welcome to our guide on how to open the Dell Inspiron 14Z Ultrabook! If you’re looking to upgrade or replace any components in your laptop, this article will walk you through the process step by step. Whether you need to add more RAM, replace the hard drive, or access the keyboard for cleaning, these instructions will help you open up your Dell Inspiron 14Z with ease.
Opening up a laptop can be intimidating, but with the right tools and careful instructions, it can be a straightforward process. Before we begin, it’s important to note that opening your laptop may void your warranty. If your device is still under warranty, it’s best to contact Dell or a certified technician for assistance. However, if your warranty has expired, or you feel comfortable performing the task yourself, let’s dive in!
In this guide, we will cover all the necessary steps to safely remove and replace various internal components of the Dell Inspiron 14Z Ultrabook. We highly recommend following the steps closely, as any mistakes could potentially damage your laptop. Take your time and proceed with caution.
To successfully open your Dell Inspiron 14Z Ultrabook, you will need a few tools. These include a small Phillips head screwdriver, a plastic prying tool or guitar pick, and a clean, well-lit workspace. Having these tools ready before you start will save you time and frustration during the process.
Now that we have introduced the purpose of this guide and the tools you will need, let’s move on to the step-by-step instructions for opening the Dell Inspiron 14Z Ultrabook. Remember, if at any point you feel uncomfortable or unsure, it’s always best to seek professional help.
Tools Needed
Before we begin the process of opening the Dell Inspiron 14Z Ultrabook, it’s important to gather the necessary tools. Having the right tools on hand will make the process smoother and help prevent any accidental damage to your laptop. Here are the tools you’ll need:
- Small Phillips head screwdriver: This screwdriver will be used to remove the screws that secure the bottom cover of the laptop.
- Plastic prying tool or guitar pick: You’ll need a flat, non-conductive tool to help with prying and separating the components of the laptop. A plastic prying tool or a guitar pick works well for this purpose.
- Clean, well-lit workspace: It’s essential to have a clean and well-organized work area that is well-lit. This will help you see the small components and avoid misplacing any screws or parts.
It’s crucial to use the correct size of screwdriver to avoid stripping the screws. If you don’t have a small Phillips head screwdriver, you can find them at most hardware stores or online. Make sure to choose a size that fits the screws on the Dell Inspiron 14Z Ultrabook.
The plastic prying tool or guitar pick is used to gently pry apart the plastic clips or adhesive holding various components in place. These tools won’t scratch or damage the laptop’s surface, making them ideal for this purpose. If you don’t have a plastic prying tool, a guitar pick can work just as well.
Creating a clean and well-lit workspace is essential for any delicate electronics repair. Removing small screws and disassembling components can be challenging without proper lighting and organization. Make sure to choose a clutter-free area and have a clean surface to place the removed components, screws, and tools.
Now that you have gathered the necessary tools, you’re ready to begin the process of opening the Dell Inspiron 14Z Ultrabook. Remember to work carefully and take your time to avoid any accidental damage to the laptop.
Removing the Bottom Cover
The first step in opening the Dell Inspiron 14Z Ultrabook is to remove the bottom cover. This will give you access to the internal components of your laptop. Follow these steps to safely remove the bottom cover:
- Shut down your laptop and disconnect any cables or peripherals.
- Place your laptop on a clean and static-free surface.
- Using a small Phillips head screwdriver, locate and remove the screws that secure the bottom cover of your laptop. These screws are usually labeled with a small arrow or a keyboard icon.
- Place the screws in a safe spot or use a magnetic tray to prevent them from getting lost.
- Once all the screws are removed, gently pry open the bottom cover using a plastic prying tool or guitar pick. Start at one corner and carefully work your way around the edges, releasing the plastic clips that hold the cover in place.
- Take your time and apply gentle pressure to avoid damaging the cover or any internal components.
- After all the clips are released, lift off the bottom cover and set it aside.
- You now have access to the internal components of your Dell Inspiron 14Z Ultrabook.
Before proceeding with any further disassembly, it’s essential to take note of the location of screws and connectors. It’s a good idea to take pictures or make a diagram to help remember where everything goes during reassembly.
Removing the bottom cover is typically the simplest step in opening a laptop. However, it’s crucial to exercise caution and patience to avoid any unintended damage. If you encounter any resistance while prying open the cover, double-check that all the screws have been removed.
Now that you have successfully removed the bottom cover, you’re ready to move on to the next step, which involves removing the battery. Remember to stay organized and take your time throughout the process.
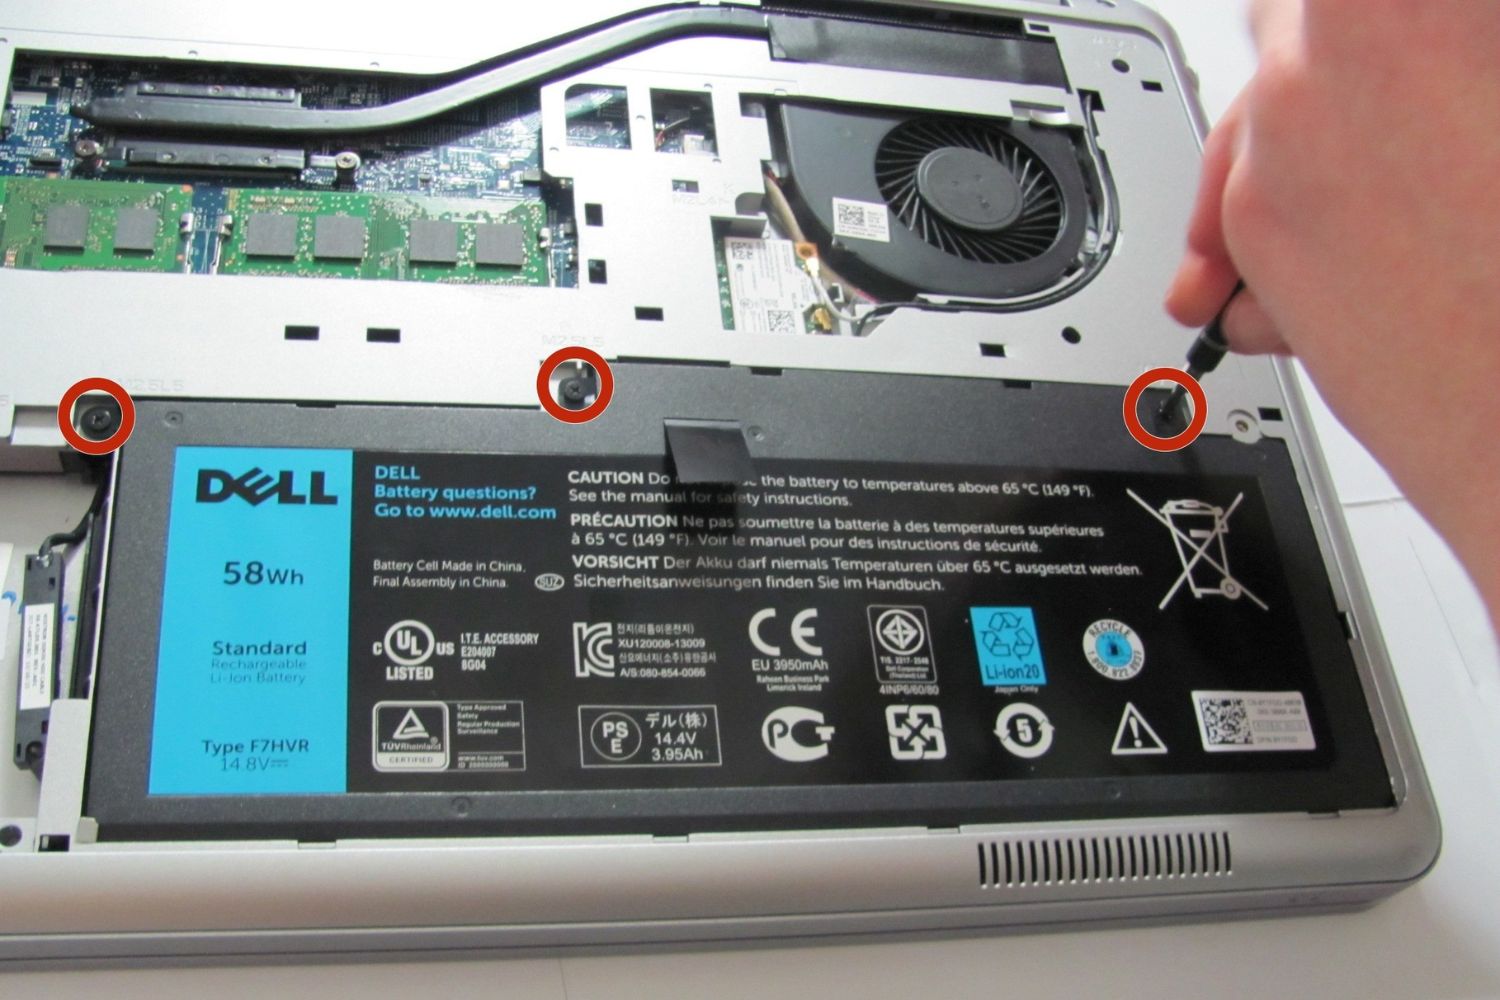
Removing the Battery
Once you have successfully removed the bottom cover of your Dell Inspiron 14Z Ultrabook, you can now proceed to remove the battery. Here are the steps to safely remove the battery:
- Locate the battery connector on the motherboard. It is usually located near the center of the laptop, labeled with the battery icon.
- Using a small screwdriver, carefully disconnect the battery connector by gently lifting it up and away from the motherboard.
- Make sure to hold the connector itself and not pull on the wires to avoid damaging them.
- Once the battery connector is removed, locate any screws or clips that may be securing the battery to the laptop.
- If there are screws, use the small Phillips head screwdriver to remove them. If there are clips, gently push or slide them to release the battery.
- With the screws or clips removed, carefully lift or slide the battery out of its housing.
- Place the battery on a static-free surface or in an anti-static bag to prevent any static electricity buildup.
It’s important to handle the battery with care and avoid placing it in any areas with extreme temperatures or where it may be subject to physical stress.
Removing the battery is a crucial step before working on any internal components of your laptop. It helps ensure your safety and prevents any accidental damage from electrical current. Always disconnect the battery before attempting to remove or replace any other parts.
Once the battery is removed, you can proceed with any necessary repairs, upgrades, or component replacements. When you’re ready to reassemble your laptop, make sure to reconnect the battery properly and secure it in place using the screws or clips.
With the battery removed, you have now gained further access to the internal components of your Dell Inspiron 14Z Ultrabook. In the next section, we will cover the steps to remove the hard drive. Stay focused and take your time throughout the process to ensure a successful disassembly.
Removing the Hard Drive
Now that you have removed the battery from your Dell Inspiron 14Z Ultrabook, the next step is to remove the hard drive. Follow these steps to safely remove the hard drive:
- Locate the hard drive compartment, which is typically located on the side or bottom of the laptop. It is usually labeled with a hard drive symbol.
- If there are any screws securing the hard drive compartment, use the small Phillips head screwdriver to remove them.
- Once the screws are removed, carefully open the compartment cover and set it aside.
- Locate the hard drive and its connector. The hard drive is a rectangular device with a data cable and power connector attached to it.
- Gently disconnect the data cable and power connector from the hard drive. You may need to use a slight wiggle motion to loosen the connectors.
- After disconnecting the cables, remove any screws or mounting brackets that secure the hard drive in place.
- Once the screws or brackets are removed, carefully slide or lift the hard drive out of its slot or bay.
Handle the hard drive with care and avoid touching the exposed circuitry, as it could be sensitive to static electricity. It’s best to hold the hard drive by its sides or use an anti-static wristband if available.
If you’re replacing the hard drive, now is the time to install the new one. Simply reverse the steps you followed to remove the old hard drive, making sure to securely connect the data cable and power connector, and secure the new drive with screws or brackets.
If you’re not replacing the hard drive and just need to access other components, you can set the hard drive aside and continue with your desired repairs or upgrades.
Removing the hard drive is an essential step if you need to replace it or access other internal components. Always handle the hard drive with care and follow the manufacturer’s instructions for proper installation and removal.
With the hard drive removed, you now have greater access to the internal components of your Dell Inspiron 14Z Ultrabook. In the next section, we will cover the steps to remove the RAM. Take your time, follow the instructions closely, and exercise caution to prevent any damages or mishaps.
Removing the RAM
The next step in opening your Dell Inspiron 14Z Ultrabook is to remove the RAM modules. Follow these steps to safely remove the RAM:
- Locate the RAM compartment, which is usually on the underside of the laptop.
- If there are any screws securing the RAM compartment cover, use a small Phillips head screwdriver to remove them.
- Once the screws are removed, carefully lift off the cover and set it aside.
- Locate the RAM modules, which are small rectangular boards connected to the motherboard.
- Depending on your laptop, there may be one or two RAM modules.
- To remove a RAM module, gently press the metal retaining clips on each side of the module outward.
- The module should pop up at a slight angle. Grasp the module by its sides and lift it out of the slot.
- If there are two RAM modules, repeat the process for the second module, if necessary.
Handle the RAM modules with care, avoiding touching the gold contacts or any exposed circuitry. To prevent static discharge, it’s best to hold the modules by their edges or use an anti-static wristband if available.
If you’re replacing the RAM or upgrading it, now is the time to install the new modules. Align the notch on the module with the notch in the RAM slot and insert it at a slight angle. Gently press it down until the metal retaining clips on each side snap back into place.
Double-check that the RAM modules are fully inserted and secured in their slots. Replace the RAM compartment cover and secure it with the screws, if applicable.
Removing and replacing the RAM can help improve the performance of your laptop or troubleshoot issues related to memory. If you’re not planning to upgrade or replace the RAM, you can now move on to accessing other components or reassembling your laptop.
With the RAM removed, you have gained further access to the internal components of your Dell Inspiron 14Z Ultrabook. In the next section, we will cover the steps to remove the Wi-Fi card. Take your time, follow the instructions closely, and exercise caution to prevent any damages or mishaps.
Removing the Wi-Fi Card
If you need to replace or upgrade the Wi-Fi card in your Dell Inspiron 14Z Ultrabook, follow these steps to safely remove the existing Wi-Fi card:
- Locate the Wi-Fi card compartment, which is typically on the underside of the laptop.
- If there are any screws securing the Wi-Fi card compartment cover, use a small Phillips head screwdriver to remove them.
- Once the screws are removed, carefully lift off the cover and set it aside.
- Locate the Wi-Fi card, which is a small rectangular board with two or three small antenna cables attached to it.
- Gently disconnect the antenna cables from the Wi-Fi card by carefully pulling them off. Note the position of each cable for reinstallation.
- Once the antenna cables are disconnected, locate the retention mechanism that secures the Wi-Fi card in its slot.
- Depending on the model, it may be held in place by a small screw or a plastic latch.
- If there is a screw, use a small Phillips head screwdriver to remove it. If there is a latch, carefully lift or slide it to release the Wi-Fi card.
- Once the retention mechanism is released, gently lift the Wi-Fi card up and out of its slot.
Handle the Wi-Fi card with care, avoiding touching the delicate circuitry or exposed connectors. If you’re replacing the card, make sure the new Wi-Fi card is compatible with your Dell Inspiron 14Z Ultrabook and align it with the slot before gently inserting it.
Reattach the antenna cables to the new Wi-Fi card, ensuring they are in their correct positions. Secure the Wi-Fi card in place with the screw or latch, and then replace the Wi-Fi card compartment cover and secure it with the screws.
Removing and replacing the Wi-Fi card can help resolve connectivity issues or provide an opportunity to upgrade to a faster or more advanced Wi-Fi module. If you’re not planning to replace the Wi-Fi card, you can now move on to accessing other components or reassembling your laptop.
With the Wi-Fi card removed, you have gained further access to the internal components of your Dell Inspiron 14Z Ultrabook. In the next section, we will cover the steps to remove the keyboard. Take your time, follow the instructions closely, and exercise caution to prevent any damages or mishaps.
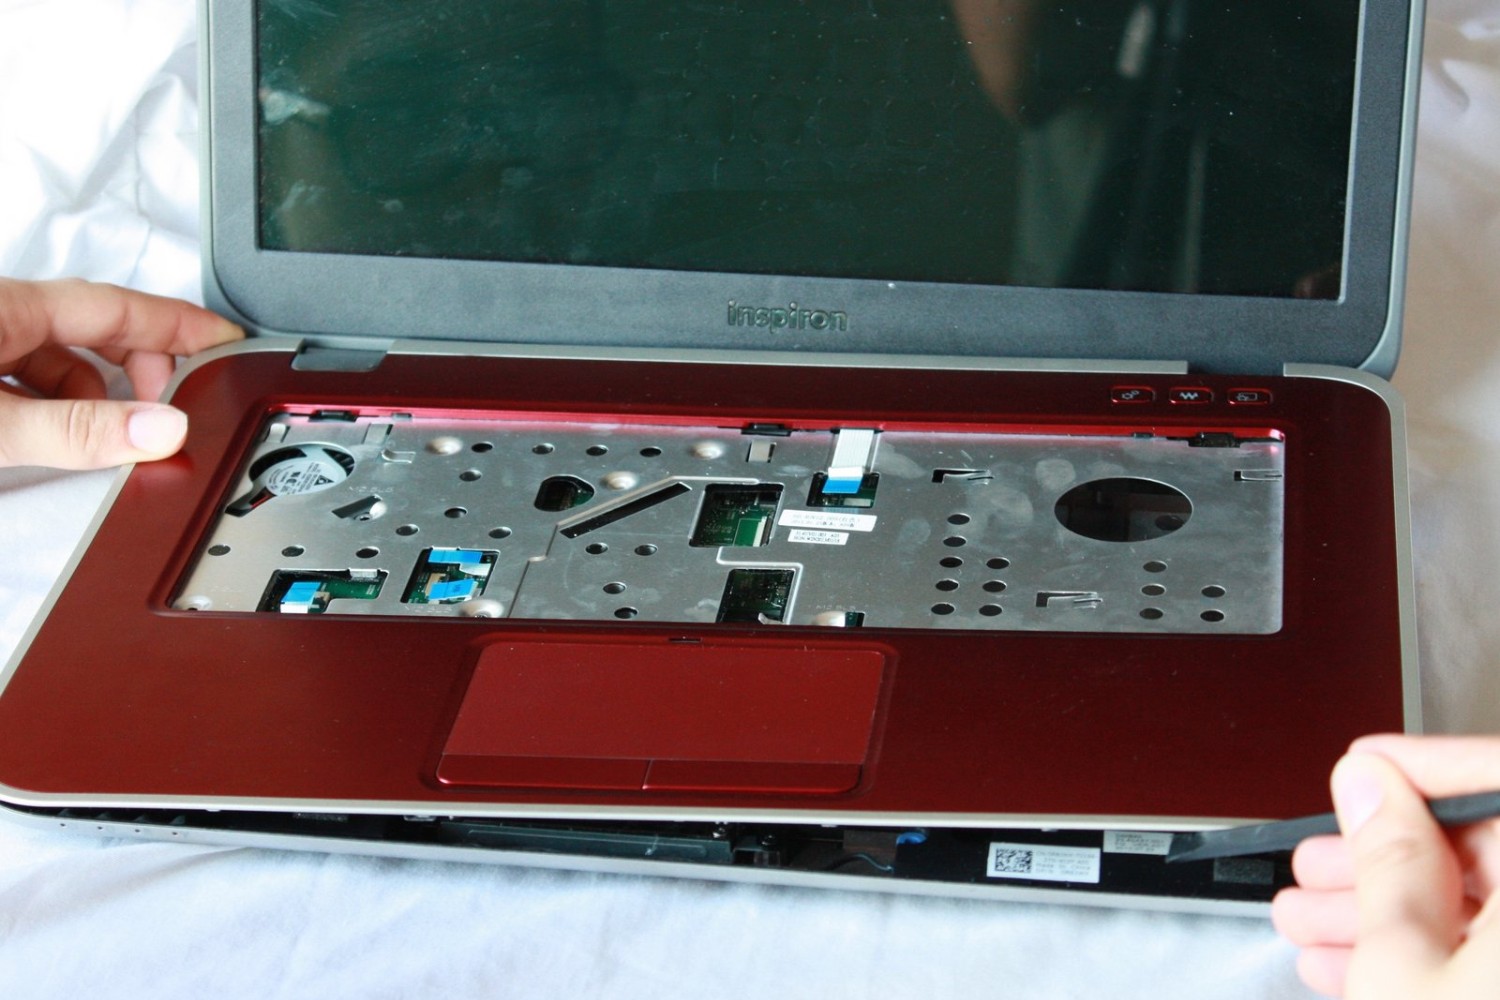
Removing the Keyboard
If you need to replace a faulty keyboard or clean underneath it, follow these steps to safely remove the keyboard from your Dell Inspiron 14Z Ultrabook:
- Ensure that your laptop is powered off and disconnected from any power sources.
- Open the display fully to access the keyboard.
- Using a small flat-head screwdriver or a plastic prying tool, gently lift the top edge of the keyboard bezel.
- Continue to pry along the edges of the bezel to release the plastic clips that secure it in place.
- Once the bezel is loose, carefully lift it up and set it aside. Be mindful of any cables that may still be attached.
- Locate the keyboard cable connector, which is usually located near the center of the laptop beneath the keyboard.
- Using your fingers or a pair of tweezers, gently lift the locking tab on the keyboard connector.
- With the locking tab in the raised position, carefully pull the keyboard cable out of the connector.
- Once the cable is disconnected, you can fully remove the keyboard from the laptop.
Handle the keyboard with care to avoid damaging the delicate keys or the underlying circuitry. If you’re replacing the keyboard, store the old one in a safe place in case you need it for reference or warranty purposes.
When reinstalling the keyboard or installing a new one, align the keyboard cable with the connector and push it firmly into place. Lower the locking tab to secure the cable.
Once the keyboard is properly connected, place the keyboard bezel back in position and press down gently to secure it in place. Listen for the plastic clips snapping back into position.
The removal and replacement of the keyboard may slightly vary depending on the specific model of the Dell Inspiron 14Z Ultrabook. Always consult the laptop’s user manual or the manufacturer’s instructions for detailed guidance.
With the keyboard removed, you now have better access to other internal components, such as the trackpad or the palm rest. In the next section, we will cover the steps to remove the display. Proceed with caution and take your time to ensure a successful disassembly.
Removing the Display
If you need to replace a damaged screen or access other components behind the display, follow these steps to safely remove the display from your Dell Inspiron 14Z Ultrabook:
- Ensure that your laptop is powered off and disconnected from any power sources.
- Lay the laptop down on a clean and soft surface to protect the screen from scratches.
- Locate the display hinges on the sides of the laptop.
- Using a small Phillips head screwdriver, remove the screws securing the hinge covers.
- Once the screws are removed, gently lift off the hinge covers and set them aside.
- With the hinge covers removed, you should see the screws that secure the display to the hinge brackets.
- Remove the screws, one on each side, using the small Phillips head screwdriver.
- Be careful to support the display while removing the last screw, as the display may become loose.
- Once the screws are removed, grasp the display from both sides and lift it straight up.
- Keep in mind that the display is still connected to the laptop by cables, so avoid pulling too forcefully.
- Locate the display cable and Wi-Fi antenna cables where they connect to the motherboard.
- Gently disconnect the cables by carefully pulling them straight out of their connectors.
- With the cables disconnected, you can now fully remove the display from the laptop.
Handle the display with care, ensuring that it remains flat and protected from any undue stress or pressure. If you’re replacing the display, store the old one in a safe place in case you need it for reference or warranty purposes.
When reinstalling the display or installing a new one, make sure to connect the display cable and the Wi-Fi antenna cables securely to their respective connectors. Double-check that all cables are properly aligned and inserted.
Once the cables are connected, carefully align the display with the hinge brackets and lower it onto the laptop. Replace the screws to secure the display to the hinges and reattach the hinge covers.
Removing the display can be a more complex task compared to the previous steps, so it’s important to follow the instructions closely and take your time. If you’re unsure or uncomfortable with this process, it’s best to seek professional assistance or refer to the laptop’s user manual.
With the display removed, you now have access to various internal components for replacement or maintenance. Take caution when working with the exposed components and ensure they are properly secured when reassembling your Dell Inspiron 14Z Ultrabook.
Conclusion
Congratulations on successfully completing the process of opening the Dell Inspiron 14Z Ultrabook! You have gained access to the internal components, allowing for repairs, upgrades, or maintenance. Remember to follow these instructions closely and exercise caution to avoid any accidental damage.
We started by introducing the purpose of this guide and the tools needed to open the laptop. We then covered the step-by-step instructions for removing the bottom cover, battery, hard drive, RAM, Wi-Fi card, keyboard, and display. Each section provided detailed guidance to ensure a smooth disassembly process.
Throughout the process, it is essential to handle the components with care, avoid static discharge, and keep track of screws and connectors for reassembly. If you encounter any difficulties or feel unsure, it is always recommended to seek professional assistance to prevent any further damage.
Once you have completed the necessary repairs, upgrades, or maintenance, carefully reassemble your Dell Inspiron 14Z Ultrabook, following the steps in reverse order. Make sure all connections are secure and screws are properly tightened.
We hope this guide has been helpful in opening your Dell Inspiron 14Z Ultrabook. By following these instructions, you have taken a significant step towards extending the life and functionality of your device. Enjoy the enhanced performance and improved functionality of your laptop!