Introduction
Are you looking to boost the performance of your ASUS Ultrabook? One effective way to achieve this is by increasing the memory of your device. Memory plays a vital role in the overall speed and multitasking capabilities of a computer, and upgrading the memory is a cost-effective solution to improve its performance.
With a memory upgrade, you can enjoy faster application loading times, smoother performance when running multiple tasks simultaneously, and an overall enhanced user experience. Whether you are a student, professional, or casual user, increasing the memory on your ASUS Ultrabook can make a noticeable difference in your day-to-day computing activities.
In this guide, we will walk you through the process of increasing memory on your ASUS Ultrabook. We will cover everything from understanding memory and checking your current memory to identifying compatible memory upgrades, purchasing the right memory module, and installing it properly. Additionally, we will provide troubleshooting tips for common issues that you may encounter during the upgrade process.
Before we dive into the step-by-step instructions, it’s important to note that making changes to your computer’s internal components requires caution and care. If you don’t feel comfortable performing the upgrade yourself, it is recommended to seek assistance from a professional or a knowledgeable friend.
Now, let’s begin the journey towards boosting your ASUS Ultrabook’s memory and unleashing its full potential!
Understanding Memory
Memory, also known as RAM (Random Access Memory), is a crucial component of your ASUS Ultrabook that temporarily stores data that the device needs to access quickly. It acts as a bridge between the processor and the computer’s storage drive, allowing for faster data retrieval and smoother multitasking.
When you open an application or a file on your Ultrabook, the data required to run that program or access that file is loaded into the memory. This allows the processor to quickly retrieve and process the data, resulting in faster response times and improved overall performance.
The amount of memory your Ultrabook has directly affects its ability to run multiple programs simultaneously and handle resource-intensive tasks. Insufficient memory can lead to slowdowns, system freezes, and even crashes, especially when you have several applications running at the same time.
It’s important to note that memory is different from the storage space on your computer, such as the hard drive or solid-state drive (SSD). Storage space is where your files, documents, and applications are permanently stored, while memory is the temporary workspace for active data.
When considering a memory upgrade, it’s crucial to know your Ultrabook’s current memory capacity and the maximum amount of memory it can support. This information will help you determine the specific memory module you need to purchase for your Ultrabook.
Now that we have a basic understanding of memory and its role in the performance of your ASUS Ultrabook, let’s move on to the next step: checking your current memory configuration.
Checking the Current Memory
Before proceeding with a memory upgrade, it’s essential to determine the current memory configuration of your ASUS Ultrabook. This will help you assess whether an upgrade is necessary and what type of memory module you should purchase.
To check the current memory of your Ultrabook, follow these steps:
- Start your ASUS Ultrabook and ensure that it is running on the operating system.
- Open the “Task Manager” by pressing “Ctrl + Shift + Esc” or right-clicking on the taskbar and selecting “Task Manager” from the menu.
- In the Task Manager window, navigate to the “Performance” tab.
- Under the “Memory” section, you will see information about your current memory usage, including the total amount of memory installed and the amount of memory in use.
- Make note of the total memory installed, as this will be important when selecting a compatible memory upgrade.
Another way to check your current memory configuration is by accessing the system information. Here’s how:
- Press the “Windows” key and the “R” key simultaneously to open the “Run” dialog box.
- Type “msinfo32” in the dialog box and press “Enter” to open the System Information window.
- In the System Information window, look for the “Installed Physical Memory (RAM)” field. This will display the total amount of memory currently installed in your Ultrabook.
- Take note of the installed memory size for future reference.
Once you have determined the current memory configuration of your ASUS Ultrabook, you can proceed to the next step: identifying compatible memory upgrades.
Identifying Compatible Memory Upgrades
Now that you know the current memory configuration of your ASUS Ultrabook, it’s time to identify the compatible memory upgrades that you can install. Upgrading your memory involves purchasing the right memory module that matches your Ultrabook’s specifications.
The key factors to consider when identifying compatible memory upgrades are the type of memory, the speed (also known as the frequency), and the maximum memory capacity supported by your Ultrabook.
First, you need to determine the type of memory that your Ultrabook requires. Common types of memory modules include DDR3 and DDR4, with DDR4 being the latest and faster option. Check your Ultrabook’s specifications or consult the manufacturer’s website to find out the memory type supported by your device.
Next, you need to consider the speed or frequency of the memory module. It is measured in megahertz (MHz) and represents the data transfer rate. Higher frequency memory modules offer faster performance. Again, consult the manufacturer’s specifications or documentation to identify the maximum supported speed for your Ultrabook.
The maximum supported memory capacity is another crucial factor to consider. This refers to the maximum amount of memory your Ultrabook can accommodate. It’s important to note that each Ultrabook model may have different limitations. Find the maximum supported memory capacity for your specific Ultrabook model in the manufacturer’s documentation or online resources.
Once you have gathered this information, you can search for compatible memory modules from reliable hardware retailers or online marketplaces. Ensure that the memory module you choose matches your Ultrabook’s requirements in terms of type, speed, and capacity.
In some cases, you may have to remove the existing memory modules from your Ultrabook to accommodate the upgrade. If this is the case, make sure to check the number of memory slots available in your Ultrabook and consider purchasing memory modules that will fulfill your desired memory capacity while utilizing the available slots effectively.
With the knowledge of your Ultrabook’s memory requirements and the compatible memory upgrades, you are now ready to proceed to the next step: selecting and purchasing a memory upgrade.
Selecting and Purchasing a Memory Upgrade
Now that you have identified the compatible memory upgrades for your ASUS Ultrabook, it’s time to select and purchase the right memory module. Here are some steps to guide you through the process:
- Research reputable hardware retailers or online marketplaces that offer compatible memory modules for your Ultrabook. Look for trusted brands and read reviews from other customers to ensure the quality and reliability of the product.
- Verify the memory module’s compatibility with your Ultrabook by cross-checking its specifications with your device’s requirements. Ensure that the memory type, speed, and capacity match your Ultrabook’s supported specifications.
- Consider purchasing memory modules from the same brand or series to ensure compatibility and optimal performance. However, compatibility is generally not an issue as long as the memory module meets the required specifications.
- Determine the desired memory capacity for your upgrade based on your computing needs. If your Ultrabook has multiple memory slots, you can choose to add another memory module or replace the existing one with a higher-capacity module.
- Compare prices from different retailers and consider factors such as warranty, return policies, and customer support before making a purchase. Look out for any discounts or promotions that might be available.
- Once you have decided on the memory module, proceed with the purchase process following the retailer’s instructions. Provide accurate shipping information and choose a secure payment method.
- After completing the purchase, keep the order confirmation and any relevant documentation for future reference.
Remember that when handling the memory module, it is essential to follow proper static electricity precautions. This includes grounding yourself to prevent any potential damage to the memory module or other internal components of your Ultrabook.
By following these steps, you can confidently select and purchase a compatible memory upgrade for your ASUS Ultrabook, setting the stage for the installation process.
Shutting Down the Ultrabook Properly
Before proceeding with the memory upgrade, it is important to shut down your ASUS Ultrabook properly to prevent any potential damage to the device or the memory module during the installation process. Follow these steps to ensure a safe shutdown:
- Save any open files or projects and close all running applications on your Ultrabook.
- Disconnect any external devices or peripherals that are connected to your Ultrabook, such as USB drives, printers, or external monitors.
- Once all applications are closed and external devices are disconnected, click on the “Start” button located at the bottom left corner of the screen.
- In the Windows Start menu, click on the power icon, which is usually represented by a circle with a vertical line inside it.
- A dropdown menu will appear, displaying options such as Sleep, Restart, and Shut down.
- Click on the “Shut down” option to initiate the shutdown process.
- Wait for your Ultrabook to complete the shutdown process. Ensure that the power indicator light is turned off before proceeding with the memory upgrade.
It is important to shut down your Ultrabook properly to avoid potential data loss or hardware issues. Rushing the shutdown process or abruptly turning off the device can lead to file corruption and other problems.
Once your ASUS Ultrabook has been shut down properly, you can move on to the next step: opening the case to access the memory slots for the installation of the new memory module.
Opening the Case
To upgrade the memory on your ASUS Ultrabook, you will need to open the case and access the memory slots. The process may vary depending on the model of your Ultrabook, so it’s important to refer to the manufacturer’s documentation or online resources for specific instructions. However, here are some general steps that can guide you:
- Make sure your Ultrabook is completely powered off and unplugged from any power sources.
- Prepare a clean and static-free work area to prevent any damage to your device or the memory module.
- Look for screws or latches on the bottom of your Ultrabook that secure the case. Use a screwdriver or the appropriate tool to remove the screws or release the latches.
- Gently pry open the case, starting from one corner and working your way around the edges. Be cautious not to apply too much force, as you don’t want to damage any internal components.
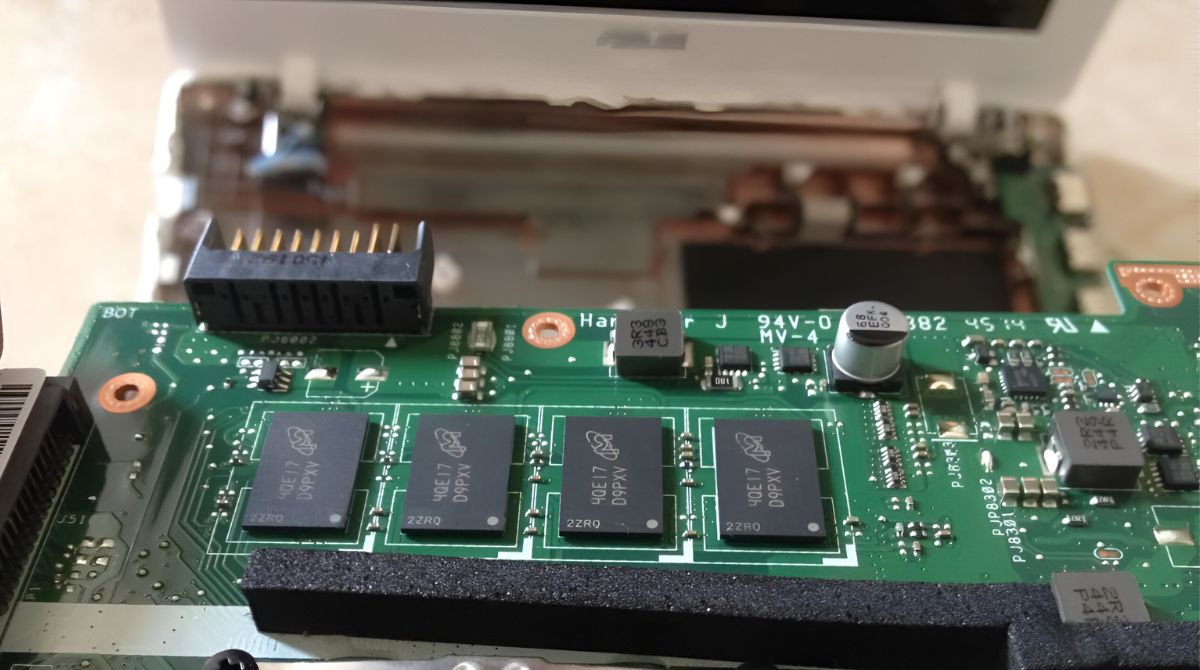
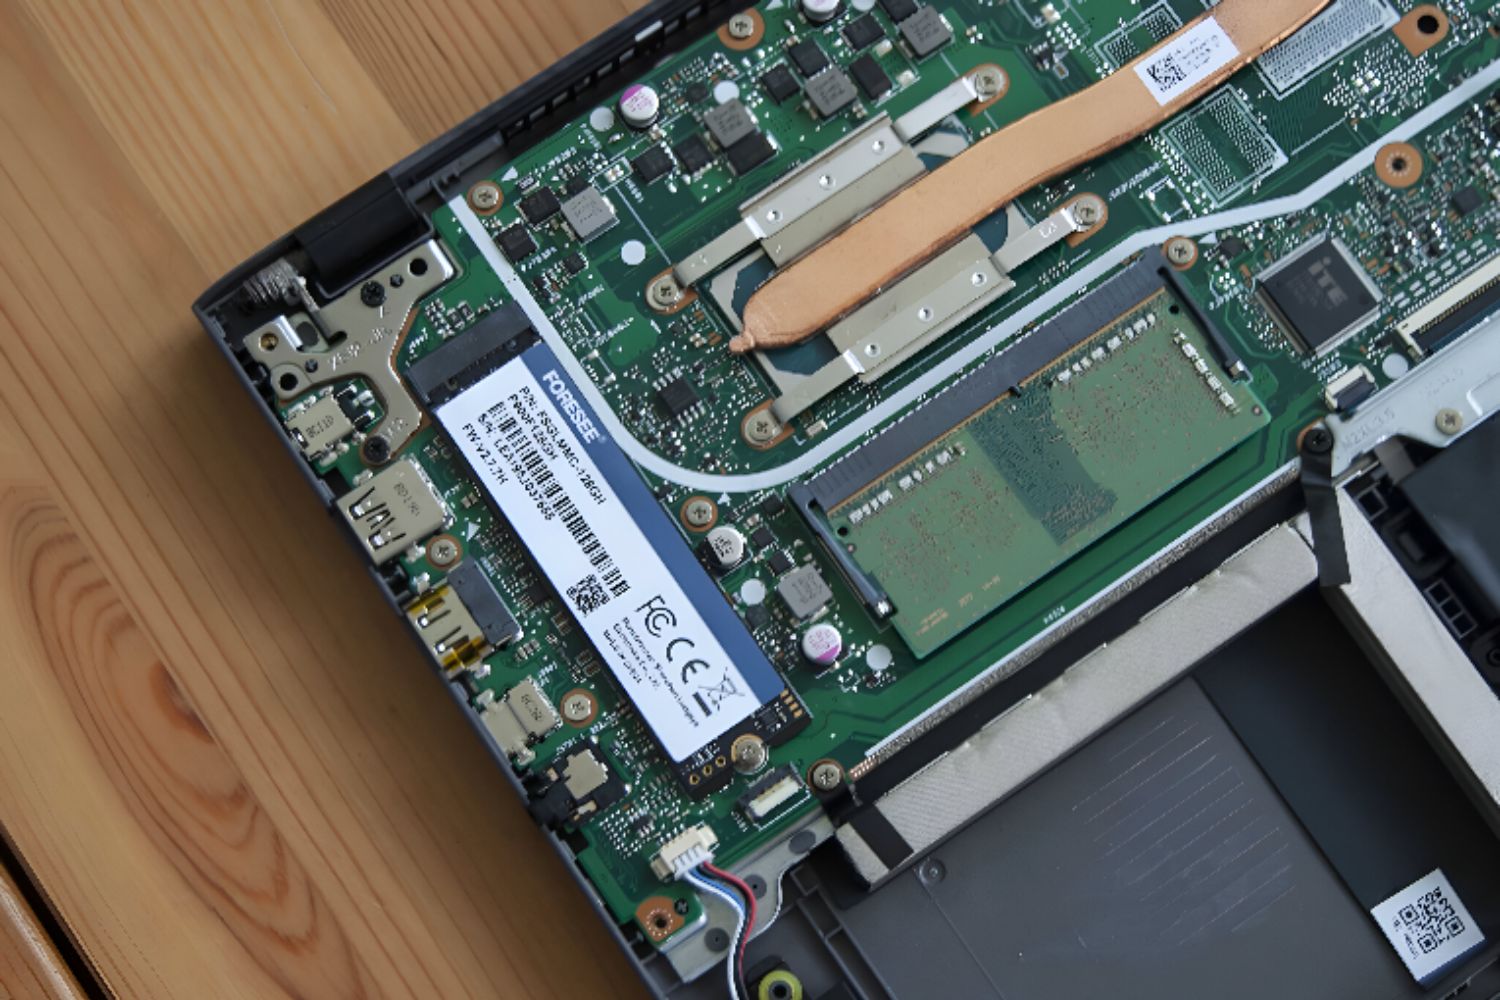
- Once the case is open, you should be able to locate the memory slots. They are typically small, rectangular slots that hold the memory modules in place.
- Before touching any internal components, make sure to discharge any static electricity by touching a grounded metal object or using an anti-static wristband.
- If there is an existing memory module, carefully release the retaining clips on each side of the module by pushing them outward. The module should pop up at an angle, allowing you to remove it.
- If the memory slots are empty, you can proceed to the next step without removing any existing modules.
- Handle the new memory module with care, holding it by the edges. Align the notch on the module with the corresponding slot key and insert it at a 45-degree angle.
- Press down firmly but gently on the module until you hear a click. This indicates that the module is properly seated and the retaining clips have secured it in place.
- If you are installing multiple memory modules, repeat the process for each slot.
Once the new memory module(s) is securely installed, you can proceed to the next step of closing the case and testing the memory upgrade.
It’s important to note that opening your Ultrabook’s case may void any warranty you have, so ensure that you are confident in your ability to perform the upgrade or consider seeking professional assistance if needed.
Installing the New Memory
Now that you have opened the case and accessed the memory slots of your ASUS Ultrabook, it’s time to install the new memory module(s) that you have prepared. Follow these steps to ensure a successful installation:
- Before handling the new memory module(s), make sure to ground yourself by touching a grounded metal object or wearing an anti-static wristband. This helps prevent any damage from static electricity.
- Take the new memory module(s) and carefully align the notch on the module with the corresponding slot key. Insert the module(s) into the slot(s) at a 45-degree angle.
- Once the module(s) is fully inserted, apply gentle and even pressure to push it down until you hear a click. This indicates that the module is properly seated in the slot.
- Repeat the process for any additional memory module(s) you are installing.
- Double-check that all modules are securely in place, with the retaining clips properly engaged on each side.
- Once the new memory module(s) is installed, you can proceed to close the case.
During the installation process, it is crucial to avoid excessive force or mishandling of the memory modules. Applying excessive force can cause damage, while mishandling can lead to static electricity discharge or improper seating of the module. Take your time and be gentle to ensure a successful installation.
After installing the new memory module(s), you can close the case securely by aligning the edges and gently pressing them together. Make sure that all the screws or latches are properly fastened to hold the case in place.
Once the case is closed, you are ready to power on your ASUS Ultrabook and test the memory upgrade. Enjoy the enhanced performance and improved multitasking capabilities that come with the increased memory capacity!
Closing the Case and Testing the Memory Upgrade
After successfully installing the new memory module(s) in your ASUS Ultrabook, it’s time to close the case and test the memory upgrade to ensure everything is functioning properly. Follow these steps:
- Align the edges of the case and gently press them together until they fit snugly. Make sure that all the screws or latches are properly fastened to secure the case in place.
- With the case closed, plug in the power adapter and any other peripherals that you had disconnected earlier.
- Power on your ASUS Ultrabook by pressing the power button.
- Allow the operating system to boot up and fully load.
- Once your Ultrabook is up and running, navigate to the system settings or use a tool like Task Manager to verify that the new memory module(s) is recognized by your system.
- Check the total amount of memory displayed and make sure it matches the capacity of the memory module(s) you installed.
- For an additional test, try running multiple applications or tasks simultaneously and monitor the performance. A noticeable improvement in speed and responsiveness indicates a successful memory upgrade.
- If the memory upgrade is recognized and your Ultrabook is performing as expected, congratulations! You have successfully closed the case and tested the memory upgrade.
If you encounter any issues during the testing process, such as system instability or errors, double-check the installation of the memory module(s) to ensure they are properly seated and securely connected. If problems persist, refer to the troubleshooting section or seek assistance from a professional.
By completing the closing of the case and testing the memory upgrade, you have successfully upgraded the memory of your ASUS Ultrabook. Enjoy the improved performance and enhanced multitasking capabilities that come with the additional memory!
Troubleshooting Common Issues
While upgrading the memory on your ASUS Ultrabook is generally a straightforward process, you may sometimes encounter common issues. Here are some troubleshooting tips to help you resolve them:
1. System Doesn’t Recognize the New Memory:
- Ensure that the memory module is properly seated in the slot and the retaining clips are engaged.
- If you installed multiple modules, try removing them one by one and testing each individually to identify any faulty modules.
- Update your Ultrabook’s BIOS firmware to the latest version, as it may include memory compatibility fixes.
- If none of the above steps work, the memory module may be incompatible or faulty. Consider contacting the manufacturer or retailer for further assistance or to explore replacement options.
2. System Instability or Frequent Crashes:
- Check if the memory module is firmly seated in the slot. Remove and reinsert it to ensure a proper connection.
- Run a memory diagnostic tool, such as Windows Memory Diagnostic or Memtest86, to check for any potential errors or issues with the new memory.
- Make sure the memory module(s) you installed are compatible with your Ultrabook’s specifications, particularly in terms of speed and capacity.
- Consider reverting to the previous memory configuration to see if the instability issues persist, as it could indicate a different underlying problem.
- If the system instability continues, it is advisable to seek professional assistance for further troubleshooting or analysis.
3. Blue Screen of Death (BSOD) Errors:
- Try removing and reinserting the memory module(s) to ensure a secure connection.
- Update your Ultrabook’s BIOS firmware to the latest version, as it may resolve compatibility issues.
- Ensure that the memory module(s) you installed are compatible with your Ultrabook’s specifications.
- Run a system file scan using the built-in Windows System File Checker (SFC) utility to check for any corrupted system files.
- If BSOD errors persist, consult with a professional or contact the manufacturer for further assistance.
If you encounter any other issues during or after the memory upgrade process, it is always recommended to consult the manufacturer’s documentation, online forums, or seek assistance from knowledgeable technicians to ensure proper troubleshooting and resolution of the problem.
Final Thoughts
Congratulations on successfully upgrading the memory of your ASUS Ultrabook! By increasing the memory capacity, you have taken a crucial step towards improving the performance and multitasking capabilities of your device.
Remember, a memory upgrade can lead to faster application loading times, smoother multitasking, and an overall enhanced user experience. Whether you are a student, professional, or casual user, the increased memory will make a noticeable difference in your day-to-day computing activities.
Throughout this guide, we covered the process of upgrading the memory on your ASUS Ultrabook, from understanding memory and checking the current configuration to identifying compatible memory upgrades, selecting and purchasing the right memory modules, opening and closing the case, and testing the memory upgrade.
If you encountered any issues during the upgrade process, we provided troubleshooting tips to help you resolve them. Remember to seek professional assistance if needed or if you feel uncomfortable performing the upgrade yourself.
Now that you have successfully completed the memory upgrade, take some time to explore the improved performance of your Ultrabook. Test out its capabilities by running multiple tasks simultaneously and enjoy a smoother computing experience.
Lastly, it’s important to keep your Ultrabook in good overall condition by regularly performing software updates, keeping it clean from dust, and using it in a safe and secure environment.
Thank you for following this guide, and we hope that the memory upgrade has brought you increased productivity, efficiency, and enjoyment while using your ASUS Ultrabook!