Introduction
Welcome to the guide on how to open the SD port on your Lenovo Ideapad Ultrabook. If you’re looking to expand the storage capacity of your Ultrabook or transfer files from an SD card, you’re in the right place. The SD port is a convenient feature that allows you to easily insert and access SD cards, which are commonly used for storing photos, videos, and other files.
Lenovo Ideapad Ultrabooks are known for their sleek design and high performance, making them popular choices among professionals and everyday users alike. With the SD port, you can seamlessly incorporate additional storage space into your workflow without the need for external devices or cables.
In this guide, we will walk you through the step-by-step process of locating the SD port on your Lenovo Ideapad Ultrabook, preparing the device for the SD card, inserting the SD card, and accessing the files stored on it. Whether you’re a tech-savvy individual or a beginner, this guide will provide you with the essential knowledge to utilize the SD port effectively.
So, let’s dive in and uncover the secrets of opening the SD port on your Lenovo Ideapad Ultrabook. By the end of this guide, you’ll be able to take full advantage of this feature and make the most out of your Ultrabook’s storage capabilities.
Step 1: Locate the SD Port
The first step in opening the SD port on your Lenovo Ideapad Ultrabook is to locate its position. The SD port is typically located on the side or front edge of the device, depending on the specific model you own.
Take a close look at your Ultrabook and examine the edges to find the SD port. It is usually marked with the letters “SD” or an icon that resembles an SD card. In some cases, you may need to slide a small cover or flap to reveal the SD port. This cover helps protect the port from dust and debris when it’s not in use.
Once you’ve identified the location of the SD port, take note of its orientation. The SD card needs to be inserted in the correct direction for it to be properly recognized by the Ultrabook. Look for the notch or slanted corner on the SD card and align it with the corresponding slot in the SD port.
It’s worth mentioning that different Lenovo Ideapad Ultrabook models may have variations in the placement of the SD port. Therefore, if you’re having trouble locating the SD port on your specific model, it’s recommended to refer to the user manual or visit the Lenovo support website for further guidance.
Now that you know where to find the SD port on your Lenovo Ideapad Ultrabook, let’s move on to the next step, which is preparing the Ultrabook for the SD card insertion.
Step 2: Prepare the Ultrabook
Before inserting the SD card into your Lenovo Ideapad Ultrabook, it’s important to properly prepare the device to ensure a smooth and successful insertion process. Here are the essential steps to prepare your Ultrabook:
- Power off the Ultrabook: It’s always recommended to power off your Ultrabook before inserting or removing any external storage devices. This will help prevent any potential data corruption or damage to the SD card or the Ultrabook itself.
- Disconnect any power sources: Make sure to unplug any power cables or adapters connected to your Ultrabook. This will eliminate the risk of electric shock and provide a safer environment for handling the SD card.
- Clean the SD port: Use a soft, lint-free cloth or compressed air to gently clean the SD port. This will remove any dirt, dust, or debris that may obstruct the proper insertion of the SD card. It’s important to avoid using any liquid cleaners, as they can cause damage to the Ultrabook.
By following these steps, you’ll ensure that your Lenovo Ideapad Ultrabook is ready to receive the SD card. Taking the time to properly prepare the Ultrabook will minimize the risk of any potential issues when inserting the SD card and help maintain the longevity of both the Ultrabook and the SD card. Now that you’ve prepared the Ultrabook, let’s proceed to the next step – inserting the SD card into the SD port.
Step 3: Insert the SD Card
With your Lenovo Ideapad Ultrabook prepared, it’s time to insert the SD card into the SD port. Follow these steps to properly insert the SD card:
- Hold the SD card: Take the SD card between your fingers and hold it with the label facing up. Ensure that you’re holding the card on its sides, avoiding touching any metallic contacts or the gold connectors.
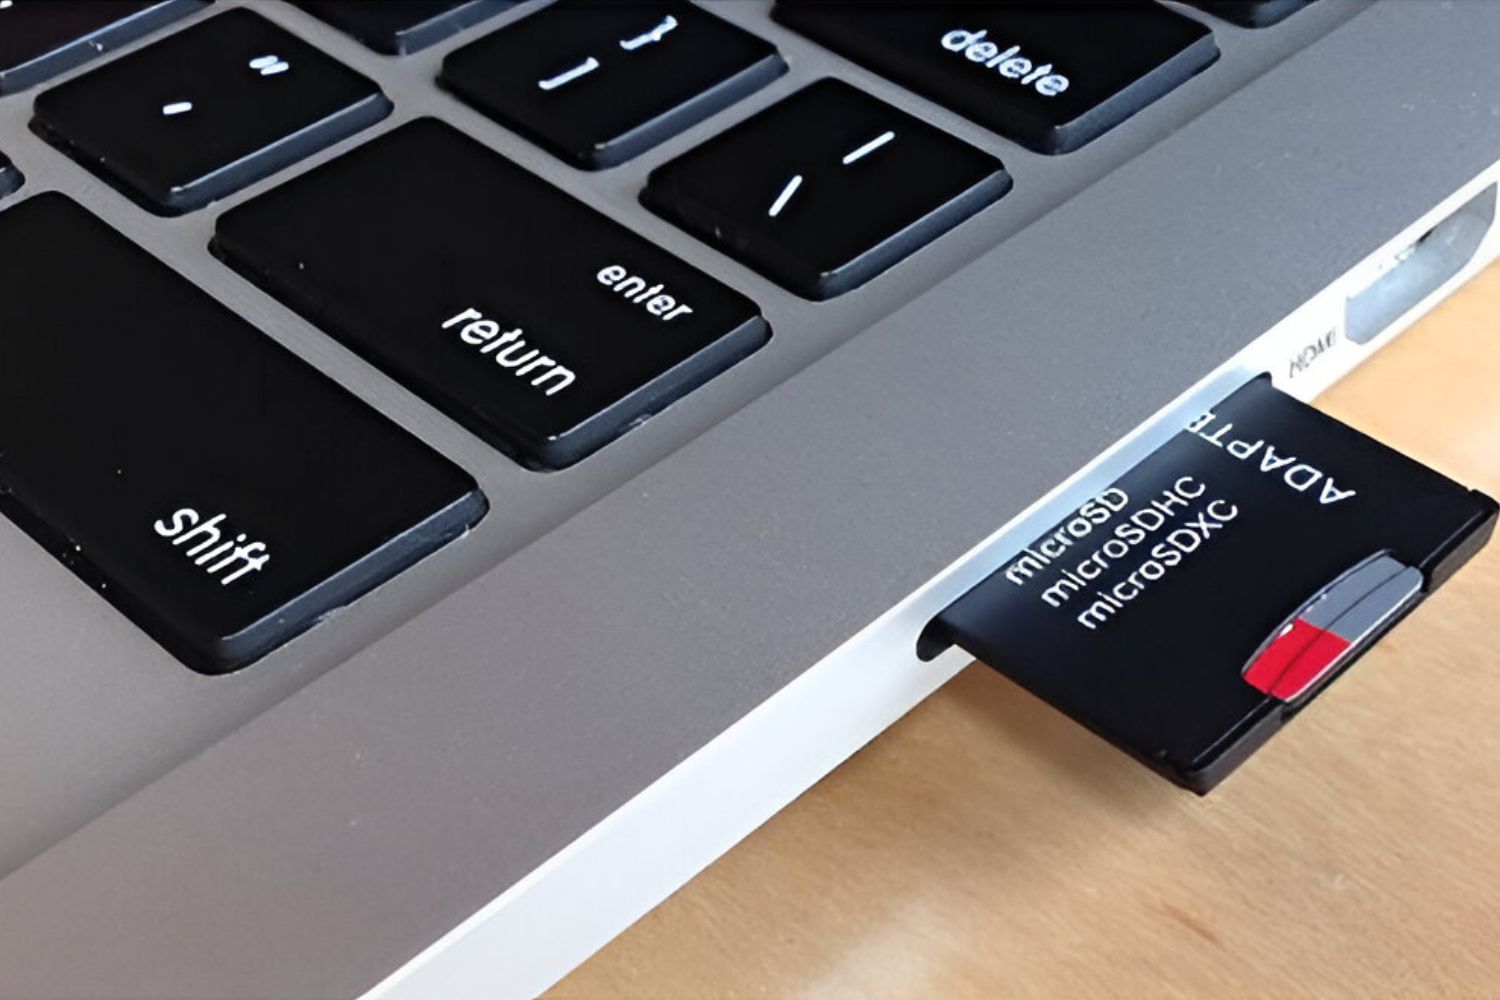
- Locate the SD port: Refer back to the location of the SD port we discussed in Step 1. Align the slanted corner or the notch of the SD card with the corresponding slot in the SD port. Make sure the card is properly oriented before proceeding.
- Insert the SD card: Gently push the SD card into the SD port until it meets the resistance. Do not force the card into the port as this can cause damage. The card should slide in smoothly until it is fully inserted.
- Secure the SD card: Once the SD card is inserted, you may hear a soft click or feel a slight resistance. This indicates that the card is securely in place. Give it a gentle tug to ensure it is properly seated in the port.
It’s important to handle the SD card with care and avoid touching the metallic contacts or the gold connectors. Any damage to these components can result in data corruption or a malfunctioning SD card.
Now that the SD card is properly inserted into the SD port, we can move on to the next step – accessing the files stored on the SD card.
Step 4: Access the SD Card
After successfully inserting the SD card into the SD port of your Lenovo Ideapad Ultrabook, it’s time to access the files stored on the card. Follow these steps to access the SD card:
- Power on the Ultrabook: Turn on your Ultrabook and wait for the operating system to load. Once the system is fully booted, it should automatically detect the presence of the SD card.
- Open the file explorer: Locate the file explorer on your Ultrabook. This may be a folder icon on your desktop or a shortcut in the taskbar. Click on the icon to launch the file explorer window.
- Locate the SD card: In the file explorer window, you will see a list of drives and devices. Look for the SD card under the “Removable Storage” or “Devices” section. It may be labeled with the name of the manufacturer or the capacity of the card.
- Double-click to access: Once you’ve located the SD card, double-click on its icon to access the files stored on it. This will open a new window displaying the contents of the SD card.
- Browse and manage files: Now you can browse through the files and folders on the SD card, just like you would with any other storage device. You can open, copy, move, delete, or modify the files according to your needs.
Remember to safely eject the SD card before physically removing it from the SD port. This can be done by right-clicking on the SD card icon in the file explorer and selecting the “Eject” or “Safely Remove” option. Wait for the system to confirm that it is safe to remove the SD card before unplugging it.
By following these steps, you can easily access and manage the files stored on the SD card in your Lenovo Ideapad Ultrabook. This allows you to conveniently transfer, edit, or store files without the need for additional devices or complicated procedures.
Now that you’re familiar with the process of accessing the SD card, you can make the most out of the additional storage capacity that it provides. Whether you’re a student, professional, or casual user, having easy access to your files is crucial for productivity and convenience.
Conclusion
Congratulations! You have successfully learned how to open the SD port on your Lenovo Ideapad Ultrabook and access the files stored on your SD card. By following the step-by-step instructions in this guide, you can easily expand the storage capacity of your Ultrabook and conveniently transfer files using an SD card.
The Lenovo Ideapad Ultrabook’s SD port provides a seamless and efficient way to incorporate additional storage space into your workflow. With the ability to insert and access SD cards, you can easily save and retrieve your files without the need for external devices or complicated procedures.
Remember to always prepare your Ultrabook by powering it off, disconnecting any power sources, and cleaning the SD port before inserting the SD card. This ensures a smooth and successful insertion process while minimizing the risk of any damage to your Ultrabook or SD card.
Once the SD card is properly inserted, you can access and manage the files stored on it by opening the file explorer and locating the SD card under the “Removable Storage” or “Devices” section. From there, you can browse, copy, move, delete, and modify your files as needed.
Finally, always remember to safely eject the SD card before physically removing it from the SD port. This prevents any potential data corruption and ensures the longevity of both the Ultrabook and the SD card.
By following these guidelines, you can make the most out of your Lenovo Ideapad Ultrabook’s SD port and enhance your productivity and storage capabilities. Enjoy the convenience and flexibility that the SD port offers, and make your Ultrabook your reliable companion for all your file storage and transfer needs.