Introduction
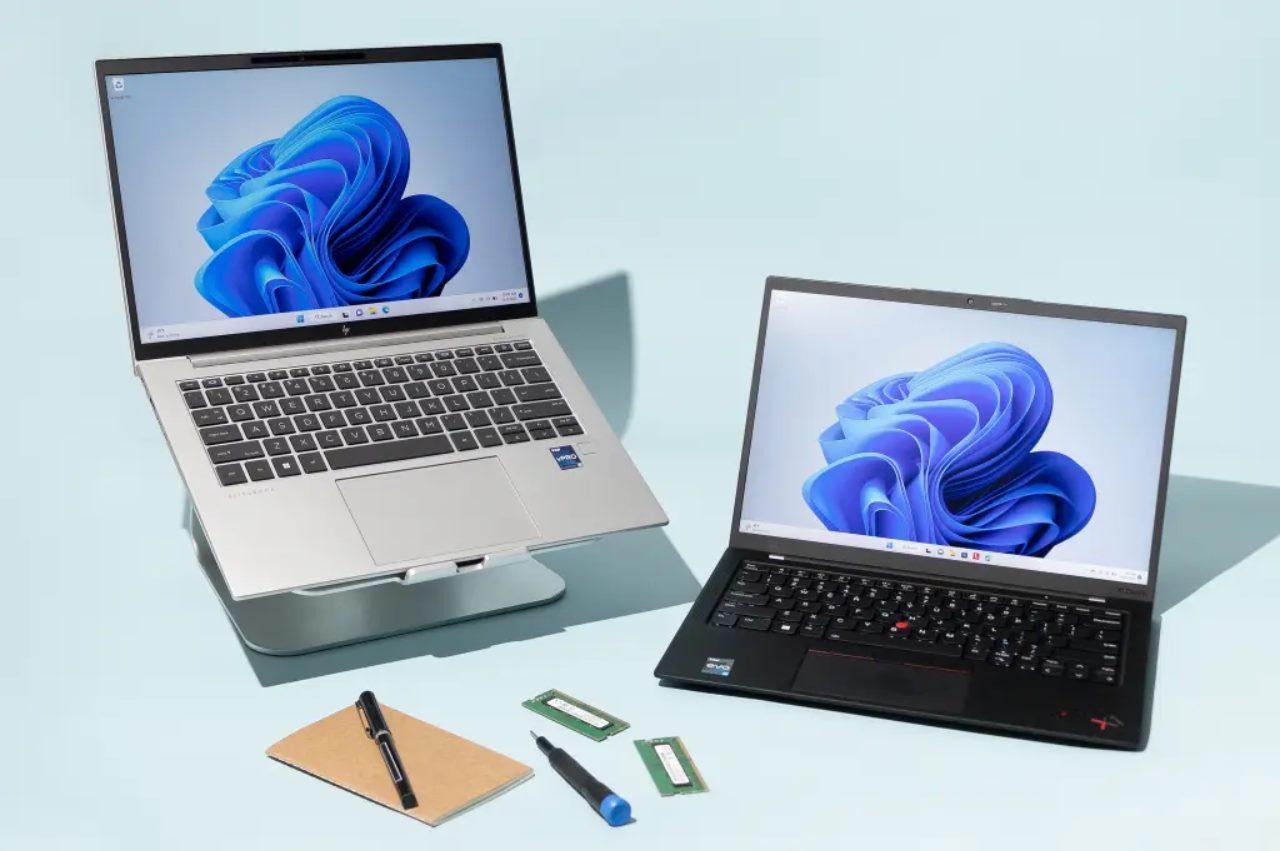
Are you looking to boost the performance of your Lenovo Ultrabook? Installing a solid-state drive (SSD) is an excellent upgrade option that can significantly enhance your Ultrabook’s speed and responsiveness. With an SSD, you can enjoy faster boot-up times, quicker application launches, and improved overall system performance.
In this article, we will guide you through the step-by-step process of installing an SSD in your Lenovo Ultrabook. We will cover everything from gathering the necessary tools to formatting the newly-installed SSD. Whether you’re a tech-savvy individual or a beginner, this guide will provide you with all the information you need to successfully install an SSD in your Lenovo Ultrabook.
Before we dive into the installation process, it’s important to note that opening your Ultrabook may void the warranty. If your laptop is still under warranty, consider checking the manufacturer’s guidelines or consulting a professional to ensure that the upgrade won’t affect your warranty coverage. Additionally, make sure to back up any important data before proceeding with the installation to avoid any potential data loss.
So, let’s get started and give your Lenovo Ultrabook a performance boost by installing an SSD!
Step 1: Gather the necessary tools and equipment
Before you begin the installation process, it’s essential to gather the necessary tools and equipment. Here’s a list of items you’ll need:
- SSD – Make sure you have the right SSD that is compatible with your Lenovo Ultrabook. Check the specifications and ensure that it fits the required form factor and interface.
- Small Phillips screwdriver – You’ll need a screwdriver to remove the back cover of your Ultrabook and secure the SSD in place.
- Anti-static wrist strap (optional) – While not necessary, an anti-static wrist strap can help prevent any damage to sensitive electronic components from static electricity.
- External storage device – It’s highly recommended to have an external storage device, such as an external hard drive or a USB flash drive, to back up your data before proceeding with the installation.
- Backup software (optional) – If you prefer a more convenient way of backing up your data, consider using backup software that allows you to create a complete system backup.
Once you have gathered all the necessary tools and equipment, you can move on to the next step of the installation process. By being prepared with the right tools and ensuring you have a backup of your data, you can proceed with confidence and minimize any potential risks during the installation.
Step 2: Back up your data
Before making any hardware changes to your Lenovo Ultrabook, it’s crucial to back up your data to avoid any potential loss or corruption. Follow these steps to back up your data:
- Connect an external storage device, such as an external hard drive or a USB flash drive, to your Ultrabook.
- Transfer any important files, documents, photos, or videos that you want to keep onto the external storage device. Make sure to double-check that everything is successfully copied.
- If you prefer a more comprehensive backup, consider using backup software to create a complete system backup. This will ensure that all your installed programs, settings, and files are backed up.
- Once the backup process is complete, safely disconnect the external storage device from your Ultrabook.
- Double-check that you have successfully backed up all your essential data before proceeding with the installation.
By backing up your data, you can have peace of mind knowing that your files are safe and secure. In the unlikely event of any issues during the installation process, you can easily restore your data without any hassle.
Remember, prevention is always better than cure, and taking the time to back up your data is an essential step in any hardware upgrade or maintenance process.
Step 3: Power off the Lenovo Ultrabook and disconnect all cables
Now that your data is safely backed up, it’s time to power off your Lenovo Ultrabook and disconnect all cables. Here’s how:
- Save any open files or ongoing tasks and close all applications.
- Shut down your Ultrabook properly by clicking on the “Start” button, selecting “Power,” and choosing “Shut down.”
- Once the Ultrabook is fully shut down, unplug the power adapter from the wall socket.
- Disconnect all peripheral devices, such as external monitors, keyboards, mice, USB drives, and any other cables connected to your Ultrabook.
- Leave your Ultrabook on a flat, stable surface, ready for the next steps of the installation.
It’s important to ensure that your Ultrabook is completely powered off and all cables are disconnected to prevent any electrical mishaps or accidental damage during the installation process. Taking the time to properly shut down and unplug your Ultrabook sets the foundation for a smooth and successful SSD installation.
Once you have completed the power-off and cable disconnection steps, you’re ready to move on to the next step of opening the back cover of your Lenovo Ultrabook.
Step 4: Open the back cover of the Ultrabook
With your Lenovo Ultrabook powered off and cables disconnected, the next step is to open the back cover to access the internal components. Follow these instructions to open the back cover:
- Place your Ultrabook on a soft, clean surface to prevent any scratches or damage to the device.
- Locate the screws securing the back cover. These screws are typically located on the bottom of the Ultrabook.
- Using a small Phillips screwdriver, carefully remove the screws. Keep them in a safe place, as you will need to reattach the back cover later.
- Once all the screws are removed, gently pry open the back cover. You may need to use a plastic opening tool or your fingers to carefully separate the cover from the Ultrabook’s body.
- Take your time and be gentle to avoid any unnecessary force or damage to the cover or internal components.
- Once the back cover is completely free, set it aside in a secure location.
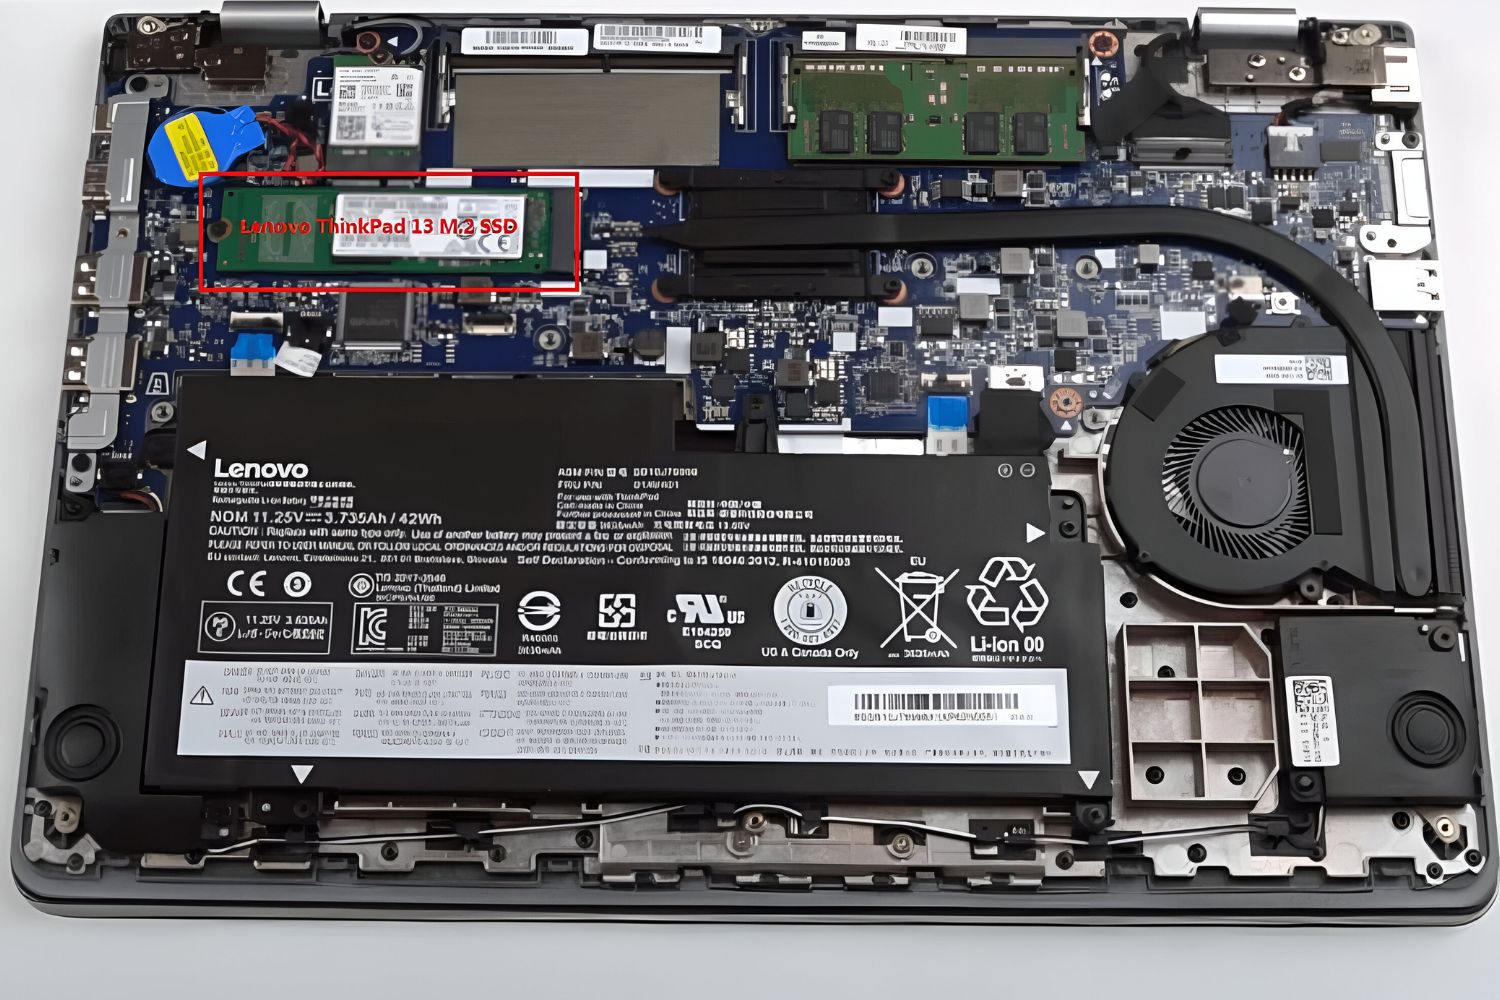
With the back cover removed, you have now gained access to the internal components of your Lenovo Ultrabook. Take a moment to familiarize yourself with the inside layout and locate the SSD slot on the motherboard. This will be your next step in the installation process, as we will guide you on how to install the SSD into the designated slot.
Remember to handle the back cover and screws with care and to keep them in a safe place to ensure an easy and successful reassembly later.
Step 5: Locate the SSD slot on the motherboard
Now that you have opened the back cover of your Lenovo Ultrabook, it’s time to locate the SSD slot on the motherboard. Follow these steps to find the appropriate slot:
- Observe the inside of your Ultrabook and locate the motherboard. It is the main circuit board that houses various components, including the CPU, RAM, and storage.
- Look for a small rectangular slot or connector that is typically labeled as “SSD” or “M.2”. This is where the SSD will be installed.
- Inspect the slot carefully to ensure that it matches the form factor and interface of the SSD you have. Common SSD form factors include M.2 2280 and M.2 2242.
- If you are unsure about the specific slot for the SSD, consult the manufacturer’s documentation or support resources for your Lenovo Ultrabook.
Locating the SSD slot is a crucial step as it ensures that you install the SSD in the correct location and avoid any potential damage or compatibility issues. Taking the time to carefully identify the SSD slot on the motherboard will set you up for a successful installation in the next step.
Once you have found the SSD slot, proceed to the next step to learn how to install the SSD securely into the designated slot.
Step 6: Install the SSD into the slot
Now that you have located the SSD slot on the motherboard, it’s time to install the SSD. Follow these steps to securely install the SSD into the designated slot:
- Hold the SSD carefully by the edges to avoid touching any of the sensitive components or connectors.
- Align the notches on the SSD with the corresponding slots on the SSD slot.
- Gently slide the SSD into the slot, ensuring that it is inserted in the correct orientation. Apply light pressure until the SSD is fully seated in the slot.
- Make sure the SSD is firmly connected and properly aligned with the slot. It should fit snugly without any gaps.
- Do not force the SSD into the slot. If you encounter any resistance, double-check the alignment and try again.
It’s crucial to handle the SSD with care during the installation process to prevent any damage to the components. Take your time and ensure that the SSD is securely inserted into the slot to avoid any performance issues or connectivity problems.
With the SSD successfully installed, you are now ready to secure it in place. Proceed to the next step to learn how to fasten the SSD using screws or clips.
Step 7: Secure the SSD with screws or clips
After installing the SSD into the designated slot, the next step is to secure it in place using screws or clips. Follow these instructions to ensure the SSD is properly fastened:
- Check if your Ultrabook comes with specific screws or clips designed for securing the SSD. Consult the manufacturer’s documentation or support resources for the recommended method.
- If screws are required, locate the screw holes near the SSD slot on the motherboard.
- Take the screws and carefully align them with the corresponding screw holes.
- Using a small Phillips screwdriver, tighten the screws until they are snug but avoid overtightening, as it may damage the SSD or motherboard.
- If your Ultrabook uses clips, locate the clips near the SSD slot and align them with the connectors on the SSD.
- Gently push down on the clips until they securely latch onto the SSD, ensuring a snug fit.
By securing the SSD with screws or clips, you can prevent any accidental movement or disconnection during everyday use. This ensures a reliable and stable connection, maximizing the performance of your installed SSD.
Once you have securely fastened the SSD, you are now ready to proceed with closing the back cover of your Lenovo Ultrabook. This will be covered in the next step, so let’s move on!
Step 8: Close the back cover of the Ultrabook
Now that the SSD is securely installed and fastened, it’s time to close the back cover of your Lenovo Ultrabook. Follow these steps to ensure a proper closure:
- Grab the back cover that you set aside earlier and position it back onto the Ultrabook.
- Align the screw holes on the cover with the corresponding holes on the Ultrabook’s body.
- Gently press down on the cover to ensure it is properly aligned and seated.
- Starting with one corner, insert a screw into its hole and tighten it slightly. Repeat this step for all the screws.
- Once all the screws are in place, use a small Phillips screwdriver to tighten them securely. Be careful not to overtighten, as it may damage the screws or the cover.
Properly closing the back cover is essential to protect the internal components and maintain the integrity of your Lenovo Ultrabook. Take your time and ensure that the cover fits flush with the Ultrabook’s body, without any gaps or misalignment.
Once the back cover is securely closed, you’re almost done! The next step will guide you on reconnecting all the cables and powering on your Lenovo Ultrabook with the newly installed SSD.
Step 9: Reconnect all cables and power on the Ultrabook
With the back cover securely closed, it’s time to reconnect all the cables and power on your Lenovo Ultrabook. Follow these steps to complete the installation process:
- Refer to the notes you took earlier to ensure all the cables are reconnected to their respective ports.
- Start with the power adapter, ensuring it is plugged into both the Ultrabook and a functioning power outlet.
- Reconnect any peripheral devices, such as monitors, keyboards, mice, and USB drives, as needed.
- Double-check that all the cables are properly attached and secured without any loose connections.
- Once you’re confident that everything is in place, press the power button to turn on your Lenovo Ultrabook.
As your Ultrabook boots up, it will recognize and initialize the newly installed SSD. Depending on your system settings, you may need to enter the BIOS or UEFI settings to ensure that the SSD is properly detected and set as the boot drive.
If everything is connected correctly, your Ultrabook should start up smoothly, and the SSD will significantly enhance the overall performance and speed of your system.
Congratulations! You have successfully installed an SSD in your Lenovo Ultrabook. Enjoy the improved performance and responsiveness that the SSD brings to your Ultrabook experience.
Step 10: Format and initialize the newly-installed SSD
After installing the SSD and powering on your Lenovo Ultrabook, the final step is to format and initialize the newly-installed SSD. Follow these instructions to complete the setup process:
- Click on the Windows Start button and type “Disk Management” in the search bar. Select “Create and format hard disk partitions” from the results.
- Once the Disk Management window opens, you should see the newly installed SSD listed as unallocated space.
- Right-click on the unallocated space corresponding to the SSD and select “New Simple Volume.”
- Follow the on-screen instructions in the New Simple Volume Wizard. Specify the desired size for the partition, assign a drive letter, and select the file system (usually NTFS).
- Complete the formatting process by following the wizard’s prompts. This may take a few moments to complete.
- Once the formatting is finished, your SSD will be ready for use.
Keep in mind that formatting the SSD will erase any existing data on it, so ensure that you have backed up all necessary files prior to this step. Formatting the SSD enables you to optimize it for your operating system and prepares it for storing and accessing data.
With the SSD formatted and initialized, you have completed the installation and setup process. Enjoy the enhanced performance, speed, and storage capacity that the new SSD brings to your Lenovo Ultrabook!
Conclusion
Congratulations on successfully installing an SSD in your Lenovo Ultrabook! By following the step-by-step guide provided in this article, you have unlocked the potential for improved performance, faster load times, and increased storage capacity.
Throughout the installation process, you learned how to gather the necessary tools, back up your data, power off the Ultrabook, open the back cover, locate the SSD slot, install the SSD, secure it with screws or clips, close the back cover, reconnect all cables, and power on the Ultrabook. Finally, you formatted and initialized the SSD to ensure optimal functionality.
With your new SSD, you can experience quicker boot-up times, seamless multitasking, and enhanced responsiveness while working with your Ultrabook. Your applications will run smoother, and you’ll have more space to store your files, documents, and media.
Remember, always follow manufacturer guidelines and consult professional assistance if you’re unsure about any steps or if it might affect your warranty.
Now that you have successfully upgraded your Lenovo Ultrabook with an SSD, enjoy the improved performance and productivity that this hardware enhancement brings!