Introduction
Welcome to the world of CDs and DVDs! While digital media has become the norm, there’s something nostalgic and satisfying about turning to physical discs for entertainment. If you’re a proud owner of an HP Ultrabook and want to enjoy your collection of CDs or DVDs, you’re in luck. In this guide, we’ll walk you through the process of using a CD/DVD player with your trusty Ultrabook to relish your favorite movies, music, or software installations.
Connecting a CD/DVD player to your HP Ultrabook is a straightforward task. Whether you have an external DVD drive or an internal one, the process is almost the same. By following a few simple steps, you’ll be able to unleash the power of your CD/DVD collection on your Ultrabook.
Once you have successfully connected the CD/DVD player to your Ultrabook, the next step is to insert the CD or DVD into the player. This is a breeze, and we’ll show you how to do it effortlessly. Just a few clicks, and you’ll be ready to dive into your favorite content.
Playing a CD/DVD on your HP Ultrabook is a delightful experience. The sleek display and powerful performance of an Ultrabook enhance the audio and video quality, making your entertainment even more enjoyable. We’ll guide you through the steps to get your CD/DVD playing seamlessly on your Ultrabook.
Adjusting playback settings can enhance your viewing or listening experience. Whether you want to choose specific audio tracks, enable subtitles, or adjust the screen display, we’ll show you how to customize your settings to suit your preferences.
While using a CD/DVD player is usually trouble-free, there might be instances where you encounter common issues. Don’t worry, we have you covered. We’ll provide troubleshooting tips and solutions for common problems you might face during playback.
Once you’re done enjoying your CD/DVD, it’s time to eject the disc from the player. We’ll show you how to safely remove the disc from your Ultrabook and the CD/DVD player, ensuring that your precious collection remains in perfect condition.
So, if you’re ready to rediscover the joy of using physical media on your HP Ultrabook, let’s dive in and explore the steps to play CDs and DVDs with your CD/DVD player.
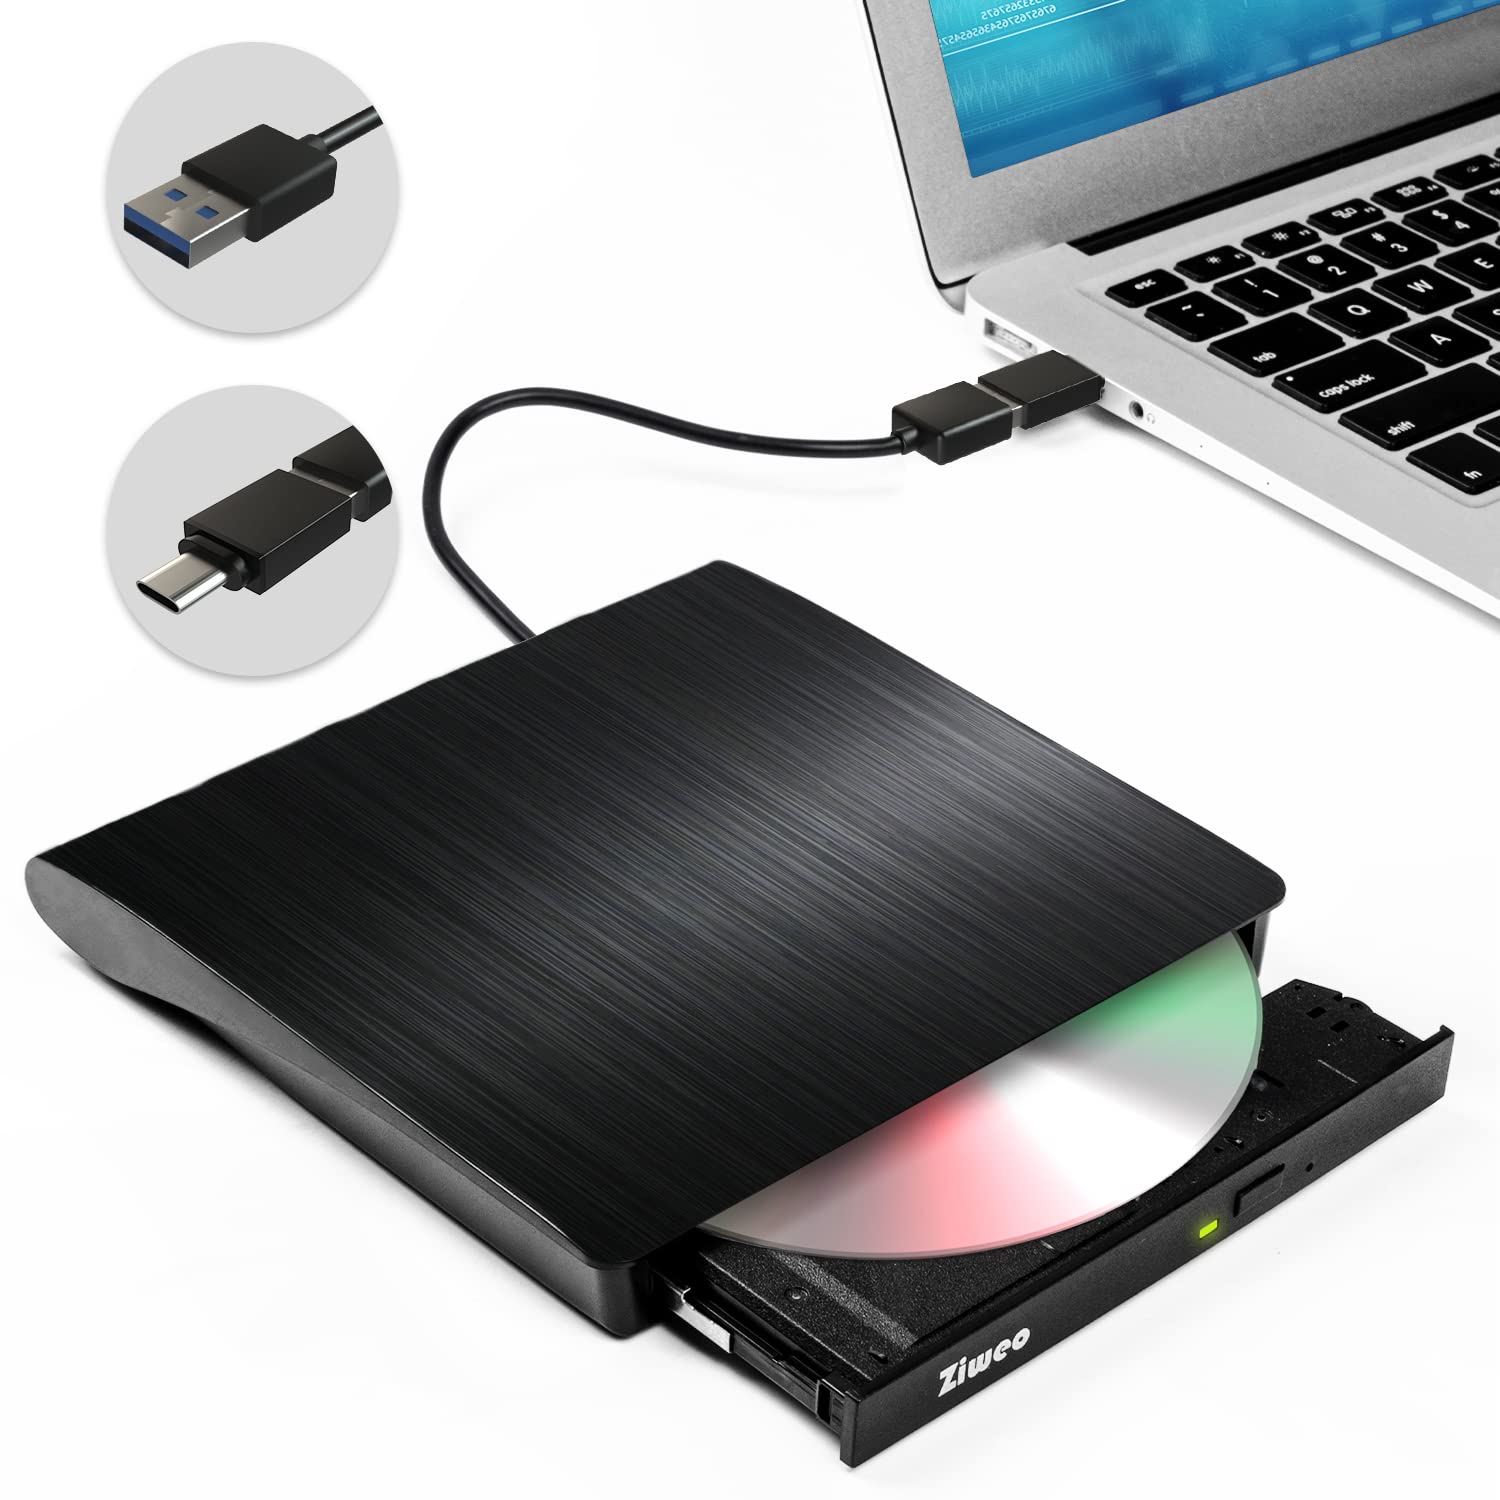
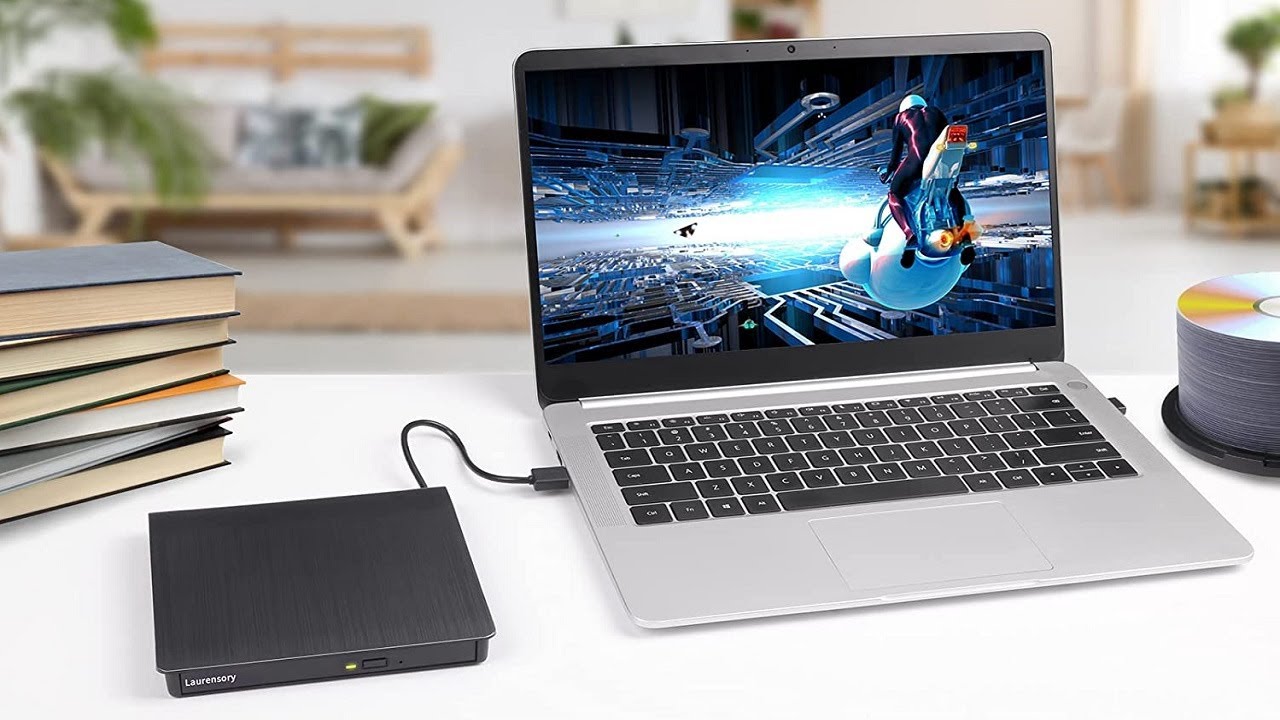
Connecting the CD/DVD Player to the HP Ultrabook
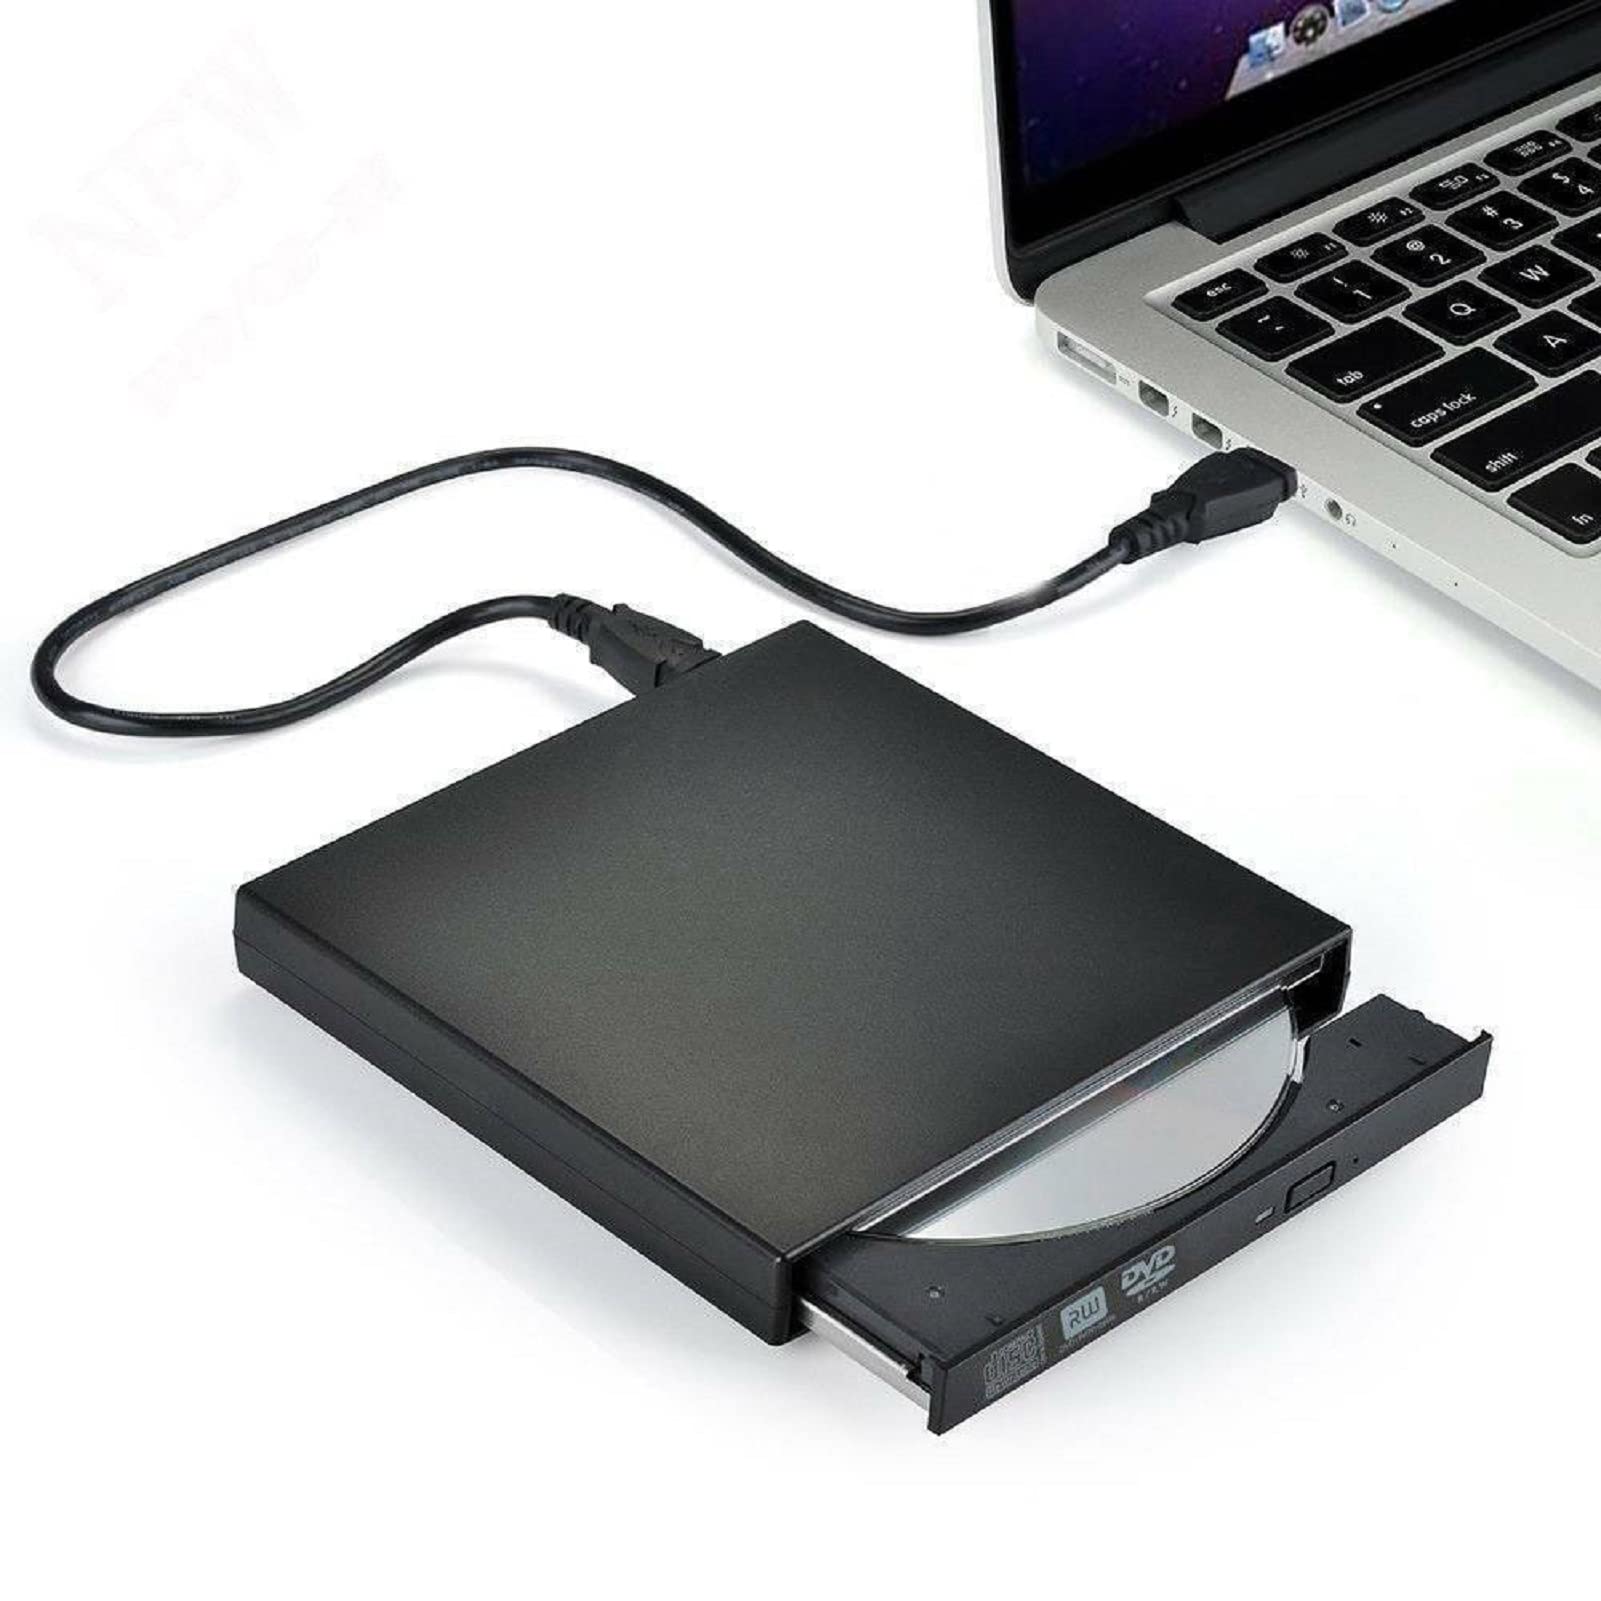
Before you can start enjoying your CDs and DVDs on your HP Ultrabook, you’ll need to connect a CD/DVD player to your device. Whether you have an external CD/DVD drive or an internal one, the process is quite simple. Follow these steps to get everything set up:
- First, check if your Ultrabook has a built-in CD/DVD drive. If it does, you won’t need to connect an external player. If not, you’ll need to purchase an external CD/DVD drive that is compatible with your Ultrabook.
- Next, locate the USB port on your Ultrabook. This is where you will connect the external CD/DVD player. Insert the USB cable from the CD/DVD player into the USB port of your Ultrabook.
- Once the CD/DVD player is connected, your Ultrabook should recognize it automatically. In some cases, you might need to install drivers or software for the CD/DVD player to ensure it functions properly. Check the manufacturer’s instructions that came with the player to see if any additional steps are required.
- Ensure that the CD/DVD player is powered on. Most external players are USB-powered and do not require separate power sources. However, if you have an internal player, make sure it is properly connected to the power supply.
- Lastly, verify that the CD/DVD player is functioning correctly. Insert a CD or DVD into the player and check if it spins. If the player recognizes and reads the disc, you’re all set to move on to the next step: inserting the CD/DVD into the player.
Connecting a CD/DVD player to your HP Ultrabook is a simple process that allows you to access your physical media library. By following these steps, you’ll be ready to play your favorite CDs and DVDs on your Ultrabook with ease.
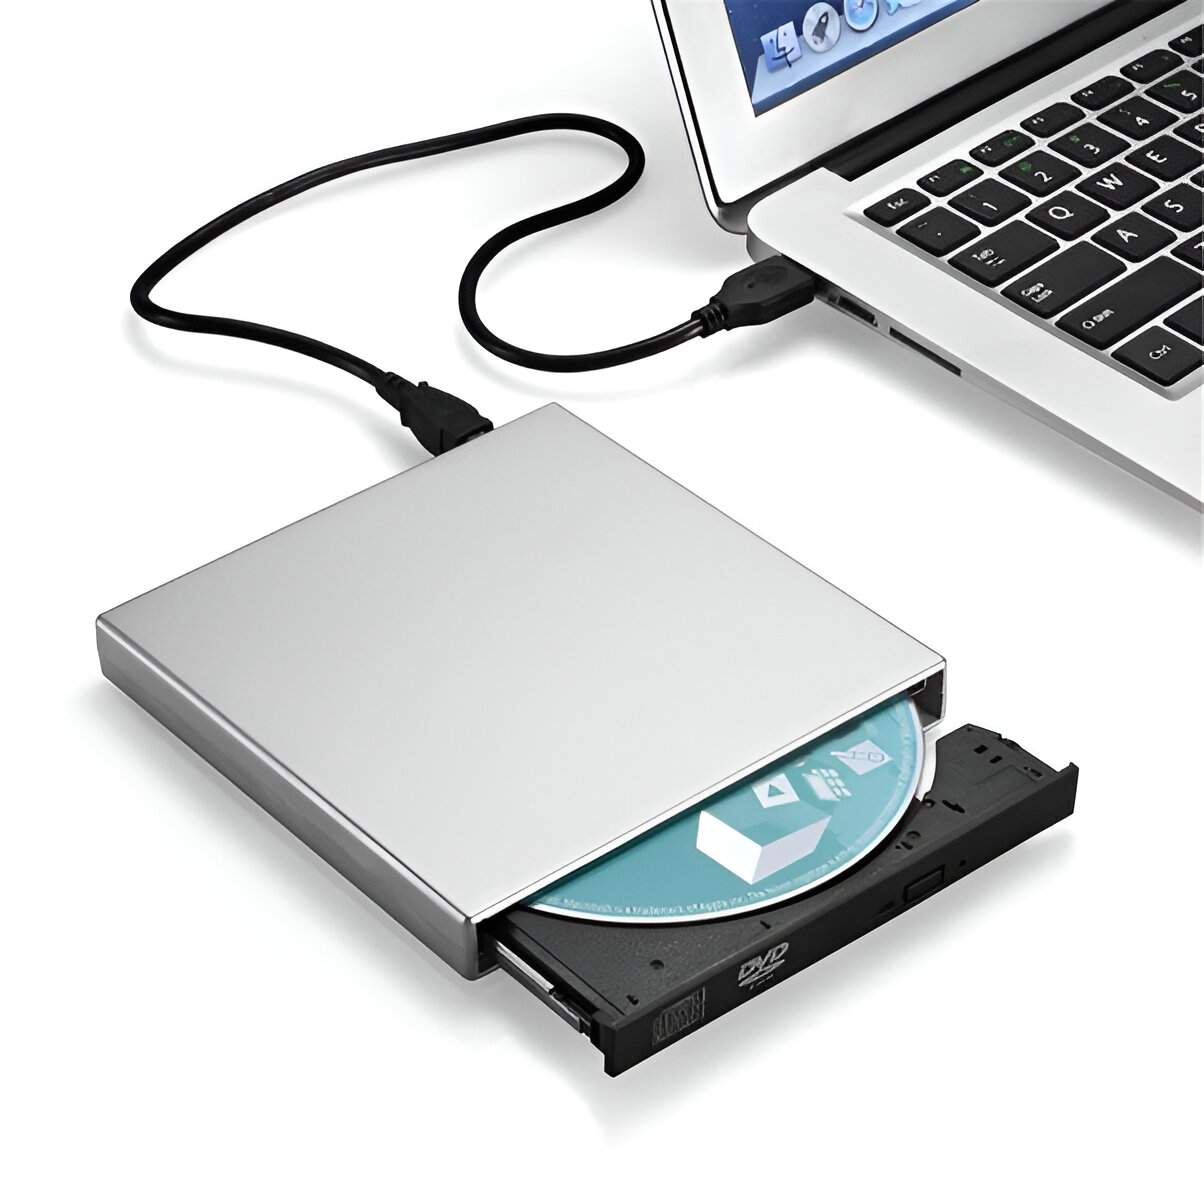
Inserting the CD/DVD into the Player
Now that you have successfully connected the CD/DVD player to your HP Ultrabook, it’s time to insert your desired CD or DVD into the player. Follow these steps to seamlessly load your disc:
- Begin by ensuring that the CD/DVD player tray or slot is empty. If there is any disc currently inserted, remove it carefully before proceeding.
- If you have a CD, hold it gently by the edges, with the label facing up. If you have a DVD, hold it the same way, but be cautious not to touch the shiny surface as fingerprints can interfere with playback.
- Locate the CD/DVD player tray eject button or the software-based eject option on your Ultrabook. Press the button or execute the eject command, and the tray or slot should open.
- Place the CD or DVD onto the tray or into the designated slot. Ensure that it is positioned correctly and fully inserted, taking care not to force it.
- If you have an external CD/DVD player with a tray, gently push the tray back into the player until it locks into place. If you have an internal player or an external slot-loading player, there is no need to manually close anything.
- Your Ultrabook will automatically detect the inserted CD or DVD. The operating system should recognize the disc and display options for playback.
By following these steps, you can effortlessly insert your CD or DVD into the player and prepare for an enjoyable entertainment experience on your HP Ultrabook.
Playing a CD/DVD on the HP Ultrabook
Now that your CD/DVD is successfully inserted into the player, it’s time to play it on your HP Ultrabook. Here’s how you can start enjoying your favorite content:
- Open the media player software on your Ultrabook. Most Ultrabooks come with built-in media player software, such as Windows Media Player or QuickTime Player. If you prefer a different media player, you can install it from a trusted source.
- In the media player software, locate the option to “Play” or “Open” a file. Click on this option to browse for the CD/DVD. A window should appear displaying the contents of the disc.
- Choose the desired audio, video, or software installation file from the CD/DVD contents. Double-click on the file to begin playback or installation. If you’re playing a video DVD, you can select the specific title or chapter you want to start with.
- The media player software will start playing the selected file from the CD/DVD. You can enjoy the audio or video content on your Ultrabook’s display and listen to the sound through the built-in speakers or headphones.
- During playback, you can control various options within the media player software. Use the playback controls to pause, play, rewind, or fast-forward through the content. You can also adjust the volume settings, enable subtitles (if available), and select different audio tracks or camera angles (for DVDs).
Playing a CD/DVD on your HP Ultrabook is a straightforward process. With the right media player software and a few clicks, you can immerse yourself in your favorite music, movies, or software installations without any hassle.
Adjusting Playback Settings
When playing a CD or DVD on your HP Ultrabook, you have the option to customize and adjust various playback settings to enhance your viewing or listening experience. Here are some settings you can consider tweaking:
- Audio Settings: Most media player software allows you to adjust audio settings such as volume, equalizer, and audio balance. Experiment with different settings to find the optimal sound quality and balance that suits your preference.
- Subtitle Options: If you’re watching a DVD with subtitles available, you can choose to enable or disable them. You might also have the option to select the subtitle language or adjust the position, font, and size of the subtitles on the screen.
- Video Display: Depending on the media player software, you can modify the video display settings. This includes adjusting the brightness, contrast, saturation, and aspect ratio to optimize the visual quality according to your personal preference and the display capabilities of your Ultrabook.
- Playback Controls: Learn and utilize the playback controls available in your media player software. These controls allow you to pause, play, rewind, fast-forward, or skip to specific sections of the CD/DVD content. Mastering these controls will enhance your overall playback experience.
- Audio Tracks and Camera Angles: If you’re playing a DVD that includes multiple audio tracks or camera angles, you can choose the desired audio track or switch between camera angles to explore different perspectives of the content.
By adjusting playback settings according to your preferences, you can create a personalized and immersive experience while enjoying your CD or DVD on your HP Ultrabook. Take some time to explore and experiment with these settings to find the perfect combination that suits your audiovisual preferences.
Troubleshooting Common Issues
While playing a CD or DVD on your HP Ultrabook usually goes smoothly, there may be instances where you encounter common issues that can disrupt your viewing or listening experience. Here are some troubleshooting tips to help you resolve commonly encountered problems:
- Disc Not Recognized: If your Ultrabook fails to recognize the inserted CD/DVD, try removing and reinserting the disc. Ensure that the disc is clean and free from scratches or smudges that could interfere with the reading process. If the issue persists, check if the CD/DVD player is properly connected, drivers are up to date, or try using a different disc to isolate the problem.
- Playback Issues: If you experience stuttering, freezing, or skipping during playback, it could indicate a problem with your CD/DVD player, software, or the disc itself. Try cleaning the disc with a soft cloth and ensure that it is not scratched. Additionally, ensure that your media player software is up to date and your Ultrabook meets the system requirements for smooth playback.
- No Sound: If you have inserted a CD or DVD, but you cannot hear any sound, check your volume settings. Ensure that the volume is not muted and set to an appropriate level. Also, verify that the speakers or headphones are properly connected to your Ultrabook and functioning correctly.
- Unsupported Format: If you encounter a message stating that the CD or DVD is in an unsupported format, it could indicate that your media player software does not support the file format or codec used on the disc. In such cases, try using a different media player software that is compatible with a wider range of formats or codecs.
- Driver Issues: If you have an external CD/DVD player and it is not working properly, check if the necessary drivers are installed. Your Ultrabook might require specific drivers to communicate with the external player. Visit the manufacturer’s website and download the latest drivers for your specific CD/DVD player model.
By following these troubleshooting tips, you can resolve common issues that may arise when playing CDs or DVDs on your HP Ultrabook. If the problem persists despite your best efforts, consider seeking further assistance from technical support or professional services.
Ejecting the CD/DVD from the Player
When you’re done enjoying your CD or DVD on your HP Ultrabook, it’s important to properly eject the disc from the player to ensure its safety and longevity. Here are the steps to safely eject the CD or DVD:
- Locate the eject button or software-based eject option on your Ultrabook. It is typically represented by a triangle pointing upward or an icon resembling an open disc tray.
- Click on the eject button or execute the eject command in your media player software. This action will notify the CD/DVD player that you want to remove the disc.
- Wait for a few moments while the CD/DVD player spins down and stops reading the disc. This ensures that the disc is no longer in use before removing it.
- If your CD/DVD player has a tray, press the eject button on the player to open the tray. If it is an internal or slot-loading player, the disc should be automatically ejected.
- Carefully remove the CD or DVD from the tray or slot, making sure not to touch the shiny side of the disc to avoid leaving fingerprints or causing damage.
- If the CD/DVD player tray is open, gently push it back into the player until it locks into place. If it is an internal or slot-loading player, there is no need to manually close anything.
By following these steps, you can safely remove the CD or DVD from your HP Ultrabook’s CD/DVD player without causing any damage to the disc or the player itself. Properly ejecting the disc ensures that you can enjoy it again in the future and maintains the longevity of your physical media collection.
Conclusion
Playing CDs and DVDs on your HP Ultrabook allows you to unlock a world of entertainment and convenience. By following the steps outlined in this guide, you can effortlessly connect a CD/DVD player to your Ultrabook, insert your favorite discs, and enjoy seamless playback.
Remember to adjust playback settings to enhance your audiovisual experience, troubleshoot common issues that may arise, and safely eject your discs to preserve their condition. With the right media player software and a few simple steps, you can relish your collection of CDs and DVDs on your HP Ultrabook anytime, anywhere.
While digital media continues to dominate, there’s something special about physically engaging with CDs and DVDs. They offer a tangible connection to our favorite music albums, movies, and software installations. Embrace the nostalgia and convenience of physical media on your Ultrabook and discover a new level of entertainment.
So, go ahead and connect your CD/DVD player to your HP Ultrabook, insert a disc, and immerse yourself in the captivating world of physical media. Enjoy the moments and cherish the memories as you navigate through your collection. Happy playback!