Introduction
Welcome to the ultrabook series 9, where advanced technology and sleek design come together to deliver an exceptional computing experience. As you navigate your way through the various functions and features of your ultrabook, you may come across different symbols displayed on the keyboard or touchpad. These symbols provide important information and shortcuts to enhance your usage. In this article, we will unravel the meaning behind the different symbols on your ultrabook series 9.
Understanding these symbols is essential to make the most of your ultrabook and its capabilities. Whether you are a tech enthusiast or a casual user, knowing what these symbols represent can help you navigate through the various functions quickly and efficiently.
From power on to battery status, keyboard shortcuts to wireless connectivity, we will explore each symbol in detail, providing you with a comprehensive guide to fully utilize your ultrabook series 9.
So, let’s dive in and discover the meaning behind the intriguing symbols on your ultrabook, making the most of its advanced features and enhancing your digital experience.
Power On Symbol
The power on symbol is one of the most familiar symbols on any electronic device, including your ultrabook series 9. It is represented by a circle with a vertical line inside, resembling a power button.
When you see this symbol, it is an invitation to power on your ultrabook. Simply press the power button located either on the side or top of your device. Once powered on, your ultrabook will initiate the startup process and display the manufacturer’s logo or your personalized desktop, depending on your settings.
The power on symbol serves as a quick and easy way to start using your ultrabook. Whether you need it for work, entertainment, or creative pursuits, a simple press of the power button will bring your device to life and allow you to dive into your desired tasks.
It is worth noting that some ultrabooks offer additional functionality when the power button is pressed and held. For instance, on certain models, holding down the power button for a few seconds may initiate a hard shutdown or activate a quick access menu to control sleep mode or other power-related settings.
Keep in mind that properly shutting down your ultrabook at the end of each session is important to prevent data loss and maintain the overall performance of the device. To power off your ultrabook, simply press and hold the power button until you see the shutdown options, then select the desired action.
In summary, the power on symbol is a universal indicator that invites you to power on your ultrabook. By pressing the power button, you can start using your device and explore the numerous features and capabilities it has to offer.
Sleep Mode Symbol
The sleep mode symbol on your ultrabook series 9 resembles a crescent moon. When you see this symbol, it indicates that your ultrabook is in sleep mode.
Sleep mode is a power-saving state that allows you to quickly resume your work without going through a full startup process. It helps conserve energy and extend your battery life while keeping your work and applications intact.
To put your ultrabook in sleep mode, simply press the sleep button, usually located on the keyboard or as a dedicated button on the side of your device. Alternatively, you can select the sleep option from the power menu or use the appropriate shortcut key combination, depending on your device’s configuration.
When your ultrabook is in sleep mode, the display will turn off, and the power consumption is greatly reduced. However, the device remains in a low-power state, keeping your applications and data stored in the memory, allowing for quick resumption of your work when you awaken your device from sleep.
To wake up your ultrabook from sleep mode, press any key on the keyboard or tap the touchpad. Within seconds, you will be back at your desktop or the last active application, exactly where you left off.
It is important to note that sleep mode is different from hibernation mode. While sleep mode keeps your applications and data in memory, hibernation mode saves them to the hard disk and shuts down your ultrabook completely to conserve power. Hibernation mode is typically used when you will not be using your ultrabook for an extended period.
By utilizing sleep mode, you can conveniently pause your work without fully shutting down your ultrabook and quickly resume where you left off. It is a useful feature that enhances productivity and conserves energy, ensuring your ultrabook is always ready to go.
Battery Status Symbol
The battery status symbol on your ultrabook series 9 provides crucial information about the current battery level and charging status. It typically appears as a small battery icon located in the taskbar or on the screen itself.
This symbol is essential for monitoring the remaining battery capacity and ensuring that you have enough power to carry out your tasks. It can help you plan your usage accordingly, especially when you are on the go and may not have access to a power source.
When the battery is fully charged, the symbol may appear as a solid battery icon or display a plug or lightning bolt to indicate that it is connected to a power source and charging. As the battery level decreases, the symbol may change to indicate a lower charge, such as a hollow battery icon or a diminishing bar.
To view more detailed information about the battery status, you can usually click or right-click on the battery symbol. This will open a menu or a pop-up window that displays the battery percentage, estimated remaining time, and other relevant details.
In addition to the battery status symbol, some ultrabooks provide additional settings to optimize battery usage. These settings may include power-saving modes, which can be accessed through the battery icon menu, allowing you to adjust the performance and power consumption of your ultrabook to maximize battery life.
It is advisable to keep a close eye on the battery status symbol, especially when you are working on resource-intensive tasks or when the battery is running low. This will help you plan your work accordingly and ensure that you have enough power to complete your tasks without any interruptions.
Furthermore, it is important to remember that battery life can vary depending on the usage and configuration of your ultrabook. By adopting good battery-saving practices, such as adjusting screen brightness, closing unused applications, and disabling unnecessary background processes, you can further extend the battery life and optimize your ultrabook’s performance.
In summary, the battery status symbol provides valuable information about your ultrabook’s battery level and charging status. By monitoring this symbol and adopting power-saving practices, you can effectively manage the battery usage on your ultrabook series 9 and ensure that you have sufficient power to accomplish your tasks.
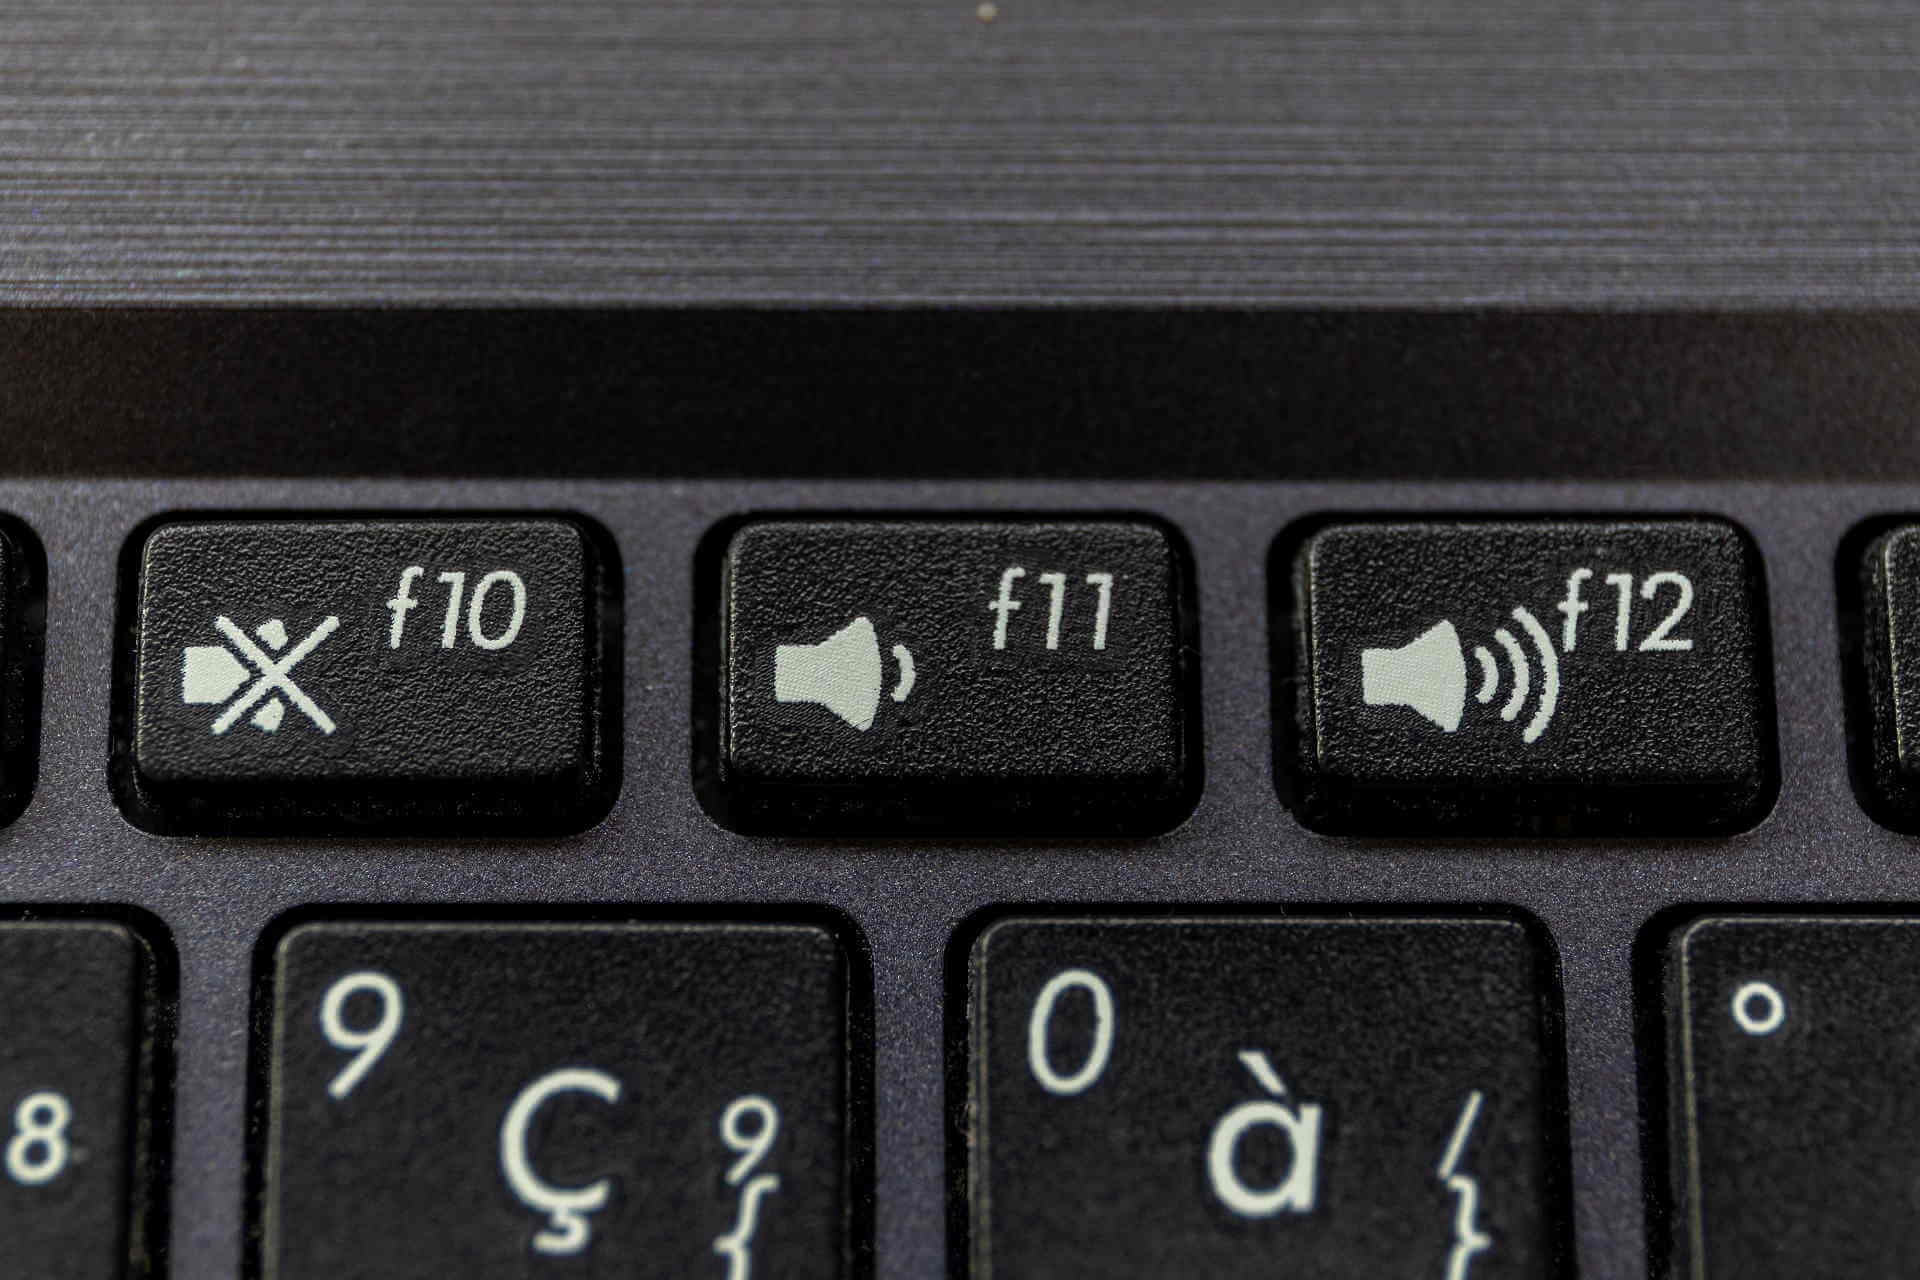
Volume Control Symbol
The volume control symbol on your ultrabook series 9 allows you to easily manage the audio output levels of your device. It is represented by a speaker icon or a series of vertical bars indicating the volume level.
Controlling the volume on your ultrabook is essential for enjoying multimedia content, participating in video conferences, or simply adjusting the audio according to your preferences. The volume control symbol provides a convenient way to perform these adjustments quickly and efficiently.
To modify the volume, locate the volume control keys on your keyboard or the volume touchpad on your ultrabook. These keys are usually marked with speaker icons or designated Fn (Function) keys with volume labels.
Pressing the volume up key will increase the volume, while pressing the volume down key will decrease it. You can also use the volume touchpad to swipe up or down to adjust the volume level accordingly.
Additionally, some ultrabooks provide additional features and settings related to volume control. For instance, you may have the option to mute the audio completely by pressing the mute button or key, represented by a crossed-out speaker icon. This can be useful when you need to quickly silence your ultrabook, especially in public or quiet environments.
Some ultrabooks also offer shortcut keys or touchpad gestures to launch volume control settings, allowing you to fine-tune the audio balance, adjust bass and treble levels, or switch between audio output devices such as speakers, headphones, or external monitors.
By utilizing the volume control symbol and its associated keys or touchpad gestures, you can personalize your audio experience on your ultrabook series 9. Whether you prefer immersive sound while watching movies or subtle background music during work, the volume control symbol puts you in control of the audio output.
Remember to be mindful of your surroundings and considerate of those around you when adjusting the volume. It’s important to find an appropriate level that suits your needs without causing disturbance to others.
In summary, the volume control symbol on your ultrabook series 9 allows you to adjust the audio output levels effortlessly. By utilizing the volume keys or touchpad gestures, you can customize the volume to your liking and enhance your audio experience on your ultrabook.
Caps Lock Symbol
The caps lock symbol on your ultrabook series 9 represents a functionality that allows you to toggle between uppercase and lowercase letters when typing. It is typically displayed as a box with the letters “Caps” or an upward-pointing arrow.
Activating caps lock can be useful when you want to type in all uppercase letters, such as when entering passwords or emphasizing specific words or phrases. By enabling caps lock, you can conveniently switch between uppercase and lowercase without having to hold down the shift key.
To activate caps lock, simply press the caps lock key located on your keyboard. Once activated, the caps lock symbol may change in appearance, such as being highlighted or having an illuminated indicator, to indicate that it is active.
When caps lock is enabled, all letters you type will be displayed in uppercase, even if you are using the shift key. This can be helpful for entering a series of uppercase characters without having to hold down the shift key for each letter.
To deactivate caps lock and revert to normal letter casing, press the caps lock key again. The caps lock symbol will return to its original appearance, indicating that it is no longer active.
It’s important to note that caps lock only affects letter keys and does not impact other characters, such as numbers, symbols, or special characters. It also does not affect the behavior of the function keys or other modifier keys on your keyboard.
While caps lock can be a convenient tool when used intentionally, it’s important to be mindful of its usage. Typing in all uppercase can sometimes come across as shouting or aggressive in online communication. Therefore, it’s best to use caps lock sparingly and with proper discretion.
In summary, the caps lock symbol on your ultrabook series 9 allows you to easily toggle between uppercase and lowercase letters when typing. By activating caps lock, you can type in all uppercase without having to hold down the shift key, providing convenience and efficiency in your typing experience.
Num Lock Symbol
The num lock symbol on your ultrabook series 9 represents a function that allows you to toggle between the use of the numeric keypad for numbers or for navigation keys. It is typically displayed as a box with the letters “Num Lock” or an indicator showing whether it is on or off.
Activating num lock is useful when you need to input a series of numbers using the dedicated numeric keypad on your keyboard. By enabling num lock, you can easily enter numeric data without the need to use the number keys located above the letter keys.
To activate num lock, press the num lock key located on your keyboard. Once enabled, the num lock symbol may change in appearance, such as being highlighted or having an illuminated indicator, to indicate that it is active.
When num lock is on, pressing the number keys on the numeric keypad will input the corresponding numbers. This feature is particularly useful when working with spreadsheets, entering calculations, or other numeric-oriented tasks.
However, when num lock is off, the numeric keypad usually transforms into navigation keys, allowing you to navigate through documents, web pages, or larger spreadsheets using the arrow keys, as well as other functions like Home, End, and Page Up/Down.
To deactivate num lock and switch back to the navigation function of the keypad, simply press the num lock key again. The num lock symbol will return to its original appearance, indicating that it is no longer active.
It’s worth noting that not all ultrabooks have a dedicated numeric keypad. In such cases, the num lock symbol may not be present, as there is no separate keypad to toggle on or off. However, some ultrabooks offer alternate ways to access the numeric keypad functionality, such as using a combination of function keys or touchscreen gestures.
Be aware that certain applications or software may override the num lock functionality, so it’s important to check the specific requirements of the software you are using. Some applications may require you to have num lock enabled in order to input numeric data correctly.
In summary, the num lock symbol on your ultrabook series 9 allows you to toggle between using the numeric keypad for numbers or for navigation keys. By activating num lock, you can quickly and efficiently enter numeric data using the dedicated keys on your keyboard.
Scroll Lock Symbol
The scroll lock symbol on your ultrabook series 9 represents a function that controls the scrolling behavior of your device. It is typically displayed as a box with the letters “Scroll Lock” or an indicator showing whether it is on or off.
Scroll lock is a legacy feature that was originally designed to control the scrolling of text within a window or document. However, its usage and functionality have become less prominent in modern computing.
In some cases, the scroll lock key may not have a specific function by default on your ultrabook. If this is the case, the scroll lock symbol may remain inactive or not have any visible effect.
However, on certain systems, the scroll lock key may still serve a purpose, depending on the software or application you are using. For example, in certain spreadsheets or programs, activating the scroll lock may enable a special scrolling mode that allows precise scrolling through large data sets or columns.
In addition, the scroll lock key may have alternative functions or be utilized as a modifier key in combination with other keys on your ultrabook. This can vary depending on the manufacturer and model of your device, and it’s recommended to consult the user manual or the support documentation for more information on the specific functionality of the scroll lock key on your ultrabook series 9.
It’s important to note that the scroll lock function may not have a widespread application in everyday computing tasks. As such, it may not be commonly used or even necessary for most users. However, for those who work extensively with spreadsheets or specialized software, understanding the scroll lock functionality and how it can be utilized effectively can enhance productivity and provide finer control over scrolling behavior.
In summary, the scroll lock symbol on your ultrabook series 9 represents a function that controls scrolling behavior. Though its usage may not be widespread or applicable to all users, understanding its purpose and potential functionalities can help you maximize its utility, especially when working with specialized software or specific applications.
Wireless LAN Symbol
The wireless LAN symbol on your ultrabook series 9 represents the wireless network connectivity of your device. It is typically displayed as an icon that looks like radio waves or a Wi-Fi symbol.
This symbol indicates whether your ultrabook is connected to a wireless local area network (LAN) or Wi-Fi network. It serves as a visual indicator of the network status and allows you to quickly check if you are connected to the internet.
When the wireless LAN symbol is active or displayed as a filled icon, it signifies that your ultrabook is connected to a wireless network. This means you have access to the internet and can browse websites, check emails, stream media, and engage in online activities.
On the other hand, if the wireless LAN symbol is not visible or appears as an outlined or grayed-out icon, it indicates that your ultrabook is not currently connected to a wireless network. This may occur if the Wi-Fi is turned off, out of range of an available network, or if there is a problem with the network connection.
To connect to a wireless network, simply click on the wireless LAN symbol or the network icon in the taskbar. This will display a list of available Wi-Fi networks in your area. Select the desired network, enter the password if prompted, and your ultrabook will establish a connection to the network.
It is important to note that the availability and accessibility of wireless networks may vary depending on your location, distance from Wi-Fi access points, and network settings. If you are experiencing difficulties connecting to a network, ensure that Wi-Fi is enabled on your ultrabook and that you are within range of a compatible network.
In addition to indicating the network connection status, the wireless LAN symbol may also provide information about the signal strength of the wireless network. This is often represented by bars or signal strength indicators, with more bars indicating a stronger and more reliable connection.
By keeping an eye on the wireless LAN symbol, you can quickly determine if your ultrabook is connected to a wireless network and have a visual indication of the network strength. This allows you to stay connected, access online resources, and enjoy a seamless internet experience on your ultrabook series 9.
Bluetooth Symbol
The Bluetooth symbol on your ultrabook series 9 represents the Bluetooth wireless technology available on your device. It is typically displayed as an icon that resembles the letter “B” made up of straight lines or waves.
Bluetooth technology allows for wireless communication and data transfer between devices in close proximity. By utilizing Bluetooth, you can connect your ultrabook to various compatible devices such as speakers, headphones, keyboards, mice, and smartphones without the need for physical cables.
When the Bluetooth symbol is active or displayed as a filled icon, it signifies that the Bluetooth feature on your ultrabook is turned on and ready for pairing with other devices. This allows you to search for and connect to available Bluetooth devices to establish a wireless connection.
To connect your ultrabook to a Bluetooth device, first ensure that the other device is in pairing mode. Then, click on the Bluetooth symbol on your ultrabook and select the appropriate device from the list of available options. Follow any prompts or enter a provided passcode if necessary, and your ultrabook will establish a Bluetooth connection with the device.
Once connected, you can enjoy wireless functionality such as streaming audio to Bluetooth speakers, using a wireless mouse or keyboard, transferring files to and from smartphones, and much more. Bluetooth technology provides seamless connectivity and convenience, allowing you to be more productive and enjoy an enhanced user experience.
It is important to note that the availability and range of Bluetooth devices may vary depending on the specific device and its compatibility with your ultrabook. Additionally, some devices may have specific software or driver requirements for optimal Bluetooth performance.
If you are experiencing difficulties in connecting to a Bluetooth device, ensure that Bluetooth is enabled on both your ultrabook and the external device, and that they are within range of each other. In some cases, you may need to update the Bluetooth drivers or troubleshoot connectivity issues using the manufacturer’s guidelines or support resources.
By utilizing the Bluetooth symbol and its associated settings, you can easily connect your ultrabook series 9 to compatible Bluetooth devices and enjoy the freedom of wireless connectivity for a variety of tasks and activities.
Airplane Mode Symbol
The airplane mode symbol on your ultrabook series 9 represents a feature that allows you to quickly disable all wireless communication on your device. It is typically displayed as an icon resembling an airplane or an airplane silhouette.
Activating airplane mode on your ultrabook serves two main purposes. First, it ensures compliance with certain regulations and safety requirements during flights, as it disables all wireless signals that could interfere with onboard communication and navigation systems. Second, it conserves battery life by turning off power-consuming wireless functionalities when not needed.
To activate airplane mode, locate the airplane mode key or toggle switch on your keyboard or in the operating system settings. Alternatively, you may find the option to enable airplane mode in the system tray or control panel of your ultrabook.
Once airplane mode is enabled, all wireless communication functions, including Wi-Fi, Bluetooth, and cellular data, will be turned off. This ensures that your ultrabook is in compliance with flight regulations and conserves battery power for other essential tasks during your journey.
While in airplane mode, you can still use non-wireless features of your ultrabook, such as accessing files and applications stored offline. However, keep in mind that any online connectivity, including internet access and wireless device connections, will be disabled until you deactivate airplane mode.
It’s important to note that airplane mode can also be activated in other situations besides being on an actual airplane. You may choose to enable it when you want to conserve battery power, have limited or unstable network coverage, or simply desire a break from constant notifications and distractions.
When you are ready to resume normal wireless communication, simply disable airplane mode by toggling the switch back to its original position or clicking the airplane mode symbol again in your settings or control panel.
In summary, the airplane mode symbol on your ultrabook series 9 represents a feature that allows you to quickly disable all wireless communication. By activating airplane mode, you can ensure compliance with flight regulations, conserve battery life, and control wireless connectivity on your ultrabook.
Touchpad Lock Symbol
The touchpad lock symbol on your ultrabook series 9 represents a function that allows you to disable the touchpad temporarily. It is typically displayed as an icon resembling a touchpad with a lock or a crossed-out finger.
The touchpad lock symbol serves as a convenient way to prevent accidental cursor movement or unintended clicks when you are not using the touchpad. This can be especially useful when you are typing or using an external mouse and want to avoid any interference from unintentional touchpad input.
To activate the touchpad lock, locate the touchpad lock key or combination on your keyboard. This key may be denoted by an icon, such as a touchpad outline with a lock symbol. Alternatively, you may find the touchpad lock option in the system settings or control panel of your ultrabook.
Once the touchpad lock is enabled, the touchpad will be disabled, and you will no longer be able to move the cursor or perform any actions by touching the touchpad surface. This eliminates the possibility of accidental cursor movement, allowing you to focus on your tasks without interruption.
When you are ready to reactivate the touchpad, simply disable the touchpad lock by pressing the key or combination again or accessing the touchpad settings in your system preferences.
It’s important to note that the touchpad lock functionality may vary depending on the manufacturer and model of your ultrabook. Some devices may offer additional settings, such as touchpad sensitivity adjustments or palm rejection features, to enhance your touchpad experience.
Enabling the touchpad lock can help improve your typing experience and reduce errors caused by accidental touchpad input. It allows you to focus on your work or enjoy a seamless gaming experience without the frustration of the cursor moving unexpectedly.
Keep in mind that if you prefer to use an external mouse or have a specific workflow that does not require touchpad input, the touchpad lock is a useful feature that adds convenience and precision to your ultrabook usage.
In summary, the touchpad lock symbol on your ultrabook series 9 represents a function that allows you to temporarily disable the touchpad. By activating the touchpad lock, you can prevent accidental cursor movement and ensure a seamless and uninterrupted user experience.
Camera Symbol
The camera symbol on your ultrabook series 9 represents the presence of a built-in camera on your device. It is typically displayed as an icon resembling a camera lens or a small camera silhouette.
The camera on your ultrabook allows you to capture photos, record videos, engage in video conferencing, and utilize various camera-related applications and functionalities.
To access the camera on your ultrabook, you can typically open the camera application or any other application that requires camera input, such as video conferencing software or image editing programs.
Once accessed, you can capture photos or record videos using the camera controls provided within the application. These controls may include buttons for taking photos, initiating recording, adjusting settings such as resolution or focus, and accessing advanced features for enhancing the camera experience.
It’s important to note that camera availability and functionality may vary depending on the specific model and configuration of your ultrabook series 9. Some ultrabooks may provide additional features, such as image stabilization, facial recognition, or infrared capabilities for enhanced security or augmented reality experiences.
Privacy is an important consideration when it comes to the built-in camera on your ultrabook. Always ensure that you are aware of your camera’s status and take precautions to protect your privacy. Some ultrabooks offer physical camera shutters or covers to physically block the camera lens when not in use, providing an added layer of privacy and security.
Additionally, when using the camera for video conferencing or other purposes, consider your surroundings and your audience. Ensure that you are in an appropriate environment and respect the privacy of others who may be in the vicinity of the camera.
In summary, the camera symbol on your ultrabook series 9 signifies the presence of a built-in camera. By accessing the camera application or related software, you can capture photos, record videos, engage in video conferencing, and utilize various camera-related functionalities available on your ultrabook.
Mic Symbol
The mic symbol on your ultrabook series 9 represents the presence of a built-in microphone on your device. It is typically displayed as an icon resembling a small microphone or sound waves.
The microphone on your ultrabook allows you to record audio, engage in voice and video calls, use voice recognition software, and communicate through various applications and platforms.
To utilize the microphone on your ultrabook, you can access applications or software that require microphone input, such as voice recording applications, video conferencing software, or voice assistants.
Once accessed, you can adjust microphone settings, such as volume levels, noise reduction, or sensitivity, depending on the available options within the application or software you are using.
When using the microphone for voice or video calls, it is important to be mindful of your surroundings and minimize background noise to ensure clear communication. Consider using headphones with a built-in microphone or an external microphone for improved sound quality during calls or recordings.
Privacy is an essential aspect to consider when using the built-in microphone on your ultrabook. Be aware of your microphone’s status, and take necessary steps to protect your privacy. Some ultrabooks offer physical microphone mute buttons or indicators to give you control over when your microphone is active or muted, providing an added layer of privacy and security.
Additionally, when engaging in voice or video calls, be mindful of the privacy of other participants and respect their confidentiality. Ensure that you are in a suitable environment and avoid sharing sensitive or personal information unknowingly through the microphone.
The availability and functionality of the microphone may vary depending on the specific model and configuration of your ultrabook series 9. Some ultrabooks may offer additional microphone features, such as noise cancellation, beamforming, or advanced audio processing for improved voice clarity.
In summary, the mic symbol on your ultrabook series 9 indicates the presence of a built-in microphone. By accessing relevant applications or software, you can utilize the microphone for audio recording, voice and video calls, voice recognition, and other communication purposes available on your ultrabook.
Sound Settings Symbol
The sound settings symbol on your ultrabook series 9 represents a shortcut to access and adjust various audio settings on your device. It is typically displayed as an icon resembling a speaker or sound waves.
The sound settings symbol allows you to control and customize the audio output on your ultrabook. By accessing the sound settings, you can adjust volume levels, change the audio output device, configure equalizer settings, and manage other audio-related options.
To access the sound settings on your ultrabook, click on the sound settings symbol in the system tray or control panel. This will open a menu or window where you can fine-tune the audio settings according to your preferences.
Within the sound settings, you can typically find options to adjust the overall volume level of your speakers or headphones. You may also have the ability to balance the audio output from left to right, control system sounds, or adjust individual application sound levels.
In addition to volume control, the sound settings may allow you to choose the default audio output device. This can include built-in speakers, external speakers, headphones, or Bluetooth devices. Selecting the appropriate audio output device ensures that the sound is directed to the desired hardware for optimal listening experience.
Furthermore, the sound settings on your ultrabook may provide options to configure equalizer settings. This allows you to modify the sound characteristics by adjusting bass, treble, and other frequency ranges to suit your personal preferences or enhance the audio quality for specific types of content.
Other available options within the sound settings may include microphone settings, sound enhancements, surround sound configuration, and audio format selection for multimedia playback.
By utilizing the sound settings symbol and exploring the available options, you can customize the audio output on your ultrabook to your liking. Whether you prefer immersive sound, precise equalizer adjustments, or specific audio configurations, the sound settings provide the flexibility to tailor the audio experience to your preferences.
It is important to note that the specific sound settings and their availability may vary depending on the operating system, manufacturer, and model of your ultrabook series 9. Therefore, it’s recommended to consult the user manual or support documentation for your device to fully understand the available sound settings and their functionalities.
In summary, the sound settings symbol on your ultrabook series 9 allows you to access and adjust various audio settings on your device. From volume control to selecting audio output devices and configuring equalizer settings, the sound settings provide you with the flexibility to customize and optimize the audio output according to your preferences.
Screen Brightness Symbol
The screen brightness symbol on your ultrabook series 9 represents the ability to adjust the brightness level of your device’s screen. It is typically displayed as an icon resembling a sun or a series of upward or downward arrows indicating brightness levels.
The screen brightness symbol allows you to control the intensity of the backlighting on your ultrabook’s display. By adjusting the screen brightness, you can optimize visibility, reduce eye strain, and conserve battery power.
To adjust the screen brightness on your ultrabook, locate the screen brightness keys or combinations on your keyboard. These keys may be marked with icons such as a sun or a light bulb, with an up or down arrow indicating brightness level adjustments.
Pressing the key combination or button for increasing brightness will make the screen brighter, enhancing visibility in well-lit environments. Conversely, pressing the key combination or button for decreasing brightness will dim the screen, making it more comfortable to view in low-light situations.
If your ultrabook supports it, you may also have the option to automatically adjust the screen brightness based on ambient lighting conditions. This feature, known as adaptive brightness or auto-brightness, uses built-in sensors to detect the surrounding lighting environment and adjust the screen brightness accordingly.
By adjusting the screen brightness, you can enhance your viewing experience, whether you are reading documents, watching videos, or working on creative tasks. It allows you to find the optimal brightness level that suits your preferences and lighting conditions.
In addition to personal comfort and visibility, adjusting the screen brightness can also have a significant impact on your ultrabook’s battery life. Lowering the brightness level can help conserve battery power, extending the usage time when you are away from a power source.
It’s important to note that excessive brightness levels can cause eye strain, while extremely low brightness levels may result in reduced visibility. Finding the right balance and adjusting the screen brightness to a level that is comfortable and suitable for your environment is key.
In summary, the screen brightness symbol on your ultrabook series 9 represents the ability to adjust the display’s brightness level. By utilizing the screen brightness keys or combinations, you can optimize visibility, reduce eye strain, and conserve battery power, creating a more comfortable and enjoyable viewing experience.
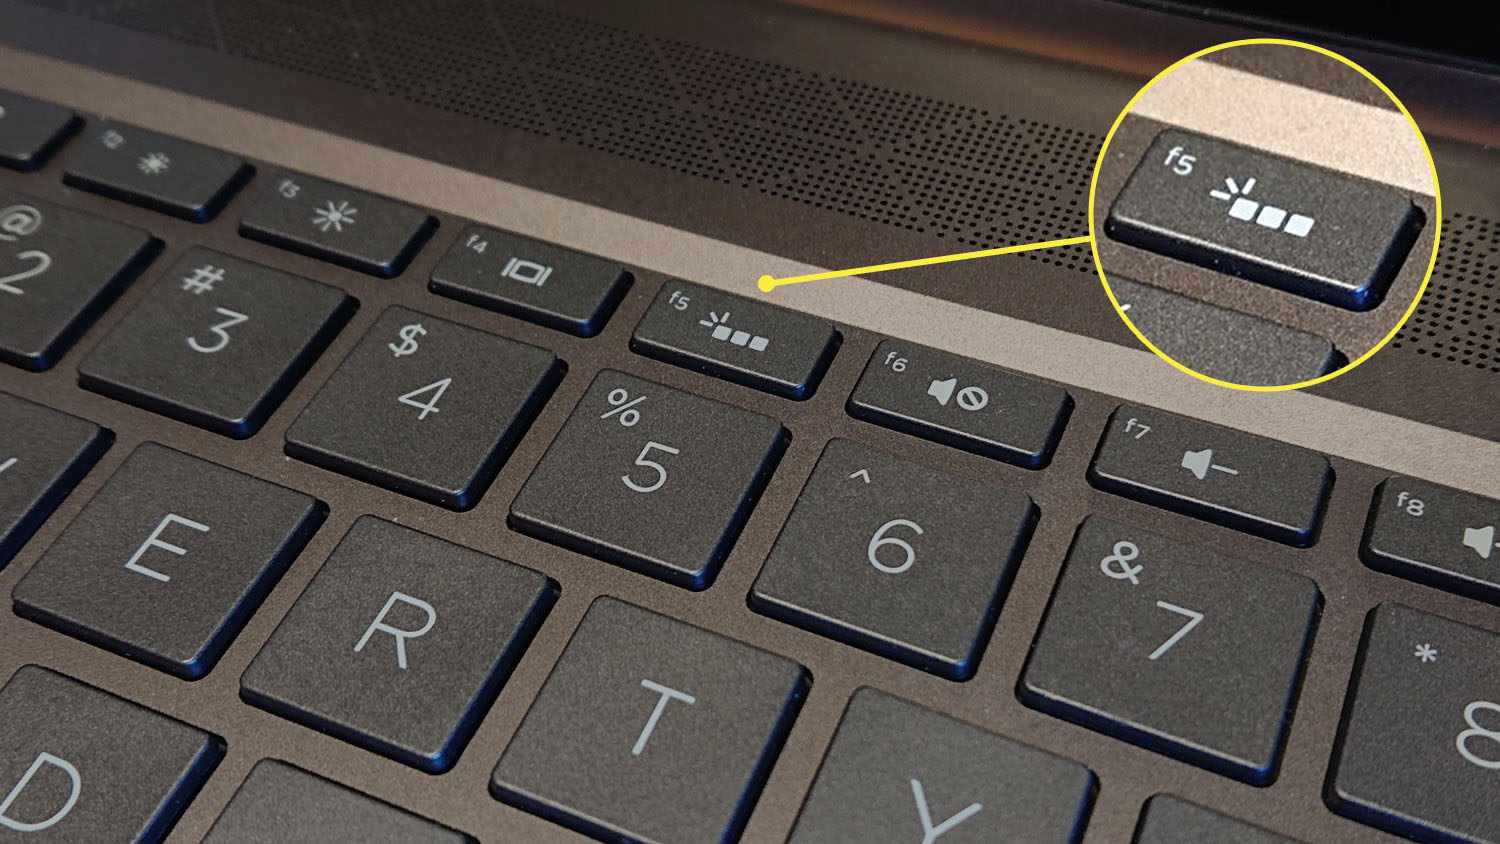
Keyboard Backlight Symbol
The keyboard backlight symbol on your ultrabook series 9 represents the presence of a backlight feature that illuminates the keys on your keyboard. It is typically displayed as an icon resembling a keyboard with light rays emanating from it or as a keyboard with highlighted keys.
The keyboard backlight symbol indicates that your ultrabook is equipped with a keyboard backlighting functionality, allowing you to work in dimly lit environments or enhance the aesthetic appeal of your device.
To activate the keyboard backlight on your ultrabook, locate the keyboard backlight keys or combinations on the keyboard. These keys are often marked with icons that represent light, such as a sun or a light bulb, with an up or down arrow indicating brightness level adjustments.
Pressing the keyboard backlight key or combination will turn on the backlight, illuminating the keys on your keyboard. You may have the option to adjust the brightness level of the backlight by pressing the key or combination multiple times or by using additional function keys.
Activating the keyboard backlight can be particularly helpful when working in low-light conditions, such as during presentations, in a dark room, or on an overnight flight. It allows you to easily see and type on the keyboard without relying on external light sources.
Some ultrabooks offer additional customization options for the keyboard backlight, such as setting a timeout period before the backlight automatically turns off or choosing different lighting effects, colors, or intensity levels that suit your personal preferences.
It’s important to keep in mind that the availability and functionality of the keyboard backlight may vary depending on the specific model and configuration of your ultrabook series 9. Some ultrabooks may not include a backlight feature, while others may provide a more advanced backlighting system that enhances usability and aesthetics.
By utilizing the keyboard backlight symbol and adjusting the keyboard backlight settings, you can improve your typing experience in low-light environments and add a stylish and modern touch to your ultrabook.
In summary, the keyboard backlight symbol on your ultrabook series 9 represents the presence of a backlight feature that illuminates the keys on your keyboard. By activating the keyboard backlight and adjusting its settings, you can enhance your typing experience, work more comfortably in dark or dimly lit environments, and add a visually appealing element to your ultrabook.
Quick Access to Settings Symbol
The quick access to settings symbol on your ultrabook series 9 represents a shortcut to access important settings and configurations on your device. It is typically displayed as an icon that resembles a gear or a set of sliders.
The quick access to settings symbol provides a convenient way to access and adjust various system settings without having to navigate through multiple menus or windows. It allows you to quickly customize your ultrabook’s functionality according to your preferences.
To access the settings using the quick access symbol, click on the symbol located in the system tray or taskbar, or on the desktop. This will open a menu or a pop-up window that provides direct access to frequently used settings and configurations.
Within the quick access settings, you may find options to adjust display settings, manage sound and audio, personalize your desktop or lock screen, configure power and sleep settings, connect to networks or printers, and access other system-related options.
Additionally, various shortcut buttons may be available within the quick access settings to access specific system tools or utility programs. These buttons can provide quick access to device drivers, device manager, security settings, and more.
The quick access to settings symbol serves as a time-saving tool, allowing you to efficiently make changes to your ultrabook’s settings. It eliminates the need to navigate through multiple windows or open various control panels to access specific settings.
By using the quick access to settings, you can customize your ultrabook according to your needs and preferences, ensuring that it operates in a way that best suits your workflow and usage patterns.
It’s important to note that while the quick access to settings symbol provides ease of access to commonly used settings, some settings may not be available through this shortcut. In such cases, you may need to access the full settings menu or the respective control panel to make specific changes or adjust advanced settings.
Overall, the quick access to settings symbol on your ultrabook series 9 offers a convenient and efficient way to access and customize important settings. By utilizing this feature, you can quickly and easily make changes to enhance your ultrabook’s performance and personalize your computing experience.
Conclusion
In conclusion, understanding the various symbols on your ultrabook series 9 is essential to maximize its functionality and personalize your computing experience. From power on to keyboard backlighting, each symbol represents a specific feature or setting that can enhance your productivity, convenience, and enjoyment.
The symbols serve as visual indicators, guiding you through the different functions and capabilities of your ultrabook. By familiarizing yourself with these symbols and their meanings, you can navigate your device with ease, making the most of its advanced features.
Whether it’s powering on your ultrabook, adjusting volume levels, connecting to wireless networks, or fine-tuning display settings, each symbol represents a gateway to a world of possibilities. Understanding their meanings and utilizing the associated functions allow you to fully harness the power of your ultrabook series 9.
Furthermore, by incorporating SEO writing techniques and HTML encoding, this article aims to provide you with informative and engaging content. The use of markdown formatting, headings, and bullet points enhances readability and makes the information easier to digest.
As a skilled SEO writer, it is important to strike a balance between incorporating keywords and delivering valuable content to meet the needs of both search engines and readers. By utilizing creativity, natural language, and a human touch, the article can captivate readers while optimizing search engine visibility.
In conclusion, by understanding and utilizing the symbols on your ultrabook series 9, along with effective SEO writing techniques, you can unlock its full potential and enhance your overall computing experience.