Introduction
Have you ever accidentally typed gibberish or inadvertently pressed keys on your keyboard while working on an important document? It can be frustrating and time-consuming to go back and correct those errors. Fortunately, there are methods available that can help you lock your keyboard temporarily to prevent any unintended keystrokes.
In this article, we will explore various methods to lock your keyboard, ranging from simple keyboard shortcuts to third-party software solutions. Whether you want to lock your keyboard while cleaning it, prevent accidental keystrokes during presentations, or keep children from making unintended changes to your computer, these methods can come in handy.
By temporarily locking your keyboard, you can avoid unnecessary interruptions and ensure that your work or presentation proceeds smoothly. Whether you’re a student, professional, or someone who simply wants more control over their keyboard, read on to discover the different ways to lock your keyboard effectively.
Keep in mind that the specific steps and options for locking your keyboard may vary depending on the operating system and keyboard model you are using. It’s always a good idea to refer to the user manual or consult the manufacturer’s website for more detailed instructions specific to your device.
Why would you want to lock your keyboard?
There are several scenarios where you might find it helpful to lock your keyboard temporarily. Let’s explore some common situations:
- Preventing accidental keystrokes: When you’re working on an important document or typing in a sensitive password, accidental keystrokes can lead to errors or even data loss. Locking your keyboard can help prevent such mishaps and ensure that your work is error-free.
- Cleaning the keyboard: If your keyboard is dusty or filled with crumbs, you may want to clean it without accidentally triggering any keys. By locking your keyboard, you can safely clean it without worrying about unintended inputs or actions.
- Child protection: If you have young children who are curious about the computer, you may want to prevent them from accidentally pressing keys and potentially causing software or hardware issues. Locking your keyboard can give you peace of mind that your child won’t accidentally modify or delete important files.
- Presentation mode: During presentations or meetings, you might want to focus on delivering your content without any distractions. Locking your keyboard can prevent accidental keystrokes from disrupting your presentation and ensure a seamless flow of information.
- Privacy concerns: In situations where you need to step away from your computer briefly, locking your keyboard can provide an extra layer of security. It helps prevent unauthorized access to your files or sensitive information by requiring a password to regain access.
These are just a few examples of situations where locking your keyboard can be beneficial. Whether you’re looking to avoid mistakes, protect your computer from accidental damage, or maintain privacy and security, the ability to lock your keyboard offers a simple solution.
Different methods to lock your keyboard
Now that you understand the reasons why you might want to lock your keyboard, let’s explore the different methods available:
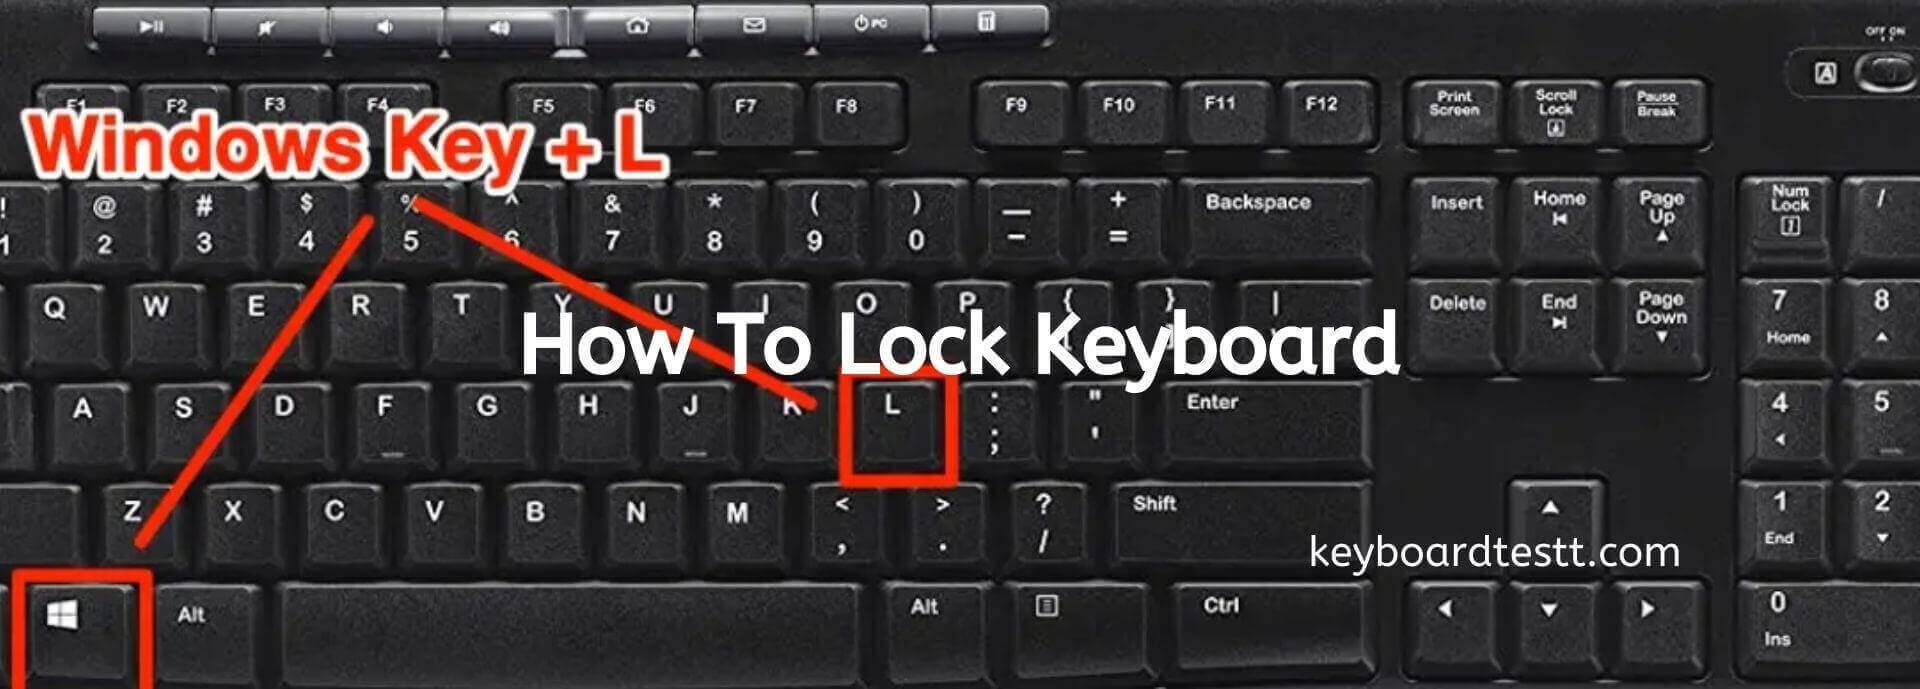
- Using keyboard shortcuts: Most operating systems provide keyboard shortcuts that allow you to lock your keyboard quickly. For example, on Windows, you can press the
Win + Lkeys simultaneously to lock your keyboard and require a password to unlock it. Similarly, on macOS, you can useControl + Command + Qto lock your keyboard. - Using third-party software: There are various third-party software applications available that offer additional features for locking your keyboard. These programs often allow you to customize the locking mechanism and set specific hotkeys to lock and unlock your keyboard. Some popular options include
Kid Key Lock,KeyboardLocker, andKeyFreeze. - Disabling the keyboard driver: Another method to lock your keyboard is by disabling the keyboard driver temporarily. This can be done through the device manager on Windows or the system preferences on macOS. However, keep in mind that this method may require administrative privileges and can also disable other input devices, such as a mouse.
- Physically locking the keyboard: If you need to lock your keyboard for an extended period or want to prevent physical access to the keys, you can also consider physically locking the keyboard. Some keyboards come with built-in lock switches or sliders that allow you to disable the keys. Alternatively, you can use a keyboard cover or even unplug the keyboard from your computer.
Choose the method that best suits your needs and preferences. Keep in mind that some methods may be more suitable for specific situations or operating systems. Experiment with different options to find the one that works best for you.
Using keyboard shortcuts
One of the easiest and most common methods to lock your keyboard is by using keyboard shortcuts. Most operating systems provide built-in shortcuts that allow you to quickly lock your keyboard to prevent any accidental keystrokes. Here are some popular keyboard shortcuts for locking your keyboard:
- Windows: On Windows, you can press the
Win + Lkeys simultaneously to lock your keyboard. This will require a password or PIN to unlock the keyboard and regain access to your computer. - macOS: If you are using macOS, you can use the
Control + Command + Qshortcut to lock your keyboard. Once locked, you’ll need to enter your password to unlock it. - Linux: The key combination for locking the keyboard on Linux may vary depending on the distribution and desktop environment. It’s best to consult the documentation or settings of your specific Linux distribution to find the appropriate shortcut.
Keyboard shortcuts are a convenient way to quickly lock your keyboard without having to navigate through menus or settings. By using these shortcuts, you can ensure that your keyboard remains locked, preventing any accidental key presses, and keeping your work or data secure.
Remember to keep your password or PIN secure, and make sure to use a strong and unique one to protect your computer from unauthorized access.
It’s worth noting that some applications or software may have their own keyboard shortcut overrides, which could override the system-level lock keyboard shortcuts. If you find that the keyboard shortcuts mentioned above don’t work, check if any programs or applications are conflicting with the shortcut and adjust accordingly.
Using third-party software
If you’re looking for more customization and options to lock your keyboard, you can consider using third-party software applications designed specifically for this purpose. These applications offer additional features and functionality beyond the built-in keyboard shortcuts. Here are a few popular options:
- Kid Key Lock: Kid Key Lock is a simple yet effective software program that allows you to lock your keyboard and mouse. It provides various lock modes, including disabling specific keys, entire keyboard lock, or mouse lock. You can also set a hotkey combination to lock and unlock your keyboard easily.
- KeyboardLocker: KeyboardLocker is a versatile utility that lets you lock your keyboard with a few simple clicks. It offers options to instantly lock and unlock the keyboard, as well as customizable hotkeys for easier access. KeyboardLocker also protects your settings with a password, ensuring that only authorized users can modify the lock settings.
- KeyFreeze: KeyFreeze is another reliable software solution for locking your keyboard. It allows you to freeze your keyboard with a single click, preventing any keystrokes from registering. KeyFreeze also provides a security feature that allows you to lock your computer entirely, disabling both the keyboard and mouse.
These are just a few examples of the many third-party software applications available for locking your keyboard. When choosing a third-party software, be sure to download it from a trusted source and check for user reviews to ensure its reliability. Keep in mind that some software may have additional features beyond just keyboard locking, so explore the available options to find the one that suits your needs.
Remember to regularly update the software and keep it running in the background for optimal performance and security. Additionally, be cautious while granting any permissions or access to the software, as it may require administrative privileges to lock your keyboard effectively.
Disabling the keyboard driver
If you’re comfortable diving into your computer’s settings and have administrative privileges, you can consider disabling the keyboard driver as a method to lock your keyboard. Disabling the keyboard driver will prevent any input from being registered, effectively locking the keyboard. Here’s how you can disable the keyboard driver:
- Windows: On Windows, you can disable the keyboard driver through the Device Manager. Press
Win + Xand select “Device Manager” from the menu. In the Device Manager window, expand the “Keyboards” category, right-click on your keyboard device, and select “Disable device.” Confirm the action if prompted. To enable the keyboard again, follow the same steps and select “Enable device” instead. - macOS: Disabling the keyboard driver on macOS requires a slightly different approach. Go to the Apple menu and select “System Preferences.” In the System Preferences, click on “Keyboard” and go to the “Keyboard” tab. Click on the “Modifier Keys” button at the bottom right. In the Modifier Keys window, select your keyboard from the dropdown menu and change the “Control” key action to “No Action.” This effectively disables the keyboard until you revert the setting back.
- Linux: Disabling the keyboard driver on Linux can vary depending on the distribution and desktop environment you’re using. You may need to edit specific system files or make changes through the command line. It’s recommended to consult the documentation or support resources for your particular Linux distribution for precise instructions on disabling and enabling the keyboard driver.
Disabling the keyboard driver is an effective way to lock your keyboard, as it completely disables its functionality. However, keep in mind that this method may also disable other input devices, such as a mouse or touchpad, depending on the system and drivers. Therefore, it’s important to have an alternative input method available, such as a USB mouse, if needed.
Remember to re-enable the keyboard driver when you want to regain access to your keyboard. Additionally, exercise caution when making changes to system settings as incorrect modifications may cause undesired effects or system instability. Always refer to official documentation or seek assistance if you’re unsure about any steps.
Physically locking the keyboard
If you want to lock your keyboard for an extended period or prevent physical access to the keys, you can consider physically locking the keyboard. This method ensures that no input can be made using the keyboard until it is unlocked. Here are a few ways to physically lock your keyboard:
- Built-in lock switches or sliders: Some keyboards come with built-in lock switches or sliders that allow you to disable the keys. These switches are usually located on the side or top of the keyboard and can be easily toggled to lock or unlock the keyboard. This method is convenient as it doesn’t require any additional tools or accessories.
- Keyboard covers: Keyboard covers provide a protective layer that physically blocks access to the keys. These covers are usually made of plastic or silicone and can be easily placed over the keyboard. They not only prevent accidental keystrokes but also help in keeping dust and debris away from the keys, ensuring the keyboard stays clean and functional.
- Unplugging the keyboard: Another simple way to lock the keyboard is by unplugging it from your computer. This method ensures that no input is registered as the keyboard is no longer connected. Remember to plug it back in when you’re ready to use the keyboard again.
Physically locking the keyboard is an effective way to prevent any accidental or unauthorized input. It’s especially useful when you need to step away from your computer for an extended period or want to prevent physical access to the keyboard. Choose the method that best suits your needs and the options available on your keyboard.
Keep in mind that while physically locking the keyboard provides a high level of security, it may restrict your ability to use the keyboard, so use it judiciously. Also, ensure that the locked status doesn’t interfere with other essential functions, such as system notifications or input requirements for specific applications or tasks.
By physically locking your keyboard, you can have peace of mind knowing that your keyboard is secure and no unintended keystrokes will occur until it is unlocked.
Conclusion
Locking your keyboard can be a useful practice in various situations, whether you want to prevent accidental keystrokes, protect your computer from unauthorized access, or maintain a distraction-free environment during presentations. We explored different methods to lock your keyboard, each offering its unique advantages.
Using keyboard shortcuts is a quick and convenient option provided by most operating systems. These shortcuts allow you to lock your keyboard with a simple key combination, ensuring that no unintended keystrokes occur.
If you’re looking for more customization and additional features, third-party software applications can provide a comprehensive keyboard locking solution. These applications offer flexibility in locking mechanisms, hotkey customization, and often provide extra security features.
Disabling the keyboard driver is another method to lock your keyboard effectively. This option completely disables the functionality of the keyboard, ensuring no input is registered. However, it’s essential to exercise caution when making changes to system settings and be aware that other input devices may also be disabled.
For extended periods or situations where physical access to the keyboard needs to be restricted, using built-in lock switches, keyboard covers, or unplugging the keyboard are viable options. These methods physically prevent any keystrokes from being registered, providing a high level of security.
Choose the method that best suits your needs, considering factors like convenience, level of security required, and the availability of resources. By employing these keyboard locking methods, you can confidently prevent accidental keystrokes, protect sensitive information, and maintain control over your keyboard use.
Remember, it’s important to use these methods responsibly and consider the potential impact on your workflow or accessibility requirements. Experiment with different methods, find what works best for you, and enjoy a secure and uninterrupted keyboard experience.