Introduction
Google Calendar is a powerful tool that helps you stay organized and manage your schedule effectively. By default, your Google Calendar is private, meaning only you can see the events and appointments you have added. However, there may be times when you need to share your calendar with others, whether it’s colleagues, clients, or family members.
In this article, we will explore how to make your Google Calendar public, allowing others to view your schedule without needing a Google account. We will discuss the benefits of making your calendar public, walk you through the step-by-step process, and provide tips on managing and customizing the privacy settings.
Sharing your Google Calendar publicly can be incredibly useful, especially in professional settings. For example, if you are a freelancer, consultant, or business owner, making your calendar public can give potential clients a glimpse into your availability. This can streamline the scheduling process and increase efficiency. Similarly, in a team or collaborative environment, sharing your calendar can help colleagues see when you are available for meetings or projects.
On a personal level, making your calendar public can be valuable for sharing important dates and events with family and friends. Whether it’s coordinating family gatherings, planning vacations, or simply keeping loved ones informed, a public calendar can simplify communication and ensure everyone stays on the same page.
Before we dive into the steps, it’s essential to note that making your calendar public does not mean you are giving others full access or control over your events. You can still maintain control over privacy settings and choose which details to display. It only allows others to see when you are available and when you have scheduled events.
Now that we understand the benefits and importance of making your Google Calendar public, let’s proceed to the next section to learn how to get started with sharing your schedule.
Why Make Your Google Calendar Public
There are several reasons why you might want to make your Google Calendar public. By sharing your calendar with others, you can enhance collaboration, streamline scheduling, and improve communication. Let’s explore some key benefits of making your calendar public:
1. Easy scheduling: Sharing your public calendar allows others to see your availability without having to send multiple emails or make phone calls. This can simplify the process of scheduling meetings, appointments, or events, especially when dealing with multiple people or time zones.
2. Increased visibility: Making your calendar public can give others insight into your professional or personal commitments. For businesses or freelancers, this can be valuable for clients who need to book your time or view your availability. It can also help colleagues understand your workload and better plan collaborative projects.
3. Efficient coordination: Whether you’re planning a team meeting, a family gathering, or a social event, making your calendar public can improve coordination and avoid scheduling conflicts. People can easily check your calendar and find a suitable time slot without having to go back and forth with multiple suggestions.
4. Enhanced transparency: Sharing your calendar publicly fosters transparency in relationships, both professional and personal. By letting others see your schedule, you demonstrate trust and openness, creating a sense of transparency and accountability.
5. Simplified event sharing: When your calendar is public, you can easily share specific events or appointments with others. Instead of manually copying and pasting details, you can simply share the event’s URL, saving time and reducing the likelihood of errors.
6. Access from any device: A public Google Calendar can be accessed from any device with an internet connection. This makes it convenient for people to view your schedule, whether they are using a computer, smartphone, or tablet, regardless of the operating system.
7. Customizable privacy settings: While your calendar is public, you still have control over the privacy settings. You can choose which details to display, such as event titles, locations, or descriptions. This allows you to strike a balance between sharing your availability and maintaining the confidentiality of certain events.
By making your Google Calendar public, you open up new possibilities for collaboration, communication, and efficient scheduling. Now that we understand the benefits, let’s move on to the step-by-step process of making your calendar public.
Step 1: Determine Which Calendars to Make Public
Before you make your Google Calendar public, it’s essential to decide which calendars you want to share. You may have multiple calendars, such as personal, work, or specific project calendars. Here’s how you can determine which calendars to make public:
1. Assess your sharing needs: Consider your specific requirements for sharing your calendar. Do you want to share only your personal calendar or also the work-related ones? Think about the audience for each calendar and what information you are comfortable making public.
2. Identify relevant calendars: Review all the calendars you have in your Google Calendar account. Identify the ones that contain events or appointments that you want to share with others. For example, you may want to make your personal calendar public for your family and close friends, while keeping work-related calendars private.
3. Consider privacy implications: Take into account any privacy concerns or sensitive information that may be present in certain calendars. Evaluate whether it’s appropriate to make those calendars public, or if it’s better to keep them private and only share specific events or appointments.
4. Prioritize calendars: If you have multiple calendars that you want to make public, prioritize them based on relevance or importance. This will help you stay organized and ensure that the most relevant information is easily accessible to others.
5. Consult with others: If you are sharing calendars with a team or group, it’s essential to discuss and agree upon which calendars should be made public. Ensure that everyone is on the same page and understands the implications of making specific calendars public.
By taking the time to assess and determine which calendars to make public, you can ensure that you share the right information with the right people. Once you have identified the calendars, you can proceed to the next step of adjusting the calendar settings to make them public.
Step 2: Adjust Calendar Settings
Once you have determined which calendars you want to make public in your Google Calendar, it’s time to adjust the settings to allow others to view your schedule. Follow these steps to adjust your calendar settings:
1. Open Google Calendar: Go to the Google Calendar website and sign in to your Google account. You can access your calendar from any computer or mobile device with an internet connection.
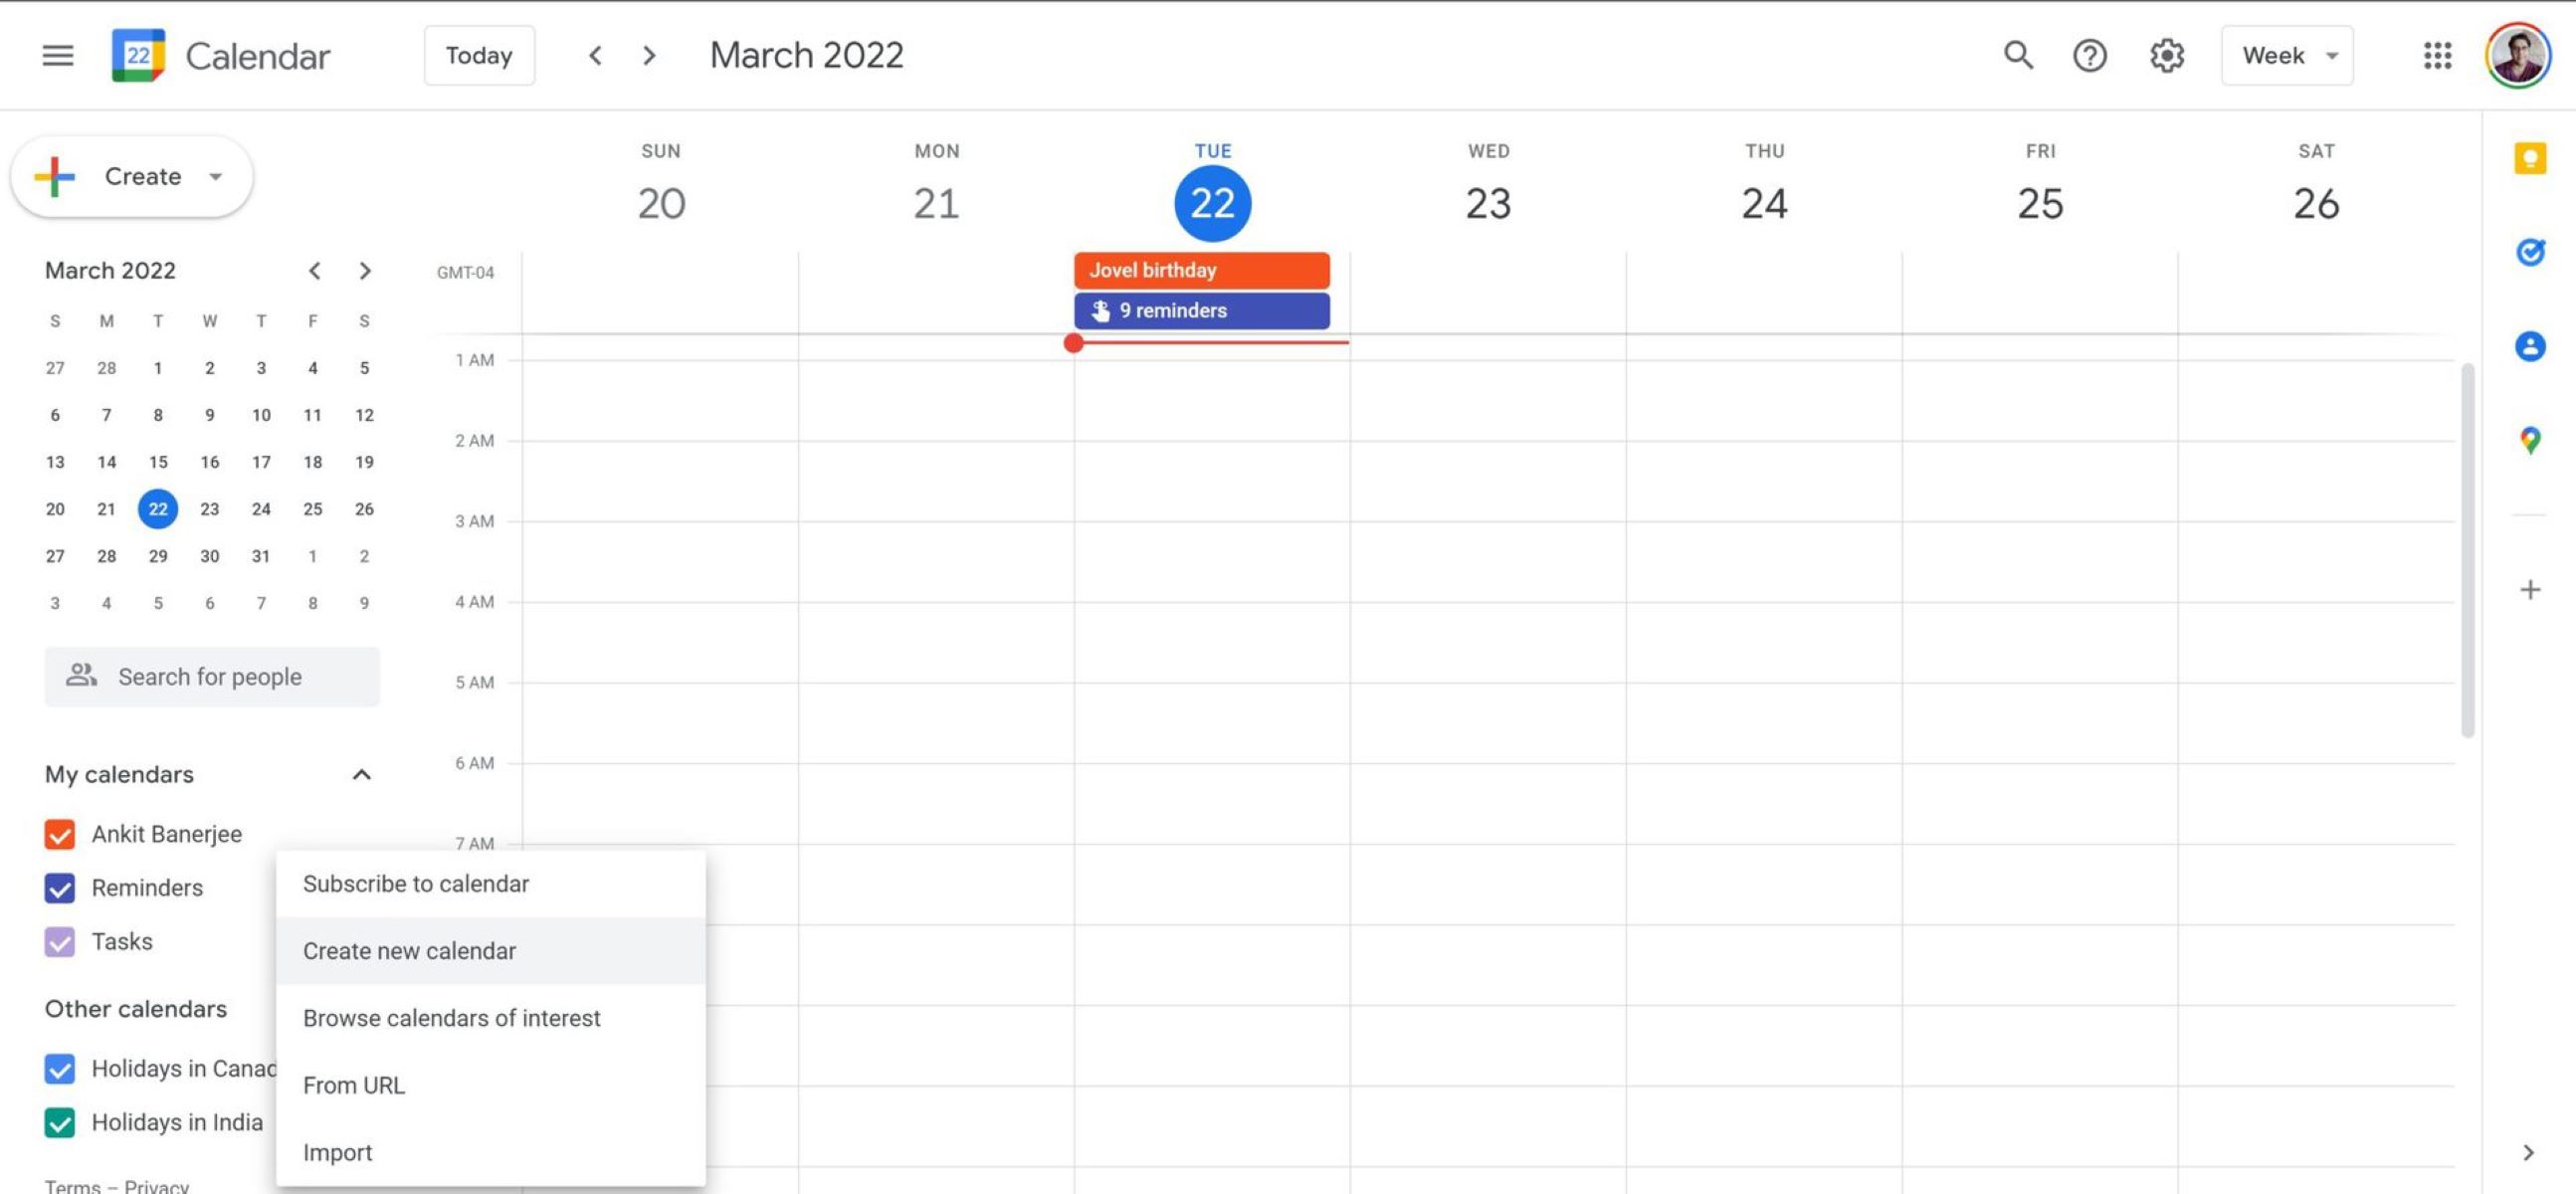
2. Select the calendar: On the left-hand side, you will see a list of calendars. Choose the calendar that you want to make public. You can click on the checkboxes to select or deselect calendars.
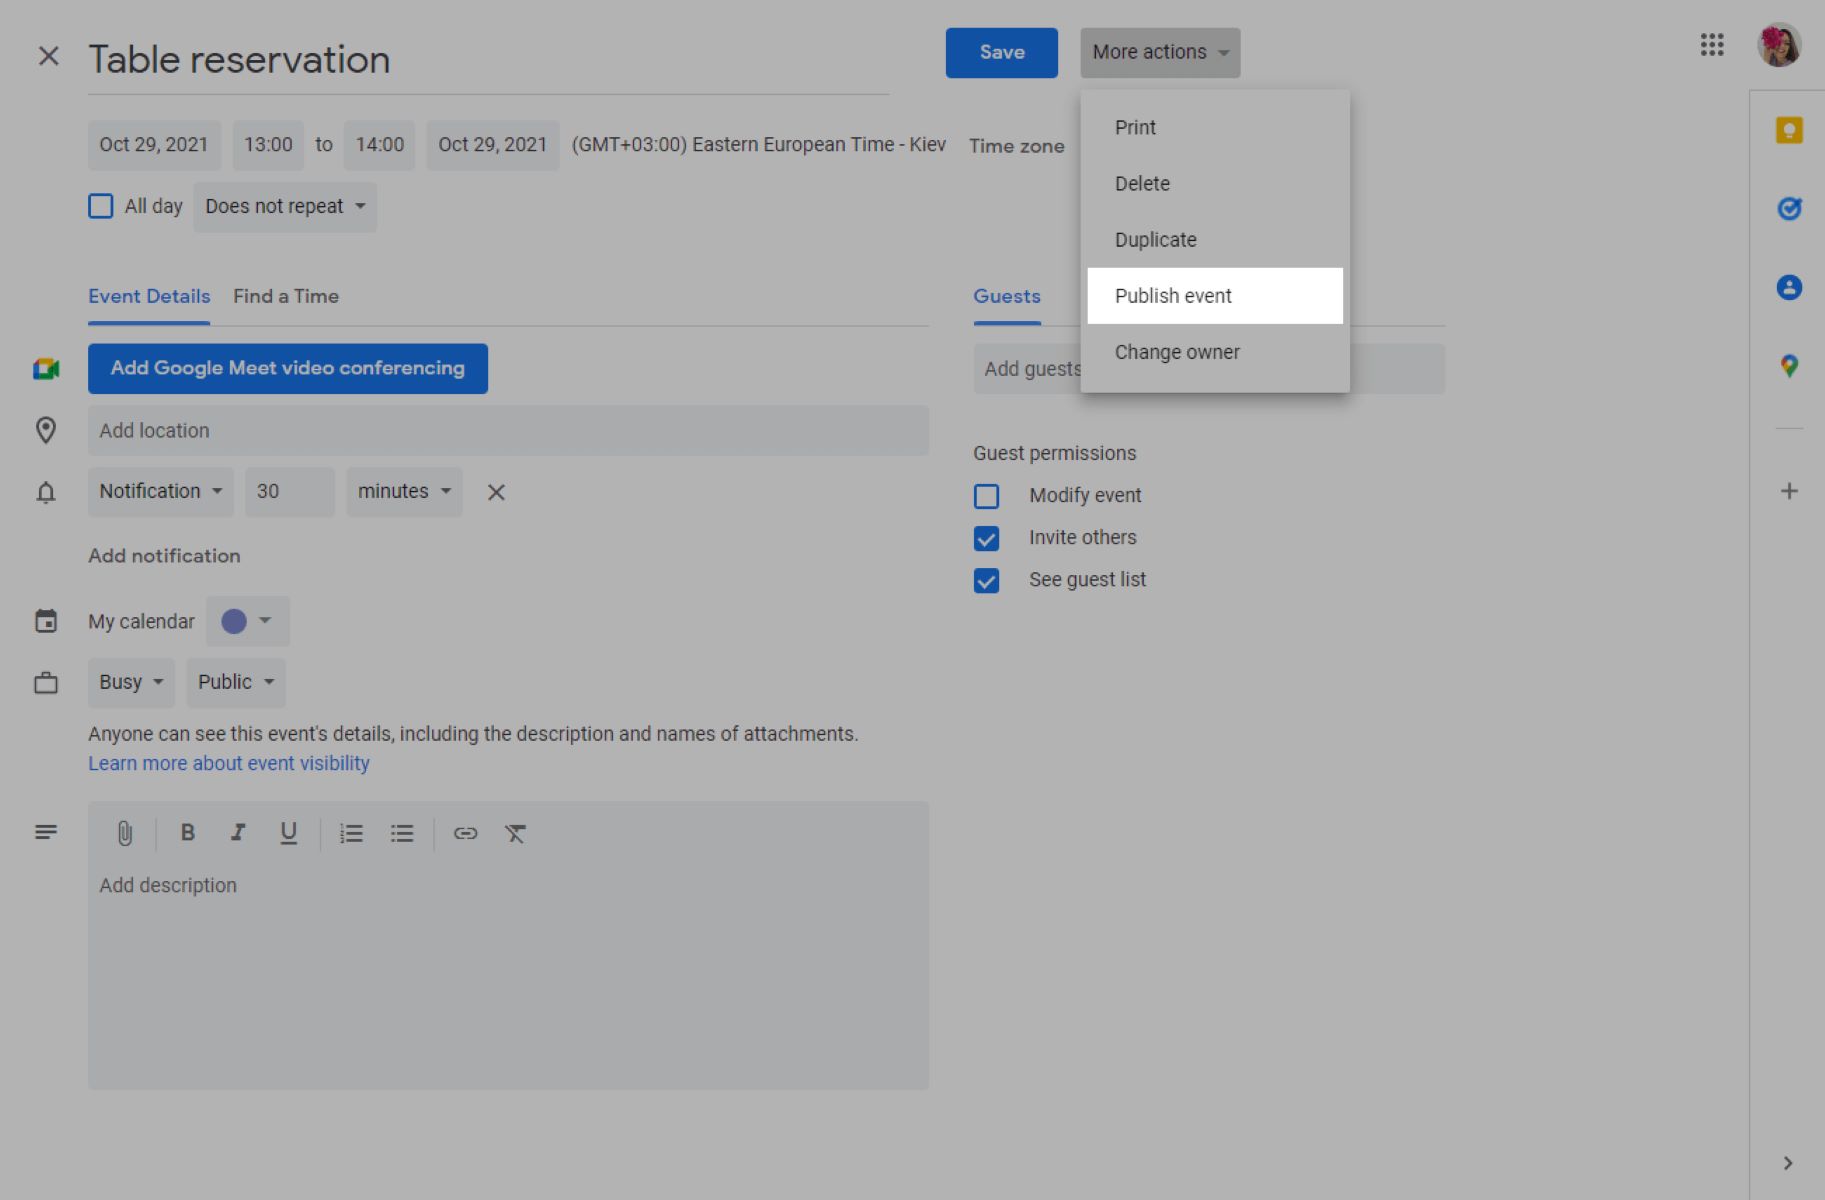
3. Click on the three vertical dots: Once you have selected the calendar, click on the three vertical dots next to its name. This will open a dropdown menu with several options.
4. Choose “Settings and sharing”: From the dropdown menu, select “Settings and sharing.” This will take you to the settings page for the selected calendar.
5. Scroll down to “Access permissions”: On the settings page, scroll down until you reach the “Access permissions” section. This is where you can adjust the sharing settings for the calendar.
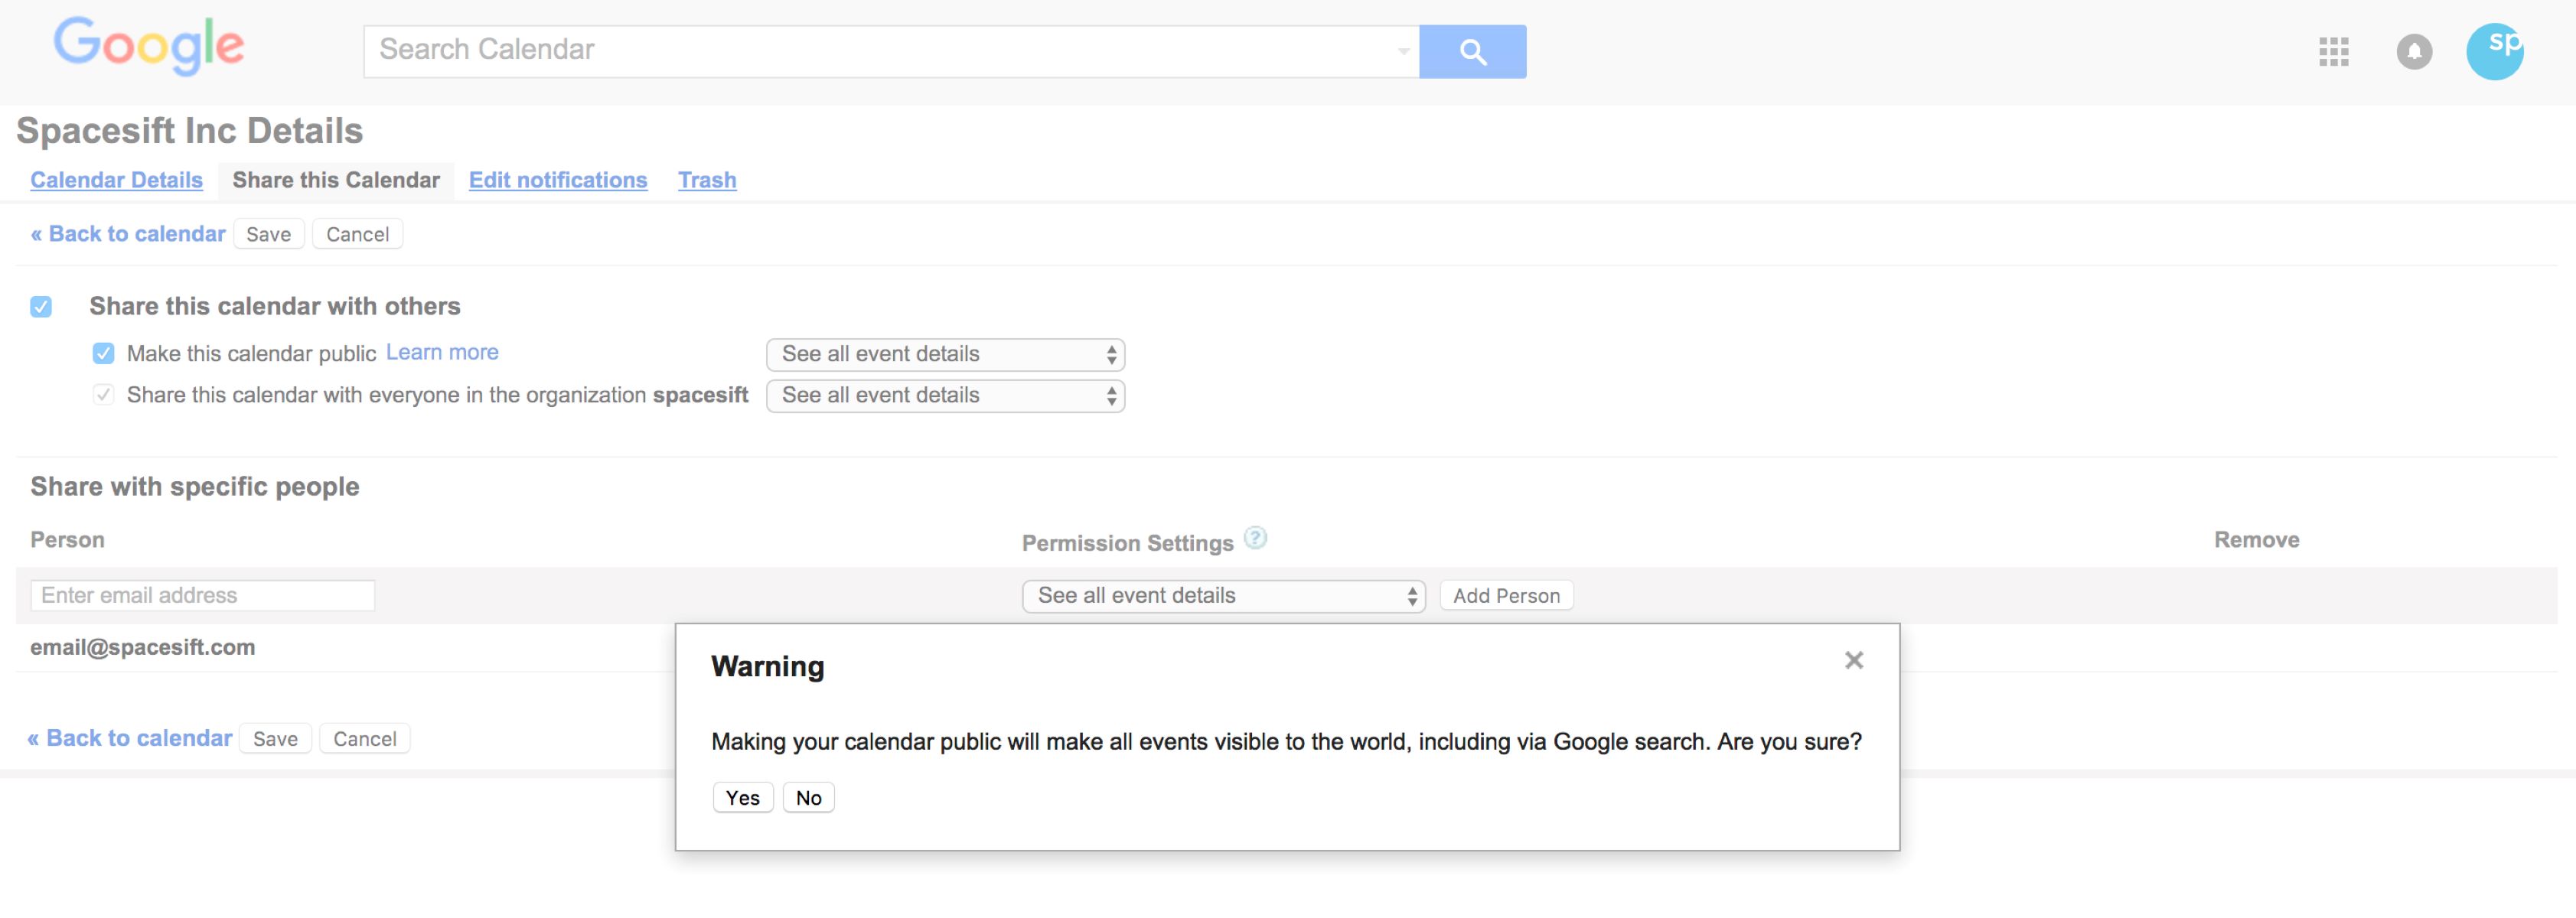
6. Make the calendar public: In the “Access permissions” section, you will see a toggle switch that says “Make available to public.” Click on the switch to turn it on and make your calendar public. This will allow anyone with the calendar’s URL to view it.
7. Customize other settings: While on the settings page, you can further customize your calendar’s visibility and permissions. For example, you can choose to display event details or only show free or busy times. You can also decide whether others can modify events or only view them.
8. Save your changes: Once you have adjusted the desired settings, don’t forget to save your changes. There will be a “Save” or “Done” button at the bottom or top right corner of the settings page. Click on it to save the new settings.
By following these steps, you will have successfully adjusted the calendar settings to make it public. Now, you can move on to the next step of sharing your public calendar URL with others.
Step 3: Share Your Public Calendar URL
Now that you have adjusted the settings to make your Google Calendar public, it’s time to share your calendar URL with others. The calendar’s URL is what allows people to view your schedule. Follow these steps to share your public calendar URL:
1. Open Google Calendar: Go to the Google Calendar website and sign in to your Google account. Make sure you are on the page displaying the calendar you want to share.
2. Find the calendar settings: Look for the settings for the calendar you want to share. This is usually represented by three vertical dots or a gear icon next to the calendar’s name.
3. Click on “Settings and sharing”: From the dropdown menu or options, select “Settings and sharing” to access the settings for the selected calendar.
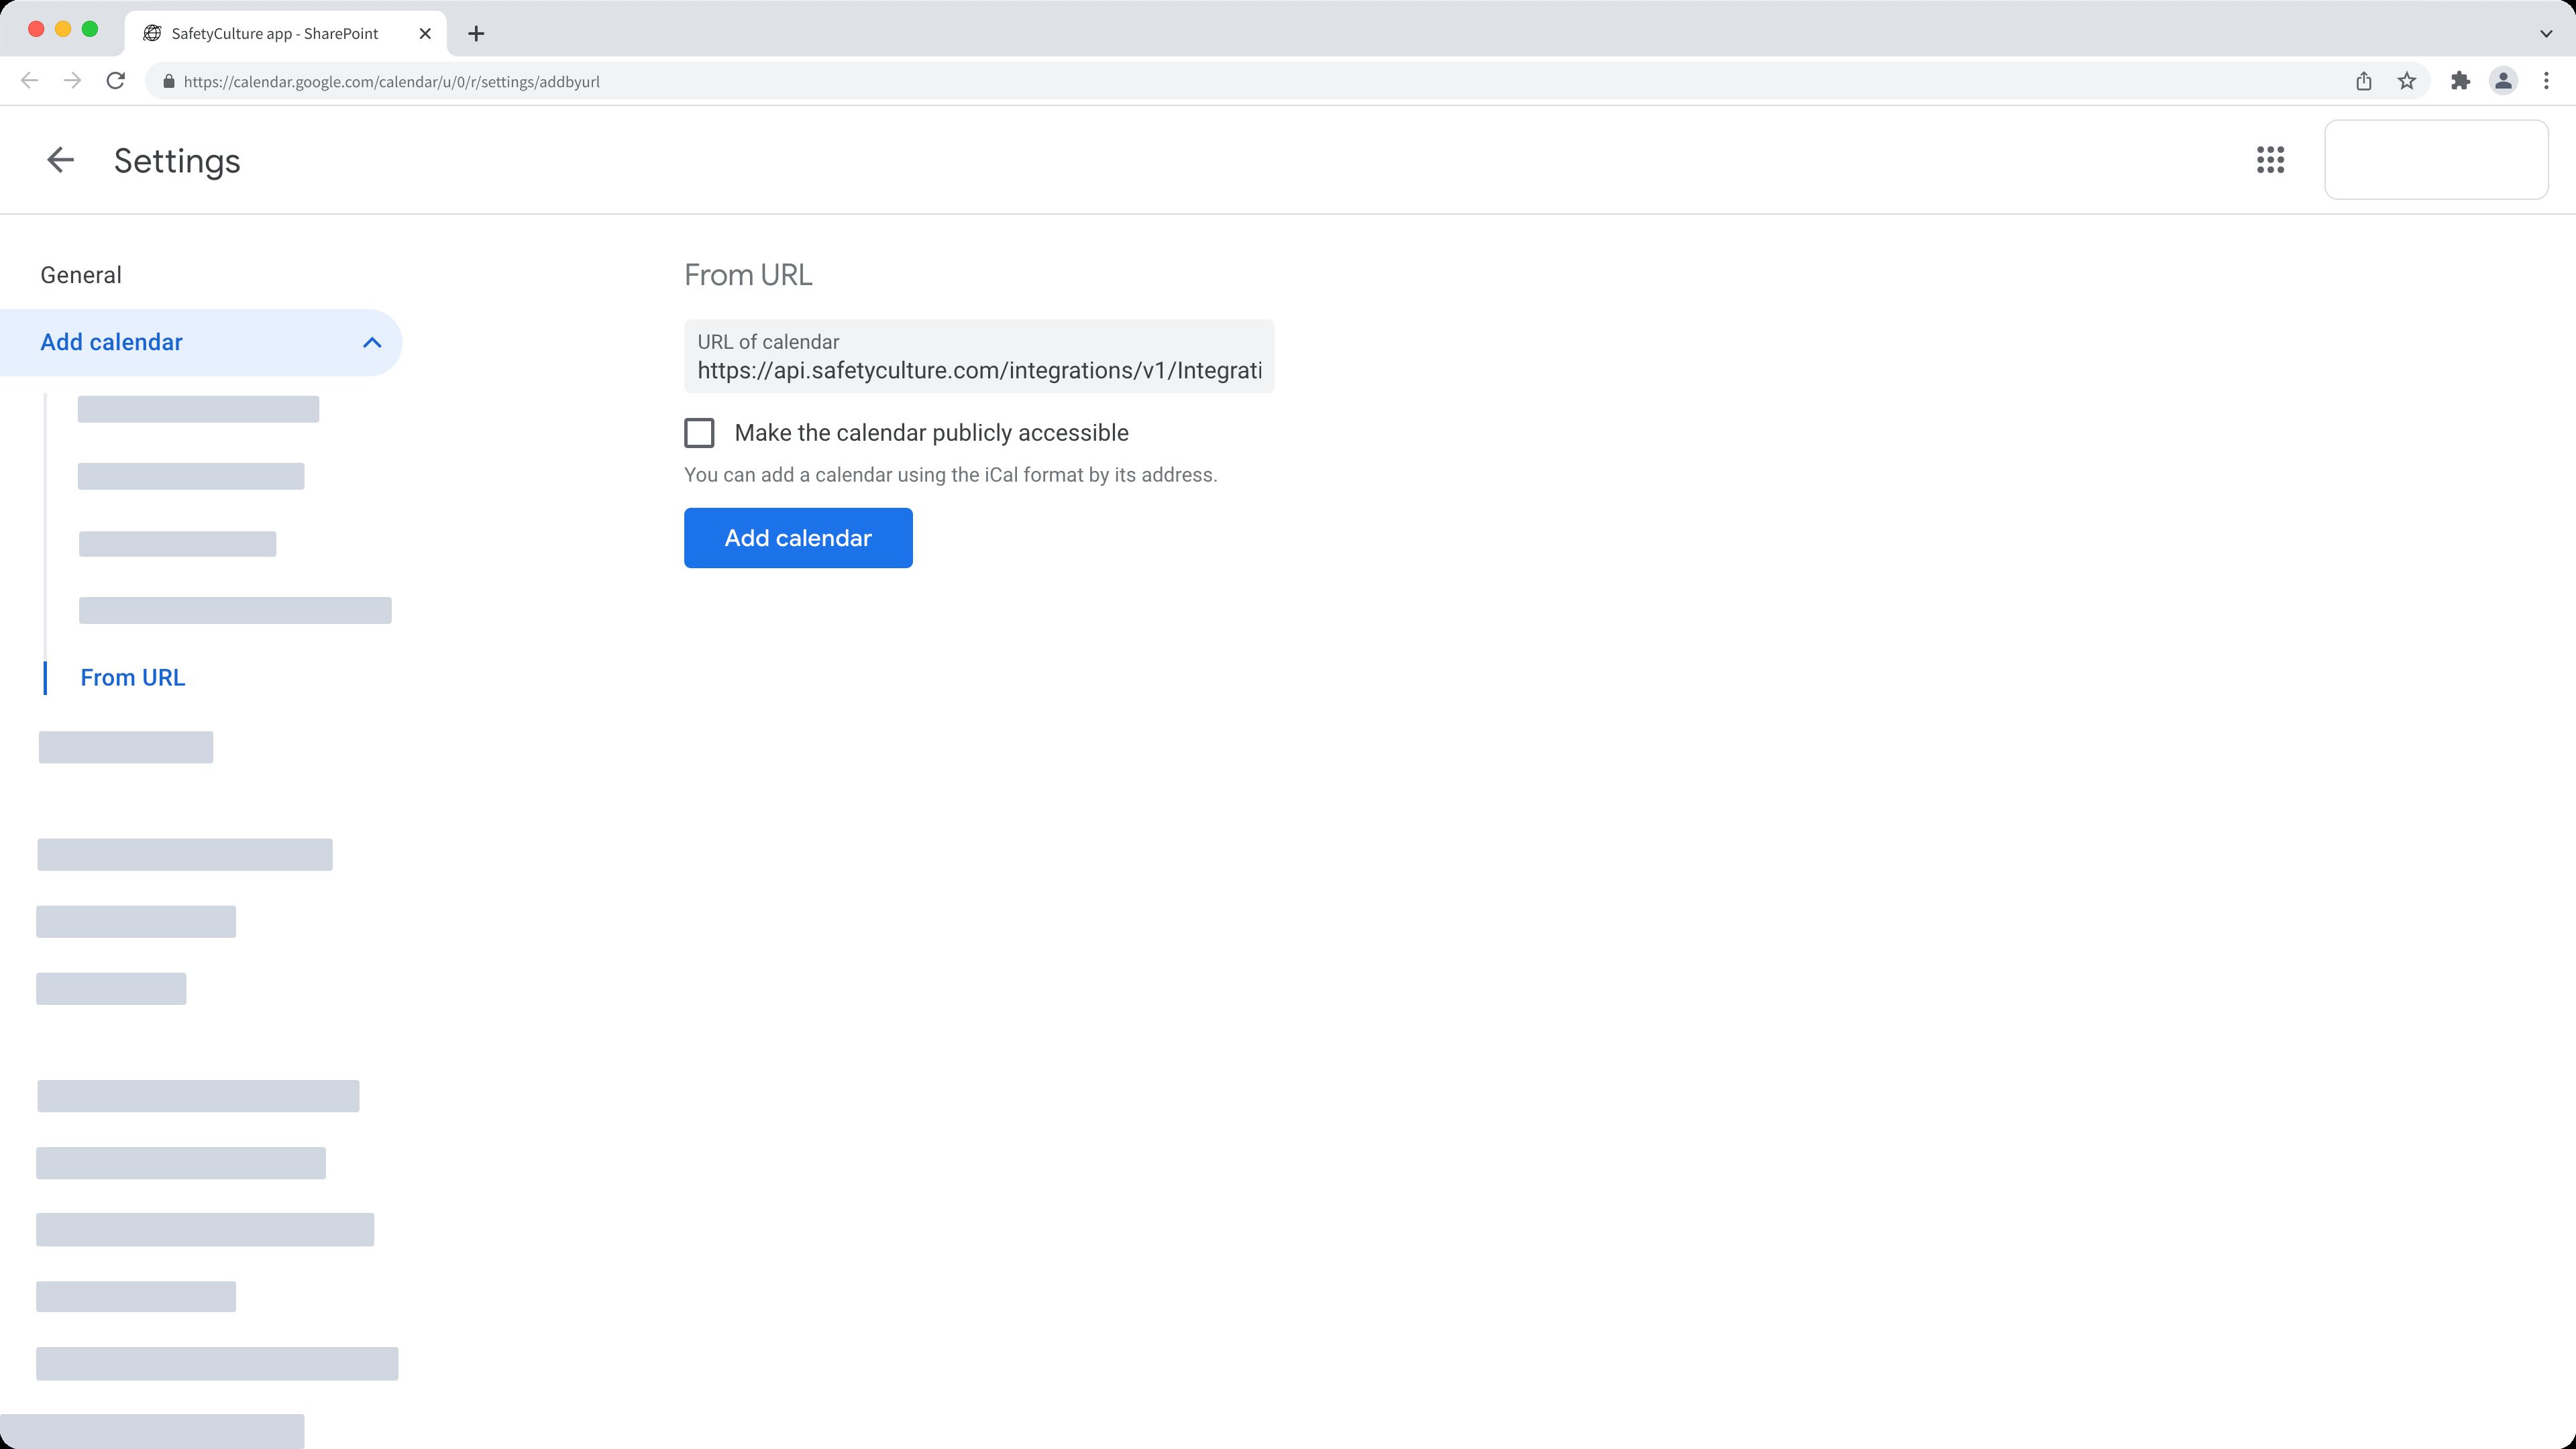
4. Copy the calendar’s URL: On the settings page, you will find the calendar’s URL in the “Integrate calendar” section. The URL will be displayed as a web link. Right-click on the link and select “Copy” to copy the URL to your clipboard.
5. Share the URL: Once you have copied the calendar’s URL, you can share it with others. You can do this by pasting the URL in an email, instant message, or any other communication platform. Alternatively, you can create a hyperlink by selecting text and using the insert link feature.
6. Specify instructions: When sharing the calendar URL, you may want to provide additional instructions or context to the recipients. For example, you could explain that the calendar is public and that they can view your availability or specific events. This can make it easier for others to understand how to use the calendar URL.
7. Update sharing as needed: Remember that you can always update the sharing settings for your calendar. If you decide that you no longer want to make it public or you want to restrict access, you can go back to the calendar settings and make the necessary modifications.
By following these steps, you can easily share your public calendar URL with others. This allows them to view your schedule and stay up-to-date with your availability and events. In the next step, we will explore how to customize calendar access and permissions.
Step 4: Customize Calendar Access and Permissions
After making your Google Calendar public and sharing the calendar URL, you may want to customize the access and permissions for your calendar. This allows you to control what information others can see and what actions they can take. Follow these steps to customize your calendar access and permissions:
1. Open Google Calendar settings: Go to the Google Calendar website and sign in to your Google account. Make sure you are on the page displaying the calendar you want to customize.
2. Find the calendar settings: Locate the settings for the calendar you want to customize. This is usually represented by three vertical dots or a gear icon next to the calendar’s name.
3. Access sharing options: From the dropdown menu or options, select “Settings and sharing” to access the settings for the selected calendar.
4. Customize sharing settings: On the settings page, you will find various options for customizing the sharing settings. You can choose who can see the calendar, who can make changes to events, and what event details are displayed.
5. Share with specific people: If you want to share your calendar with specific individuals rather than the public, you can choose the “Share with specific people” option. This allows you to add email addresses or Google accounts of people you want to grant access to.
6. Set access levels: When sharing with specific people, you can set different access levels for each individual. For example, you can give someone view-only access, allowing them to see your availability but not make any changes to events.
7. Customize event details: You can decide what details of events are displayed when someone views your calendar. You can choose to show event titles, locations, descriptions, or only display free or busy times.
8. Save your changes: Once you have customized the sharing settings to your preferences, don’t forget to save your changes. There will be a “Save” or “Done” button at the bottom or top right corner of the settings page. Click on it to save your customizations.
By customizing the access and permissions for your Google Calendar, you can maintain control over the information you share and who has the ability to modify your events. This gives you the flexibility to strike a balance between sharing your schedule and maintaining privacy. In the next step, we will explore how to share your public calendar with specific people.
Step 5: Share Public Calendar with Specific People
In addition to making your Google Calendar public, you have the option to share it with specific individuals. This allows you to grant access to your calendar to specific people while keeping it private from the general public. Follow these steps to share your public calendar with specific people:
1. Open Google Calendar: Go to the Google Calendar website and sign in to your Google account. Make sure you are on the page displaying the calendar you want to share.
2. Find the calendar settings: Locate the settings for the calendar you want to share. This is usually represented by three vertical dots or a gear icon next to the calendar’s name.
3. Access sharing options: From the dropdown menu or options, select “Settings and sharing” to access the settings for the selected calendar.
4. Share with specific people: On the settings page, scroll down to the “Share with specific people” section. Here, you can add the email addresses or Google accounts of individuals you want to grant access to your calendar.
5. Set access levels: For each person you add, you can set different access levels. You can choose to give them full access, allowing them to make changes to events, or limit their access to view-only, enabling them to see your schedule but not modify it.
6. Add a message (optional): You have the option to add a message when sharing your calendar with specific people. This can be helpful if you want to provide additional instructions or context about the calendar’s purpose or any specific event details.
7. Send the invitation: Once you have added the email addresses and set the access levels, click on the “Send” or “Save” button to send the invitation. The individuals you have invited will receive an email notification with a link to access your calendar.
8. Modify or revoke access if needed: If you need to modify the access levels or revoke access for specific individuals in the future, you can always go back to the calendar settings and make the necessary changes.
Sharing your public calendar with specific people allows you to control who can view and interact with your schedule. It’s a great way to collaborate, coordinate, and communicate events with a select group of individuals. In the next step, we will explore how to embed your public calendar on a website.
Step 6: Embed Your Public Calendar on a Website
An effective way to share your public Google Calendar with a wider audience is by embedding it on a website. This allows visitors to view your schedule without leaving the webpage they are on. Follow these steps to embed your public calendar on a website:
1. Open Google Calendar: Visit the Google Calendar website and sign in to your Google account. Make sure you are on the page displaying the calendar you want to embed.
2. Find the calendar settings: Locate the settings for the calendar you want to embed. This is usually represented by three vertical dots or a gear icon next to the calendar’s name.
3. Access sharing options: From the dropdown menu or options, select “Settings and sharing” to access the settings for the selected calendar.
4. Navigate to “Integrate calendar”: On the settings page, find and click on the “Integrate calendar” tab or section. This is where you will generate the code to embed your calendar.
5. Customize the embed settings: On the “Integrate calendar” page, you will find various customization options. You can choose the width and height for the embedded calendar, as well as specify the number of weeks or days to display.
6. Copy the embed code: Once you have customized the settings, the embed code will be generated automatically. Copy the code provided in the text box or click on the “Copy” button to copy the code to your clipboard.
7. Paste the code on your website: Open the HTML editor of your website and navigate to the page where you want to embed the calendar. Paste the embed code in the appropriate location, such as within a div or iframe element.
8. Save and publish your changes: Once you have added the embed code to your website, save the changes and publish the page. The embedded Google Calendar will now be visible to visitors of your website.
Note: If you are using a website builder or content management system, the process of embedding the calendar may vary. Consult the documentation or support resources of your specific platform for instructions on how to embed HTML code.
By embedding your public Google Calendar on a website, you can provide easy access to your schedule for visitors to your site. This is particularly useful for businesses, event organizers, or individuals who want to share their calendar publicly and increase engagement with their audience. In the final step, we will explore how to manage the privacy settings of your public calendar.
Step 7: Manage Public Calendar Privacy Settings
Once you have made your Google Calendar public and shared it with specific people or embedded it on a website, it’s important to regularly review and manage your calendar’s privacy settings. This ensures that you have control over the information you share and who can access it. Follow these steps to manage the privacy settings of your public calendar:
1. Open Google Calendar: Visit the Google Calendar website and sign in to your Google account. Make sure you are on the page displaying the calendar you want to manage.
2. Find the calendar settings: Locate the settings for the calendar you want to manage. This is usually represented by three vertical dots or a gear icon next to the calendar’s name.
3. Access sharing options: From the dropdown menu or options, select “Settings and sharing” to access the settings for the selected calendar.
4. Review access permissions: On the settings page, you will see the current access permissions for your calendar. Take a moment to review who can view and make changes to the calendar to ensure it aligns with your preferences.
5. Update sharing settings: If you want to make changes to the sharing settings, you can do so on this page. You can adjust the privacy level, limit access to specific people, or revert back to a private calendar if needed.
6. Customize event details: Consider the event details that are displayed when someone views your public calendar. You may want to modify this to ensure only relevant information is visible to others. Options can include showing or hiding event titles, locations, descriptions, or only displaying free or busy times.
7. Manage external event invitations: When your calendar is public, anyone with the calendar’s URL can invite you to events. Decide whether you want to allow external event invitations or if you prefer to restrict event creation to specific individuals or yourself.
8. Regularly review and update: As your needs or preferences change, it’s important to regularly review and update your calendar’s privacy settings. This ensures that your calendar remains secure and aligned with your sharing preferences.
By actively managing the privacy settings of your public Google Calendar, you can ensure that you have control over who can view and interact with your schedule. Regularly reviewing and updating these settings allows you to maintain the level of privacy and security that you desire. With these steps completed, you have successfully learned how to make your Google Calendar public and manage its privacy settings.
Conclusion
In today’s fast-paced world, managing your schedule efficiently is crucial. Google Calendar provides a powerful solution for staying organized and sharing your schedule with others. By making your Google Calendar public, you can enhance collaboration, streamline scheduling, and improve communication, both in professional and personal settings.
In this article, we explored the step-by-step process of making your Google Calendar public. We discussed why you might want to make your calendar public, how to determine which calendars to share, and how to adjust the calendar settings. We also covered how to share your public calendar URL, customize access and permissions, and embed your calendar on a website. Additionally, we touched on the importance of managing the privacy settings of your public calendar to maintain control over your schedule.
Throughout the process, it’s crucial to strike a balance between sharing your availability and events, while also maintaining the privacy of sensitive information. By carefully managing the sharing options and customizing the access levels, you can ensure that the right people have access to the right information while maintaining your desired level of confidentiality.
Remember to regularly review and update your calendar’s privacy settings as your needs and preferences change. This will help you maintain control over who can view and interact with your schedule, ensuring the security and privacy of your information.
Whether you’re a professional looking to streamline scheduling or an individual wanting to keep loved ones informed, making your Google Calendar public can bring numerous benefits. It simplifies communication, fosters collaboration, and promotes efficiency in managing your time.
Now that you have mastered the process of making your Google Calendar public, go ahead and implement these steps to streamline your scheduling and enhance collaboration and communication with others. Embrace the power of sharing your schedule publicly and enjoy the benefits it brings to your personal and professional life.