Introduction
Welcome to the world of virtualization! Creating a Linux virtual machine (VM) is a fantastic way to explore and experiment with one of the most popular operating systems in the open-source world. Whether you are a developer, system administrator, or simply curious about Linux, having a virtual machine can provide a safe and flexible environment to learn, test, and play around with various distributions.
In this guide, we will walk you through the process of creating and setting up your very own Linux virtual machine. But before we dive into the technical details, let’s first discuss what virtualization is and why it is so valuable.
Virtualization is the process of running multiple virtual machines on a single physical machine, each with its own isolated operating system and resources. It enables users to run software and applications in a controlled environment without interfering with the host system. Virtual machines offer several benefits, including:
1. Flexibility and Isolation
With a Linux virtual machine, you can experiment with different distributions, setups, and software configurations without worrying about affecting your primary operating system. Virtualization provides a sandboxed environment where you can safely test new applications or perform system updates without risking the stability of your host system.
2. Resource Optimization
Virtual machines allow you to make the most out of your hardware resources. By running multiple virtual machines on a single physical machine, you can efficiently utilize available CPU, memory, and storage capacity. This makes virtualization an excellent choice for servers or development environments.
3. Easy Deployment and Management
Creating and managing virtual machines is a straightforward process. You can easily deploy, clone, and migrate virtual machines as needed. This flexibility allows you to replicate and distribute virtual machines across different physical machines or cloud platforms.
Now that we understand the benefits of virtualization let’s dive into the step-by-step process of creating and setting up your own Linux virtual machine. By the end of this guide, you’ll be ready to embark on your Linux journey and explore the vast ecosystem of open source software.
Prerequisites
Before we begin creating your Linux virtual machine, there are a few prerequisites you need to have in place:
1. Computer Hardware Requirements
Make sure that your computer meets the minimum requirements for running a virtual machine. This includes sufficient RAM, CPU, and hard disk space. While the exact specifications may vary depending on the Linux distribution you choose, it is generally recommended to have at least 4GB of RAM and a multi-core processor.
2. Virtualization Software
You will need virtualization software to create and run your Linux virtual machine. There are several popular options available, including:
- Oracle VM VirtualBox: A free and open-source virtualization platform that runs on Windows, macOS, and Linux.
- VMware Workstation Player: A free version of VMware Workstation that is available for personal use on Windows and Linux.
- Hyper-V: A built-in virtualization platform available on Windows 10 Pro, Enterprise, and Education editions.
Choose the virtualization software that best suits your needs and ensure that it is installed and functioning properly on your computer.
3. Linux Distribution ISO
Select the Linux distribution you want to install on your virtual machine. There are numerous options to choose from, such as Ubuntu, Fedora, CentOS, Debian, and more. Visit the official website of your chosen distribution and download the ISO file.
4. Sufficient Disk Space
Ensure that you have enough free disk space to accommodate the installation of the virtualization software and the Linux distribution. The size of the virtual machine and the amount of disk space required will vary depending on the distribution and the software you choose.
Once you have these prerequisites in place, you’re ready to move on to the next step: choosing a virtualization software. This software will serve as the foundation for creating and managing your Linux virtual machine. Let’s explore your options and help you make the right choice in the next section.
Step 1: Choose a Virtualization Software
Before we begin creating your Linux virtual machine, you need to choose a virtualization software that best suits your needs. Here are three popular options to consider:
1. Oracle VM VirtualBox
Oracle VM VirtualBox is a powerful, cross-platform virtualization platform that allows you to run multiple operating systems on top of your existing operating system. It supports Windows, macOS, Linux, and Solaris as host systems and offers a wide range of features, including shared folders, snapshotting, and virtual networking. VirtualBox is a free and open-source software, making it an excellent choice for both personal and commercial use.
2. VMware Workstation Player
VMware Workstation Player is a free version of the popular VMware Workstation software. It is available for personal use on Windows and Linux platforms. While it doesn’t provide all the advanced features of the paid version, it still offers robust virtualization capabilities. With VMware Workstation Player, you can create and run virtual machines seamlessly, making it an ideal choice for beginners or casual users.
3. Hyper-V
Hyper-V is a virtualization platform built into Windows 10 Pro, Enterprise, and Education editions. It provides a reliable and secure environment for creating and managing virtual machines. If you’re using a compatible Windows operating system, Hyper-V can be an excellent choice as it integrates well with the host system and offers advanced features like virtual machine checkpoints and PowerShell management.
When choosing a virtualization software, consider factors such as your operating system, specific requirements, available features, ease of use, and community support. Take some time to research and evaluate each option to determine which one will be the best fit for your needs.
Now that you’ve selected a virtualization software, it’s time to move on to the next step: downloading a Linux distribution ISO. In the next section, we’ll guide you through the process of acquiring the necessary installation file for your Linux virtual machine.
Step 2: Download a Linux Distribution ISO
Now that you have chosen a virtualization software, the next step is to download the ISO file for the Linux distribution you want to install on your virtual machine. The ISO file contains the installation image of the operating system and serves as the basis for setting up your Linux environment.
To download a Linux distribution ISO, follow these steps:
1. Choose a Linux Distribution
There are numerous Linux distributions available, each with its own set of features, package managers, and user interfaces. Some popular choices include Ubuntu, Fedora, CentOS, Debian, and Linux Mint. Consider your needs, familiarity, and preferences when selecting a distribution.
2. Visit the Official Website
Go to the official website of the Linux distribution you have chosen. Usually, the website will provide a download section where you can find the ISO files for your desired distribution.
3. Select the ISO File
Within the download section, look for the ISO file that matches your system architecture (32-bit or 64-bit). Make sure to download the latest stable release for optimal performance and security.
4. Verify the ISO File
Verifying the integrity of the downloaded ISO file is essential to ensure that it has not been corrupted during the download process. Most Linux distributions provide checksums or hash values for their ISO files. You can compare these checksums with the calculated checksum of the file using a checksum verification tool like md5sum or sha256sum.
5. Save the ISO File
Save the downloaded ISO file to a location on your computer where it is easily accessible. You will need this file later during the virtual machine creation process.
Now that you have successfully downloaded a Linux distribution ISO, you are ready to proceed to the next step, where we will guide you through the installation of the virtualization software. This will enable you to start building your Linux virtual machine.
Step 3: Install the Virtualization Software
With the Linux distribution ISO downloaded, it’s time to install the virtualization software on your computer. The virtualization software will serve as the platform for creating and managing your Linux virtual machine.
To install the virtualization software, follow these steps:
1. Run the Installer
Locate the installer file for the virtualization software you have chosen. Double-click on the installer to launch the installation wizard.
2. Follow the Installation Wizard
Follow the on-screen instructions provided by the installation wizard. These instructions may vary slightly depending on the virtualization software you are using. In most cases, you will need to agree to the terms of the license agreement and choose the installation location.
3. Select Installation Options
During the installation process, you may be presented with various installation options. These options could include selecting additional components or customizing specific settings. Review the options and select the ones that best suit your needs.
4. Complete the Installation
After configuring the installation options, continue with the installation process by clicking the “Install” or “Next” button. The virtualization software will be installed on your computer.
5. Reboot if Required
Depending on the virtualization software, you might need to reboot your computer after the installation is complete. Follow any prompt to reboot or restart your system.
Once the virtualization software is installed and your system is rebooted if necessary, you are now ready to create your Linux virtual machine. In the next step, we will guide you through the process of setting up a new virtual machine using the installed virtualization software.
Step 4: Create a New Virtual Machine
Now that the virtualization software is installed on your computer, it’s time to create a new virtual machine (VM) for your Linux installation. A virtual machine acts as a standalone computer within your physical computer, allowing you to run an operating system and applications in an isolated environment.
To create a new virtual machine, follow these steps:
1. Launch the Virtualization Software
Open the virtualization software you installed in the previous step. The software’s interface should appear, providing options for creating and managing virtual machines.
2. Click on “New” or “Create New VM”
Look for the option to create a new virtual machine. It is typically labeled as “New” or “Create New VM.” Click on it to start the VM creation process.
3. Enter a Name and Choose Operating System
In the new VM creation wizard, you will be prompted to enter a name for your virtual machine. Choose a descriptive name that identifies the Linux distribution you will be installing. Additionally, select the operating system type and version that matches the Linux distribution you downloaded.
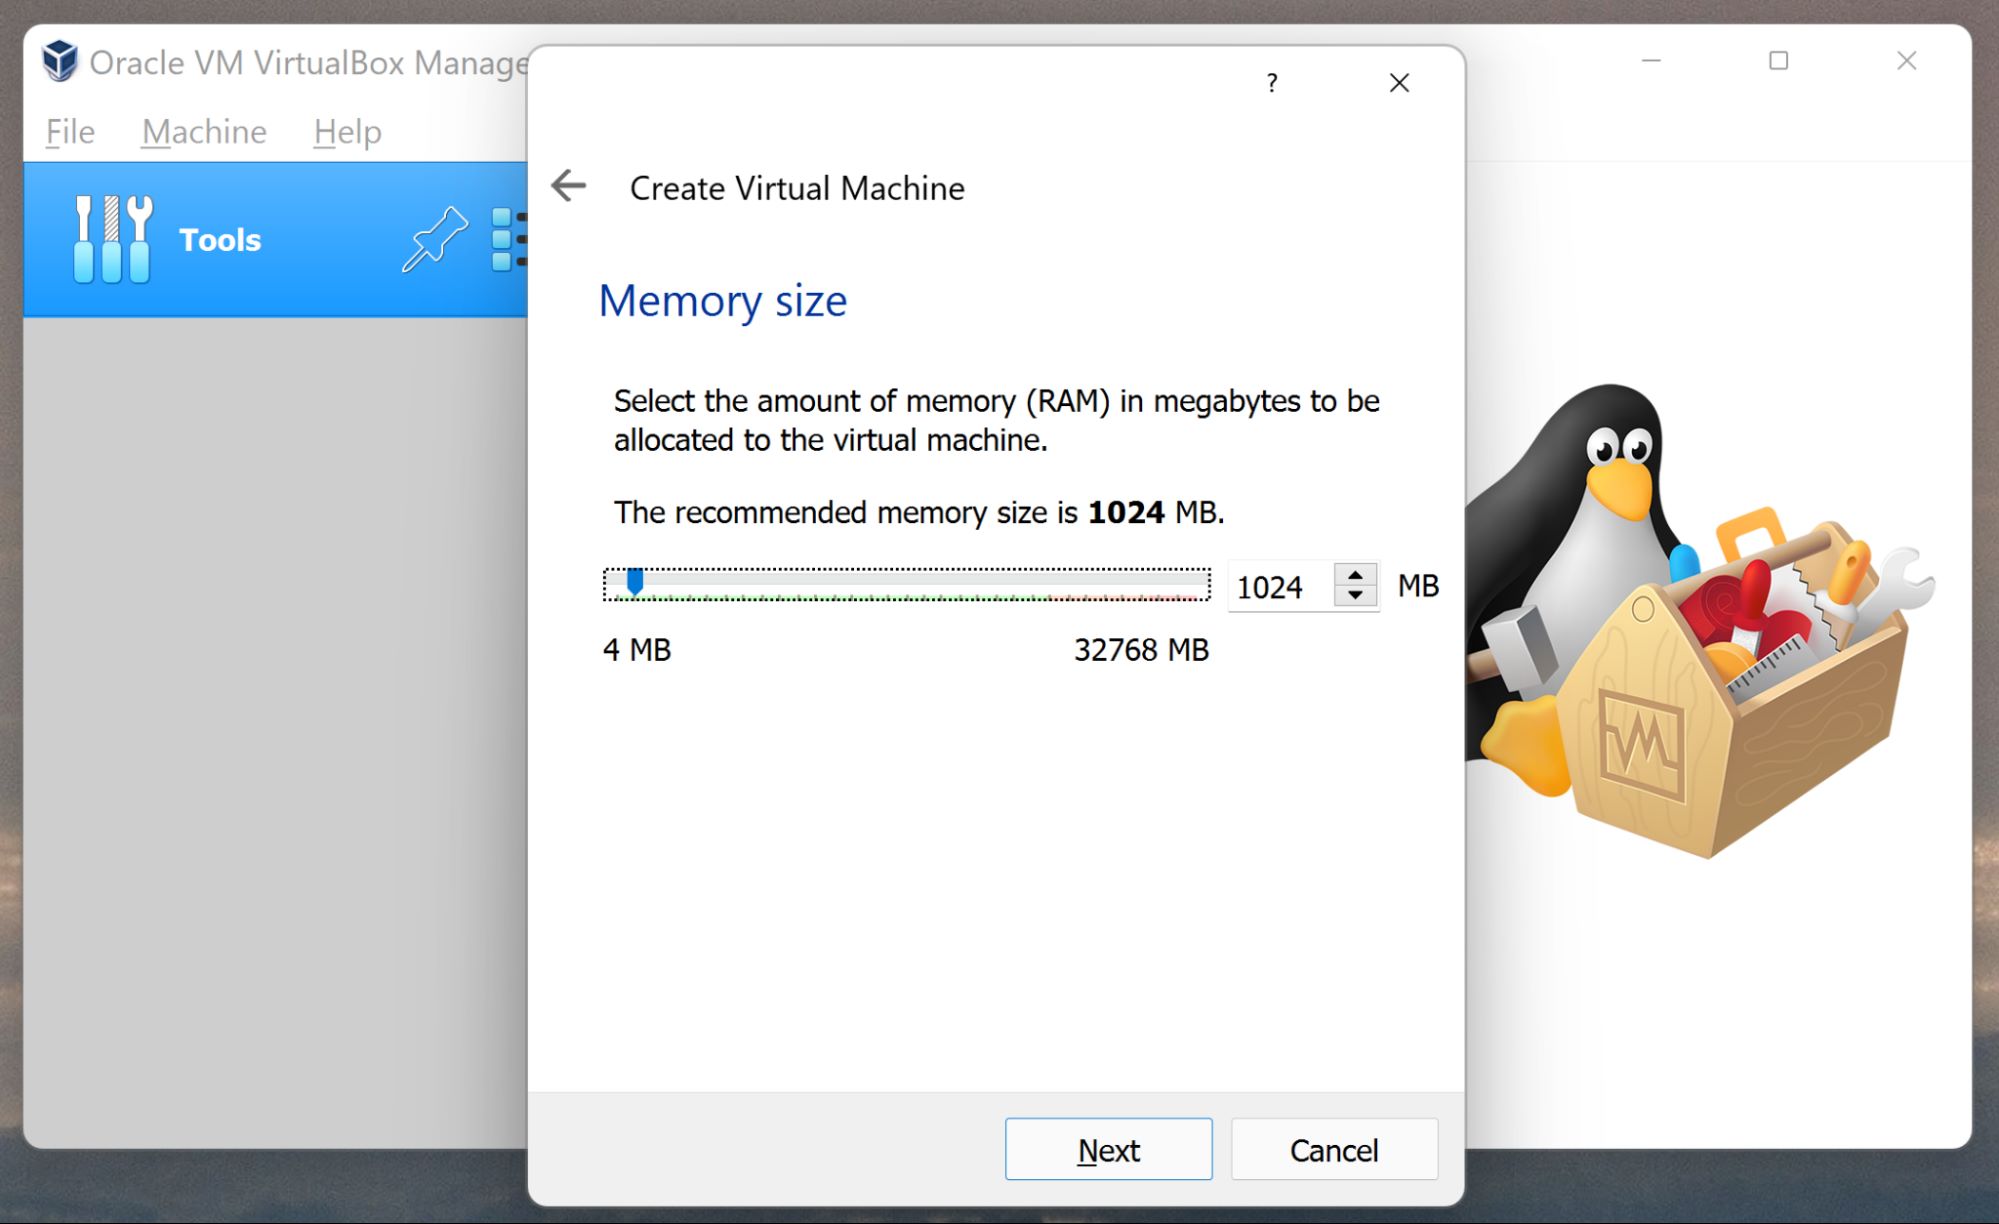
4. Allocate Memory (RAM)
Choose the amount of memory (RAM) to allocate to your virtual machine. The recommended amount varies depending on the Linux distribution’s requirements and the capabilities of your host system. Allocate a sufficient amount of memory to ensure smooth performance.
5. Create a Virtual Hard Disk
Create a virtual hard disk for your virtual machine. Select the option to create a new virtual hard disk and choose the file format (usually VDI or VMDK). Set the disk size according to your needs, ensuring that you have enough space for the Linux installation and any additional software you plan to install.
6. Configure Hardware Settings
Review and configure additional hardware settings for your virtual machine. This may include adjusting the number of CPU cores, enabling or disabling virtualization extensions, configuring network settings, and attaching virtual optical drives if necessary.
7. Finish the VM Creation Process
Follow the remaining steps in the VM creation wizard to finalize the process. This may include reviewing the configuration summary, selecting the ISO file you downloaded for the Linux distribution, and confirming the creation of the virtual machine.
Congratulations! You have successfully created a new virtual machine for your Linux installation. In the next step, we will guide you through the process of configuring the virtual machine settings before proceeding with the Linux installation.
Step 5: Configure the Virtual Machine Settings
Now that you have created a new virtual machine, it’s time to configure its settings to ensure optimal performance and compatibility for your Linux installation. These settings allow you to customize various aspects of the virtual machine, such as storage, display, and network options.
To configure the virtual machine settings, follow these steps:
1. Start the Virtual Machine
Launch the virtualization software and select the newly created virtual machine from the list. Click on the “Start” or “Power On” button to start the virtual machine.
2. Access the VM Settings
Once the virtual machine is running, locate the settings menu. In most virtualization software, you can find it under the “Machine” or “VM” menu. Click on it to access the virtual machine settings.
3. Adjust Display Settings
Configure the display settings to ensure optimal resolution and monitor compatibility. Adjust the display settings to match your screen size and preferred graphics adapter. You may also have options to enable hardware acceleration or install guest additions later for improved graphics performance.
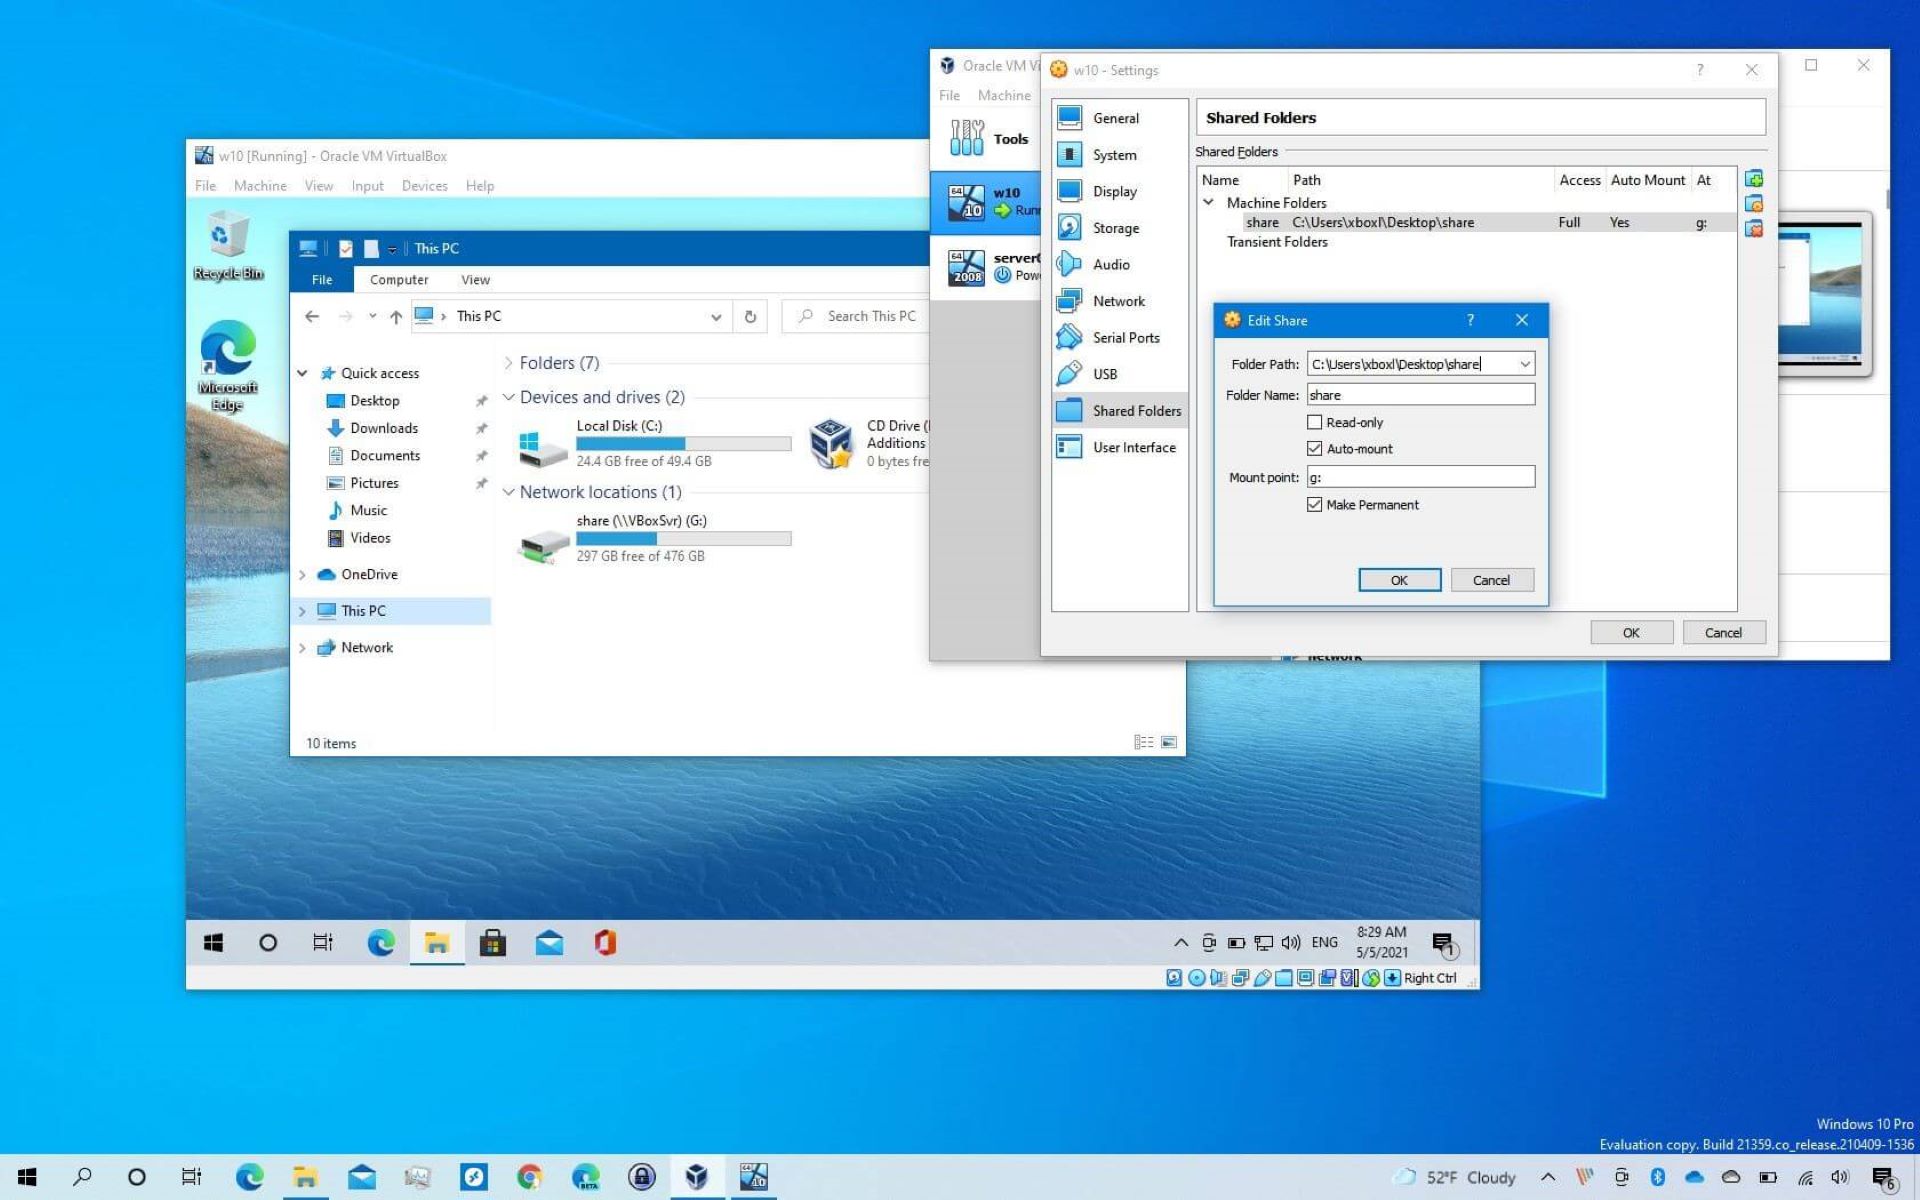
4. Customize Storage Options
Determine the storage options for your virtual machine. You can allocate additional virtual hard disks, attach external storage devices, or utilize shared folders for seamless file sharing between the host and guest systems. Adjust the storage settings according to your requirements.
5. Configure Network Settings
Set up the network settings to enable network connectivity within the virtual machine. Depending on your network configuration, you can choose between different network modes, such as NAT, Bridged, or Host-only. Select the appropriate mode and configure any additional network settings if necessary.
6. Customize Other Settings
Review and customize any other available settings according to your needs. This may include adjusting CPU allocation, enabling hardware virtualization extensions, configuring sound or USB support, and defining keyboard or mouse behavior within the virtual machine.
7. Save and Apply Changes
Once you have configured all the desired settings, save and apply the changes. This ensures that your virtual machine is properly configured and ready for the Linux installation.
Great! You have successfully configured the settings for your virtual machine. In the next step, we will guide you through the process of installing the Linux operating system on your virtual machine. This will allow you to start using your Linux virtual machine and explore all the features and capabilities it has to offer.
Step 6: Install Linux on the Virtual Machine
With the virtual machine settings configured, it’s time to install the Linux operating system on your virtual machine. This process involves booting the virtual machine from the Linux distribution ISO file and following the installation wizard to set up the Linux environment.
To install Linux on the virtual machine, follow these steps:
1. Start the Virtual Machine
Launch the virtualization software and select the virtual machine you’ve created. Click on the “Start” or “Power On” button to start the virtual machine.
2. Mount the Linux Distribution ISO
Within the virtual machine, locate the option to mount an ISO file or virtual optical drive. Select the Linux distribution ISO file you downloaded and attach it to the virtual machine’s optical drive. This will make the ISO file accessible as if it were a physical CD/DVD inserted in a real computer.
3. Boot from the ISO
Restart the virtual machine to initiate the boot process. The virtual machine will now boot from the Linux distribution ISO and present you with the installation menu.
4. Follow the Installation Wizard
Follow the installation wizard’s instructions to set up the Linux environment. This typically includes selecting the language, keyboard layout, and timezone. You may also need to partition the virtual hard disk and choose the installation type (e.g., clean installation or alongside an existing operating system).
5. Create User Account
During the installation process, you will be asked to create a user account for the Linux system. Input your desired username, password, and any additional information required for user configuration.
6. Install Additional Software (Optional)
Depending on the Linux distribution, you may have the option to install additional software packages during the installation process. Select any optional software you wish to include or continue with the default installation.
7. Complete the Installation
After configuring all necessary settings, the installation process will continue and copy the necessary files to the virtual hard disk. Once the installation is complete, you will be prompted to reboot the virtual machine.
Congratulations! You have successfully installed the Linux operating system on your virtual machine. In the next step, we will guide you through adjusting the virtual machine’s resources to optimize its performance and responsiveness.
Step 7: Adjust Virtual Machine Resources
After installing Linux on your virtual machine, it’s important to adjust the virtual machine’s resources to optimize its performance and responsiveness. By properly allocating resources such as CPU, memory, and storage, you can ensure that your virtual machine operates efficiently and meets your specific needs.
To adjust the virtual machine resources, follow these steps:
1. Start the Virtual Machine
Launch your virtualization software and select the virtual machine running the installed Linux operating system. Click on the “Start” or “Power On” button to start the virtual machine.
2. Access the Virtual Machine Settings
Locate the settings menu within the virtualization software. In most cases, you can find it under the “Machine” or “VM” menu. Click on it to access the virtual machine settings.
3. Adjust the CPU Allocation
Determine the number of CPU cores allocated to the virtual machine. You can increase or decrease the CPU allocation based on your workload and performance requirements. Allocating more CPU cores can improve multitasking capabilities, while reducing the allocation can free up resources for other tasks.
4. Allocate Memory (RAM)
Adjust the amount of memory (RAM) allocated to the virtual machine. Increasing the memory allocation can enhance the virtual machine’s performance, especially when running memory-intensive applications. Ensure that you have enough available memory on your host system to accommodate the increase.
5. Modify Storage Allocation
Review and adjust the storage allocation for your virtual machine if needed. If you need more storage space, you can allocate additional virtual hard disks or increase the size of existing ones. This allows you to install and store more applications and files within the virtual machine.
6. Configure Network Settings
Review and modify the network settings for your virtual machine. Depending on your requirements, you can choose between different network modes like NAT, Bridged, or Host-only. Ensure that your virtual machine has proper network connectivity to access the internet or other devices on the network.
7. Save and Apply Changes
Once you have made the necessary adjustments, save and apply the changes to the virtual machine’s settings. The virtual machine will now utilize the updated resource allocation for improved performance.
Great job! You have successfully adjusted the resources of your virtual machine according to your specific needs. In the next step, we will explore the option to install Guest Additions, which can enhance the functionality and integration between the virtual machine and the host system.
Step 8: Install Guest Additions (Optional)
Installing Guest Additions is an optional but highly recommended step to enhance the functionality and integration between your Linux virtual machine and the host system. Guest Additions are a set of additional drivers and utilities that enable features such as seamless mouse integration, shared folders, clipboard sharing, and improved graphics performance.
To install Guest Additions, follow these steps:
1. Start the Virtual Machine
Launch the virtualization software and start your Linux virtual machine.
2. Insert the Guest Additions CD
In the virtual machine window, go to the “Devices” or “VM” menu of the virtualization software. Look for an option like “Insert Guest Additions CD Image.” Click on this option to mount the Guest Additions CD image within the virtual machine.
3. Mount the CD Image
Within the Linux virtual machine, open a terminal or file manager and navigate to the mounted CD image. Run the installation script from the CD image. The script is usually named “VBoxLinuxAdditions.run” or similar.
4. Run the Installation Script
Execute the installation script with administrator or root privileges. This can usually be done by running the command sudo ./VBoxLinuxAdditions.run. Follow the on-screen instructions to complete the installation process.
5. Reboot the Virtual Machine
After the installation is complete, reboot the virtual machine to activate the installed Guest Additions. This will ensure that the new drivers and features are activated and functioning properly.
6. Enable Guest Additions Features
Once the virtual machine has restarted, enable the desired Guest Additions features. These features may include seamless mouse integration, shared folders, shared clipboard, and improved display performance. Access the options within the virtualization software to activate and configure these features.
By installing Guest Additions, you can greatly enhance the usability and integration of your Linux virtual machine with the host system. It allows for smoother file sharing, better mouse control, and overall improved user experience. Feel free to explore the various options and settings available with Guest Additions to customize the virtual machine according to your requirements.
Now that you’ve installed Guest Additions (or decided to skip this optional step), your Linux virtual machine is ready to be used and managed. In the next step, we will explore the importance of taking snapshots, which can greatly simplify backup and recovery processes.
Step 9: Take Snapshots for Easy Restore
Taking snapshots of your Linux virtual machine is an essential step in managing and safeguarding your system. Snapshots capture the state and configuration of the virtual machine at a specific point in time, allowing you to easily revert to that snapshot if needed. They are particularly useful before performing system updates, making significant changes, or testing experimental configurations.
To take snapshots of your virtual machine, follow these steps:
1. Start the Virtual Machine
Launch your virtualization software and start your Linux virtual machine.
2. Navigate to the Snapshot Menu
Within the virtual machine window, locate the snapshot menu. It is usually found in the toolbar or under the “Machine” or “VM” menu of the virtualization software. Click on the snapshot menu to open it.
3. Take a New Snapshot
In the snapshot menu, select the option to take a new snapshot. Give the snapshot a descriptive name and provide an optional description if needed. This will help you easily identify and understand the purpose of the snapshot in the future.
4. Capture the Snapshot
Confirm the creation of the snapshot. The virtualization software will capture the virtual machine’s current state, including the configuration, disk contents, and memory contents, if supported. This process may take a few moments, depending on the size and complexity of your virtual machine.
5. Repeat for Multiple Snapshots (Optional)
If desired, you can take multiple snapshots of your virtual machine at different points in time. This allows you to have a series of restore points or save different system configurations.
6. Restore from a Snapshot
If you need to revert to a previous state of your virtual machine, you can easily do so by selecting the desired snapshot from the snapshot menu and choosing the option to restore it. This will roll back the virtual machine to the selected snapshot, undoing any changes made after that point.
Taking snapshots of your Linux virtual machine ensures that you have a fallback option in case of system issues or unwanted changes. It simplifies the process of rolling back and restoring the virtual machine to a known working state, saving you valuable time and effort.
Now that you understand the importance of taking snapshots, you are ready to use and manage your Linux virtual machine effectively. In the next step, we will provide some tips and guidelines for utilizing and managing your virtual machine successfully.
Step 10: Use and Manage Your Linux Virtual Machine
Now that you have set up and configured your Linux virtual machine, it’s time to start using and managing it effectively. Here are some tips and guidelines to help you make the most out of your virtual machine:
1. Install Required Software
Begin by installing the necessary software and applications within your Linux virtual machine. This could include programming tools, development environments, web servers, or any other software relevant to your needs. Use the package manager of your Linux distribution to easily install and update software packages.
2. Keep the System Up to Date
Regularly update your Linux virtual machine to ensure that you have the latest security patches, bug fixes, and software updates. Use the package manager or update manager of your Linux distribution to keep the system up to date. This will help maintain the stability and security of your virtual machine.
3. Secure Your Virtual Machine
Implement security measures to protect your Linux virtual machine. This includes enabling a firewall, using strong passwords for user accounts, and disabling unnecessary services. Regularly audit your virtual machine’s security configuration to identify and address potential vulnerabilities.
4. Back up Your Virtual Machine
Regularly back up your Linux virtual machine to safeguard your data and configurations. Depending on your virtualization software, you can export the virtual machine as an appliance or create a clone of the virtual disk. Store these backups in a separate location, such as an external drive or cloud storage, to ensure availability in case of system failures or accidents.
5. Optimize Performance
Monitor and optimize the performance of your Linux virtual machine regularly. Adjust resource allocation based on workload requirements, use tools like htop or top to identify resource-hungry processes, and optimize disk I/O by utilizing virtual machine disk formats that offer better performance.
6. Utilize Snapshots for Testing and Development
Take advantage of snapshots for testing and development purposes. Before making any significant changes or updates, create a snapshot to have a rollback option in case of issues. Snapshots are also useful for testing out new configurations, software installations, or system updates without the risk of permanently affecting the virtual machine.
7. Explore Collaboration and Integration
Utilize the integration options available in your virtualization software to enable seamless collaboration and integration between the host and guest systems. This could include shared folders, clipboard sharing, or drag-and-drop functionality. Explore and leverage these features to enhance your workflow and productivity.
By following these tips and guidelines, you can effectively use and manage your Linux virtual machine. Remember to regularly maintain, update, and backup your virtual machine to ensure a stable and secure environment for your work or experimentation.
With your Linux virtual machine fully set up and managed, you are now equipped to explore the world of Linux, experiment with new software, develop applications, or run server environments—all within the safety and convenience of your own virtual space. Enjoy the journey and unlock the full potential of Linux!
Conclusion
Congratulations on successfully creating, setting up, and managing your Linux virtual machine! You have now acquired a powerful tool that allows you to delve into the world of Linux, experiment with different distributions, and explore the vast ecosystem of open-source software.
Throughout this guide, we discussed the step-by-step process of creating a Linux virtual machine, from choosing the virtualization software to installing the Linux operating system. We covered essential steps like adjusting virtual machine resources, installing Guest Additions for enhanced functionality, and using snapshots for easy restoration.
Remember to continue managing and maintaining your virtual machine effectively. Keep the system up to date, secure it with appropriate measures, and regularly back up your virtual machine to ensure the safety of your data and configurations.
Utilize the flexibility and isolation virtual machines offer to test new software, install development tools, or create server environments without compromising your host system. Take advantage of the collaboration and integration features available in your virtualization software to streamline your workflow.
By following the guidelines and tips provided, you can make the most out of your Linux virtual machine and harness its full potential.
Whether you are a developer, system administrator, or simply someone eager to explore the Linux operating system, your virtual machine will serve as a valuable learning and experimentation environment.
Now it’s time to embark on your Linux journey! Dive into the vast world of Linux distributions, explore the command line, customize your desktop environment, and unleash your creativity with the power of open-source software.
Enjoy your Linux virtual machine and have fun exploring everything that this incredible operating system has to offer!