Introduction
Welcome to the world of virtual machines! In this article, we will guide you through the process of installing a Linux virtual machine on your Windows 10 operating system. Whether you are a software developer, a system administrator, or just curious about exploring the Linux environment, setting up a virtual machine can provide you with a convenient and flexible way to access and work with Linux.
A virtual machine is a software-based emulation of a physical computer system. It allows you to run an entire operating system within your existing Windows 10 environment, without the need for a separate physical machine. This means you can experience the power and versatility of Linux without having to dual-boot or replace your current operating system.
By using a virtual machine, you can create a sandboxed environment that is isolated from your main operating system. This allows you to test new software, experiment with different Linux distributions, and learn about Linux without affecting your primary Windows 10 installation.
In this article, we will walk you through the step-by-step process of installing Virtualbox software, downloading a Linux distribution, creating a new virtual machine, configuring it appropriately, and finally installing Linux on the virtual machine. We will also cover post-installation setup and integration options between Windows 10 and the Linux virtual machine.
Before we dive into the details, let’s take a moment to ensure that you meet the system requirements for running a virtual machine on your Windows 10 operating system. It’s important to have a compatible system to ensure smooth performance and functionality.
What is a Linux Virtual Machine?
A Linux virtual machine (VM) is a software-based implementation of a Linux operating system that runs within a host operating system. In this case, the host operating system is Windows 10. The VM provides a complete virtualized environment, including virtual hardware devices and virtual storage, allowing you to run Linux applications and perform tasks as if you were using a physical Linux computer.
With a Linux virtual machine, you can have the best of both worlds. You can leverage the familiarity and convenience of your Windows 10 environment while enjoying the benefits of Linux for various tasks such as software development, testing, learning, or running specific Linux-based applications.
Virtual machines use a hypervisor, such as Oracle’s Virtualbox, to create and manage the virtual environment. The hypervisor allows multiple operating systems to run simultaneously on a single physical machine, providing the necessary isolation and resources for each VM.
Running Linux in a virtual machine gives you several advantages:
- Flexibility: You can create and configure multiple Linux VMs with different distributions, versions, and configurations based on your specific needs.
- Isolation: The virtual machine provides a sandboxed environment, protecting your host operating system from the potential risks of running Linux applications.
- Portability: You can easily move and share the VMs between different physical machines or cloud environments, allowing for seamless migration and collaboration.
- Resource management: By allocating specific resources, such as CPU cores and memory, to the VM, you can efficiently utilize your hardware without impacting the host system’s performance.
- Experimentation: With a Linux VM, you can experiment with different configurations, software installations, and system setups without the fear of impacting your primary operating system.
Whether you are a software developer, system administrator, or simply interested in exploring the Linux ecosystem, a Linux virtual machine provides a versatile and accessible platform to fulfill your goals.
System Requirements
Before setting up a Linux virtual machine on your Windows 10 system, it’s important to ensure that your computer meets the minimum system requirements for running virtualization software and hosting a virtual machine. Here are the general system requirements to consider:
- Hardware: You will need a computer with a reasonably fast processor, preferably an Intel Core i5 or AMD equivalent. The more cores and higher clock speed you have, the better the virtual machine’s performance will be. It is recommended to have at least 8GB of RAM, although more will improve performance. Additionally, you will need free disk space to store the virtual machine and the Linux distribution ISO file.
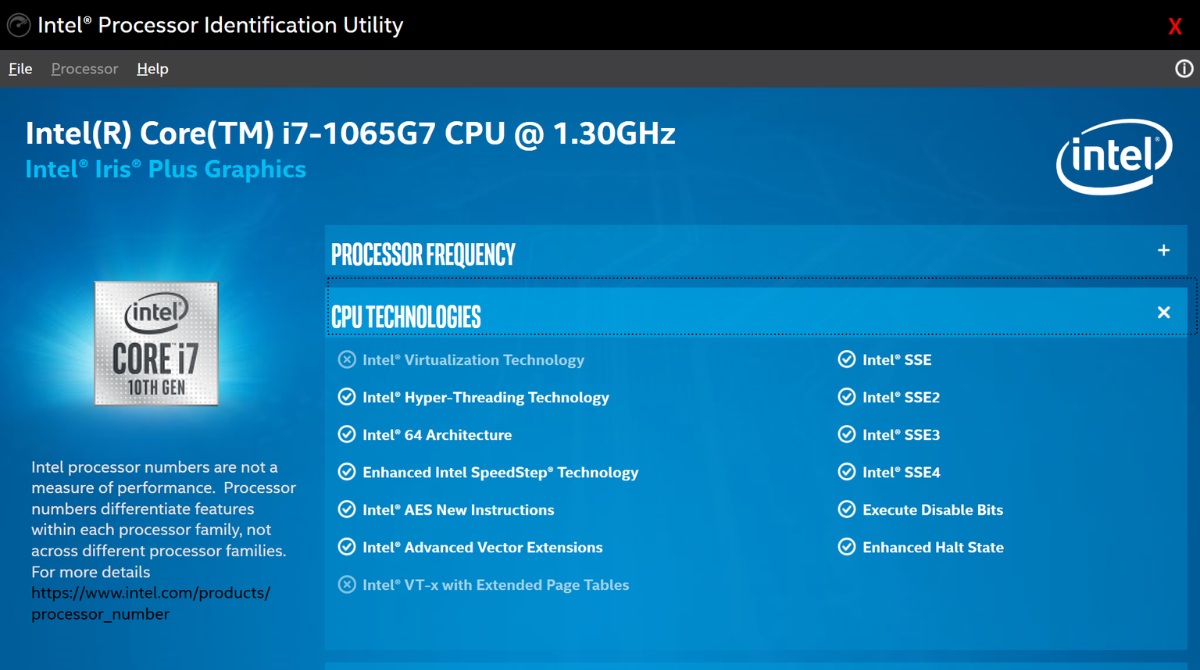
- Operating System: For running a virtual machine, you need a 64-bit version of Windows 10. Virtualization capabilities must be enabled in the system BIOS settings. You can check if your system supports virtualization by using third-party software, such as CPU-Z or Speccy.
- Software: You will need to download and install virtualization software on your Windows 10 system. One popular option is Oracle’s Virtualbox, which is free and widely supported. Ensure that you have the latest version of Virtualbox downloaded and installed on your computer before proceeding.
- Internet Connection: An internet connection is required for downloading the Linux distribution ISO file and any software updates during the installation process. Ensure that you have a stable and reasonably fast internet connection.
It’s worth noting that the system requirements may vary based on the specific Linux distribution you choose, as some distributions require more resources than others. It’s always a good idea to check the system requirements provided by the Linux distribution’s official website before proceeding with the installation.
By ensuring that your system meets the necessary requirements, you can ensure a smooth and successful installation of the virtualization software and the Linux virtual machine.
Downloading Virtualbox Software
Before you can create and run a Linux virtual machine on your Windows 10 system, you need to install virtualization software. One of the most popular and widely used virtualization platforms is Oracle’s Virtualbox. Here’s how you can download and install Virtualbox on your Windows 10 computer:
- Visit the Virtualbox website: Open your preferred web browser and navigate to the official Virtualbox website at https://www.virtualbox.org.
- Download Virtualbox: On the Virtualbox website, click on the “Downloads” menu option at the top of the page. You will be redirected to the downloads page where you can find the latest stable version of Virtualbox for various operating systems. Locate and click on the download link for the Windows hosts.
- Select the appropriate installer: Depending on your system specifications, you may have multiple options for downloading the Virtualbox installer. Choose the version that matches your Windows 10 architecture (32-bit or 64-bit). If you are unsure about your system architecture, you can check it by going to “Settings” > “System” > “About” on your Windows 10 computer.
- Start the download: Once you have selected the appropriate installer, click on the download link to initiate the download. The file size is usually around 100-200MB, so it may take a few minutes depending on your internet speed.
- Install Virtualbox: Once the download is complete, navigate to the location where you saved the installer file and double-click on it to start the installation process. Follow the on-screen instructions provided by the installer to complete the installation of Virtualbox on your Windows 10 system.
After the successful installation of Virtualbox, you will have the necessary software to create and manage virtual machines on your Windows 10 computer. In the next section, we will guide you through the process of creating a new virtual machine for running Linux.
Installing Virtualbox Software
Once you have downloaded the Virtualbox software onto your Windows 10 system, you can proceed with the installation process. Follow these steps to install Virtualbox:
- Locate the installation file: Navigate to the location where you saved the Virtualbox installer file.
- Run the installer: Double-click on the installer file to launch the installation wizard.
- Choose the installation options: On the installation wizard, you will be presented with various options. Read through the information and select the desired options. It is recommended to keep the default settings unless you have specific requirements.
- Install Virtualbox: Once you have chosen the installation options, click on the “Install” button to start the installation process. The installer will copy the necessary files and drivers onto your system.
- Complete the installation: After the installation process is complete, click on the “Finish” button to exit the installation wizard.
- Optional: Additional configurations: After the installation, you may need to perform some additional configurations, such as enabling virtualization in your BIOS settings. Make sure to consult the Virtualbox documentation or online resources for any necessary post-installation configuration steps.
Once the installation is complete, you will have Virtualbox installed and ready to use on your Windows 10 system. The next step is to download a Linux distribution that you want to install on your virtual machine.
Remember to keep the Virtualbox software updated to ensure you have the latest features and security patches. You can check for updates within Virtualbox or visit the official Virtualbox website to download the latest version when available.
Downloading a Linux Distribution
Now that you have Virtualbox installed on your Windows 10 system, you need to download a Linux distribution that you want to use on your virtual machine. There are numerous Linux distributions available, each with its own unique features and characteristics. Here’s how you can download a Linux distribution:
- Choose a Linux distribution: Research and decide which Linux distribution you want to use. Some popular options include Ubuntu, Fedora, CentOS, and Linux Mint. Consider factors such as your level of experience, specific requirements, and personal preferences. Visit the official website of the chosen distribution to download the ISO file.
- Visit the official website: Open your web browser and navigate to the official website of the Linux distribution you have chosen. For example, if you decide to go with Ubuntu, visit the Ubuntu website at https://ubuntu.com/download.
- Select the appropriate version: On the download page, you will usually find multiple versions of the Linux distribution. Choose the version that matches your requirements and hardware specifications. In most cases, the 64-bit version is recommended for modern hardware.
- Start the download: Click on the download link provided for the selected version to initiate the download. The file size of the ISO image can vary, so it may take some time depending on your internet speed.
- Verify the integrity of the ISO file (optional): Some Linux distributions provide checksums or GPG signatures to verify the integrity of the downloaded ISO file. You can compare the provided checksums or verify the GPG signature to ensure that the downloaded file has not been tampered with.
Once the download is complete and the integrity of the file has been verified (if applicable), you are ready to move on to the next step: creating a new virtual machine in Virtualbox. In the next section, we will guide you through the process of creating and configuring a virtual machine for your Linux distribution.
Creating a New Virtual Machine
With Virtualbox installed and a Linux distribution downloaded, you can now proceed to create a new virtual machine (VM) to install Linux on. Here’s how you can create a new virtual machine in Virtualbox:
- Launch Virtualbox: Open the Virtualbox application on your Windows 10 system.
- Create a new virtual machine: Click on the “New” button in the Virtualbox toolbar or go to “Machine” > “New”. This will open the new VM creation wizard.
- Provide a name: Enter a descriptive name for your virtual machine. This name will help you identify it later.
- Select the Linux distribution: In the “Type” dropdown menu, choose “Linux” as the operating system type. In the “Version” dropdown menu, select the specific version or distribution that matches the Linux ISO you downloaded.
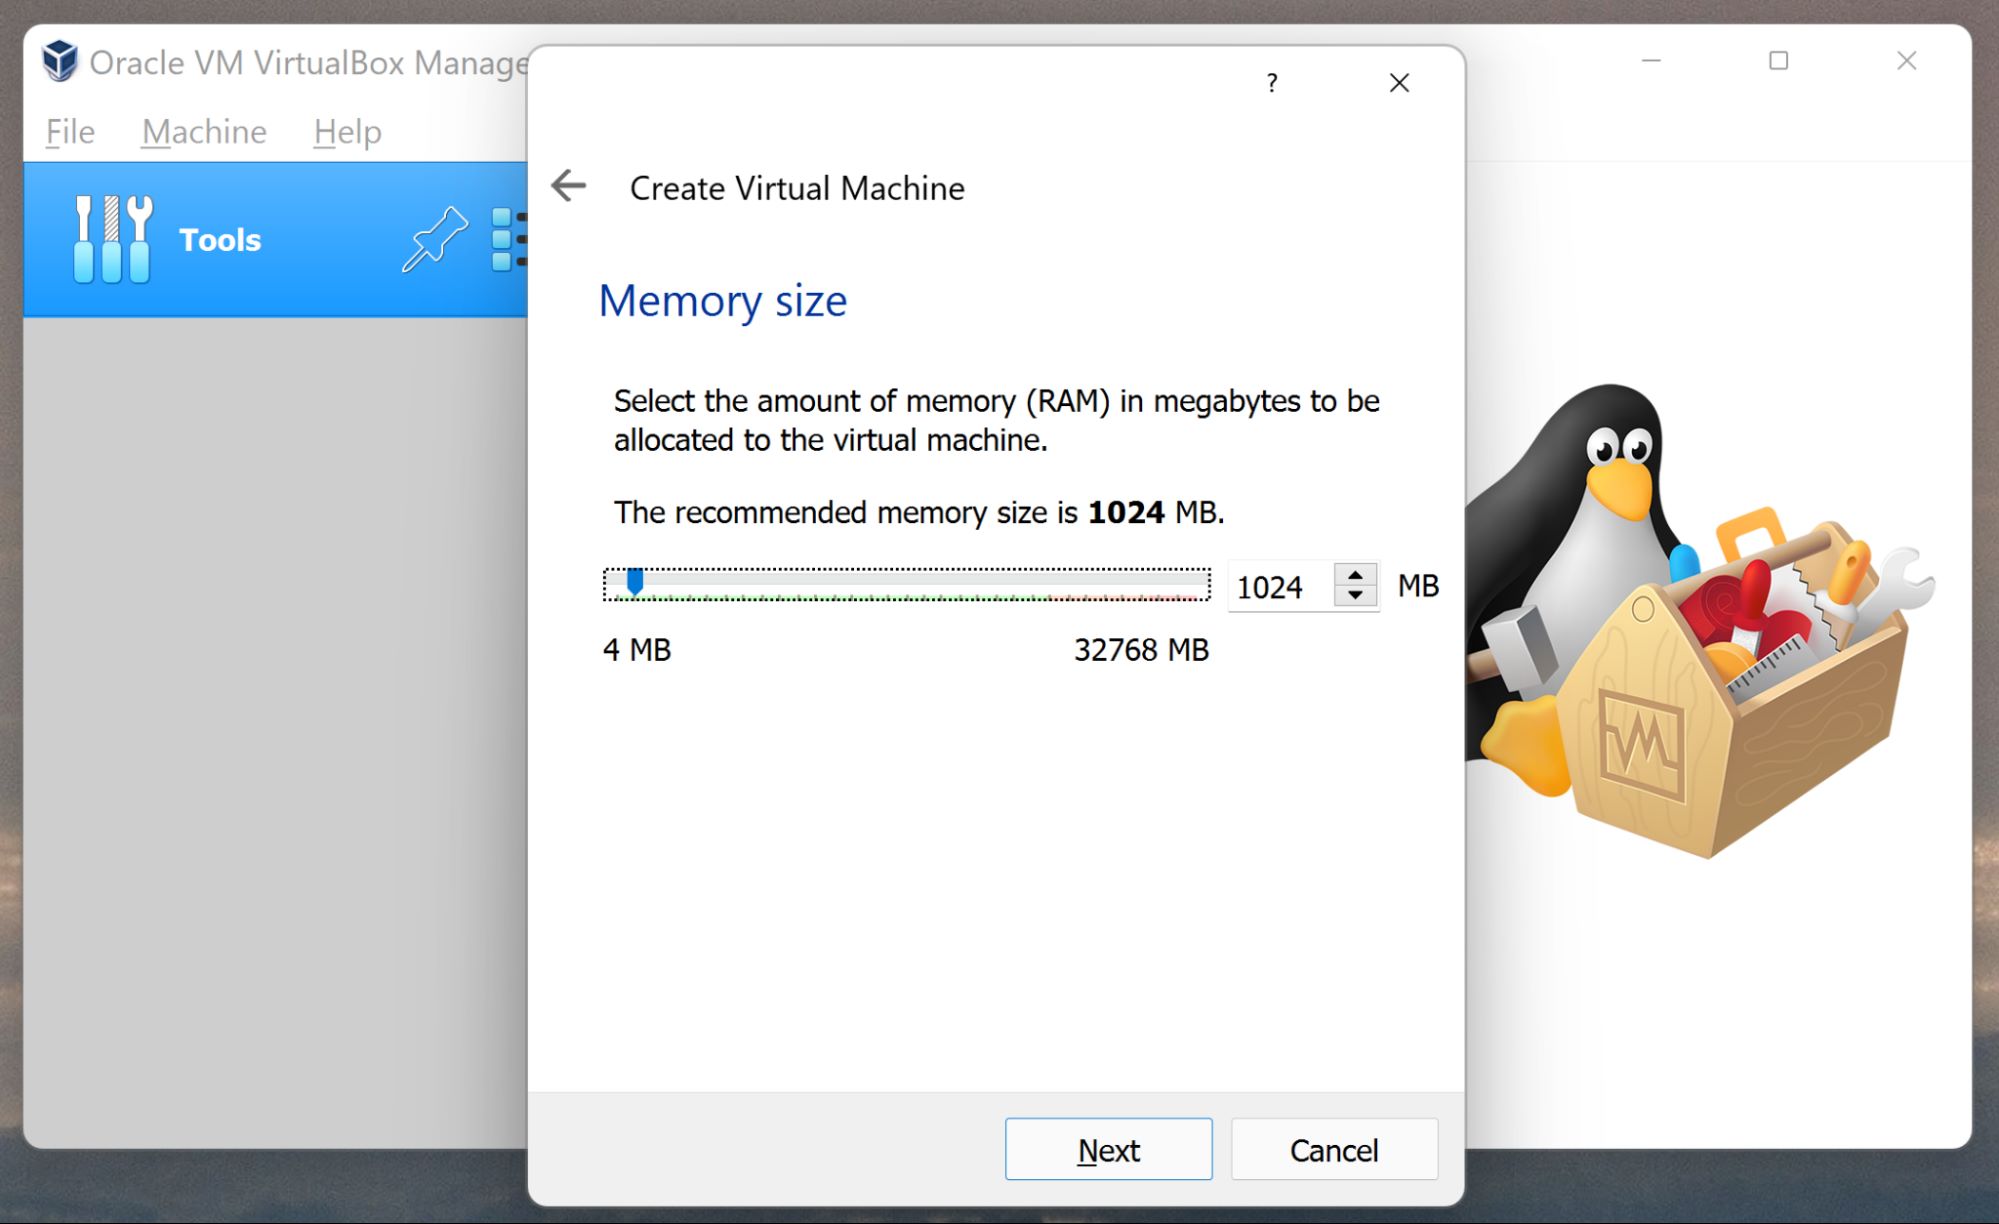
- Specify memory allocation: Allocate an appropriate amount of memory (RAM) to the virtual machine. It is recommended to assign at least 1GB of RAM, but you can adjust this based on your system’s resources and the requirements of your Linux distribution.
- Create a virtual hard disk: Select the option to “Create a virtual hard disk now” and click “Create”. This will open the virtual hard disk creation wizard.
- Choose a hard disk file type: Select the default option, “VDI (VirtualBox Disk Image)”.
- Choose storage type: Depending on your preference, select either “Dynamically allocated” or “Fixed size” storage. The dynamic allocation option allows the virtual hard disk to grow in size as needed, while the fixed size option allocates the full space immediately.
- Specify the virtual hard disk size: Enter the desired size for the virtual hard disk. It is recommended to allocate at least 20GB of storage, but you can adjust this based on your requirements.
- Create the virtual hard disk: Click “Create” to create the virtual hard disk file that will be used for your Linux virtual machine.
After completing these steps, you will have a new virtual machine created in Virtualbox. In the next section, we will guide you through the process of configuring the virtual machine settings before installing Linux on it.
Configuring Virtual Machine Settings
Once you have created a new virtual machine in Virtualbox, you need to configure its settings to ensure optimal performance and compatibility. Here are some important settings you should consider:
- General settings: In the “General” tab of the virtual machine settings, you can modify the name and allocation of CPU resources, enable or disable EFI support, and configure other general settings based on your preferences.
- System settings: In the “System” tab, you can adjust the allocation of Base Memory (RAM) and enable or disable other features like I/O APIC, PAE/NX, and nested virtualization. Ensure that you allocate enough memory to run your chosen Linux distribution smoothly.
- Display settings: The “Display” tab allows you to adjust the video memory and enable features like 3D acceleration and 2D video acceleration for improved graphics performance. You can also change the graphics controller type if needed.
- Storage settings: In the “Storage” tab, you can add or remove storage devices for your virtual machine. Attach the downloaded Linux distribution ISO file by adding it as a virtual optical disk. This will be used to install Linux on the virtual machine.
- Network settings: The “Network” tab allows you to configure network connectivity for your virtual machine. Choose the appropriate network adapter type, such as NAT or Bridged, to enable internet access and network connectivity within the virtual machine.
- Shared folders: If you want to share files between your host Windows 10 system and the Linux virtual machine, you can configure shared folders in the “Shared Folders” tab. This allows for easy file transfer and accessing files from both operating systems.
- Other settings: Depending on your requirements, you can explore additional settings like USB device configuration, audio settings, and more, in their respective tabs.
Take some time to review and configure these virtual machine settings according to your needs. Once you have customized the settings, you are ready to proceed with the installation of Linux on your virtual machine. In the next section, we will walk you through the installation process step-by-step.
Installing Linux on the Virtual Machine
With the virtual machine settings configured, you are now ready to install Linux on your virtual machine. Follow these steps to install Linux on your Virtualbox virtual machine:
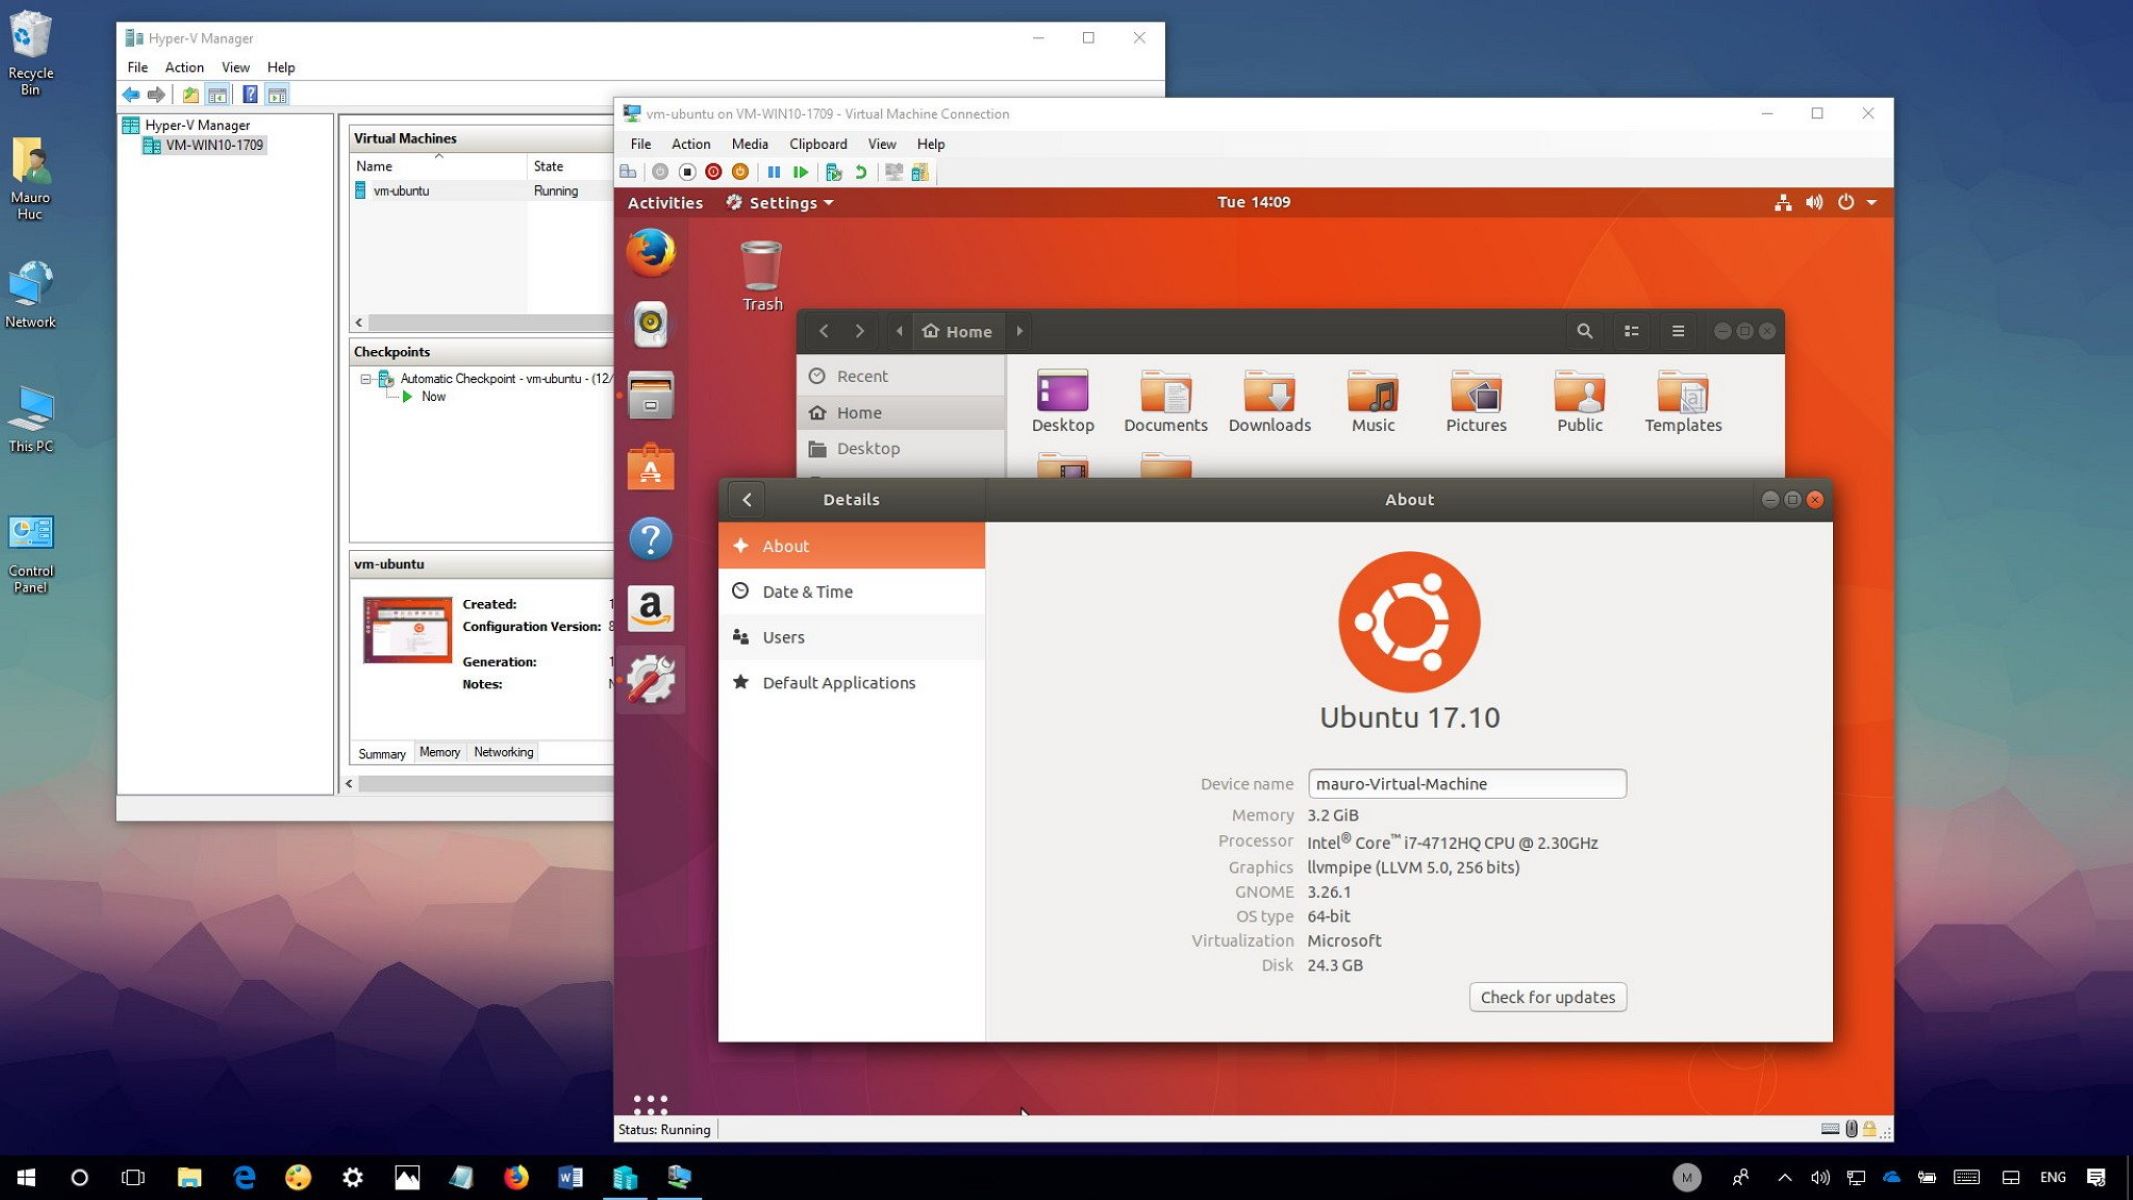
- Start the virtual machine: Select the virtual machine from the Virtualbox Manager and click on the “Start” button. This will launch the virtual machine and start the installation process.
- Select the installation media: When the virtual machine starts, it will prompt you to select the installation media. Choose the Linux distribution ISO file that you attached as a virtual optical disk in the storage settings.
- Begin the installation: Once the ISO file is selected, the installation should begin. Follow the prompts and instructions provided by the Linux distribution’s installer.
- Configure language and keyboard settings: Choose the desired language and keyboard layout that you want to use for your Linux installation.
- Partitioning and disk allocation: At this stage, you will be prompted to partition your virtual hard disk and allocate disk space for the Linux installation. You can either choose the default partitioning scheme or manually configure the partitions based on your preference.
- Create a user account: Provide the necessary information to create a user account for your Linux installation. This includes a username, password, and other optional details.
- Continue with the installation: Once you have completed the required steps and configured the necessary settings, the installer will proceed with the installation of the Linux distribution.
- Finish the installation: After the installation is complete, you will be prompted to restart the virtual machine. At this point, you can safely restart the virtual machine to complete the installation process.
- Post-installation steps: Once the virtual machine restarts, follow any additional post-installation steps provided by the Linux distribution. This may include installing updates, configuring additional software, or setting up user preferences.
After completing these steps, you should now have Linux successfully installed on your virtual machine. You can start exploring and using Linux within the virtual machine environment, allowing you to enjoy the benefits and capabilities of Linux alongside your Windows 10 operating system.
Post-Installation Setup
After installing Linux on your virtual machine, there are a few post-installation steps you can take to optimize your experience and ensure everything is running smoothly. Here are some key post-installation setup tasks:
- Update the system: It’s important to ensure that your Linux distribution is up to date with the latest security patches and software updates. Run the system update command (e.g.,
sudo apt update && sudo apt upgradefor Ubuntu) to update the installed packages. - Install additional software: Depending on your needs, you may want to install additional software packages on your Linux virtual machine. This could include development tools, productivity applications, web browsers, or multimedia software. Use your distribution’s package manager to install the desired software.
- Configure user preferences: Customize your Linux environment by configuring user preferences. This can include changing the desktop background, setting up user accounts, adjusting system settings, and personalizing the desktop environment to your liking.
- Set up networking: Ensure that your virtual machine has network connectivity. If necessary, configure the network settings in your virtual machine’s network manager to establish a stable and reliable internet connection.
- Configure shared folders: If you set up shared folders between your Windows 10 host and Linux virtual machine, configure the necessary settings to access and transfer files between the two environments.
- Enable guest additions: Virtualbox provides guest additions that improve the integration between the host and guest operating systems. Install the guest additions package within your virtual machine to enable features like seamless mouse integration, automatic desktop resizing, and shared clipboard functionality.
- Backup your virtual machine: It’s always a good practice to create regular backups of your virtual machine, especially if you have invested time and effort into customizing and configuring the environment. Use the backup tools provided by Virtualbox or other backup solutions to create a snapshot or backup of your virtual machine.
- Explore documentation and resources: Take advantage of the available documentation, tutorials, and online resources to further enhance your knowledge and usage of Linux. This can include browsing official Linux distribution websites, participating in Linux forums or communities, and reading books or online tutorials to deepen your understanding.
By completing these post-installation setup tasks, you can ensure that your Linux virtual machine is fully functional and tailored to your needs. Now you are ready to enjoy the benefits and versatility of Linux within your Windows 10 environment.
Integration Between Windows 10 and the Linux VM
One of the advantages of running a Linux virtual machine on your Windows 10 system is the ability to seamlessly integrate the two environments. Here are some ways you can enhance the integration between Windows 10 and your Linux virtual machine:
- Shared clipboard: With guest additions installed, you can enable the shared clipboard feature, allowing you to copy and paste text and files between the host Windows 10 system and the Linux virtual machine.
- Drag-and-drop: Another feature enabled by guest additions is drag-and-drop functionality. You can easily drag files from your Windows 10 desktop and drop them into the Linux virtual machine, and vice versa, simplifying file sharing between the two environments.
- Shared folders: As mentioned earlier, you can set up shared folders between Windows 10 and your Linux virtual machine. This allows you to access and modify files from both operating systems without the need for complex file transfer methods.
- Seamless mouse integration: Guest additions enable seamless mouse integration, ensuring that your cursor seamlessly transitions between the host and guest operating systems without the need for any special keystrokes or settings.
- Virtual machine window modes: Virtualbox offers different window modes that allow you to customize your virtual machine’s display. You can run the Linux virtual machine in full-screen mode, seamless mode, or in a resizable window, providing flexibility and convenient toggling between operating systems.
- Shared network: By configuring the appropriate network settings, you can establish a shared network connection between your Windows 10 system and the Linux virtual machine. This allows for seamless internet access and network communication between the host and guest operating systems.
- Remote Desktop Protocol (RDP): Virtualbox allows you to connect to your virtual machine using Remote Desktop Protocol. This allows for remote access to your Linux virtual machine from a Windows 10 system, enhancing accessibility and flexibility.
By leveraging these integration features, you can work seamlessly between your Windows 10 system and the Linux virtual machine, making it easier to share files, access resources, and utilize the power and capabilities of both operating systems.
Remember to refer to the Virtualbox documentation and resources for specific instructions on how to enable and configure these integration features within your virtual machine.
Conclusion
Creating a Linux virtual machine on your Windows 10 system opens the door to a world of possibilities. By following the steps outlined in this guide, you can successfully install and configure a Linux virtual machine using Virtualbox. This allows you to experience the power and versatility of Linux without the need for a dedicated physical machine or any major changes to your existing Windows 10 setup.
A Linux virtual machine provides numerous benefits, such as flexibility, isolation, portability, resource management, experimentation, and more. Whether you are a software developer, system administrator, or simply curious about Linux, a virtual machine offers a convenient and accessible platform to explore and utilize the Linux ecosystem.
Throughout this article, we discussed the process of downloading and installing Virtualbox software, downloading a Linux distribution, creating a new virtual machine, configuring its settings, and installing Linux on the virtual machine. We also explored the concept of post-installation setup and integration features between Windows 10 and the Linux virtual machine.
Remember to keep your virtual machine and Virtualbox software updated to benefit from the latest features and security patches. Additionally, exploring additional resources, documentation, and online communities can deepen your understanding and help you get the most out of your Linux virtual machine.
Now that you have the knowledge and steps to set up a Linux virtual machine, why not dive in and start exploring all that Linux has to offer? Unleash your creativity, experiment with different Linux distributions, and discover new possibilities in the world of Linux within the comfort of your Windows 10 operating system.