Introduction
Welcome to the world of business email, where professionalism and efficiency are the keys to success. In today’s digital age, having a dedicated email address for your business is essential for establishing credibility and maintaining effective communication with clients, partners, and stakeholders.
But with so many options and configurations available, setting up a business email can seem like a daunting task. That’s where we come in. In this article, we will guide you through the process of creating and optimizing your business email to ensure seamless communication and brand consistency.
Whether you are a small startup, a growing medium-sized company, or an established enterprise, having a professional business email is crucial for your success. It not only reflects your brand’s identity but also helps you build trust with your customers and business contacts.
Throughout this article, we will cover various aspects of creating and managing a business email, including selecting a domain, choosing an email service provider, configuring email clients, setting up email aliases, integrating with your website, and implementing best practices for business communication.
By the end of this article, you will have the knowledge and tools to set up and optimize your business email, ensuring a streamlined and professional communication experience for your company.
So let’s dive in and explore the exciting world of business email!
Choosing a domain for your business email
When setting up a business email, the first step is to choose a domain name that reflects your company’s identity and aligns with your brand. A domain is the unique web address that appears after the “@” symbol in an email address.
Here are some key considerations when selecting a domain for your business email:
- Branding: Your domain should ideally include your company name or a relevant keyword that represents your brand. This helps create a professional image and reinforces your brand identity in every email you send.
- Extension: The domain extension, such as .com, .net, or .org, plays a role in shaping perceptions. Generally, .com is the most commonly used and widely recognized extension for businesses.
- Memorability: Choose a domain that is easy to remember and pronounce. Avoid using numbers, hyphens, or any complex spelling that might confuse or deter recipients from contacting you.
- Availability: Check the availability of your desired domain name to ensure it hasn’t already been registered by another company or individual. You can use domain registration websites to search for available domains.
- Legal considerations: Make sure your domain doesn’t violate any trademark or copyright laws. Conduct a thorough search to avoid potential legal issues down the road.
By carefully considering these factors, you can choose a domain that reflects your brand, is easy to remember, and helps establish a professional image for your business. Once you have selected a domain, you are ready to move on to the next step – selecting an email service provider.
Selecting an email service provider
Choosing the right email service provider (ESP) is crucial for the smooth functioning of your business email. An ESP is responsible for hosting and managing your email accounts, ensuring reliable and secure email delivery, and providing essential features and functionalities. Here are some factors to consider when selecting an email service provider:
- Reliability and uptime: Look for an ESP that guarantees high uptime and minimal service disruptions. Downtime can lead to loss of productivity and can negatively impact your business communication.
- Security measures: Ensure that the ESP has robust security measures in place to protect your sensitive information and prevent unauthorized access to your emails.
- Storage capacity: Assess your storage needs and choose an ESP that offers sufficient storage space for your business emails. Consider future growth when making this decision.
- Scalability: If your business is projected to grow in the future, it’s important to select an ESP that can easily accommodate the increased email volume and user accounts.
- User-friendly interface: A user-friendly interface makes it easier for you and your team to navigate the email platform, manage accounts, and access important features.
- Integration capabilities: If you use other business tools like customer relationship management (CRM) software or project management platforms, ensure that the ESP allows seamless integration with these applications.
- Customer support: Look for an ESP that offers reliable customer support to address any technical issues or concerns that may arise.
- Pricing: Compare the pricing plans of different ESPs to find one that aligns with your budget and includes the necessary features and support.
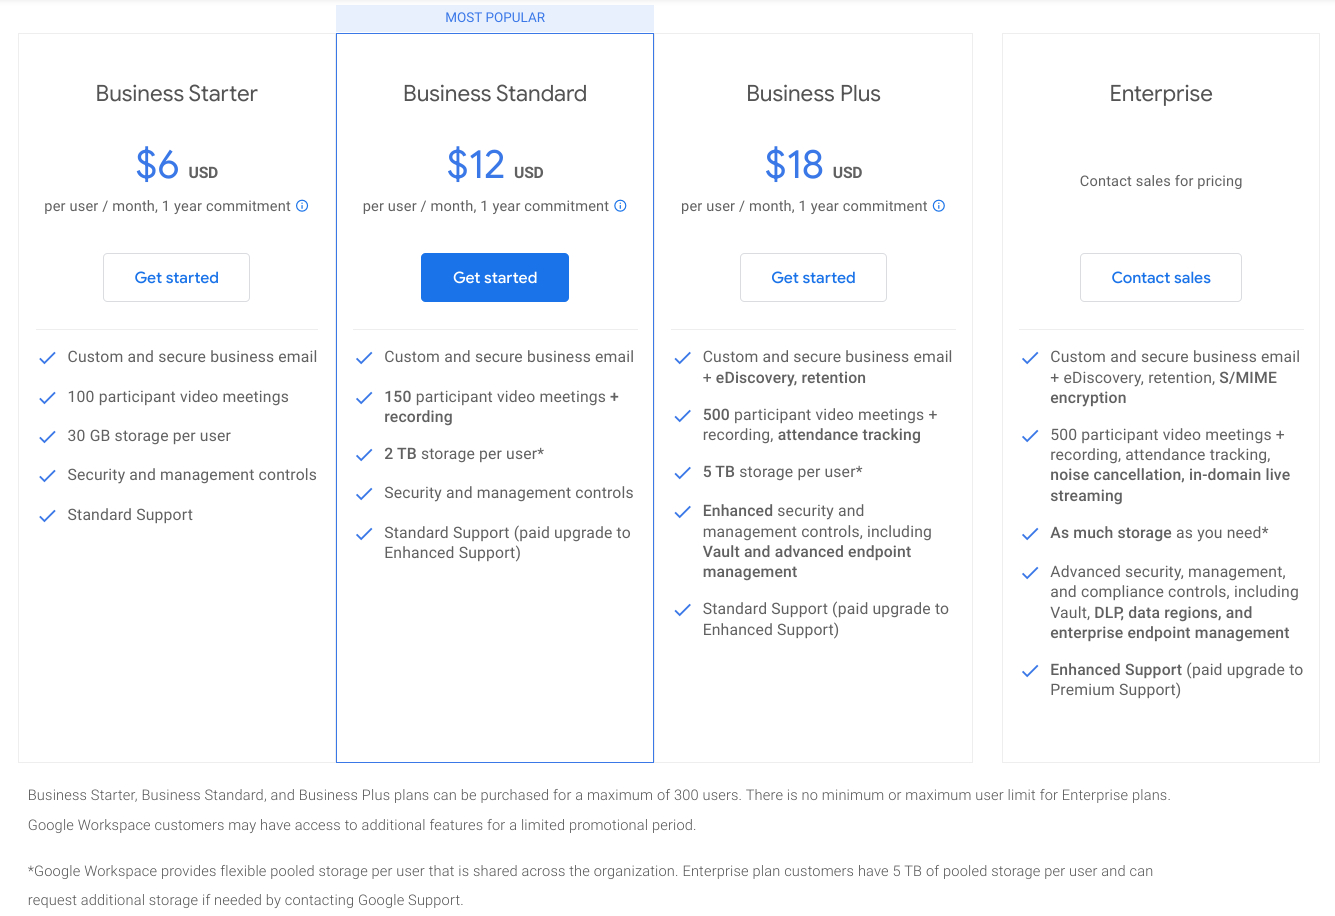
By carefully assessing these factors, you can choose an ESP that meets your business’s specific needs and requirements. Popular ESPs include Gmail, Microsoft Outlook, and Zoho Mail. Each has its own set of features and pricing options, so take the time to research and compare before making a decision.
Once you have selected an ESP, you can proceed with the setup and configuration of your business email accounts. In the next sections, we will explore setting up a business email using Gmail and Outlook, two widely used email clients.
Setting up your business email with Gmail
Gmail is a popular and powerful email service provider that offers a range of features and seamless integration with other Google services. Setting up your business email with Gmail is a straightforward process. Here’s how to do it:
- Create a Google Workspace account: To use Gmail for your business email, you will need to sign up for a Google Workspace account. This account allows you to create customized email addresses using your domain.
- Verify your domain: Once you have a Google Workspace account, you will need to verify that you own the domain you want to use for your business email. Google provides detailed instructions on how to complete the domain verification process.
- Add users and email aliases: After verifying your domain, you can add users to your Google Workspace account. Each user will have their own email address associated with your domain. Additionally, you can create email aliases, which are email addresses that forward messages to an existing user’s inbox.
- Customize your email settings: Gmail allows you to customize various settings for your business email. You can set up email filters, enable automatic forwarding, configure signature settings, and more. Take some time to explore the options and tailor them to your specific needs.
- Access your business email: Once the setup is complete, you and your team members can start accessing your business email through the Gmail interface. Simply log in with your Google Workspace account credentials, and you will have access to your professional email inbox.
Using Gmail for your business email offers numerous benefits, such as a user-friendly interface, powerful search capabilities, spam filtering, and seamless integration with other Google services like Google Drive and Google Calendar.
With a properly set up Gmail account, you can efficiently manage your business emails, stay organized, and collaborate with team members, all within the familiar and trusted Gmail environment.
In the next section, we will explore how to configure your business email with Outlook, another popular email client.
Configuring your business email with Outlook
Microsoft Outlook is a widely used email client known for its robust features and advanced functionality. Configuring your business email with Outlook allows you to access and manage your emails seamlessly. Here’s how you can do it:
- Open Outlook and click on ‘File’: Launch Outlook on your computer and navigate to the ‘File’ tab located in the top left corner of the interface.
- Select ‘Add Account’: Under the ‘File’ menu, click on the ‘Add Account’ button to initiate the email setup process.
- Enter your email address: In the ‘Add Account’ window, enter your business email address in the provided field and click ‘Connect’.
- Choose your account type: Outlook will attempt to automatically configure your account settings based on your email address. If it’s unable to do so, you will be prompted to select your account type (IMAP or POP) and enter the server settings manually.
- Enter your account details: Provide the necessary information, such as your name, email address, username, password, and server settings. You may need to consult your email service provider for the specific server settings.
- Complete the setup: After entering the required information, click on ‘Next’ and wait for Outlook to validate your account settings. Once validated, you will be notified that your account setup is complete.
- Access your business email: You can now access and manage your business email through Outlook. Your inbox, sent items, and other folders will be synchronized with your email server, allowing you to view and send emails directly from Outlook.
Configuring your business email with Outlook provides a user-friendly interface, powerful email management tools, and the ability to work offline. It also offers advanced features like calendar integration, task management, and email filtering, allowing you to stay organized and productive.
By seamlessly integrating your business email with Outlook, you can centralize your communication and gain access to a wide range of features that enhance your email experience.
In the next section, we will explore the concept of creating email aliases for different departments, which can help streamline communication within your organization.
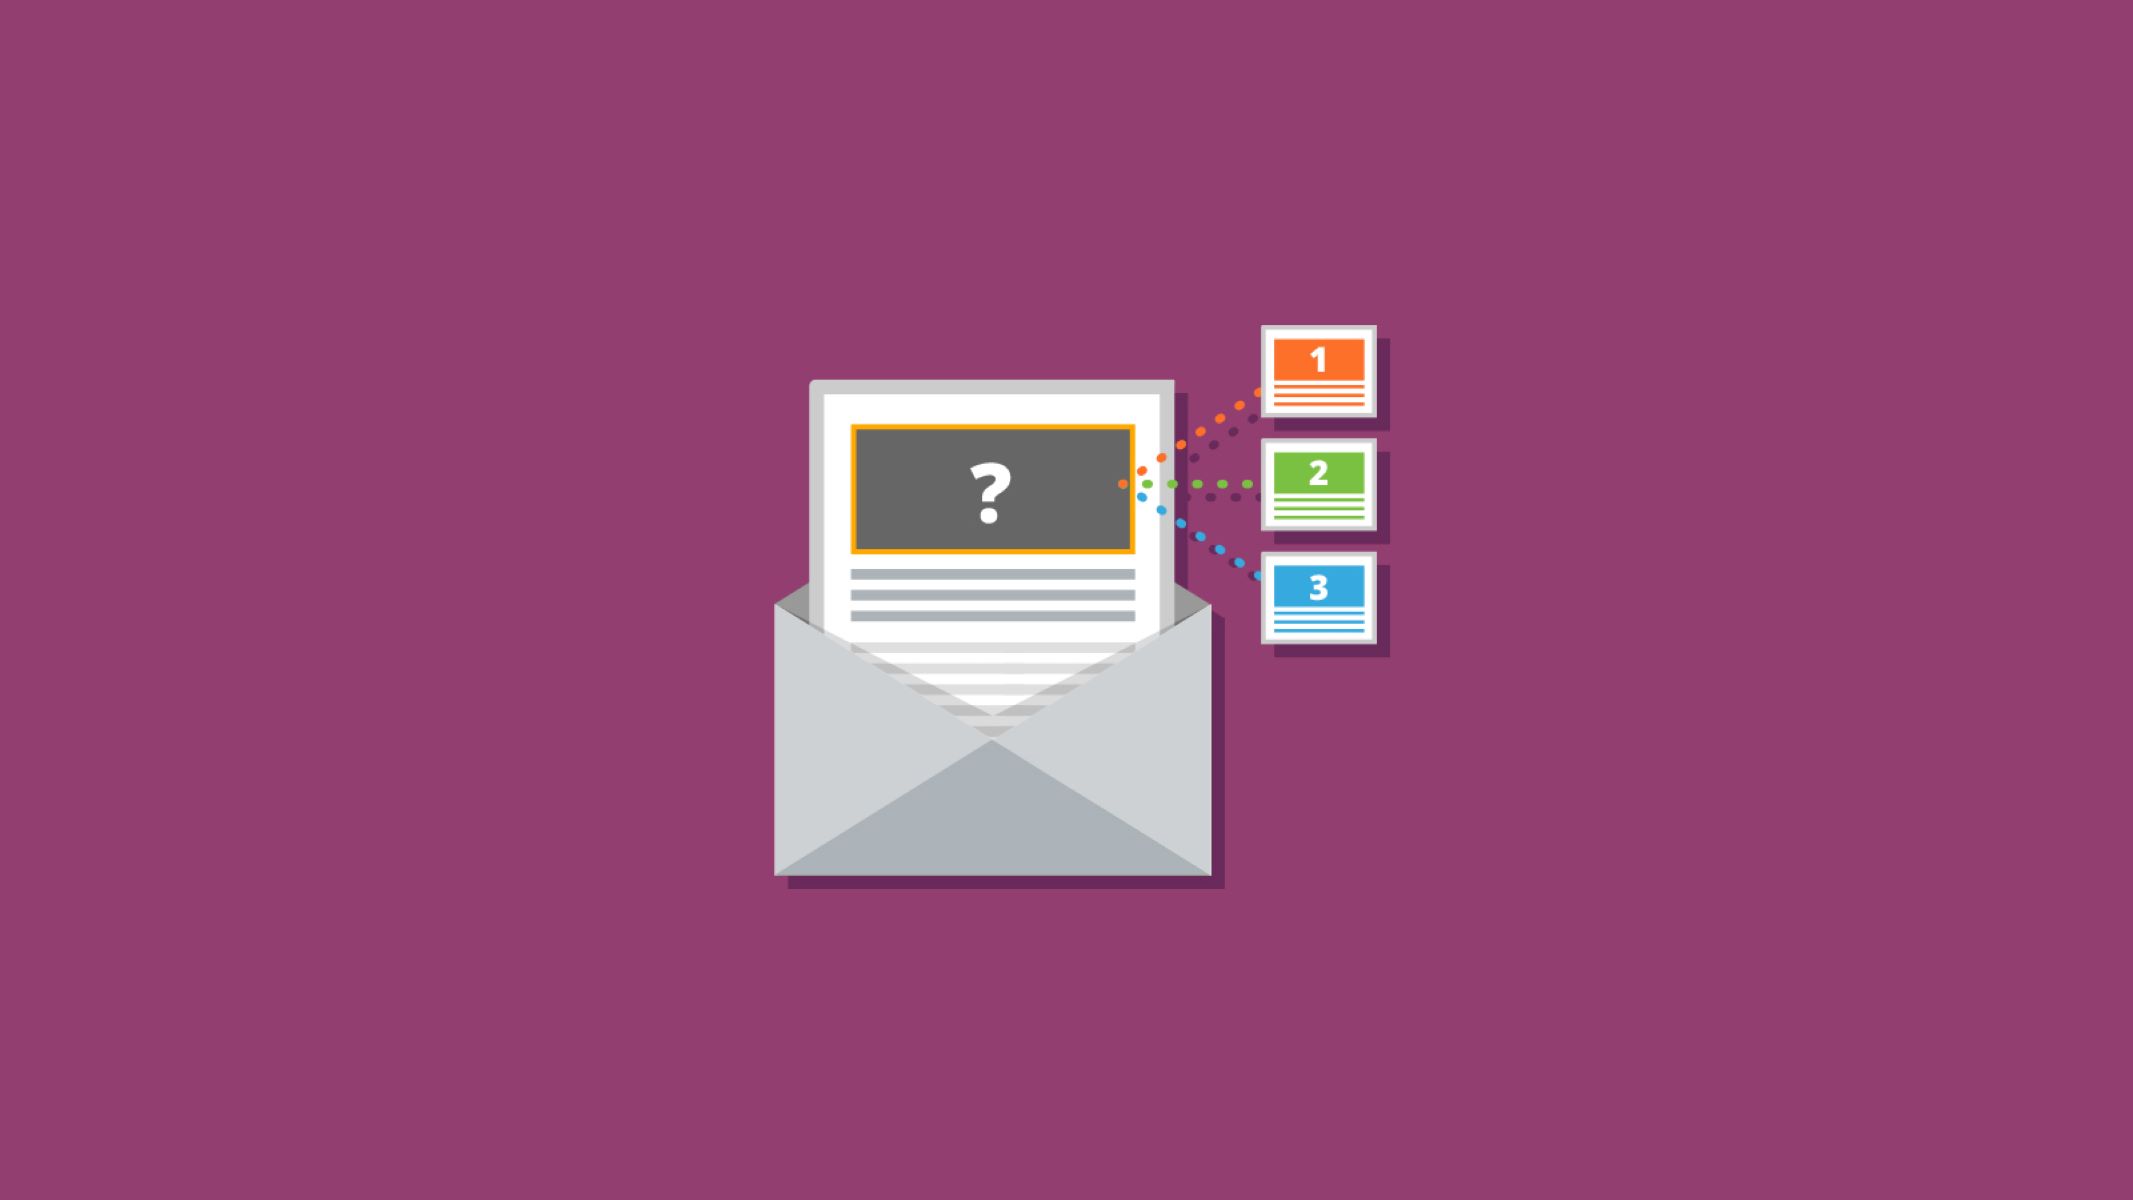
Creating email aliases for different departments
Creating email aliases for different departments is a useful practice that can help streamline communication within your organization. An email alias is an additional email address that redirects messages to a designated recipient or group of recipients. Here’s how you can create email aliases for different departments:
- Identify the departments: Determine the various departments or teams within your organization that would benefit from having their own email aliases. Examples may include sales, marketing, customer support, finance, and HR.
- Create the email aliases: Depending on your email service provider, the process for creating email aliases may vary. In most cases, you can log in to your account settings and navigate to the section for managing aliases. Follow the instructions provided to create email aliases for each department.
- Assign recipients: Once you have created the email aliases, specify the recipients who should receive messages sent to each alias. This can be individual team members within the department or a group email address shared by the entire team.
- Communicate the aliases: Make sure to inform your team members and external contacts about the email aliases. This will ensure that everyone is aware of the appropriate email address to use when contacting specific departments.
Creating email aliases for different departments offers several benefits. It provides a clear and organized way to direct department-specific inquiries and allows for easier tracking and management of communication within your organization.
For example, external stakeholders can send inquiries to the sales department by emailing sales@yourdomain.com, while internal team members can collaborate by using the marketing@yourdomain.com alias. This segmentation helps ensure that messages reach the right individuals or teams, improving response times and overall efficiency.
Lastly, creating email aliases for different departments also allows for better tracking and analysis of communication metrics. You can easily monitor the volume of messages received by each department, track response times, and gain insights into department-specific trends.
Next, let’s explore the concept of email forwarding and how it can simplify the management of multiple email addresses.
Setting up email forwarding
Email forwarding is a practical feature that allows you to automatically redirect incoming messages from one email address to another. It simplifies the management of multiple email addresses and ensures that you can access all incoming emails in a centralized location. Here’s how you can set up email forwarding:
- Identify the email addresses to forward: Determine which email addresses you want to set up forwarding for. This can include personal email accounts, department-specific emails, or even emails from different domains.
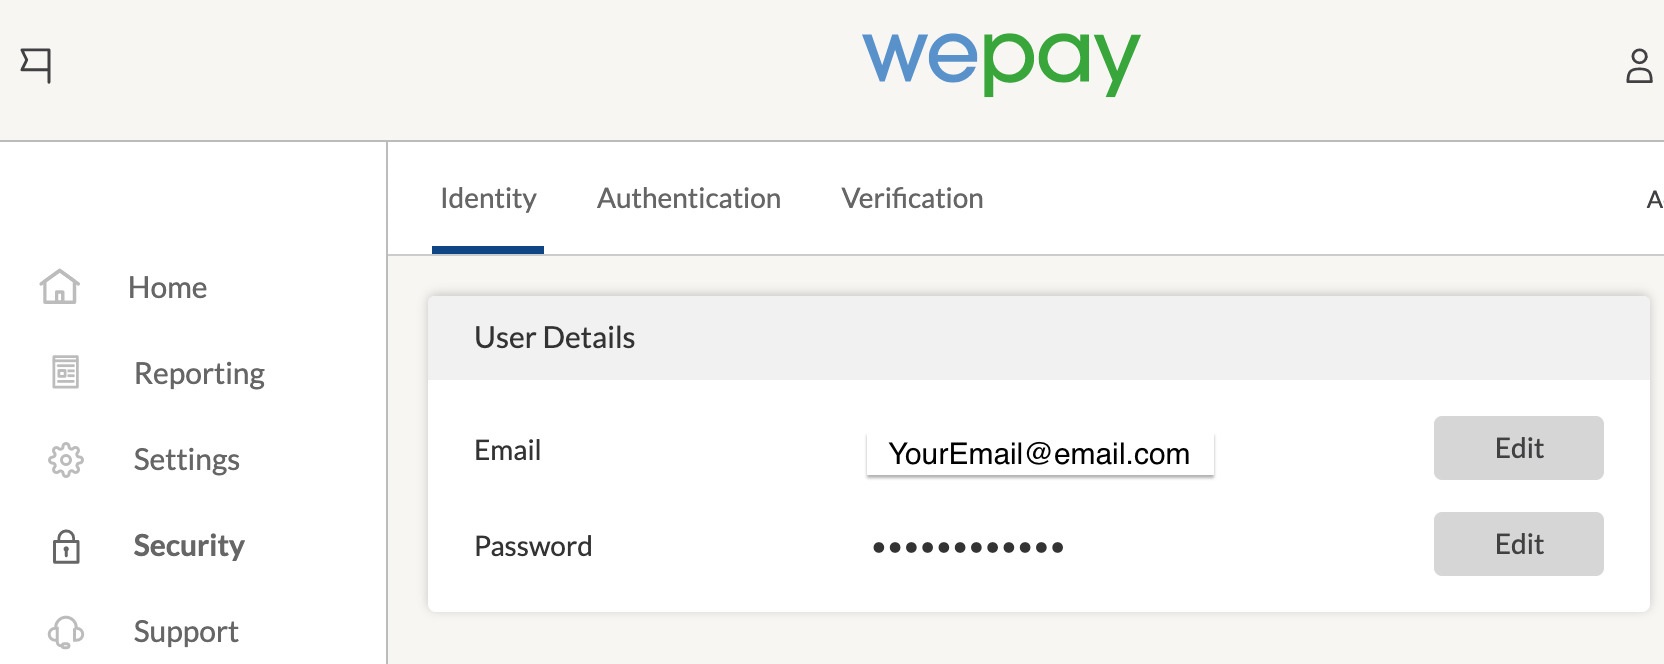
- Access your email settings: Log in to the email account that you want to set up forwarding for and navigate to the account settings. The exact location may vary depending on your email service provider.
- Locate the forwarding settings: In the account settings, look for the forwarding options or rules. Depending on the email service provider, you may find it under a section like “Forwarding and POP/IMAP” or “Filters and forwarding.”
- Set up email forwarding: Follow the instructions provided to set up email forwarding. Typically, you will need to enter the email address to which you want to forward incoming messages. You may also have the option to choose if you want to keep a copy of forwarded messages in the original mailbox.
- Test and verify: After saving the forwarding settings, send a test email to the email address that should be forwarded. Check to ensure that the email is successfully forwarded to the designated address.
Setting up email forwarding simplifies email management by allowing you to consolidate incoming messages from different accounts into a single inbox. It helps ensure that you don’t miss any important emails and allows for better organization and prioritization.
For example, you can set up forwarding from a personal email account to your business email address, ensuring that all incoming messages are accessible from one central location. This eliminates the need to log in to multiple accounts and simplifies the process of staying on top of your email correspondence.
Additionally, email forwarding can be useful for redirecting department-specific emails to the appropriate team members. For instance, emails sent to marketing@yourdomain.com can be automatically forwarded to the individuals responsible for marketing initiatives within your organization.
By setting up email forwarding, you can streamline your email management process, ensure prompt responses, and maintain better control over your communication channels.
Next, let’s explore how you can integrate your business email with your website to create a cohesive online presence.
Integrating your business email with your website
Integrating your business email with your website is crucial for creating a cohesive online presence and ensuring seamless communication with your website visitors. By displaying your business email prominently on your website, you make it easy for visitors to contact you and establish a professional and trustworthy image for your brand. Here are some ways to integrate your business email with your website:
- Contact page: Create a dedicated “Contact” page on your website and prominently display your business email address. Include a contact form as an alternative method for visitors to reach out to you.
- Email links: In addition to displaying your email address, make sure to add links throughout your website that automatically open the visitor’s default email client with your email address pre-filled. This simplifies the process for visitors to send you an email.
- Widget or live chat: Consider integrating a widget or live chat feature on your website that allows visitors to initiate a real-time conversation or send a message directly to your email address.
- Email buttons: Create visually appealing buttons or banners that link directly to your business email. Place these buttons strategically on your website, such as in the header, footer, or sidebar.
- Branded email signature: Include your business email address in your email signature, which should be consistent across all email accounts and communication channels. This reinforces your brand identity and provides a professional touch.
By integrating your business email with your website, you make it convenient for visitors to connect with you and increase the chances of receiving inquiries, feedback, and business opportunities.
Remember to regularly monitor your business email and promptly respond to any inquiries or messages received through your website. This shows your dedication to customer service and helps build trust with your audience.
Next, let’s explore the concept of setting up an autoresponder for your business email to effectively manage incoming messages.
Setting up an autoresponder
Setting up an autoresponder for your business email is a valuable tool for managing incoming messages and ensuring timely responses to your contacts. An autoresponder is a pre-written email message that is automatically sent to anyone who sends an email to your business email address. Here’s how you can set up an autoresponder:
- Access your email settings: Log in to your email account and navigate to the settings or options section. Look for the autoresponder or vacation responder feature.
- Compose your autoresponder message: Write a clear and concise message that informs the sender about your absence, provides alternative contact information if necessary, and sets expectations for when they can expect a response.
- Set the duration: Specify the duration for which the autoresponder should be active. It can be a specific date range or a general timeframe.
- Manage recipient exclusions: Determine if there are any recipients who shouldn’t receive the autoresponder message, such as internal team members or VIP clients. Exclude these recipients from receiving the autoresponder.
- Enable the autoresponder: Once you have composed your message, set the duration, and managed recipient exclusions, enable the autoresponder feature.
An autoresponder serves various purposes, such as informing others of your absence, acknowledging their message, and offering alternative means of contact if immediate assistance is required. It helps manage expectations and provides a professional touch to your email communication.
Some common scenarios where utilizing an autoresponder can be beneficial include when you are on vacation, attending a conference, or simply need uninterrupted time to focus on important tasks. Regardless of the reason, an autoresponder ensures that senders receive a confirmation that their email has been received and will be addressed in due course.
Remember to regularly check your inbox and respond to any urgent or important messages that may require immediate attention, even if an autoresponder is activated. It’s also a good practice to disable the autoresponder feature once you’re back and ready to resume regular communication.
Now that you have learned how to set up an autoresponder, let’s move on to the importance of email etiquette and best practices for effective business communication.
Email etiquette and best practices for business communication
When it comes to business communication, email etiquette plays a vital role in conveying professionalism, building relationships, and ensuring effective and efficient correspondence. Here are some best practices to follow for successful business email communication:
- Use a professional tone: Ensure your emails are written in a professional tone, using proper grammar, spelling, and punctuation. Be concise and focus on the main points to convey your message clearly.
- Be mindful of your subject line: Use a clear and informative subject line to help recipients understand the purpose of your email. A well-crafted subject line increases the chances of your email being read and addressed promptly.
- Reply promptly: Aim to reply to emails in a timely manner. Responding promptly shows respect for the sender’s time and helps maintain efficient communication. Even if you are unable to provide a detailed response immediately, acknowledge receipt of the email and indicate when the sender can expect a more comprehensive reply.
- Use appropriate greetings and closings: Begin your email with a polite greeting, such as “Dear [Recipient’s Name]” or “Hello [Recipient’s Name].” End your email with a closing, such as “Best regards” or “Sincerely,” followed by your name and contact information.
- Be mindful of tone and emotions: Avoid using overly emotional or confrontational language in emails. Email communication can lack the context of body language or tone of voice, which can lead to misinterpretation. Choose your words carefully and consider how your message may be received by the recipient.
- Use email signatures: Include a professional email signature that includes your name, job title, company, and contact information. This helps recipients easily identify you and provides them with essential ways to get in touch with you.
- Proofread before sending: Always proofread your emails before sending them to ensure there are no spelling or grammatical errors. Read your email carefully to ensure your message is clear, concise, and conveys the intended meaning.
- Respect privacy and confidentiality: Be cautious when sharing sensitive information via email. Double-check the recipients’ email addresses and consider encrypting sensitive attachments to protect the privacy and confidentiality of your communication.
By following these email etiquette and best practices, you can cultivate professional and effective communication with your clients, colleagues, and business partners. Remember, strong email communication enhances your professional image and helps foster positive relationships within your professional network.
Now that you are equipped with these best practices, you can confidently engage in business email communication, ensuring clarity, professionalism, and efficient correspondence.
Conclusion
In today’s digital age, a professional business email is a necessity for establishing credibility, maintaining effective communication, and building strong relationships with clients, partners, and stakeholders. By following the steps outlined in this article, you can create and optimize your business email to ensure seamless communication and brand consistency.
Choosing the right domain for your business email sets the foundation for your online presence. Selecting an email service provider that offers reliability, security, and scalability is crucial for the smooth functioning of your business email. Configuring your business email with popular email clients like Gmail and Outlook allows you to leverage their advanced features and user-friendly interfaces.
Creating email aliases for different departments facilitates streamlined communication within your organization, while email forwarding simplifies the management of multiple email addresses. Integrating your business email with your website creates a cohesive online presence and makes it easy for visitors to contact you.
Automating your email communication with an autoresponder ensures prompt responses and sets expectations for when the sender can expect a reply. Adhering to email etiquette and best practices, such as using a professional tone, replying promptly, and respecting privacy and confidentiality, helps foster effective and respectful business communication.
By implementing these strategies and best practices, you can enhance your professional image, improve communication efficiency, and establish strong connections with your contacts. Remember to regularly review and update your business email setup to adapt to changing needs and technology advancements.
Now, armed with the knowledge and tools provided in this article, you are well-equipped to optimize and manage your business email effectively. Embrace the power of a professional email presence and watch as it elevates your business to new heights.