Checking RAM Type
Before diving into finding your specific RAM model, it’s important to determine the type of RAM you have. Different types of RAM include DDR, DDR2, DDR3, and DDR4. The RAM type affects the speed and compatibility of your system, so it’s essential to know which type you have.
To check your RAM type, you can follow these steps:
- Open the Task Manager on your Windows PC by pressing Ctrl + Shift + Esc or right-clicking on the taskbar and selecting “Task Manager.”
- Click on the “Performance” tab.
- Under the “Memory” section, you’ll see information about your installed RAM, including the type. Look for “DDR,” followed by a number.
If you’re using a Mac, you can find the RAM type by following these steps:
- Click on the Apple menu and select “About This Mac.”
- In the Overview tab, you’ll find the “Memory” section, which will display the RAM type.
On Linux, you can use the terminal to check the RAM type. Open the terminal and enter the following command:
sudo dmidecode -t memory | grep -i type
This command will display the RAM type installed on your Linux system.
Knowing your RAM type is crucial because it determines the compatibility when upgrading or changing your RAM. Now that you have determined the RAM type, you can proceed to find the specific model of RAM you have.
Finding RAM Model on Windows
On Windows, there are several methods you can use to find the specific model of your RAM. Here are a few of the most common methods:
Checking RAM Model using Command Prompt
One way to find the RAM model is by using the Command Prompt:
- Press the Windows key and search for “Command Prompt” or “cmd.”
- Open the Command Prompt.
- Type the following command and press Enter:
wmic memorychip get devicelocator, manufacturer, partnumber. - You will see the RAM details, including the manufacturer and part number of each memory chip installed in your system.
Checking RAM Model using Task Manager
The Task Manager in Windows can also provide information about your RAM:
- Press Ctrl + Shift + Esc to open the Task Manager.
- Click on the “Performance” tab.
- Under the “Memory” section, you’ll find details about the total physical memory installed in your system.
- Click on “Open Resource Monitor.”
- In the Resource Monitor, go to the “Memory” tab.
- Under “Physical Memory,” you’ll find information about your RAM, including the manufacturer and part number.
Checking RAM Model using System Information
The System Information tool provides detailed information about various hardware components, including your RAM:
- Press the Windows key and search for “System Information.”
- Open the System Information application.
- In the left pane, expand “Components” and click on “Memory.”
- In the right pane, you’ll find information about your installed RAM, including the manufacturer and part number.
By following these methods, you can easily find the model information for your RAM on a Windows operating system. Now you can proceed to find the RAM model on your specific hardware and operating system.
Finding RAM Model on Mac
If you are a Mac user, you can find the model of your RAM by following these steps:
Using About This Mac
- Click on the Apple menu in the top left corner of your screen and select “About This Mac.”
- In the Overview tab, you’ll find the “Memory” section, which displays information about your installed RAM.
- Click on “Memory” to get more details about your RAM.
- Here, you will find information such as the total memory capacity, the number of memory slots used, and the RAM type and speed.
Using System Report
- Click on the Apple menu and select “About This Mac.”
- In the Overview tab, click on “System Report.”
- In the left sidebar, under “Hardware,” click on “Memory.”
- In the right pane, you’ll see detailed information about your RAM, including the manufacturer, part number, and other specifications.
By using these methods, you can easily find the model and specifications of the RAM installed in your Mac. This information is essential when upgrading your RAM or troubleshooting any issues related to memory on your Mac.
Finding RAM Model on Linux
Linux provides several methods to find the model of RAM installed on your system. Here are a few ways to accomplish this:
Using dmidecode Command
One of the easiest ways to retrieve RAM model information on Linux is by using the dmidecode command:
- Open a terminal on your Linux system.
- Enter the following command:
sudo dmidecode -t memory. - This command will display detailed information about your installed RAM, including the manufacturer, part number, and other specifications.
Checking /proc/meminfo File
Another method to find RAM details is by checking the /proc/meminfo file:
- Open a terminal on your Linux system.
- Enter the following command:
cat /proc/meminfo. - In the output, you will find information about your RAM, including the total memory, available memory, and other details.
These methods should help you find the model and specifications of your RAM on a Linux system. It’s crucial to know this information when upgrading your RAM or troubleshooting any memory-related issues.
Checking RAM Model using Command Prompt
If you’re using a Windows operating system, you can easily find the model of your RAM using the Command Prompt. Here’s how:
- Press the Windows key on your keyboard and type “Command Prompt” in the search bar. Click on the Command Prompt application to open it.
- In the Command Prompt window, type the following command and press Enter:
wmic memorychip get devicelocator, manufacturer, partnumber - You will see a list of information about your RAM, including the device locator, manufacturer, and part number for each memory chip installed in your system.
The “DeviceLocator” is the physical slot on your motherboard where the memory chip is plugged in. The “Manufacturer” field indicates the company that manufactured the RAM, and the “PartNumber” field provides the specific model number for each memory chip.
By using the Command Prompt, you can quickly gather detailed information about your RAM model. This is particularly useful for upgrading your RAM or troubleshooting hardware issues.
Keep in mind that the Command Prompt method may require administrator privileges. If prompted, grant the necessary permissions to access the memory details. Additionally, note that the Command Prompt output may vary depending on the specific hardware and configuration of your system.
Checking RAM Model using Task Manager
If you’re using a Windows operating system, another convenient way to find the model of your RAM is by using the built-in Task Manager. Here’s how:
- Press the Ctrl + Shift + Esc keys simultaneously on your keyboard to open the Task Manager.
- Once the Task Manager window is open, click on the “Performance” tab at the top.
- Under the “Memory” section, you’ll find details about the total physical memory installed in your system.
- Now, click on the “Open Resource Monitor” link at the bottom of the window.
- In the Resource Monitor, go to the “Memory” tab.
- Under the “Physical Memory” section, you’ll find additional information about your RAM, including the manufacturer and part number.
The Task Manager provides a quick and easy way to access basic information about your RAM. However, the detailed RAM model and specifications might not be available through this method.
Keep in mind that the Task Manager’s output may differ based on your specific Windows version or configuration. Additionally, the Task Manager’s functionality may vary on older versions of Windows. In such cases, you can use alternative methods mentioned earlier to find your RAM model with more accuracy and detail.
By utilizing Task Manager, you can quickly gain insights into your system’s memory capabilities, which can be useful when troubleshooting performance issues or planning RAM upgrades.
Checking RAM Model using System Information
One of the easiest ways to find the model of your RAM on a Windows operating system is by using the System Information tool. Here’s how you can do it:
- Press the Windows key on your keyboard.
- Type “System Information” in the search bar and click on the “System Information” application that appears.
- In the System Information window, you’ll see various categories on the left pane.
- Click on the arrow next to “Components” to expand the category.
- Now, click on “Memory” under the “Components” category.
- On the right pane, you’ll find detailed information about your RAM, including the manufacturer, part number, and other specifications.
The System Information tool provides a comprehensive overview of your system’s hardware, including your installed RAM. It offers detailed information that can be useful for troubleshooting, compatibility, or upgrading purposes.
Note that the System Information method works on most Windows versions, including Windows 10, Windows 8, and Windows 7. However, the interface or layout may vary slightly across different versions.
By using the System Information tool, you can easily find the model and specifications of your RAM, allowing you to make informed decisions when considering upgrades or troubleshooting any issues related to memory on your Windows system.
Checking RAM Model using CPU-Z
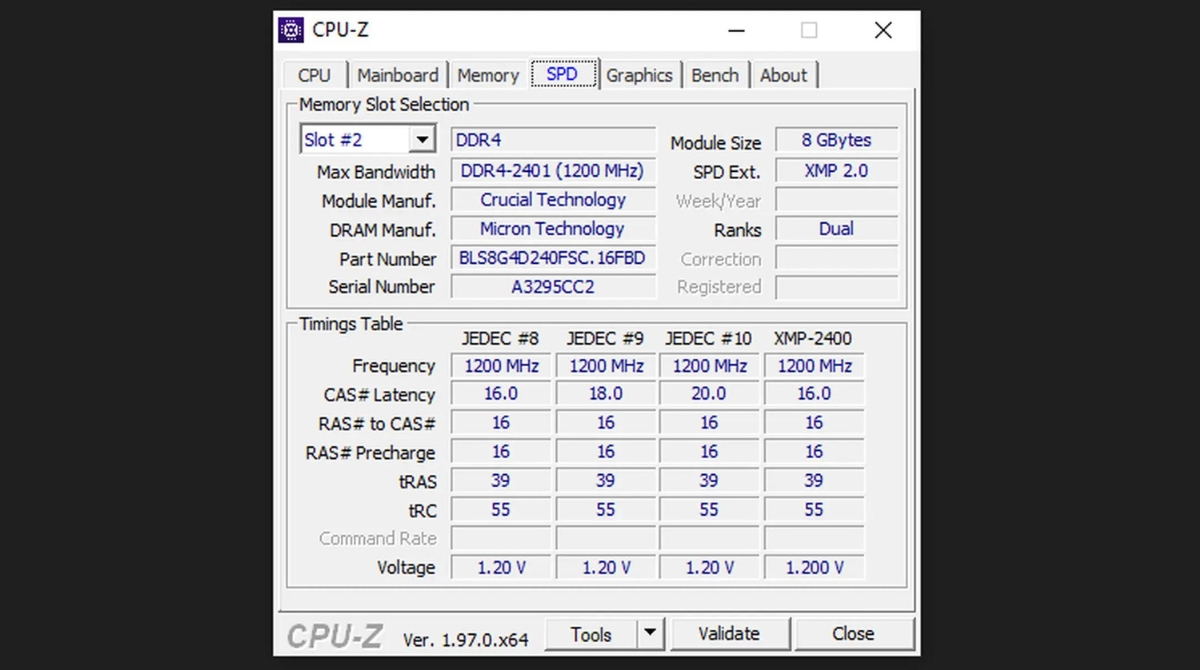
CPU-Z is a popular and user-friendly utility that provides detailed information about your system’s hardware. It’s an excellent tool for finding the model and specifications of your RAM. Follow these steps to use CPU-Z:
- Download and install CPU-Z from the official website.
- Launch CPU-Z after the installation is complete.
- Once CPU-Z is open, click on the “Memory” tab at the top.
- Under the “General” tab, you will see detailed information about your RAM, including the manufacturer, memory type, capacity, channels, and timings.
- In the “SPD” tab, you can select the memory slot to view detailed information about each RAM module installed in your system. It will show you the part number, serial number, and other specifications.
CPU-Z provides a comprehensive and user-friendly interface to identify the model and specifications of your RAM. The detailed information it provides can be extremely helpful when troubleshooting compatibility issues or planning to upgrade your memory modules.
Note that CPU-Z is compatible with various Windows versions and can also be used on Linux systems. It offers accurate and up-to-date information about your hardware components, making it a reliable tool for retrieving RAM model details.
Using CPU-Z simplifies the process of identifying your RAM model, allowing you to make informed decisions when upgrading or troubleshooting memory-related issues on your system.
Checking RAM Model using Speccy
Speccy is a comprehensive system information tool developed by Piriform. It provides detailed information about various hardware components, including your RAM. Follow the steps below to check your RAM model using Speccy:
- Download and install Speccy from the official website.
- Launch Speccy after the installation is complete.
- Once Speccy is open, you’ll see an overview of your system’s hardware components.
- Click on the “RAM” tab in the left sidebar.
- In the right pane, you’ll find detailed information about your RAM modules, including the manufacturer, part number, clock speed, capacity, and other specifications.
Speccy presents the RAM information in a clear and organized manner, making it easy to identify the model and specifications of your RAM. The comprehensive details it provides can be valuable when troubleshooting compatibility issues, planning RAM upgrades, or simply gaining a better understanding of your system’s memory configuration.
Speccy is compatible with Windows operating systems and supports both 32-bit and 64-bit versions. It offers real-time monitoring capabilities and allows you to save reports for future reference.
By using Speccy, you can quickly and accurately find the model and specifications of your RAM modules, empowering you to make informed decisions about system upgrades and optimizations.
Checking RAM Model using HWiNFO
HWiNFO is a powerful system information and diagnostic tool that provides detailed hardware information about your computer. Here’s how you can use HWiNFO to find the model of your RAM:
- Download and install HWiNFO from the official website.
- Launch HWiNFO after the installation is complete.
- Once HWiNFO is open, you’ll see a comprehensive list of hardware components on the main screen.
- In the left-hand pane, expand the “Memory” category.
- You will find detailed information about your RAM, including the manufacturer, part number, capacity, clock speed, and other specifications.
HWiNFO provides in-depth and accurate information about your RAM, allowing you to identify the specific model installed in your system with ease. The detailed specifications it provides can be crucial when troubleshooting compatibility issues, expanding your memory capacity, or optimizing your system’s performance.
HWiNFO is compatible with various versions of Windows, including both 32-bit and 64-bit. It offers a user-friendly interface and real-time monitoring capabilities for monitoring hardware performance.
By using HWiNFO, you can quickly access detailed information about your RAM model, enabling you to make informed decisions regarding RAM upgrades, system optimizations, and compatibility troubleshooting.
Checking RAM Model using Crucial System Scanner
If you want a convenient and reliable way to check your RAM model, you can use the Crucial System Scanner. Crucial, a well-known manufacturer of memory modules, offers a user-friendly online tool that automatically scans your system and provides detailed information about your RAM. Here’s how you can use the Crucial System Scanner:
- Visit the Crucial website and locate the “System Scanner” tool on their homepage.
- Click on the “Scan My Computer” or a similar button to start the scanning process.
- Follow the on-screen instructions to run the scanner plugin. It may require you to download and install a small software component.
- Once the scan is complete, the Crucial System Scanner will provide a detailed report with information about your RAM model, manufacturer, capacity, and compatibility options.
The Crucial System Scanner eliminates the need for manual hardware inspection or software installations. It ensures accurate and up-to-date information about your RAM, allowing you to easily identify the specific model and make informed decisions regarding memory upgrades or replacements.
Keep in mind that the Crucial System Scanner is specifically designed for Crucial memory modules. If your RAM is not manufactured by Crucial, it may still provide useful information about the capacity and type of RAM installed but may not provide specific model details.
The Crucial System Scanner is compatible with various versions of Windows and macOS. It simplifies the process of checking your RAM model, providing a hassle-free experience for users.
By utilizing the Crucial System Scanner, you can quickly and accurately find the model and specifications of your RAM, enabling you to make informed decisions when upgrading or troubleshooting memory-related issues.
Checking RAM Model using Kingston HyperX Memory Finder
If you have Kingston HyperX RAM or want to check compatibility for your system, you can use the Kingston HyperX Memory Finder tool. This online tool provided by Kingston allows you to easily find the model and specifications of your RAM. Here’s how you can use the Kingston HyperX Memory Finder:
- Visit the Kingston HyperX Memory Finder page.
- On the Memory Finder page, you’ll find a section to select your specific system type, brand, and model.
- Select the appropriate options for your system to filter the compatible RAM modules.
- Once you have specified your system details, the Memory Finder tool will display a list of compatible Kingston HyperX RAM modules for your system.
- In the list of compatible memory modules, you can find the model name, speed, capacity, and other detailed specifications.
The Kingston HyperX Memory Finder tool simplifies the process of finding compatible RAM modules for your system. It ensures that you choose the right Kingston HyperX RAM model with the correct specifications for optimal performance and compatibility.
Whether you are upgrading your current RAM or simply want to check the model and compatibility for your system, the Kingston HyperX Memory Finder provides a user-friendly and reliable solution.
Keep in mind that the Kingston HyperX Memory Finder is specifically designed for Kingston HyperX RAM modules, thereby providing accurate and detailed information for their specific product line.
By utilizing the Kingston HyperX Memory Finder, you can easily find the model and specifications of your Kingston HyperX RAM, ensuring the compatibility and performance of your system’s memory.
Checking RAM Model using Corsair Memory Finder
For users who have Corsair RAM or want to check compatibility for their system, Corsair provides a convenient online tool called the Corsair Memory Finder. This tool helps you find the model and specifications of your RAM quickly and easily. Follow these steps to use the Corsair Memory Finder:
- Go to the Corsair Memory Finder page.
- On the Corsair Memory Finder page, you’ll find a section to select your system’s brand, model, and type.
- Choose the appropriate options to specify your system configuration and click on the “Find My Memory” or similar button.
- The Corsair Memory Finder will then display a list of compatible Corsair RAM modules for your system.
- In the list, you can find the model name, capacity, speed, and other specifications of the recommended Corsair RAM modules.
The Corsair Memory Finder tool simplifies the process of finding the right Corsair RAM model for your system. It ensures compatibility and helps you choose the best module with the correct specifications to achieve optimal performance.
Please note that the Corsair Memory Finder is designed specifically for Corsair RAM modules. It provides accurate and detailed information for their specific product line.
By utilizing the Corsair Memory Finder, you can easily identify the model and specifications of your Corsair RAM, ensuring compatibility and performance for your system’s memory requirements.
Checking RAM Model using G.Skill Memory Configurator
If you have G.Skill RAM or want to check compatibility for your system, G.Skill provides a handy online tool called the G.Skill Memory Configurator. This tool helps you identify the model and specifications of your RAM quickly and accurately. Here’s how you can use the G.Skill Memory Configurator:
- Visit the G.Skill Memory Configurator page.
- On the Memory Configurator page, you’ll find different options such as DDR Type, Intel/AMD Platform, and Memory Series.
- Select the appropriate options based on your system requirements and preferences.
- After selecting the desired options, the Memory Configurator will display a list of compatible G.Skill RAM modules for your system.
- In the list, you can find the model name, speed, capacity, timing, and other detailed specifications of each recommended G.Skill RAM module.
The G.Skill Memory Configurator simplifies the process of finding the right RAM model for your system, ensuring compatibility and optimal performance. It provides accurate and up-to-date information for G.Skill RAM modules, allowing you to make informed decisions when upgrading or building your system.
By utilizing the G.Skill Memory Configurator, you can easily identify the model and specifications of your G.Skill RAM, ensuring proper compatibility and performance for your system’s memory needs.
Checking RAM Model using AIDA64
AIDA64 is a comprehensive system diagnostic and benchmarking tool that provides detailed information about various hardware components, including your RAM. Using AIDA64, you can easily check the model and specifications of your RAM. Here’s how:
- Download and install AIDA64 from the official website.
- Launch AIDA64 after the installation is complete.
- In the left-hand pane, expand the “Motherboard” category.
- Click on the “SPD” option under the “Motherboard” category.
- In the right pane, you’ll find detailed information about your RAM modules, including the manufacturer, part number, capacity, and other specifications.
AIDA64 presents the RAM information in a clear and organized manner, allowing you to quickly identify the model and specifications of your RAM. The detailed specifications it provides can be valuable when troubleshooting compatibility issues, planning RAM upgrades, or optimizing your system’s performance.
AIDA64 is compatible with various versions of Windows, including both 32-bit and 64-bit. It offers a user-friendly interface and real-time monitoring capabilities for monitoring hardware performance.
By utilizing AIDA64, you can easily access detailed information about your RAM model, enabling you to make informed decisions when upgrading or troubleshooting memory-related issues.
Checking RAM Model using CPUID
CPUID is a popular software utility that provides detailed information about the hardware components of your system. It includes a feature to check the model and specifications of your RAM. Here’s how you can use CPUID to find your RAM model:
- Download and install CPUID from the official website.
- Launch CPUID after the installation is complete.
- In the CPUID interface, navigate to the “Memory” tab.
- Under the “Memory” tab, you’ll find detailed information about your RAM, including the manufacturer, part number, and other specifications for each installed RAM module.
CPUID offers a user-friendly interface and presents the RAM information in a clear and organized manner. It provides accurate details about your RAM modules, helping you quickly identify the model and specifications of your RAM.
CPUID works on various versions of Windows operating systems and supports both 32-bit and 64-bit systems. It offers real-time monitoring capabilities and allows you to save reports for future reference.
By using CPUID, you can easily access detailed information about your RAM model, enabling you to make informed decisions when upgrading or troubleshooting memory-related issues on your system.


